Skinned Mesh Character Animation
with Direct3D 9.0c
Frank Luna
www.moon-labs.com
Copyright © 2004. All rights reserved.
Created on Monday, February 20, 2004
Update 1 on Friday, September 10, 2004
Section 1 describes the motion and data structural representation of a 3D
Real-Time character animation plays an important role in a wide variety of 3D
simulation programs, and particularly in 3D computer games. This paper describes the
data structures and algorithms used to drive a modern real-time character animation
system. In addition, it presents a thorough examination of the D3DX 9.0c Animation
API.
character. Section 2 focuses on the datasets needed to describe an animation sequence.
Section 3 examines an animation technique that works with rigid bodies and emphasizes
the problems associated with this approach. Section 4 explains a new animation
technique, vertex blending (also called skinned mesh animation), which does not suffer
the problems of rigid body animation. Section 5 shows how to implement a skinned
mesh character animation using the D3DX Animation API. Section 6 demonstrates how
to play multiple distinct animation sequences. Section 7 explores how to create new
animations from existing ones using the D3DX animation blending functionality. And
finally, Section 8 explains how to execute code in parallel with an animation sequence,
using the D3DX animation callback functionality.
1 An Overview of Character Mesh Hierarchies
called a skeleton. A skeleton provides a natural underlying structure for driving a
character animation system. The skeleton is surrounded by an exterior skin, which we
model as 3D geometry (vertices and polygons). Each bone in the skeleton influences the
shape and position of the skin, just like in real life; mathematically, bones are described
by transformation matrices which transform the skin geometry appropriately. Thus, as
we animate the skeleton, the attached skin is animated accordingly to reflect the current
pose of the skeleton.
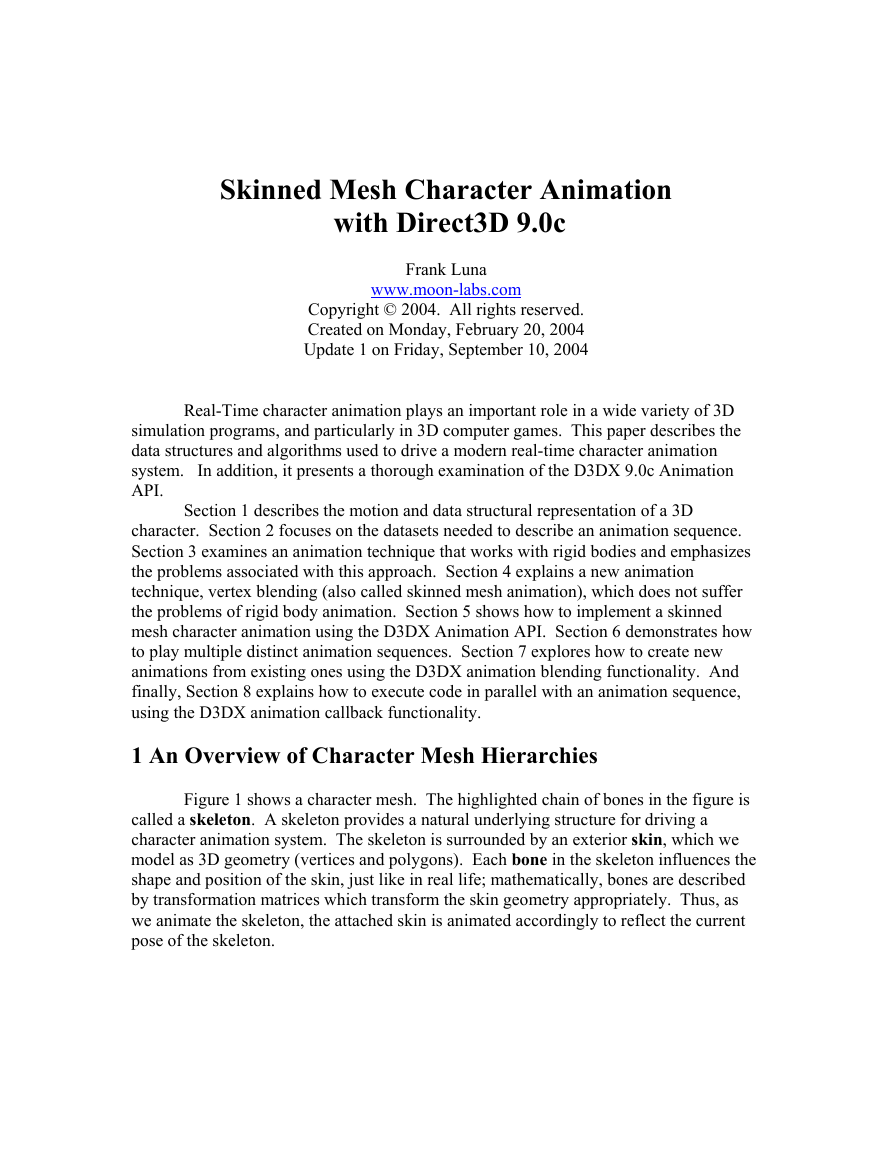
Figure 1 shows a character mesh. The highlighted chain of bones in the figure is
�
Figure 1: A Character mesh. The highlighted bone chain represents the character's skeleton. The
dark colored polygons represent the character's skin.
1.1 Bones and Inherited Transforms
Initially, all bones start out in bone space with their joints coincident with the
origin. A bone B has two associated transforms: 1) A local transform L and 2) a
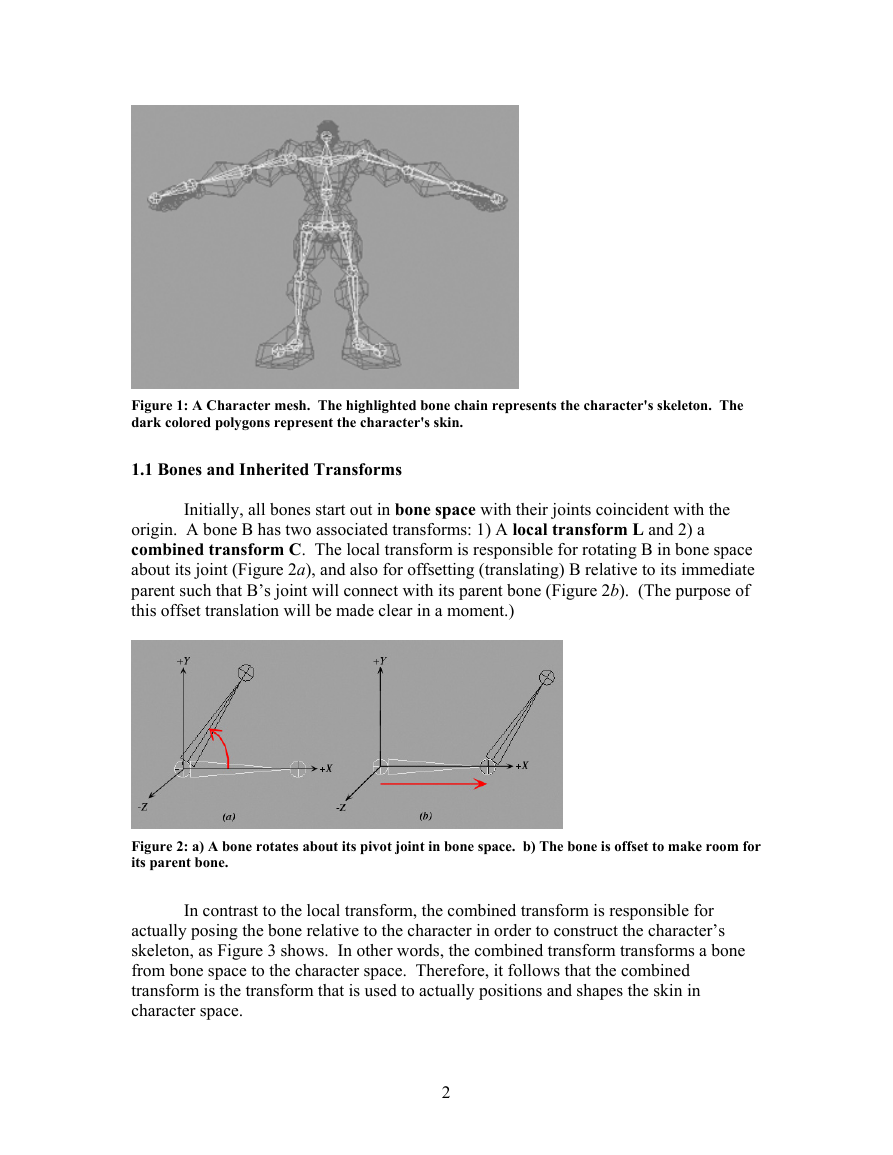
combined transform C. The local transform is responsible for rotating B in bone space
about its joint (Figure 2a), and also for offsetting (translating) B relative to its immediate
parent such that B’s joint will connect with its parent bone (Figure 2b). (The purpose of
this offset translation will be made clear in a moment.)
Figure 2: a) A bone rotates about its pivot joint in bone space. b) The bone is offset to make room for
its parent bone.
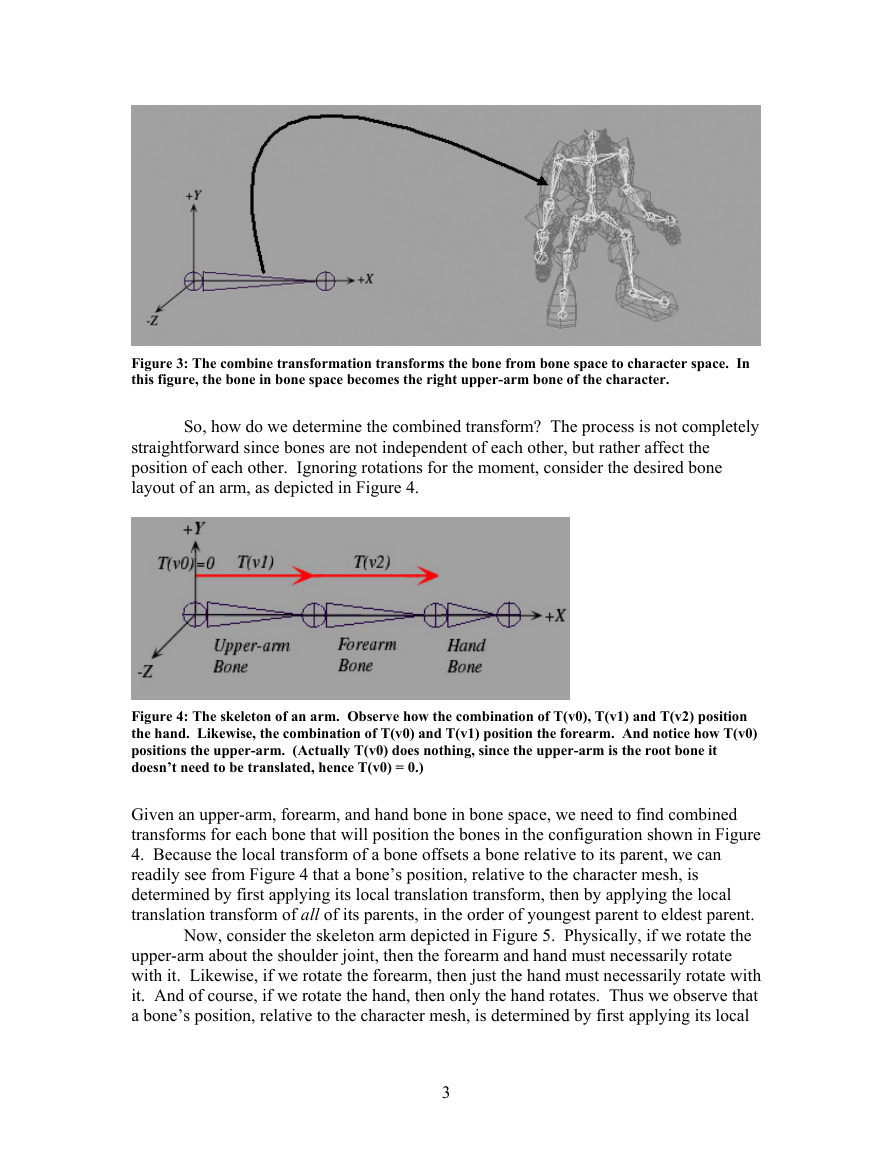
In contrast to the local transform, the combined transform is responsible for
actually posing the bone relative to the character in order to construct the character’s
skeleton, as Figure 3 shows. In other words, the combined transform transforms a bone
from bone space to the character space. Therefore, it follows that the combined
transform is the transform that is used to actually positions and shapes the skin in
character space.
2
�
So, how do we determine the combined transform? The process is not completely
Figure 3: The combine transformation transforms the bone from bone space to character space. In
this figure, the bone in bone space becomes the right upper-arm bone of the character.
straightforward since bones are not independent of each other, but rather affect the
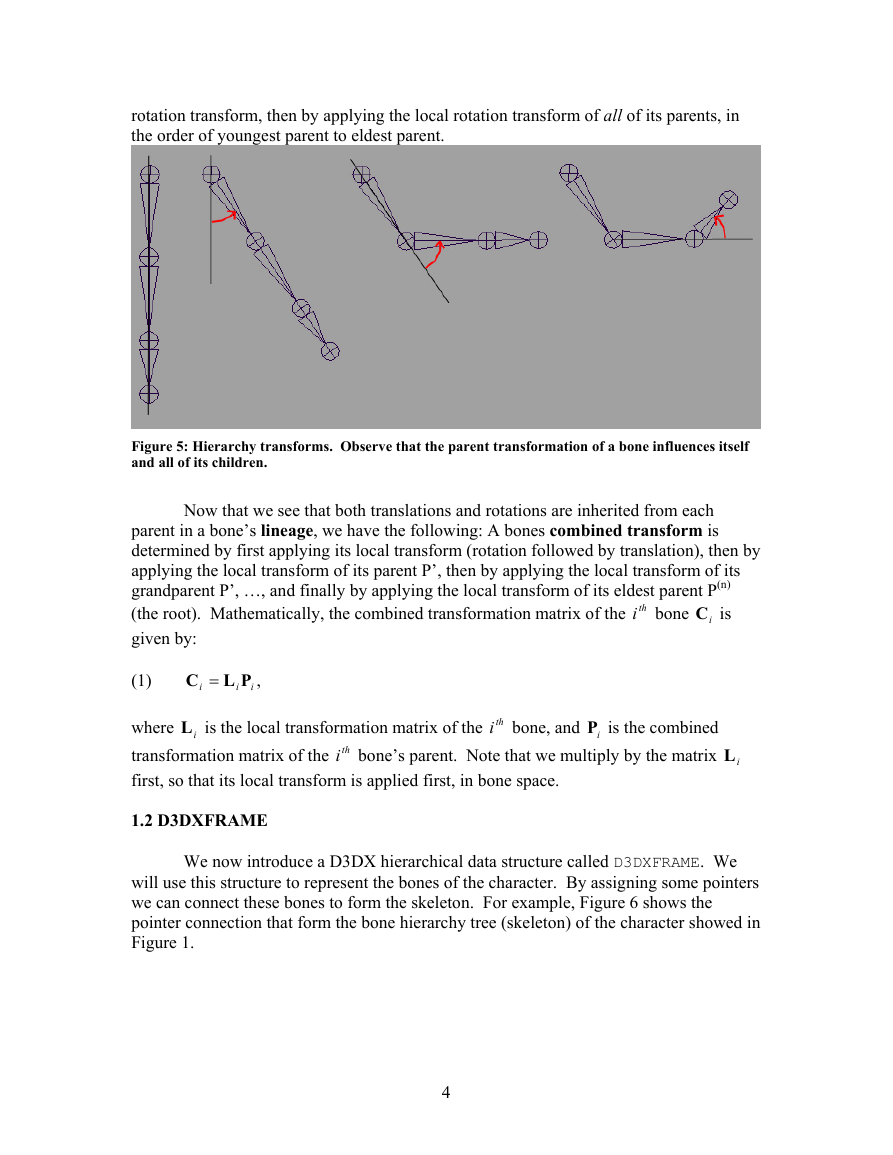
position of each other. Ignoring rotations for the moment, consider the desired bone
layout of an arm, as depicted in Figure 4.
Figure 4: The skeleton of an arm. Observe how the combination of T(v0), T(v1) and T(v2) position
the hand. Likewise, the combination of T(v0) and T(v1) position the forearm. And notice how T(v0)
positions the upper-arm. (Actually T(v0) does nothing, since the upper-arm is the root bone it
doesn’t need to be translated, hence T(v0) = 0.)
Given an upper-arm, forearm, and hand bone in bone space, we need to find combined
transforms for each bone that will position the bones in the configuration shown in Figure
4. Because the local transform of a bone offsets a bone relative to its parent, we can
readily see from Figure 4 that a bone’s position, relative to the character mesh, is
determined by first applying its local translation transform, then by applying the local
translation transform of all of its parents, in the order of youngest parent to eldest parent.
Now, consider the skeleton arm depicted in Figure 5. Physically, if we rotate the
upper-arm about the shoulder joint, then the forearm and hand must necessarily rotate
with it. Likewise, if we rotate the forearm, then just the hand must necessarily rotate with
it. And of course, if we rotate the hand, then only the hand rotates. Thus we observe that
a bone’s position, relative to the character mesh, is determined by first applying its local
3
�
rotation transform, then by applying the local rotation transform of all of its parents, in
the order of youngest parent to eldest parent.
Figure 5: Hierarchy transforms. Observe that the parent transformation of a bone influences itself
and all of its children.
Now that we see that both translations and rotations are inherited from each
parent in a bone’s lineage, we have the following: A bones combined transform is
determined by first applying its local transform (rotation followed by translation), then by
applying the local transform of its parent P’, then by applying the local transform of its
grandparent P’, …, and finally by applying the local transform of its eldest parent P(n)
iC is
(the root). Mathematically, the combined transformation matrix of the thi
given by:
bone
PLC =
i
i
i
,
bone, and
iL is the local transformation matrix of the thi
iP is the combined
bone’s parent. Note that we multiply by the matrix
(1)
where
transformation matrix of the thi
first, so that its local transform is applied first, in bone space.
1.2 D3DXFRAME
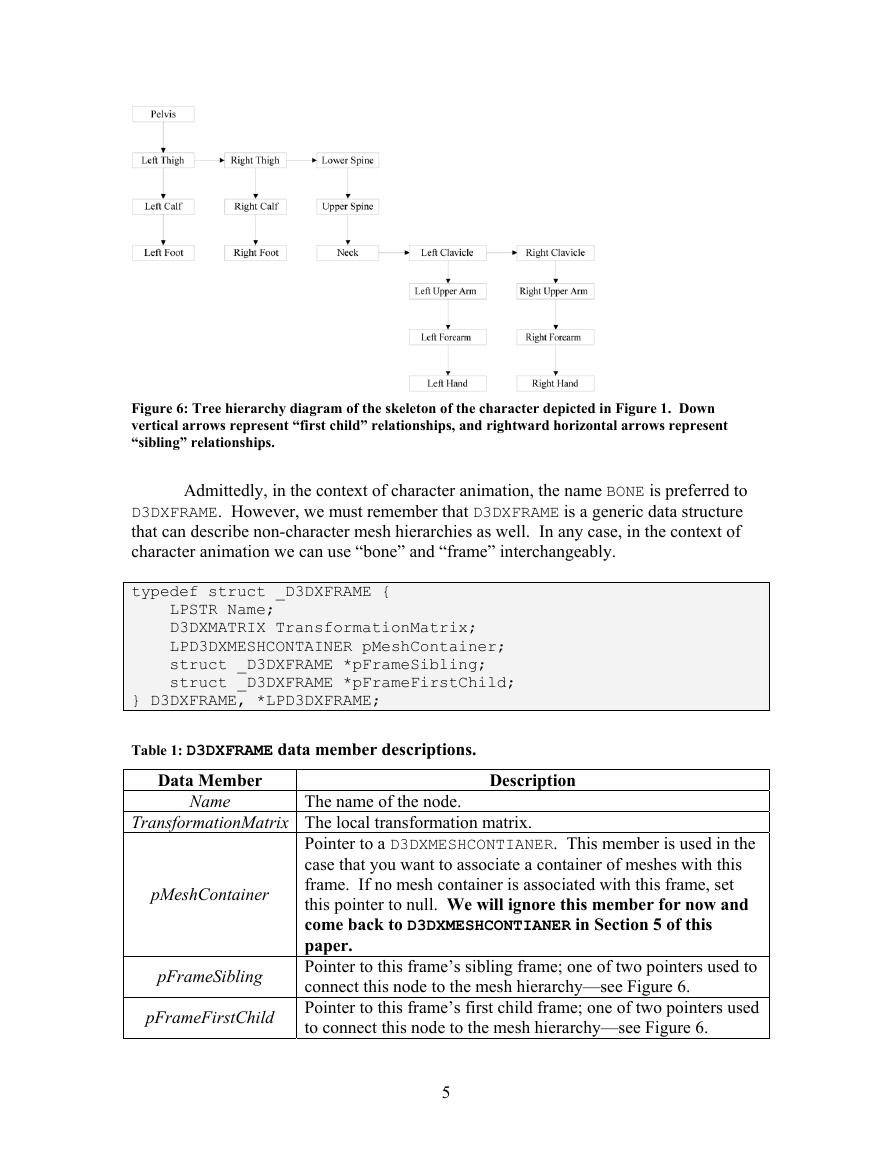
will use this structure to represent the bones of the character. By assigning some pointers
we can connect these bones to form the skeleton. For example, Figure 6 shows the
pointer connection that form the bone hierarchy tree (skeleton) of the character showed in
Figure 1.
We now introduce a D3DX hierarchical data structure called D3DXFRAME. We
iL
4
�
Figure 6: Tree hierarchy diagram of the skeleton of the character depicted in Figure 1. Down
vertical arrows represent “first child” relationships, and rightward horizontal arrows represent
“sibling” relationships.
Admittedly, in the context of character animation, the name BONE is preferred to
D3DXFRAME. However, we must remember that D3DXFRAME is a generic data structure
that can describe non-character mesh hierarchies as well. In any case, in the context of
character animation we can use “bone” and “frame” interchangeably.
typedef struct _D3DXFRAME {
LPSTR Name;
D3DXMATRIX TransformationMatrix;
LPD3DXMESHCONTAINER pMeshContainer;
struct _D3DXFRAME *pFrameSibling;
struct _D3DXFRAME *pFrameFirstChild;
} D3DXFRAME, *LPD3DXFRAME;
Table 1: D3DXFRAME data member descriptions.
TransformationMatrix The local transformation matrix.
The name of the node.
Description
Data Member
Name
pMeshContainer
pFrameSibling
pFrameFirstChild
Pointer to a D3DXMESHCONTIANER. This member is used in the
case that you want to associate a container of meshes with this
frame. If no mesh container is associated with this frame, set
this pointer to null. We will ignore this member for now and
come back to D3DXMESHCONTIANER in Section 5 of this
paper.
Pointer to this frame’s sibling frame; one of two pointers used to
connect this node to the mesh hierarchy—see Figure 6.
Pointer to this frame’s first child frame; one of two pointers used
to connect this node to the mesh hierarchy—see Figure 6.
5
�
The immediate problem with D3DXFRAME is that it does not have a combined
We can compute the combined transform C for each node in the hierarchy by
transform member. To remedy this we extend D3DXFRAME as follows:
struct FrameEx : public D3DXFRAME
{
D3DXMATRIX combinedTransform;
};
1.3 Generating the Combined Transforms in C++
recursively traversing the tree top-down. The following C++ code implements this
process:
void CombineTransforms(FrameEx* frame,
D3DXMATRIX& P) // parent's combined transform
{
// Save some references to economize line space.
D3DXMATRIX& L = frame->TransformationMatrix;
D3DXMATRIX& C = frame->combinedTransform;
C = L * P;
FrameEx* sibling = (FrameEx*)frame->pFrameSibling;
FrameEx* firstChild = (FrameEx*)frame->pFrameFirstChild;
}
And to start off the recursion we would write:
D3DXMATRIX identity;
D3DXMatrixIdentity(&identity);
CombineTransforms( rootBone, identity );
Because the root does not have a parent, we pass in an identity matrix for its parent’s
combined transform.
2 Keyframes and Animation
// Recurse down siblings.
if( sibling )
// Recurse to first child.
if( firstChild )
combineTransforms(sibling, P);
combineTransforms(firstChild , C);
6
�
For this paper we will consider prerecorded animation data; that is, animations
that have been predefined in a 3D modeler, or from a motion capture system. Note
however, it is indeed possible to dynamically animate meshes at runtime using physics
models, for example. Moreover, Section 7 describes a technique that enables us to create
new animations by blending together existing animations.
The preceding section stated that as we animate a skeleton, the attached skin is
animated accordingly, via the bone transform matrices, to reflect the current pose of the
skeleton. The question then is: How do we animate a skeleton?
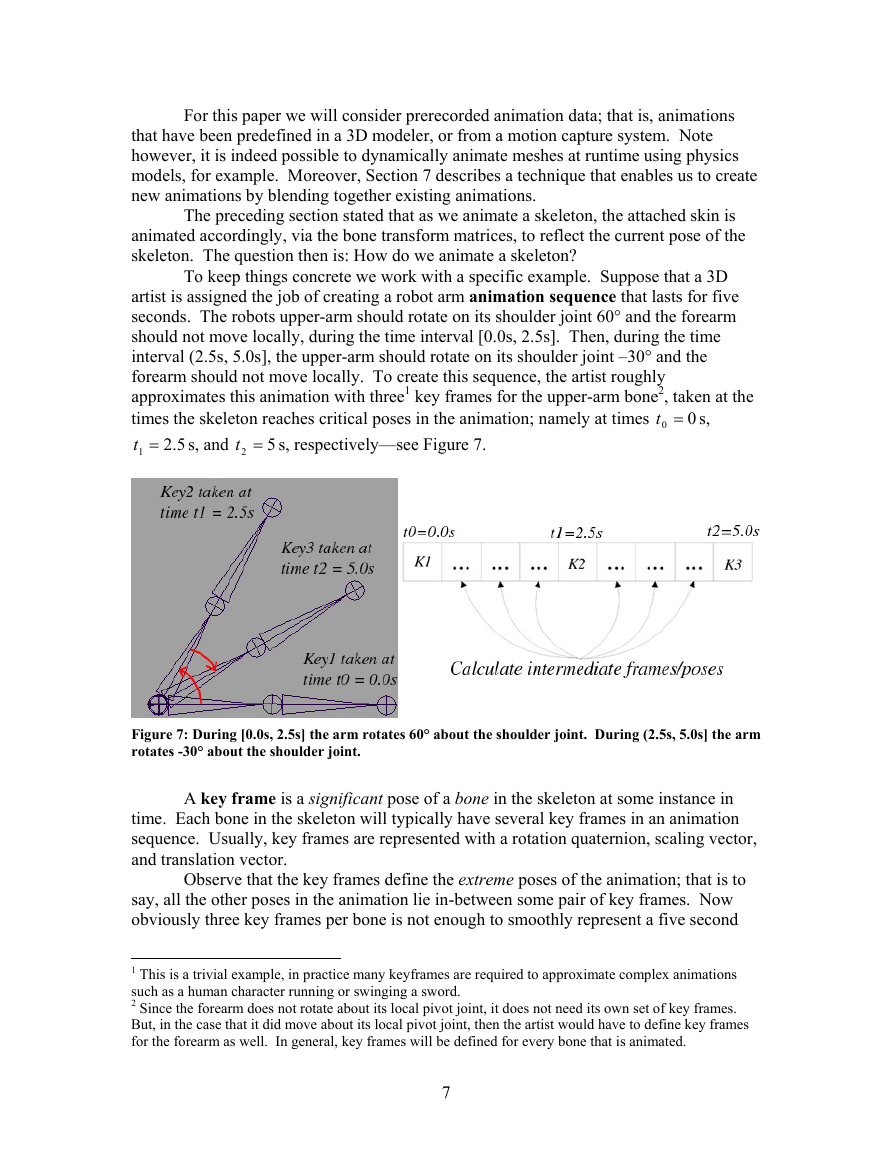
To keep things concrete we work with a specific example. Suppose that a 3D
artist is assigned the job of creating a robot arm animation sequence that lasts for five
seconds. The robots upper-arm should rotate on its shoulder joint 60° and the forearm
should not move locally, during the time interval [0.0s, 2.5s]. Then, during the time
interval (2.5s, 5.0s], the upper-arm should rotate on its shoulder joint –30° and the
forearm should not move locally. To create this sequence, the artist roughly
approximates this animation with three1 key frames for the upper-arm bone2, taken at the
times the skeleton reaches critical poses in the animation; namely at times
1 =t
s, respectively—see Figure 7.
s, and
2 =t
5.2
5
0 =t
0
s,
Figure 7: During [0.0s, 2.5s] the arm rotates 60° about the shoulder joint. During (2.5s, 5.0s] the arm
rotates -30° about the shoulder joint.
A key frame is a significant pose of a bone in the skeleton at some instance in
time. Each bone in the skeleton will typically have several key frames in an animation
sequence. Usually, key frames are represented with a rotation quaternion, scaling vector,
and translation vector.
Observe that the key frames define the extreme poses of the animation; that is to
say, all the other poses in the animation lie in-between some pair of key frames. Now
obviously three key frames per bone is not enough to smoothly represent a five second
1 This is a trivial example, in practice many keyframes are required to approximate complex animations
such as a human character running or swinging a sword.
2 Since the forearm does not rotate about its local pivot joint, it does not need its own set of key frames.
But, in the case that it did move about its local pivot joint, then the artist would have to define key frames
for the forearm as well. In general, key frames will be defined for every bone that is animated.
7
�
animation sequence; that is, three frames per five seconds will result in an extremely
choppy animation. However, the key idea is this: Given the key frames, the computer
can calculate the correct intermediate bone poses between key frames at any time in the
five-second sequence. By calculating enough of these intermediate poses (say sixty
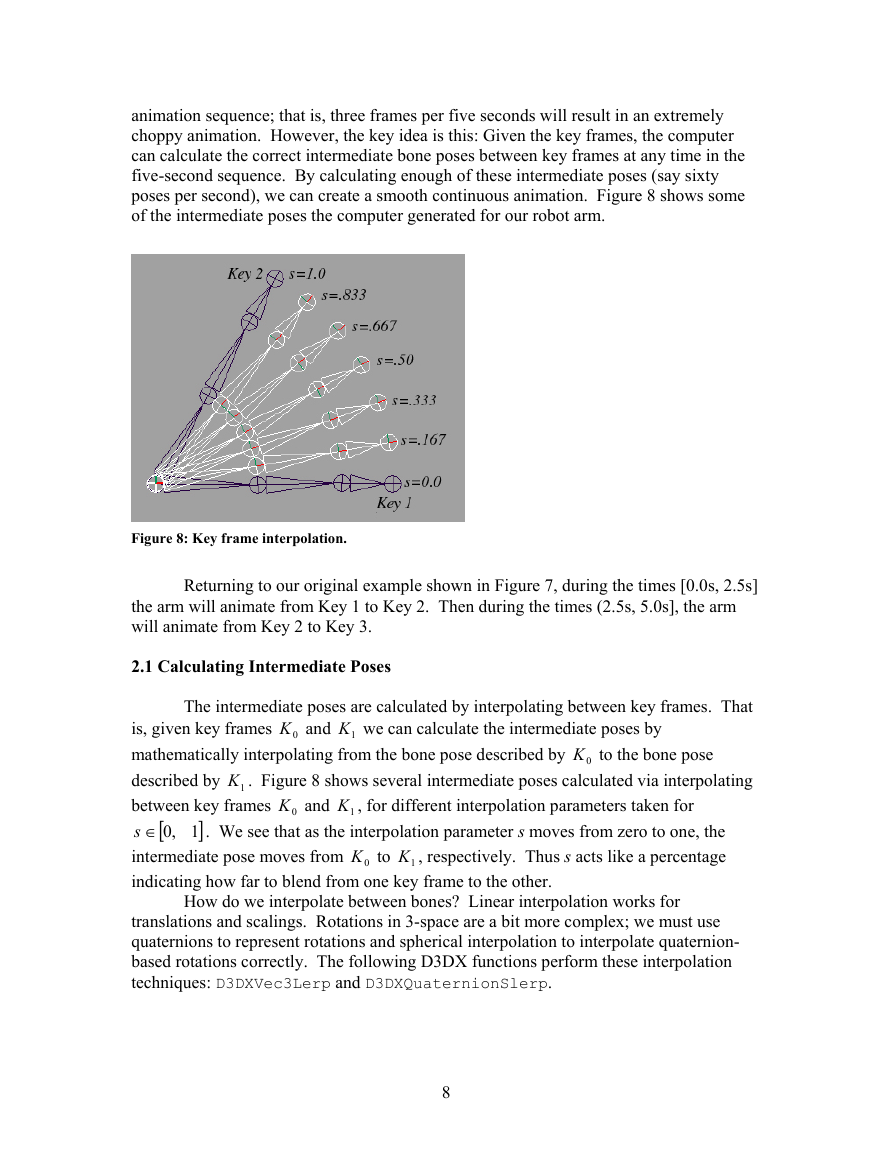
poses per second), we can create a smooth continuous animation. Figure 8 shows some
of the intermediate poses the computer generated for our robot arm.
Returning to our original example shown in Figure 7, during the times [0.0s, 2.5s]
Figure 8: Key frame interpolation.
the arm will animate from Key 1 to Key 2. Then during the times (2.5s, 5.0s], the arm
will animate from Key 2 to Key 3.
2.1 Calculating Intermediate Poses
is, given key frames
mathematically interpolating from the bone pose described by
described by
between key frames
]1,0∈s
intermediate pose moves from
indicating how far to blend from one key frame to the other.
. We see that as the interpolation parameter s moves from zero to one, the
1K , respectively. Thus s acts like a percentage
1K , for different interpolation parameters taken for
0K and
1K we can calculate the intermediate poses by
1K . Figure 8 shows several intermediate poses calculated via interpolating
The intermediate poses are calculated by interpolating between key frames. That
[
0K and
0K to
0K to the bone pose
How do we interpolate between bones? Linear interpolation works for
translations and scalings. Rotations in 3-space are a bit more complex; we must use
quaternions to represent rotations and spherical interpolation to interpolate quaternion-
based rotations correctly. The following D3DX functions perform these interpolation
techniques: D3DXVec3Lerp and D3DXQuaternionSlerp.
8
�


 2023年江西萍乡中考道德与法治真题及答案.doc
 2012年重庆南川中考生物真题及答案.doc
 2013年江西师范大学地理学综合及文艺理论基础考研真题.doc
 2020年四川甘孜小升初语文真题及答案I卷.doc
 2020年注册岩土工程师专业基础考试真题及答案.doc
 2023-2024学年福建省厦门市九年级上学期数学月考试题及答案.doc
 2021-2022学年辽宁省沈阳市大东区九年级上学期语文期末试题及答案.doc
 2022-2023学年北京东城区初三第一学期物理期末试卷及答案.doc
 2018上半年江西教师资格初中地理学科知识与教学能力真题及答案.doc
 2012年河北国家公务员申论考试真题及答案-省级.doc
 2020-2021学年江苏省扬州市江都区邵樊片九年级上学期数学第一次质量检测试题及答案.doc
 2022下半年黑龙江教师资格证中学综合素质真题及答案.doc