Handbook for Palm™ Tungsten™ T2 Handheld
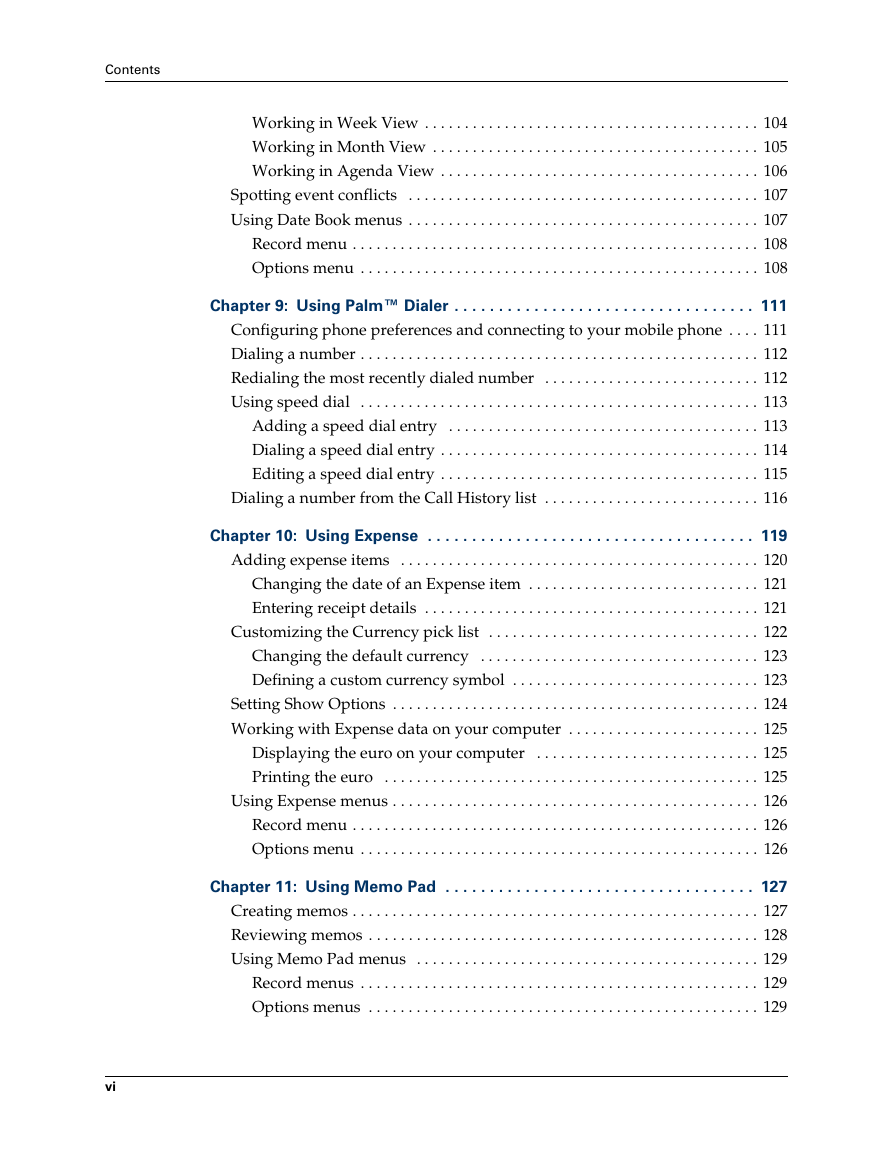
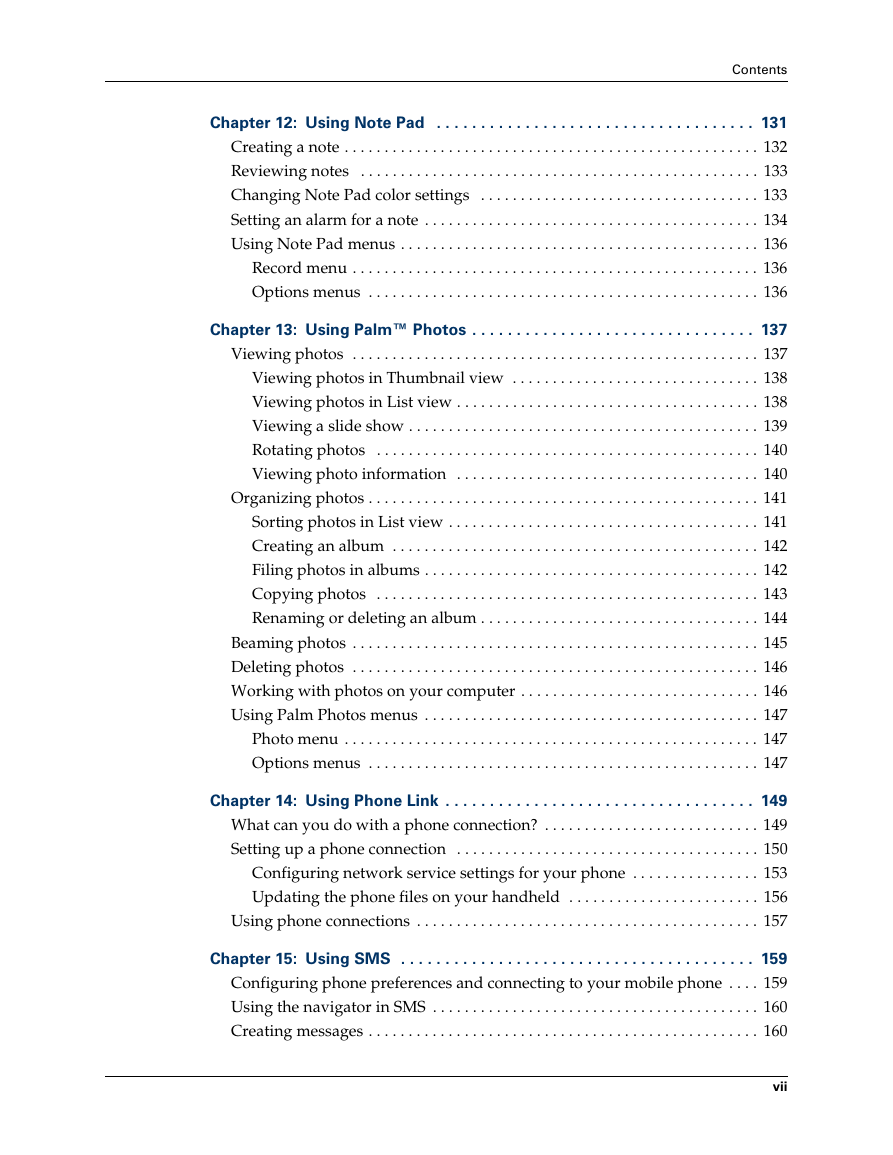
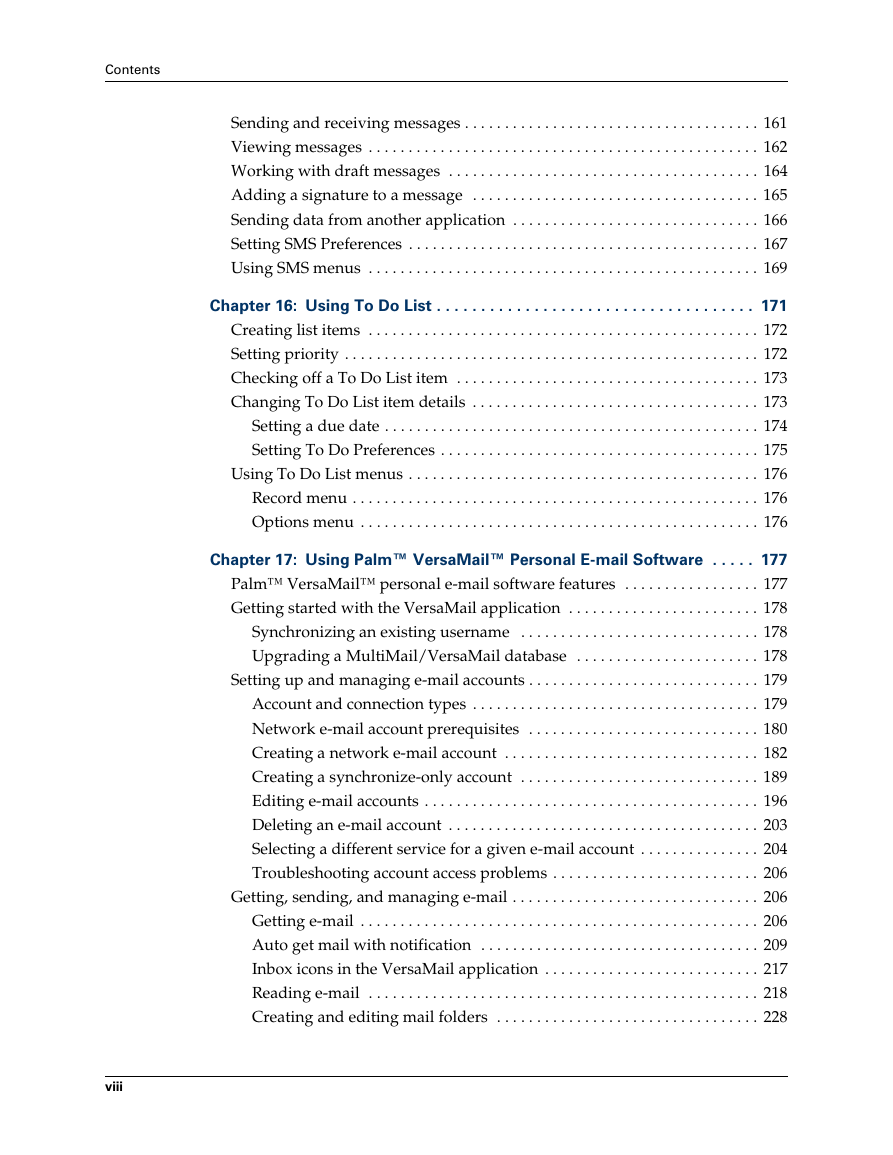
Contents
About This Book
Setting Up Your Palm™ Tungsten™ T2 Handheld
System requirements
Minimum requirements: Windows computers
Minimum requirements: Mac computers
Internet access requirements
Upgrade information
Step 1: Connect the HotSync cradle/cable to the computer
Step 2: Charge your handheld
Step 3: Set up your handheld
Step 4: Install software
Step 5: Perform a HotSync operation
Step 6: Register your handheld
Congratulations!
Exploring Your Handheld
Locating handheld components
Opening and closing your handheld
To open your handheld:
To close your handheld:
Locating front panel controls
Locating top panel components
Adjusting screen brightness
To adjust the brightness of the backlight:
Locating back panel components
Using the protective cover
To remove the cover:
Adding an expansion card
To insert a card:
To remove a card:
Tapping and typing
Elements of the handheld interface
Displaying online tips
To display an online tip:
Using the navigator
To navigate in list screens, do any of the following:
To navigate in record screens:
To navigate in dialog boxes:
Entering Data on Your Handheld
Using the onscreen keyboard
To use the onscreen keyboard:
Using Graffiti 2 writing to enter data
To write Graffiti 2 characters:
To delete Graffiti 2 characters:
Graffiti 2 tips
Graffiti 2 alphabet
Capital letters
To write additional capital letters:
Graffiti 2 numbers
Punctuation marks
Accented characters
Symbols and other special characters
To write symbols and special characters:
Graffiti 2 Gestures
Graffiti 2 ShortCuts
Full-screen writing area
To use the full-screen writing area:
To temporarily disable the full-screen writing area:
Beaming data
To select a business card:
To beam a record, business card, or category of records:
To beam an application:
To receive beamed information:
Beaming tips
Sending data
Sending data using Bluetooth communication
To send data using Bluetooth communication:
Sending data using e-mail or SMS communication
Using your computer keyboard
Importing data
Importing data from a Windows computer
To import data from a Windows computer:
Using File Link
Importing data from a Mac computer
To import data from a Mac computer:
Using Note Pad
Using a portable keyboard
Working with Applications
Opening applications
To open an application on your handheld:
Other ways to open applications
Opening expansion card applications
To open an application on an expansion card:
Switching between applications
To switch to an expansion card:
Categorizing applications
To categorize an application:
To display applications by category:
Changing the Applications Launcher display
To change the Applications Launcher display:
To open the Applications Launcher to the last opened category:
Copying applications to or from an expansion card
To copy an application to an expansion card:
To copy an application from an expansion card:
Selecting copy settings
To select copy settings:
Using menus
To open the menu bar:
Choosing a menu
To select a menu command with the stylus:
Graffiti 2 menu commands
Choosing application preferences
To change preferences for an application:
Performing common tasks
Creating records
To create a record:
Editing records
Entering text
Using the Edit menu
To select text in an application:
Deleting records
To delete a record:
To delete a record with alternate methods:
Purging records
To purge records:
Categorizing records
To move a record into a category:
To display a category of records:
To define a new category:
To rename a category:
Finding information
Looking up Address Book records
To look up an Address Book record with the navigator:
To look up an Address Book record with the stylus:
Using Find
To use Find:
Using Phone Lookup
To use Phone Lookup:
Using Graffiti 2 commands with Phone Lookup
Looking up names to add to Expense records
To add names to an Expense record:
Sorting lists of records
To sort records in To Do List and Expense:
To sort records in Address Book, Note Pad, Voice Memo, and Memo Pad:
Attaching notes
To attach a note to a record:
To review or edit a note:
To delete a note:
Choosing fonts
To change the font style:
Receiving alerts
Receiving alerts on your handheld
To respond to alerts, do one of the following:
Receiving alerts from Palm Desktop software
To enable an event alert from Palm Desktop software:
Hiding or masking private records
Installing and removing applications
Installing files and add-on applications
Installing applications and files on a Windows computer
To drag and drop applications or files onto the Palm Quick Install icon:
To drag and drop applications or files onto the Palm Quick Install window:
To use the command buttons in the Palm Quick Install window:
To use the right-click menu to send the file to Palm Quick Install:
Palm Quick Install tips
Installing applications and files on a Mac computer
To install add-on software on your handheld using a Mac computer:
Removing applications
To remove an add-on application:
Removing Palm Desktop software
To remove Palm Desktop software from a Windows computer:
To remove Palm Desktop software from a Mac computer:
Using Address Book
To open Address Book:
Creating an Address Book entry
To create a new Address Book entry:
Selecting types of phone numbers
To select other types of phone numbers in an entry:
Changing Address Entry details
To open the Address Entry Details dialog box:
Making connections from Address Book
Quick Connect
To use Quick Connect from an Address entry:
To use Quick Connect from the Address list:
To configure Quick Connect settings:
Tap-to-Connect
To enable Tap-to-Connect:
To make a connection with Tap-to-Connect:
Using Address Book menus
Record menus
Options menus
Using Calculator
To open Calculator:
Performing calculations
Viewing Recent Calculations
To display recent calculations:
Using Calculator menus
Options menu
Using Card Info
Reviewing Card Information
To review Card Information:
Renaming a card
To rename a card:
Formatting a card
To format a card:
Managing expansion cards
Using Card Info menus
Card menu
Using Date Book
To open Date Book:
Scheduling an event
To schedule an event for the current day:
To schedule an event for another day:
To schedule an untimed event:
Selecting an event
To select an event:
Rescheduling an event
To reschedule an event:
Setting an alarm for an event
To set an alarm for an event:
Scheduling repeating or continuous events
To schedule a repeating or continuous event:
Changing repeating or continuous events
To delete repeating events:
Considerations for repeating or continuous events
Changing the Date Book view
To cycle through Day, Week, Month, and Agenda views:
Working in Week View
To display the Week View:
Working in Month View
Working in Agenda View
To display the Agenda View:
Spotting event conflicts
Using Date Book menus
Record menu
Options menu
Display Options
Preferences
About Date Book
Using Palm™ Dialer
To open Palm Dialer:
Configuring phone preferences and connecting to your mobile phone
Dialing a number
To dial a number:
Redialing the most recently dialed number
To redial the most recently dialed number:
Using speed dial
Adding a speed dial entry
To add a speed dial entry:
Dialing a speed dial entry
To dial a speed dial entry:
Editing a speed dial entry
To edit a speed dial entry:
Dialing a number from the Call History list
To dial a number from the Call History list:
Using Expense
To open Expense:
Adding expense items
To add an expense item:
Changing the date of an Expense item
To change the date of an Expense item:
Entering receipt details
To open the Receipt Details dialog box:
Customizing the Currency pick list
To customize the Currency pick list:
Changing the default currency
To change your default currency:
Defining a custom currency symbol
To define a custom currency symbol:
Setting Show Options
To open the Show Options dialog box:
Working with Expense data on your computer
Displaying the euro on your computer
Printing the euro
Using Expense menus
Record menu
Options menu
Using Memo Pad
To open Memo Pad:
Creating memos
To create a new memo:
Reviewing memos
To review a memo:
Using Memo Pad menus
Record menus
Options menus
Using Note Pad
To open Note Pad:
Creating a note
To create a new note:
To clear the screen:
Reviewing notes
To review a note:
Changing Note Pad color settings
To set the colors:
Setting an alarm for a note
To set an alarm for a note:
Using Note Pad menus
Record menu
Options menus
Using Palm™ Photos
To open Palm Photos:
Viewing photos
Viewing photos in Thumbnail view
To view photos in Thumbnail view:
Viewing photos in List view
To view photos in List view:
Viewing a slide show
To view a slide show:
To adjust the delay between photos during a slide show:
Rotating photos
To rotate a photo:
Viewing photo information
To review photo information:
Organizing photos
Sorting photos in List view
To sort photos in List view:
Creating an album
To create an album:
Filing photos in albums
To file photos in albums:
Copying photos
To copy photos:
Renaming or deleting an album
To rename an album:
To delete an album:
Beaming photos
To beam photos:
Deleting photos
To delete photos:
Working with photos on your computer
Using Palm Photos menus
Photo menu
Options menus
Using Phone Link
What can you do with a phone connection?
Setting up a phone connection
To configure a phone connection on your handheld:
To configure Bluetooth settings for your phone connection:
Configuring network service settings for your phone
To configure a GPRS high-speed wireless data service connection for your phone:
To configure a dial-up connection:
Updating the phone files on your handheld
To install the phone files from your Windows computer:
To install the phone files from your Mac computer:
Using phone connections
To make an infrared connection:
To make a cable connection:
To make a Bluetooth connection:
Using SMS
To open SMS:
Configuring phone preferences and connecting to your mobile phone
Using the navigator in SMS
To navigate in SMS list screens:
To navigate in message screens:
Creating messages
To create a message:
Sending and receiving messages
To send and receive messages at the same time:
To send all messages in your Outbox:
To download all messages from your phone:
Viewing messages
To view text messages in your Inbox:
To view data messages in your Inbox:
To view messages in your Outbox or Archive categories:
To view messages in your Trash:
Working with draft messages
To place a message in the Draft category:
To view or edit draft messages:
Adding a signature to a message
To define a signature:
To add your signature to a message:
Sending data from another application
To send data from another application:
Setting SMS Preferences
To view or change SMS Preferences:
Using SMS menus
Message menu
Options menu
Using To Do List
To open To Do List:
Creating list items
To create a To Do List item:
Setting priority
To set the priority of a To Do List item:
Checking off a To Do List item
To check off a To Do List item:
Changing To Do List item details
To display the To Do Item Details dialog box:
Setting a due date
To set a due date for a To Do List item:
Setting To Do Preferences
To change the Preferences settings:
Using To Do List menus
Record menu
Options menu
Using Palm™ VersaMail™ Personal Email Software
Palm™ VersaMail™ personal e-mail software features
Getting started with the VersaMail application
Synchronizing an existing username
Upgrading a MultiMail/VersaMail database
To upgrade an existing e-mail database for use with the VersaMail application:
Setting up and managing email accounts
Account and connection types
Network e-mail account prerequisites
Using an ISP
Using a corporate e-mail account
VPNs
Creating a network e-mail account
To create a network e-mail account:
Entering the account username and password
To enter the account username and password:
Entering the name of the outgoing and incoming mail server
To enter mail server settings:
Setting mail retrieval options for a POP or IMAP account
To set mail retrieval server options for a POP or IMAP account:
Setting outgoing mail options
To set outgoing mail options:
Adding a signature
To add a personal signature:
Setting advanced outgoing mail options
To set advanced outgoing mail options:
Testing your new account
Creating a synchronize-only account
To create a synchronize-only e-mail account:
Entering the account username and password
To enter the account username and password:
Entering the name of the outgoing and incoming mail server
To enter mail server settings:
Setting mail retrieval options for a POP or IMAP account
To set mail retrieval server options for a POP or IMAP account:
Setting outgoing mail options
To set outgoing mail options:
Adding a signature
To add a personal signature:
Setting advanced outgoing mail options
To set advanced outgoing mail options:
Configuring your synchronize-only account
Editing e-mail accounts
To select the account to edit:
To edit an account:
Changing the account username and password
To edit the account username and password:
Editing the names of the outgoing and incoming mail servers
To edit mail server settings:
Editing mail retrieval options for a POP or IMAP account
To edit mail retrieval server options for a POP or IMAP account:
Editing outgoing mail options
To edit outgoing mail options:
Editing a signature
To edit a personal signature:
Editing advanced outgoing mail options
To edit advanced outgoing mail options:
Deleting an e-mail account
To delete an account:
Selecting a different service for a given e-mail account
To set up a service for a given e-mail account (different from the default service for your handheld):
Troubleshooting account access problems
Getting, sending, and managing e-mail
Getting e-mail
Choosing the e-mail account and displaying the Inbox
To display an account and its Inbox:
Getting e-mail by subject or getting the entire message
To get e-mail messages:
Auto get mail with notification
Scheduling auto get mail
To set up a scheduled auto get mail:
Auto get notifications
Setting notification options
To set notification options:
Making your handheld buzz or blink when you get new email
To make your handheld buzz or blink when you get new e-mail:
Viewing and using the Reminders screen
To view the Reminders screen:
Auto get mail retries
Resource issues with auto get mail
Inbox icons in the VersaMail application
Reading e-mail
To read a message using the navigator:
Plain text and HTML e-mail
To select whether to receive e-mail messages in HTML or in plain text format:
Viewing other folders
To view other folders:
Managing display options in the folder’s list view
To change the sort order:
To select a one-line or two-line view:
To display or hide a column in a folder’s list view:
To change the font:
To select colors for read and unread mail:
To change the size of a column in the folder’s list view:
To change the font of a composed message:
Moving e-mail between folders
To move one e-mail message:
To move multiple e-mail messages:
Creating and editing mail folders
To create and edit e-mail folders:
Creating and sending new e-mail
To create a new e-mail message:
Addressing a message by typing the address
To enter the address:
Addressing a message using Address Book
To use an address from Address Book:
Using Smart Addressing to address a message
To use Smart Addressing to address a message:
Turning Smart Addressing on or off
To turn Smart Addressing on or off in VersaMail Preferences:
Composing and sending e-mail
To compose the rest of the e-mail and send it:
Send retry
To select automatic send retry:
Send retry notifications
Modifying messages in the Outbox
Outbox icons in the VersaMail applications
Completing drafts
Attaching a personal signature
To create a personal signature:
Forwarding e-mail
To forward e-mail:
Replying to e-mail
To reply to an e-mail that you are reading:
To reply to an e-mail from the folders list:
Working with URLs
Working with attachments
Downloading attachments to your handheld
To download an attachment:
Downloading large attachments
To determine if a message has an attachment or multiple attachments that exceed the maximum message size:
To download a single attachment that exceeds the maximum message size:
To download multiple attachments whose total size exceeds the maximum message size:
Saving attachments to an expansion card
To save an attachment to an expansion card:
Attaching files from a handheld application
To attach a file from a handheld application:
Attaching files from an expansion card
To attach a file from an expansion card:
Forwarding an attachment
To forward a message with an attachment:
Deleting messages
To delete one or more messages:
To delete messages before a certain date:
Emptying the trash
To empty the trash:
To have the trash emptied automatically:
Marking messages as read or unread
To mark messages as read or unread:
Setting preferences for getting and deleting e-mail
To set e-mail preferences:
Adding or updating an Address Book entry directly from a message
To add a new Address Book entry:
Synchronizing e-mail between the handheld and the desktop
Configuring an account in HotSync Manager
To start Palm VersaMail HotSync Conduit:
Setting synchronization options and account settings
To configure an account and set the synchronization options:
To set handheld synchronization settings:
Account information screens
To view the Account Overview screen:
To view the Handheld Settings Overview screen:
Palm VersaMail HotSync Conduit shortcuts
Verifying handheld account settings before synchronizing accounts
Configuring Microsoft Outlook
To configure Microsoft Outlook:
Configuring Microsoft Outlook Express
To configure Outlook Express:
Configuring Eudora
To set up MAPI in Eudora:
Converting attached files
To turn off attachment conversion plug-ins:
Synchronizing an account
To select which accounts are synchronized during a HotSync operation:
Synchronizing multiple accounts
Using SSL with the conduit
Going beyond the basics
Managing mail filters
Creating mail filters
To create a filter:
Turning filters on and off
To turn a filter on or off:
Editing or deleting a filter
To edit or delete a filter:
Managing mail settings
To select the account whose settings you want to manage:
To change the protocol type:
To change your username or password:
To set a default service for this account (different from the default service for your handheld):
To change e-mail address/mail server settings:
To change incoming mail server settings:
To set additional incoming mail options:
To set outgoing mail server (SMTP) settings:
To set additional outgoing mail options:
Adding APOP to an account
To edit an account and add APOP:
Adding ESMTP to an account
To edit an account and add ESMTP:
Setting advanced account preferences
To set advanced account preferences:
Cutting and copying text from an e-mail message for use in other applications
To copy and paste text from an e-mail message:
To paste the text elsewhere in the VersaMail application or in another application:
To cut/copy and paste text from within a Word document:
Using the command bar
To access the command bar on your handheld:
E-mail header details
To switch between short header and full header view:
Backing up mail databases
To back up the e-mail database:
Wireless IMAP folder synchronization
To wirelessly synchronize handheld/mail server IMAP folders during a Get Mail operation:
To wirelessly synchronize handheld/mail server IMAP folders from the Options menu:
Using Secure Sockets Layer (SSL)
To send messages so that they appear to have been sent over a secure connection:
Five-way navigation in the VersaMail application
To read and delete a message:
Keyboard shortcuts in the VersaMail application
To use a keyboard shortcut:
Using Voice Memo
To open Voice Memo:
Creating a voice memo
Recording a voice memo
To record a voice memo on your handheld:
Pausing and resuming a voice memo recording
To pause and restart while creating a voice memo:
Storing voice memos on an expansion card
To store specific voice memos on an expansion card:
To automatically store voice memos on an expansion card:
Listening to voice memos
To listen to a voice memo:
To adjust the volume:
To play a portion of a voice memo:
Setting an alarm for a voice memo
To set an alarm for a voice memo:
Using Voice Memo menus
V Memo menus
Options menus
Using Web Browser Pro
To open Web Browser Pro:
What Web Browser Pro looks like
Getting help in Web Browser Pro
Disconnecting from and connecting to the Internet
To disconnect from the Internet:
To connect to the Internet:
Browsing the web on your handheld
Visiting a web page
To visit a web page using the Open URL dialog box:
To visit a web page using the URL Entry field:
Following a link
To follow a link:
Returning to a web page you just visited
To go back to the last web page you visited:
To go back to an earlier page:
To go forward through the cached pages:
Returning to your home page
To return to your home page:
Downloading a file to your handheld
To download a file by following a link from a web page:
To stop a web page from downloading:
To stop a file from downloading:
Refreshing a page
To refresh a page:
Viewing information about a web page
To view information about the current web page:
Using passwords
To enter a password:
Copying and pasting text
Copying text
To undo the last Cut, Copy, or Select All action:
Pasting text
To paste text in a web page field or dialog box:
To paste text in another application:
To undo a Paste action:
Communicating with other users
Sending e-mail
To send e-mail:
Beaming a URL
To beam a web page’s URL:
E-mailing a URL
To e-mail a web page’s URL:
Bookmarking your favorite pages
Adding a bookmark
To add a bookmark for the current page:
Visiting a bookmarked page
To visit a bookmarked page:
Editing information about a bookmark
To edit information about a bookmark:
Deleting a bookmark
To delete a bookmark:
Saving pages
Saving a page
To save a web page:
Opening a saved page
To open a saved page:
Editing information about a saved page
To edit information about a saved page:
Deleting a saved page
To delete a saved page:
Finding web pages you recently visited
Returning to a page you visited
To return to a page you visited:
Clearing the History list
To clear the History list:
Customizing Web Browser Pro
Changing the default size of text
To change the default size of text:
Changing your home page
To change your home page:
Changing how images are downloaded
To change how images are downloaded and displayed:
Changing link colors
To change link colors:
Enabling or disabling autofill
To enable or disable autofill:
Enabling or disabling cookies
To enable or disable cookies:
Enabling or disabling JavaScript
To enable or disable JavaScript:
Changing the size and content of the cache
To change the size and content of the cache:
Controlling how Web Browser Pro accesses the Internet
To change connection settings:
Changing Network Preferences
To change Network Preferences:
Changing the host server
To access a new host server:
Using World Clock
To open World Clock:
Viewing the time
To view the time:
Setting the primary location
To set the primary location:
To set the date:
To set the time:
Choosing a different primary location
To change the primary location:
Setting the secondary locations
To select the secondary locations:
Adding a location
To add a location:
To set Daylight Saving options:
Modifying a location
To modify a location:
Removing a location
To remove a location:
Setting an alarm
To set an alarm:
Using World Clock menus
Options menu
Performing HotSync® Operations
Selecting HotSync setup options
To set the HotSync options on a Windows computer:
To set the HotSync options on a Mac computer:
Customizing HotSync application settings
To customize HotSync application settings on a Windows computer:
To customize HotSync application settings on a Mac computer:
Conducting cradle/cable HotSync operations
Performing a cradle/cable HotSync operation: Windows computers
To perform a local HotSync operation on a Windows computer:
Performing a direct HotSync operation: Mac computers
To perform a local HotSync operation on a Mac computer:
Conducting IR HotSync operations
Preparing your computer for infrared communication
To configure HotSync Manager for infrared communication on a Windows computer:
To configure HotSync Manager for infrared communication on a Mac computer:
Performing an IR HotSync operation
To perform an IR HotSync operation:
Returning to cradle/cable HotSync operations
To return to local USB cradle/cable HotSync operations on a Windows computer:
To return to local Serial cradle/cable HotSync operations on a Windows computer:
To return to local serial cradle/cable HotSync operations on a Mac computer:
Conducting modem HotSync operations
Preparing your computer for a modem HotSync operation
To prepare a Windows computer for a modem HotSync operation:
To prepare a Mac computer for a modem HotSync operation:
Preparing your handheld for a modem HotSync operation
To prepare your handheld for a modem HotSync operation:
Selecting the conduits for a modem HotSync operation
To change the Conduit Setup for a modem HotSync operation:
Performing a modem HotSync operation
To perform a modem HotSync operation:
Conducting Bluetooth HotSync operations
Preparing your computer for a Bluetooth HotSync operation
To prepare your Windows computer for a Bluetooth HotSync operation:
To prepare your Mac computer for a Bluetooth HotSync operation:
Preparing your handheld for a Bluetooth HotSync operation
To prepare your handheld for a Bluetooth HotSync operation:
Performing a Bluetooth HotSync operation
To perform a Bluetooth HotSync operation:
Conducting network HotSync operations
Connecting to your company’s dial-in server
To prepare your Windows computer for a network HotSync operation:
To prepare your handheld for a network HotSync operation:
Performing a network HotSync operation
To perform a network HotSync operation:
Using File Link
Creating a user profile
To create a user profile on a Windows computer:
To create a user profile on a Mac computer:
Performing the first HotSync operation with a user profile
To use a profile for a first-time HotSync operation on a Windows computer:
To use a profile for a first-time HotSync operation on a Mac computer:
Setting Preferences for Your Handheld
Setting General Preferences
To open the General Preferences screens:
Date & Time Preferences
To set the location:
To set the date:
To set the time:
To set the time zone and daylight saving time:
Digitizer Preferences
To calibrate your handheld screen:
Formats Preferences
Country default
To set the country default:
Time, date, week start, and numbers formats
To select the time, date, week start, and numbers format:
Graffiti 2 Preferences
To select alternate strokes:
Power Preferences
Auto-off after
To set the Auto-off after interval:
Stay on in Cradle
To change the cradle/cable setting:
Beam Receive
To turn off the Beam Receive feature:
Power on when opened and Power off when closed
To change the power on setting:
To change the power off setting:
Sounds & Alerts Preferences
To select a profile:
System Sound, Game Sound, and Alarm Sound settings
To set the sound settings:
Alarm LED and Alarm Vibrate settings
To set the Alarm LED and Alarm Vibrate settings:
Writing Area Preferences
To turn Writing Area Preferences on and off:
Setting Communication Preferences
Bluetooth Preferences
Turning Bluetooth communication on and off
To turn on Bluetooth communication:
Assigning a Bluetooth device name
To assign a Bluetooth name to your handheld:
Setting device discovery
To disable discovery:
Allowing Wakeup
To enable wakeup:
To enable wakeup during specific hours:
Adding trusted devices
To add a trusted device:
To view details about a trusted device:
To delete a trusted device:
Enabling/disabling the user cache
To disable the user cache:
Making Bluetooth connections
Connection Preferences
Editing connections
To edit the IR to Phone connection:
Creating Bluetooth connections
To create a Bluetooth to LAN connection:
Connecting to non-GSM phones
To create a connection with a non-GSM phone:
Network Preferences
Creating and selecting network service profiles
To add a new network service profile:
To select a network service profile:
To duplicate an existing network service profile:
Entering a user name
To enter a user name:
Entering a password
To enter a password:
Selecting a connection
To select a connection:
Adding telephone settings
To enter your server phone number:
Entering a prefix
To enter a prefix:
Disabling Call Waiting
To disable Call Waiting:
Using a calling card
To use a calling card:
Connecting to your service
To establish a connection:
To close a connection:
LAN access points
Accessing the Internet with a Bluetooth phone or LAN access point
To configure Internet access with a Bluetooth phone or LAN access point:
To enter an INIT string for a high-speed wireless data network connection:
Adding detailed information to a network service profile
To add connection details:
Idle timeout
To set the Idle timeout:
Defining primary and secondary DNS
To enter a primary and secondary DNS:
IP address
To identify dynamic IP addressing:
To enter a permanent IP address:
Login scripts
Creating a login script on your handheld
To create a login script:
Plug-in applications
Deleting a network service profile
To delete a network service profile:
Network Preferences menu commands
Service menu
Options menu
TCP/IP troubleshooting
Displaying expanded Service Connection Progress messages
Viewing the Network Log
To view the Network Log:
Adding a DNS number
Phone Preferences
To set Phone Preferences:
Setting Personal Preferences
To open the Personal Preferences screens:
Buttons Preferences
To change the Buttons Preferences:
Pen Preferences
To change the pen preferences:
HotSync Buttons Preferences
To change the HotSync buttons preferences:
Color Theme Preferences
To select a color theme:
Owner Preferences
To customize the Owner Preferences:
To unlock the Owner Preferences screen:
Security Preferences
Assigning a password
To assign a password:
Changing or deleting a password
To change or delete your password:
Masking your password entry
To mask your password entry:
Setting the quick password delay time limit
To set the quick password delay time limit:
Locking your handheld
Locking your handheld automatically
To set your handheld to lock when you turn it off:
To set your handheld to lock at a preset time:
To set your handheld to lock after a period of inactivity:
Locking your handheld manually
To lock and turn off your handheld:
Recovering from a forgotten password
To delete a forgotten password:
Making records private
To hide all private records:
To mask all private records:
To display all private records:
To unmask individual records:
To make a record private:
Hiding or masking your private records automatically
To hide or mask your records when you turn your handheld off:
To automatically hide or mask records at a preset time:
To automatically hide or mask your records after a period of inactivity:
Encrypting your data
To encrypt your data when the handheld locks:
Using security shortcuts
To create and activate security shortcuts:
ShortCuts Preferences
Creating a ShortCut
To create a ShortCut:
Editing a ShortCut
To edit a ShortCut:
Deleting a ShortCut
To delete a ShortCut:
Maintaining Your Handheld
Caring for your handheld
Prolonging battery life
Resetting your handheld
Performing a soft reset
To perform a soft reset:
Performing a hard reset
To perform a hard reset:
To restore your data from a Windows computer after a hard reset:
To restore your data from a Mac computer after a hard reset:
Frequently Asked Questions
Software installation problems
Operating problems
Tapping and writing problems
Application problems
HotSync problems
Beaming and sending problems
Phone connection problems
VersaMail™ problems
Recharging problems
Password problems
Technical support
To find version and memory information:
Product Regulatory Information
Varning
Advarsel!
Varoitus
Advarsel
Waarschuwing!
Uwaga
Index



 2023年江西萍乡中考道德与法治真题及答案.doc
 2012年重庆南川中考生物真题及答案.doc
 2013年江西师范大学地理学综合及文艺理论基础考研真题.doc
 2020年四川甘孜小升初语文真题及答案I卷.doc
 2020年注册岩土工程师专业基础考试真题及答案.doc
 2023-2024学年福建省厦门市九年级上学期数学月考试题及答案.doc
 2021-2022学年辽宁省沈阳市大东区九年级上学期语文期末试题及答案.doc
 2022-2023学年北京东城区初三第一学期物理期末试卷及答案.doc
 2018上半年江西教师资格初中地理学科知识与教学能力真题及答案.doc
 2012年河北国家公务员申论考试真题及答案-省级.doc
 2020-2021学年江苏省扬州市江都区邵樊片九年级上学期数学第一次质量检测试题及答案.doc
 2022下半年黑龙江教师资格证中学综合素质真题及答案.doc