HP Deskjet Ink Advantage 4510 e-All-in-One Series
Get started
1. Set up your printer: Follow the illustrations on the setup flyer, and then the printer display.
2. Install software: Go to www.hp.com/ePrint/DJ4510, and then follow the on-screen instructions.
If your computer is not connected to the Internet, insert the software CD in your computer, and then
follow the on-screen instructions.
CD does not start?
Windows®: Browse to Computer, double-click the CD/DVD drive icon with the HP logo, and then double-click
setup.exe.
Mac: Double-click the CD icon on your desktop, and then double-click HP Installer.
No CD/DVD drive?
Install the software from: www.hp.com/ePrint/DJ4510.
h
s
i
l
g
n
E
Learn more
Electronic Help: Install electronic Help by selecting it from the recommended software during software
installation. Learn about product features, printing, troubleshooting, and support. Find notices, environmental,
and regulatory information, including the European Union Regulatory Notice and compliance statements, in the
Technical Information section.
• Windows 8: On the Start screen, right-click an empty area on the screen, click All Apps on the app bar, click
the icon with the printer’s name, and then click Help.
• Windows 7, Windows Vista®, and Windows XP: Click Start > All Programs > HP > HP Deskjet 4510 series >
Help.
• OS X Lion, Mountain Lion: Click Help > Help Center. In the Help Viewer window, click Help for all your apps,
and then click HP Deskjet 4510 series.
• OS X v10.6: Click Help > Mac Help. In the Help Viewer window, choose HP Deskjet 4510 series from the Mac
Help pop-up menu.
Readme: Contains HP support information, operating system requirements, and recent printer updates.
• Windows: Insert the software CD in your computer, and then browse to the ReadMe.chm. Double-click
ReadMe.chm to open, and then select the ReadMe in your language.
• Mac: Insert the software CD, and then open the ReadMe folder located at the top-level of the software CD.
Double-click ReadMe.html and select the ReadMe in your language.
On the Web: Additional help and information: www.hp.com/go/support. Printer registration: www.register.hp.com.
Declaration of Conformity: www.hp.eu/certificates. Ink usage: www.hp.com/go/inkusage.
Note: Ink from the cartridges is used in the printing process in a number of different ways and some residual ink
is left in the cartridge after it is used.
EN
ZHCN
KO
ID
TH
*A9J41-90003*
*A9J41-90003*
A9J41-90003
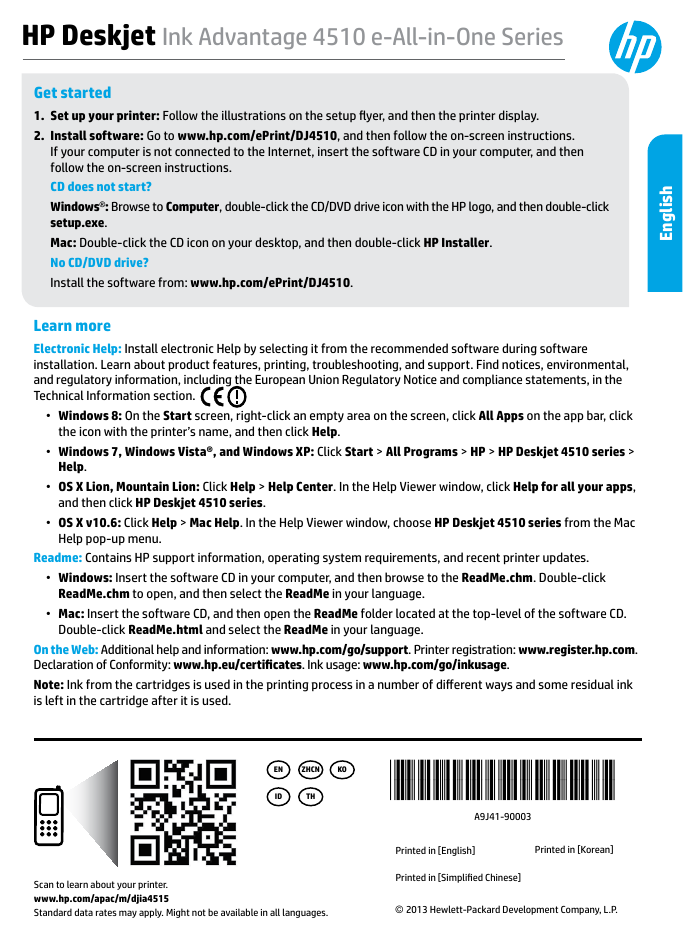
Scan to learn about your printer.
www.hp.com/apac/m/djia4515
Standard data rates may apply. Might not be available in all languages.
Printed in [English]
Printed in [Korean]
Printed in [Simplified Chinese]
© 2013 Hewlett-Packard Development Company, L.P.
�
Control Panel
E
n
g
l
i
s
h
2
1
2/16
3/9
4
5
6
7
8
10
11
12
13
14
15
17
18
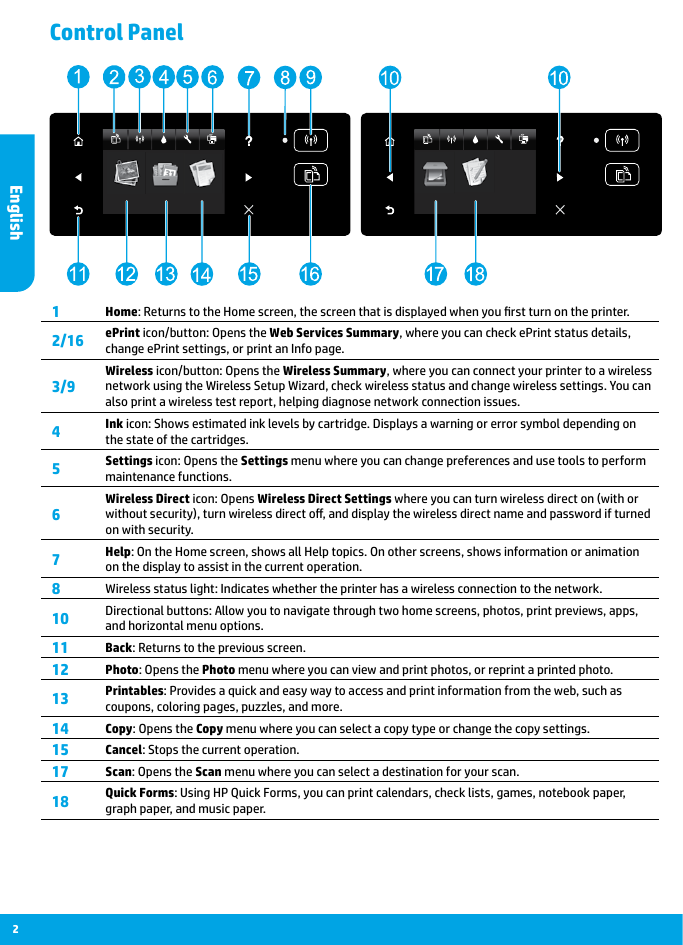
Home: Returns to the Home screen, the screen that is displayed when you first turn on the printer.
ePrint icon/button: Opens the Web Services Summary, where you can check ePrint status details,
change ePrint settings, or print an Info page.
Wireless icon/button: Opens the Wireless Summary, where you can connect your printer to a wireless
network using the Wireless Setup Wizard, check wireless status and change wireless settings. You can
also print a wireless test report, helping diagnose network connection issues.
Ink icon: Shows estimated ink levels by cartridge. Displays a warning or error symbol depending on
the state of the cartridges.
Settings icon: Opens the Settings menu where you can change preferences and use tools to perform
maintenance functions.
Wireless Direct icon: Opens Wireless Direct Settings where you can turn wireless direct on (with or
without security), turn wireless direct off, and display the wireless direct name and password if turned
on with security.
Help: On the Home screen, shows all Help topics. On other screens, shows information or animation
on the display to assist in the current operation.
Wireless status light: Indicates whether the printer has a wireless connection to the network.
Directional buttons: Allow you to navigate through two home screens, photos, print previews, apps,
and horizontal menu options.
Back: Returns to the previous screen.
Photo: Opens the Photo menu where you can view and print photos, or reprint a printed photo.
Printables: Provides a quick and easy way to access and print information from the web, such as
coupons, coloring pages, puzzles, and more.
Copy: Opens the Copy menu where you can select a copy type or change the copy settings.
Cancel: Stops the current operation.
Scan: Opens the Scan menu where you can select a destination for your scan.
Quick Forms: Using HP Quick Forms, you can print calendars, check lists, games, notebook paper,
graph paper, and music paper.
�
Basic Troubleshooting
If you are unable to print:
1. Check for error messages and resolve them.
2. Make sure the printer is powered on. The On button will be lit white.
3. Check the wireless status light to make sure your printer is connected to a network.
• Solid blue light indicates that wireless connection has been established and you can print.
• Slow blinking light indicates that wireless is on, but the printer is not connected to a network. Make sure your
printer is within the range of a wireless signal.
• Fast blinking light indicates wireless error. Refer to the message on the printer display.
• If wireless is turned off, the wireless light is off and the display screen shows Wireless Off.
Visit the HP Diagnostic Tools website at www.hp.com/go/tools to download free diagnostic utilities (tools) that
you can use to fix common printer problems.
Windows
Make sure that the printer is set as your default
printing device.
• Windows 8: Point to or tap the upper-right corner
Mac
Check your print queue.
1. In System Preferences, click Print & Scan (Print &
Fax in OS X v10.6).
of the screen to open the Charms bar, click the
Settings icon, click or tap Control Panel, and then
click or tap View devices and printers.
• Windows 7: From the Windows Start menu, click
Devices and Printers.
• Windows Vista: On the Windows taskbar, click
Start, click Control Panel, and then click Printer.
• Windows XP: On the Windows taskbar, click Start,
click Control Panel, and then click Printers and
Faxes.
Make sure that your printer has a check mark in the
circle next to it. If your printer is not selected as the
default printer, right-click the printer icon and choose
Set as Default Printer from the menu.
If you are still unable to print, or the software
installation fails, do the following.
1. Remove the CD from the CD/DVD drive.
2. Restart the computer.
3. Insert the printer software CD in the CD/DVD drive,
then follow the on-screen instructions to install the
printer software.
4. After the installation finishes, restart the computer.
Acknowledgements
Windows XP, Windows Vista, Windows 7 and Windows 8
are U.S. registered trademarks of Microsoft Corporation.
2. Click Open Print Queue.
3. Click a print job to select it.
4. Use the following buttons to manage the print job:
• Delete: Cancel the selected print job.
• Resume: Continue a paused print job.
5. If you made any changes, try to print again.
Restart and reset.
1. Restart the computer.
2. Reset the printer.
a. Turn off the printer and unplug the power cord.
b. Wait a minute, then plug the power cord back in
and turn on the printer.
If you are still unable to print, uninstall and reinstall
the software.
Note: The uninstaller removes all of the HP software
components specific to the device. It does not remove
components shared by other products or programs.
To uninstall the software:
1. Disconnect the HP printer from your computer.
2. Open the Applications: Hewlett-Packard folder.
3. Double-click HP Uninstaller. Follow the on-screen
instructions.
To install the software:
1. Connect the USB cable.
2. Insert the HP software CD into the CD/DVD drive.
3. On the desktop, open the CD and then double-click
HP Installer.
4. Follow the on-screen and the printed setup
instructions that came with the HP printer.
h
s
i
l
g
n
E
3
�
Networking
Need networking help?
www.hp.com/go/wirelessprinting
The HP Wireless Printing Center at www.hp.com/go/wirelessprinting can help you prepare your wireless
network, set up or reconfigure your printer, and troubleshoot networking problems.
If your network installation was unsuccessful:
• Confirm that Wireless is enabled on your printer.
From the printer control panel, press the Wireless button (
• Confirm that your printer is connected to your network.
), if it shows Wireless Off, touch Turn On.
1. From your printer control panel, press the Wireless button (
2. Touch Settings.
3. Touch Print Reports, and then touch Wireless Test Report. The Wireless Test Report is automatically
).
printed.
4. Check the top of the report to see if something failed during the test.
– See the Diagnostics Results section for all tests that were performed, to determine whether or not
your printer passed.
– From the Current Configuration section, find out the Network Name (SSID) to which your printer is
currently connected. Make sure that the printer is connected to the same network as your computer.
Note: If your computer is connected to a Virtual Private Network (VPN), temporarily disconnect from the VPN
before proceeding with the installation. After installation you will need to disconnect from the VPN to access
your printer over your home network.
• Make sure security software is not blocking communication over your network.
Security software, such as firewalls, can block communication between your computer and printer when the
software is installed over a network. If your printer cannot be found, temporarily disable your firewall and check
if the problem goes away. For more help and tips on security software, go to: www.hp.com/go/wpc-firewall.
After you have successfully installed your printer:
• Share your printer with multiple computers on your network.
If your printer is already connected to your home network, you can share your printer with other computers
on the same network. For each additional computer you only need to install the HP printer software. During
the software installation, select Wireless from the Connection Options screen and then follow the on-
screen instructions.
Note: Use only with the power cord supplied by HP.
E
n
g
l
i
s
h
4
�
Networking (continued)
If you want to change from a USB connection to a wireless connection:
You must have already successfully installed your printer software.
Windows
1. Do one of the following according to your operating system:
• Windows 8: On the Start screen, right-click an empty area on the screen, click All Apps on the app bar.
• Windows 7, Windows Vista, and Windows XP: From the computer Start menu, select All Programs or
Programs, and then select HP.
2. Select HP Deskjet 4510 series.
3. Select Printer Setup & Software.
4. Select Convert a USB connected printer to wireless. Follow the on-screen instructions.
Mac
Use HP Setup Assistant in Applications/Hewlett-Packard/Device Utilities to change the software connection
to wireless for this printer.
h
s
i
l
g
n
E
If you want to use the printer wirelessly without a router:
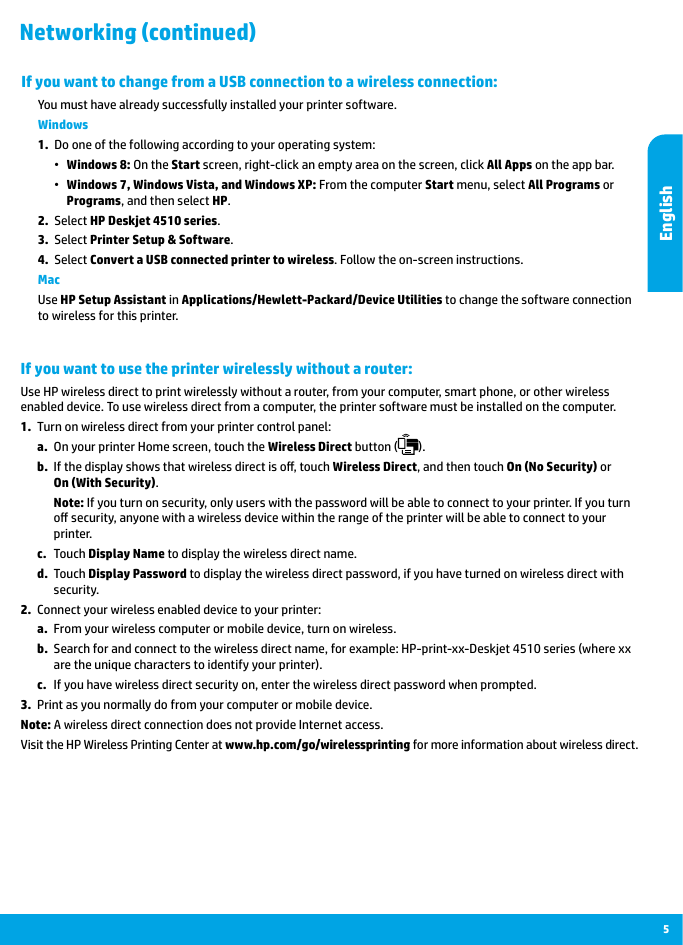
Use HP wireless direct to print wirelessly without a router, from your computer, smart phone, or other wireless
enabled device. To use wireless direct from a computer, the printer software must be installed on the computer.
1. Turn on wireless direct from your printer control panel:
a. On your printer Home screen, touch the Wireless Direct button (
b. If the display shows that wireless direct is off, touch Wireless Direct, and then touch On (No Security) or
).
On (With Security).
Note: If you turn on security, only users with the password will be able to connect to your printer. If you turn
off security, anyone with a wireless device within the range of the printer will be able to connect to your
printer.
c. Touch Display Name to display the wireless direct name.
d. Touch Display Password to display the wireless direct password, if you have turned on wireless direct with
security.
2. Connect your wireless enabled device to your printer:
a. From your wireless computer or mobile device, turn on wireless.
b. Search for and connect to the wireless direct name, for example: HP-print-xx-Deskjet 4510 series (where xx
are the unique characters to identify your printer).
c. If you have wireless direct security on, enter the wireless direct password when prompted.
3. Print as you normally do from your computer or mobile device.
Note: A wireless direct connection does not provide Internet access.
Visit the HP Wireless Printing Center at www.hp.com/go/wirelessprinting for more information about wireless direct.
5
�
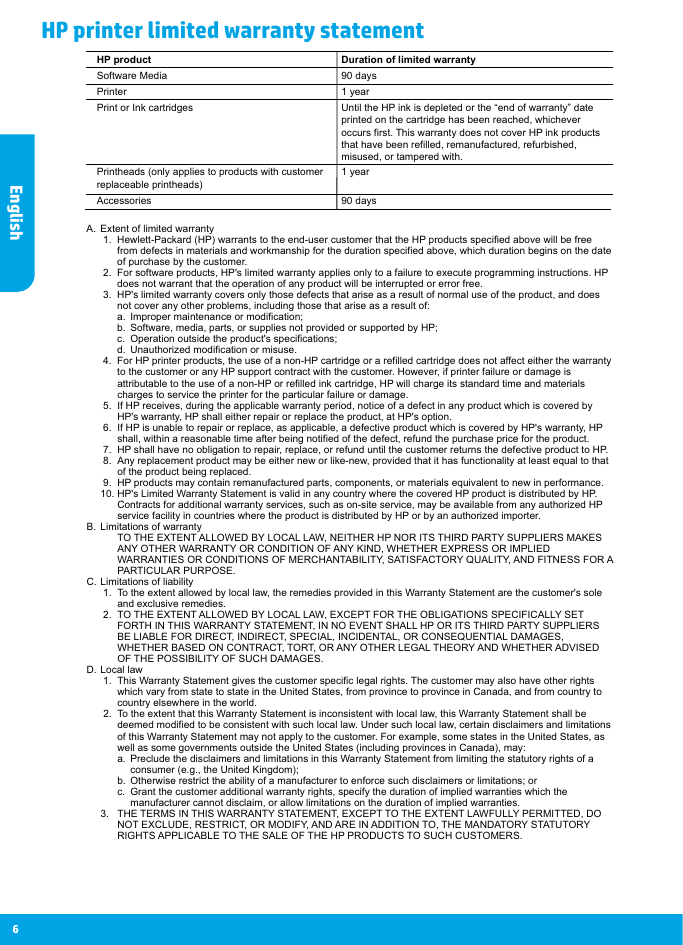
HP printer limited warranty statement
HP product
Software Media
Printer
Print or Ink cartridges
Printheads (only applies to products with customer
replaceable printheads)
Accessories
Duration of limited warranty
90 days
1 year
Until the HP ink is depleted or the “end of warranty” date
printed on the cartridge has been reached, whichever
occurs first. This warranty does not cover HP ink products
that have been refilled, remanufactured, refurbished,
misused, or tampered with.
1 year
90 days
E
n
g
l
i
s
h
6
A. Extent of limited warranty
1. Hewlett-Packard (HP) warrants to the end-user customer that the HP products specified above will be free
from defects in materials and workmanship for the duration specified above, which duration begins on the date
of purchase by the customer.
2. For software products, HP's limited warranty applies only to a failure to execute programming instructions. HP
does not warrant that the operation of any product will be interrupted or error free.
3. HP's limited warranty covers only those defects that arise as a result of normal use of the product, and does
not cover any other problems, including those that arise as a result of:
a. Improper maintenance or modification;
b. Software, media, parts, or supplies not provided or supported by HP;
c. Operation outside the product's specifications;
d. Unauthorized modification or misuse.
4. For HP printer products, the use of a non-HP cartridge or a refilled cartridge does not affect either the warranty
to the customer or any HP support contract with the customer. However, if printer failure or damage is
attributable to the use of a non-HP or refilled ink cartridge, HP will charge its standard time and materials
charges to service the printer for the particular failure or damage.
5. If HP receives, during the applicable warranty period, notice of a defect in any product which is covered by
HP's warranty, HP shall either repair or replace the product, at HP's option.
6. If HP is unable to repair or replace, as applicable, a defective product which is covered by HP's warranty, HP
shall, within a reasonable time after being notified of the defect, refund the purchase price for the product.
7. HP shall have no obligation to repair, replace, or refund until the customer returns the defective product to HP.
8. Any replacement product may be either new or like-new, provided that it has functionality at least equal to that
of the product being replaced.
9. HP products may contain remanufactured parts, components, or materials equivalent to new in performance.
10. HP's Limited Warranty Statement is valid in any country where the covered HP product is distributed by HP.
Contracts for additional warranty services, such as on-site service, may be available from any authorized HP
service facility in countries where the product is distributed by HP or by an authorized importer.
TO THE EXTENT ALLOWED BY LOCAL LAW, NEITHER HP NOR ITS THIRD PARTY SUPPLIERS MAKES
ANY OTHER WARRANTY OR CONDITION OF ANY KIND, WHETHER EXPRESS OR IMPLIED
WARRANTIES OR CONDITIONS OF MERCHANTABILITY, SATISFACTORY QUALITY, AND FITNESS FOR A
PARTICULAR PURPOSE.
B. Limitations of warranty
C. Limitations of liability
and exclusive remedies.
1. To the extent allowed by local law, the remedies provided in this Warranty Statement are the customer's sole
2. TO THE EXTENT ALLOWED BY LOCAL LAW, EXCEPT FOR THE OBLIGATIONS SPECIFICALLY SET
FORTH IN THIS WARRANTY STATEMENT, IN NO EVENT SHALL HP OR ITS THIRD PARTY SUPPLIERS
BE LIABLE FOR DIRECT, INDIRECT, SPECIAL, INCIDENTAL, OR CONSEQUENTIAL DAMAGES,
WHETHER BASED ON CONTRACT, TORT, OR ANY OTHER LEGAL THEORY AND WHETHER ADVISED
OF THE POSSIBILITY OF SUCH DAMAGES.
D. Local law
1. This Warranty Statement gives the customer specific legal rights. The customer may also have other rights
which vary from state to state in the United States, from province to province in Canada, and from country to
country elsewhere in the world.
2. To the extent that this Warranty Statement is inconsistent with local law, this Warranty Statement shall be
deemed modified to be consistent with such local law. Under such local law, certain disclaimers and limitations
of this Warranty Statement may not apply to the customer. For example, some states in the United States, as
well as some governments outside the United States (including provinces in Canada), may:
a. Preclude the disclaimers and limitations in this Warranty Statement from limiting the statutory rights of a
consumer (e.g., the United Kingdom);
b. Otherwise restrict the ability of a manufacturer to enforce such disclaimers or limitations; or
c. Grant the customer additional warranty rights, specify the duration of implied warranties which the
manufacturer cannot disclaim, or allow limitations on the duration of implied warranties.
3. THE TERMS IN THIS WARRANTY STATEMENT, EXCEPT TO THE EXTENT LAWFULLY PERMITTED, DO
NOT EXCLUDE, RESTRICT, OR MODIFY, AND ARE IN ADDITION TO, THE MANDATORY STATUTORY
RIGHTS APPLICABLE TO THE SALE OF THE HP PRODUCTS TO SUCH CUSTOMERS.
�
HP Deskjet Ink Advantage 4510 e-All-in-One Series
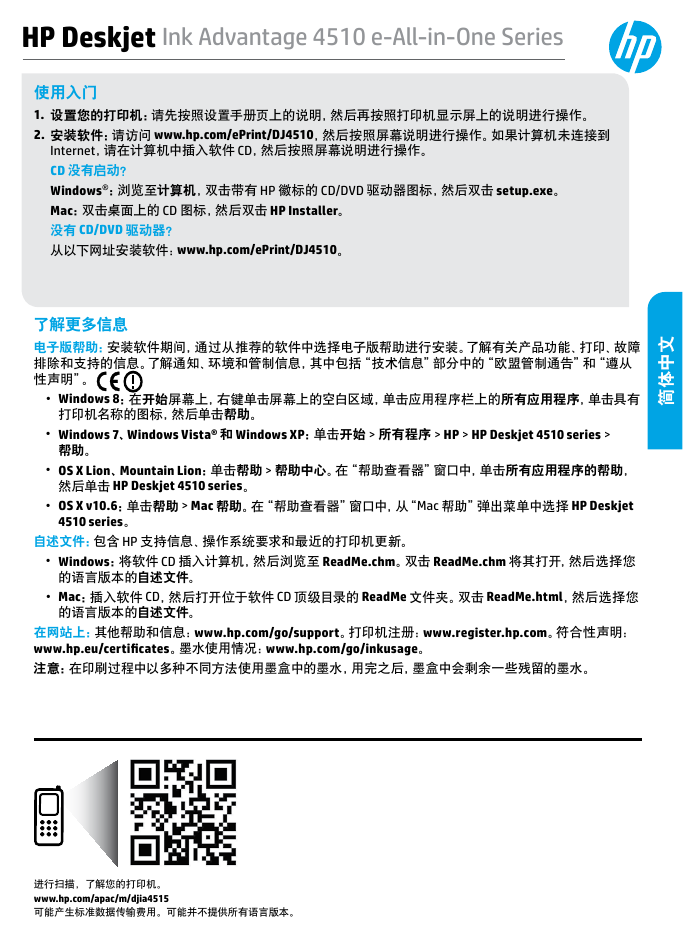
使用入门
1. 设置您的打印机:请先按照设置手册页上的说明,然后再按照打印机显示屏上的说明进行操作。
2. 安装软件:请访问 www.hp.com/ePrint/DJ4510,然后按照屏幕说明进行操作。如果计算机未连接到
Internet,请在计算机中插入软件 CD,然后按照屏幕说明进行操作。
CD 没有启动?
Windows®:浏览至计算机,双击带有 HP 徽标的 CD/DVD 驱动器图标,然后双击 setup.exe。
Mac:双击桌面上的 CD 图标,然后双击 HP Installer。
没有 CD/DVD 驱动器?
从以下网址安装软件:www.hp.com/ePrint/DJ4510。
了解更多信息
电子版帮助:安装软件期间,通过从推荐的软件中选择电子版帮助进行安装。了解有关产品功能、打印、故障
排除和支持的信息。了解通知、环境和管制信息,其中包括“技术信息”部分中的“欧盟管制通告”和“遵从
性声明”。
• Windows 8:在开始屏幕上,右键单击屏幕上的空白区域,单击应用程序栏上的所有应用程序,单击具有
文
中
体
简
打印机名称的图标,然后单击帮助。
• Windows 7、Windows Vista® 和 Windows XP:单击开始 > 所有程序 > HP > HP Deskjet 4510 series >
帮助。
• OS X Lion、Mountain Lion:单击帮助 > 帮助中心。在“帮助查看器”窗口中,单击所有应用程序的帮助,
然后单击 HP Deskjet 4510 series。
• OS X v10.6:单击帮助 > Mac 帮助。在“帮助查看器”窗口中,从“Mac 帮助”弹出菜单中选择 HP Deskjet
4510 series。
自述文件:包含 HP 支持信息、操作系统要求和最近的打印机更新。
• Windows:将软件 CD 插入计算机,然后浏览至 ReadMe.chm。双击 ReadMe.chm 将其打开,然后选择您
的语言版本的自述文件。
• Mac:插入软件 CD,然后打开位于软件 CD 顶级目录的 ReadMe 文件夹。双击 ReadMe.html,然后选择您
的语言版本的自述文件。
在网站上:其他帮助和信息:www.hp.com/go/support。打印机注册:www.register.hp.com。符合性声明:
www.hp.eu/certificates。墨水使用情况:www.hp.com/go/inkusage。
注意:在印刷过程中以多种不同方法使用墨盒中的墨水,用完之后,墨盒中会剩余一些残留的墨水。
进行扫描,了解您的打印机。
www.hp.com/apac/m/djia4515
可能产生标准数据传输费用。可能并不提供所有语言版本。
�
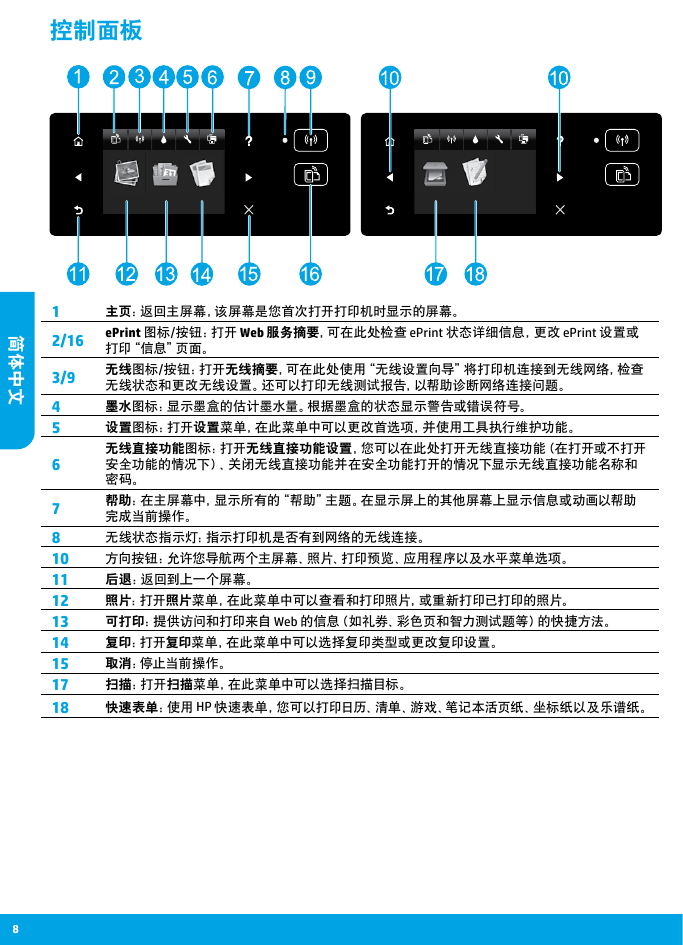
控制面板
1
2/16
3/9
主页:返回主屏幕,该屏幕是您首次打开打印机时显示的屏幕。
ePrint 图标/按钮:打开 Web 服务摘要,可在此处检查 ePrint 状态详细信息,更改 ePrint 设置或
打印“信息”页面。
无线图标/按钮:打开无线摘要,可在此处使用“无线设置向导”将打印机连接到无线网络,检查
无线状态和更改无线设置。还可以打印无线测试报告,以帮助诊断网络连接问题。
4
5
6
7
8
10
11
12
13
14
15
17
18
墨水图标:显示墨盒的估计墨水量。根据墨盒的状态显示警告或错误符号。
设置图标:打开设置菜单,在此菜单中可以更改首选项,并使用工具执行维护功能。
无线直接功能图标:打开无线直接功能设置,您可以在此处打开无线直接功能(在打开或不打开
安全功能的情况下)、关闭无线直接功能并在安全功能打开的情况下显示无线直接功能名称和
密码。
帮助:在主屏幕中,显示所有的“帮助”主题。在显示屏上的其他屏幕上显示信息或动画以帮助
完成当前操作。
无线状态指示灯:指示打印机是否有到网络的无线连接。
方向按钮:允许您导航两个主屏幕、照片、打印预览、应用程序以及水平菜单选项。
后退:返回到上一个屏幕。
照片:打开照片菜单,在此菜单中可以查看和打印照片,或重新打印已打印的照片。
可打印:提供访问和打印来自 Web 的信息(如礼券、彩色页和智力测试题等)的快捷方法。
复印:打开复印菜单,在此菜单中可以选择复印类型或更改复印设置。
取消:停止当前操作。
扫描:打开扫描菜单,在此菜单中可以选择扫描目标。
快速表单:使用 HP 快速表单,您可以打印日历、清单、游戏、笔记本活页纸、坐标纸以及乐谱纸。
简
体
中
文
8
�


 2023年江西萍乡中考道德与法治真题及答案.doc
 2012年重庆南川中考生物真题及答案.doc
 2013年江西师范大学地理学综合及文艺理论基础考研真题.doc
 2020年四川甘孜小升初语文真题及答案I卷.doc
 2020年注册岩土工程师专业基础考试真题及答案.doc
 2023-2024学年福建省厦门市九年级上学期数学月考试题及答案.doc
 2021-2022学年辽宁省沈阳市大东区九年级上学期语文期末试题及答案.doc
 2022-2023学年北京东城区初三第一学期物理期末试卷及答案.doc
 2018上半年江西教师资格初中地理学科知识与教学能力真题及答案.doc
 2012年河北国家公务员申论考试真题及答案-省级.doc
 2020-2021学年江苏省扬州市江都区邵樊片九年级上学期数学第一次质量检测试题及答案.doc
 2022下半年黑龙江教师资格证中学综合素质真题及答案.doc