Murata Components Library for Agilent ADS Install Manual
1. Introduction
This manual describes how to install and use Murata Components Library for Agilent ADS.
Although operating the Library in accordance with this manual can basically perform the required
operations, some operations may differ partially depending on the environment used.
This manual is described based on the following environment. See the manuals for the PC, etc. used in the
actual environment.
Platform
OS
ADS
: PC
: Windows2000
: ADS2005A
(Can not use with older version than ADS2005A)
# If previous version of the library is installed, delete previous version before install new version as follows.
1. Start ADS.
2. Select “Design Kit” -> “Setup Design Kits…” in the main window.
3. Select “muRataLibWeb” in “Over view” in “Setup ADS Design Kits” window, and click “Cut” button, then
click “OK” button to close the window.
4. Shutdown ADS and delete installed files. (all files under “muRata_DK” folder)
2. Download the Library
Download the library from the following URL
http://www.murata.com/designlib/agilent/index.html
3. Installing the Library
1. Start ADS.
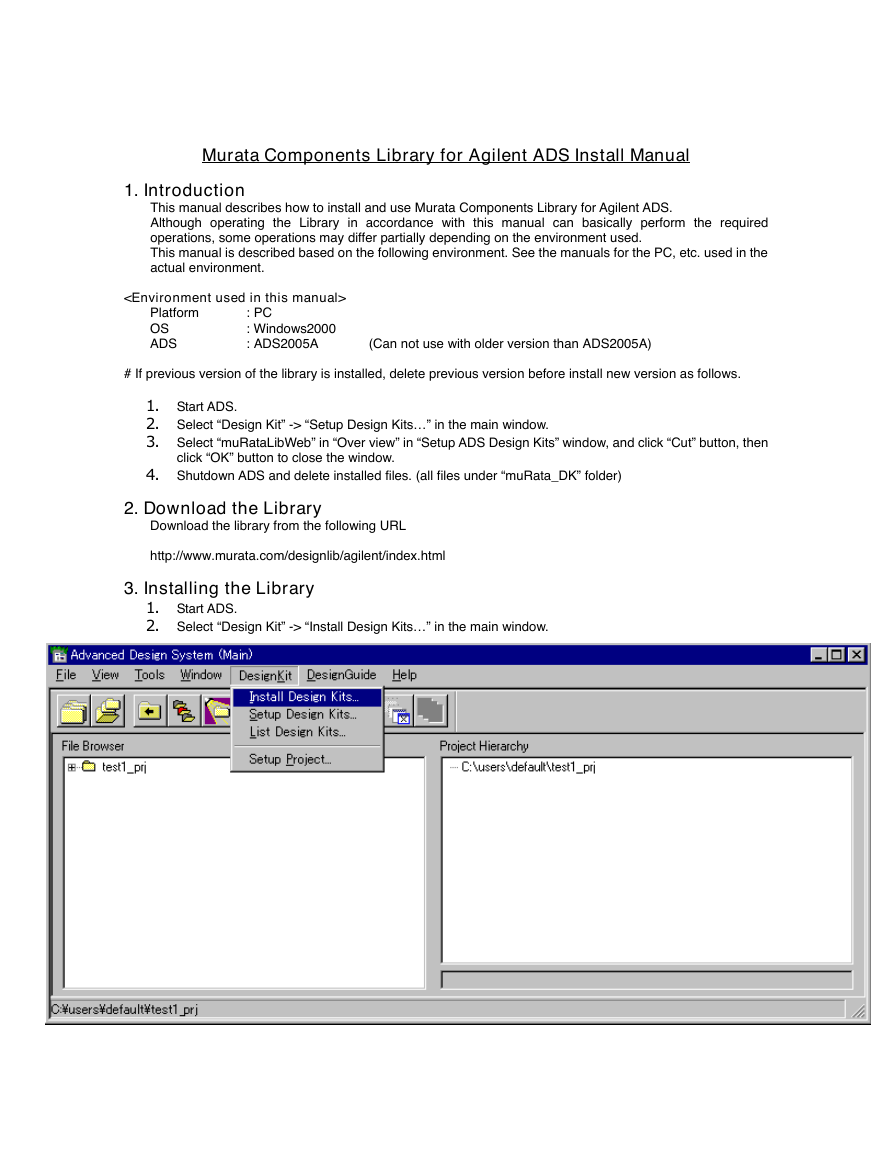
2. Select “Design Kit” -> “Install Design Kits…” in the main window.
�
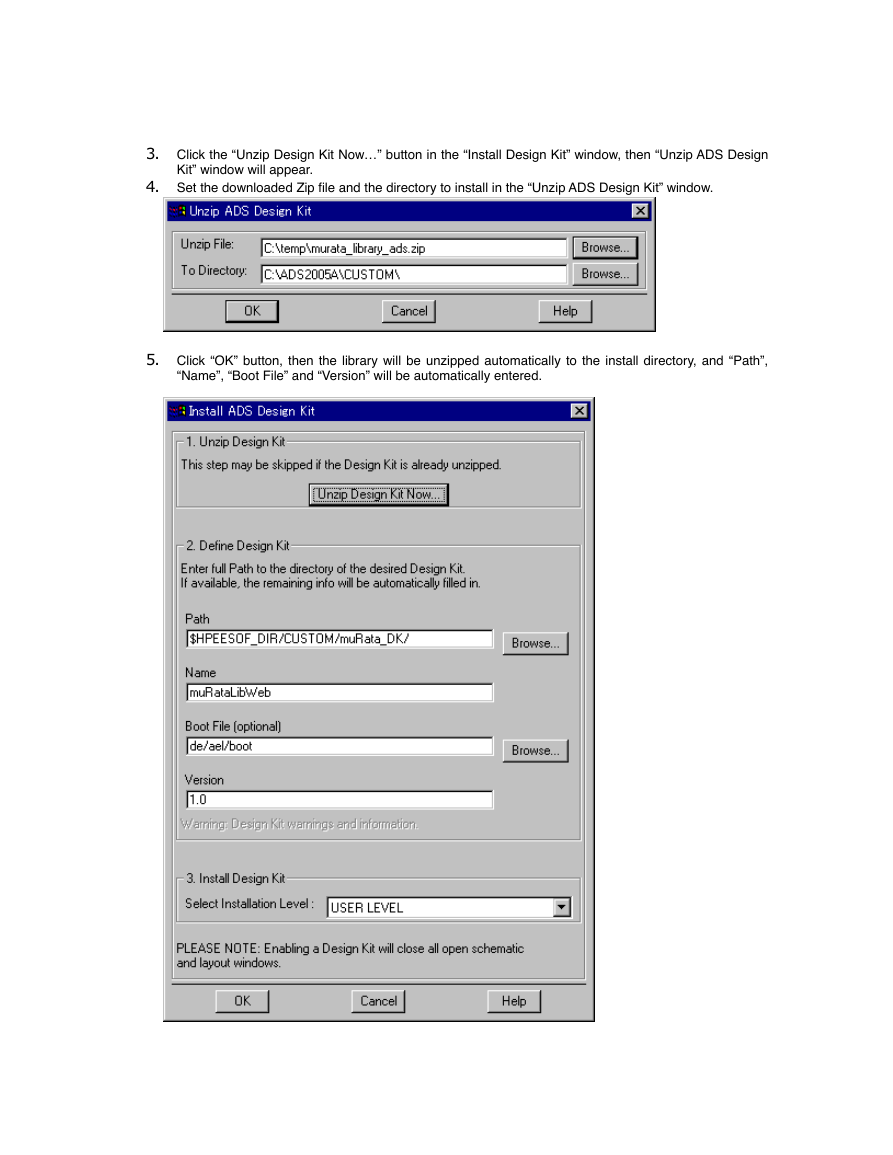
3. Click the “Unzip Design Kit Now…” button in the “Install Design Kit” window, then “Unzip ADS Design
Kit” window will appear.
4. Set the downloaded Zip file and the directory to install in the “Unzip ADS Design Kit” window.
5. Click “OK” button, then the library will be unzipped automatically to the install directory, and “Path”,
“Name”, “Boot File” and “Version” will be automatically entered.
�
6. Select Installation Level at “3. Install Design Kit” in the “Install ADS Design Kit” window.
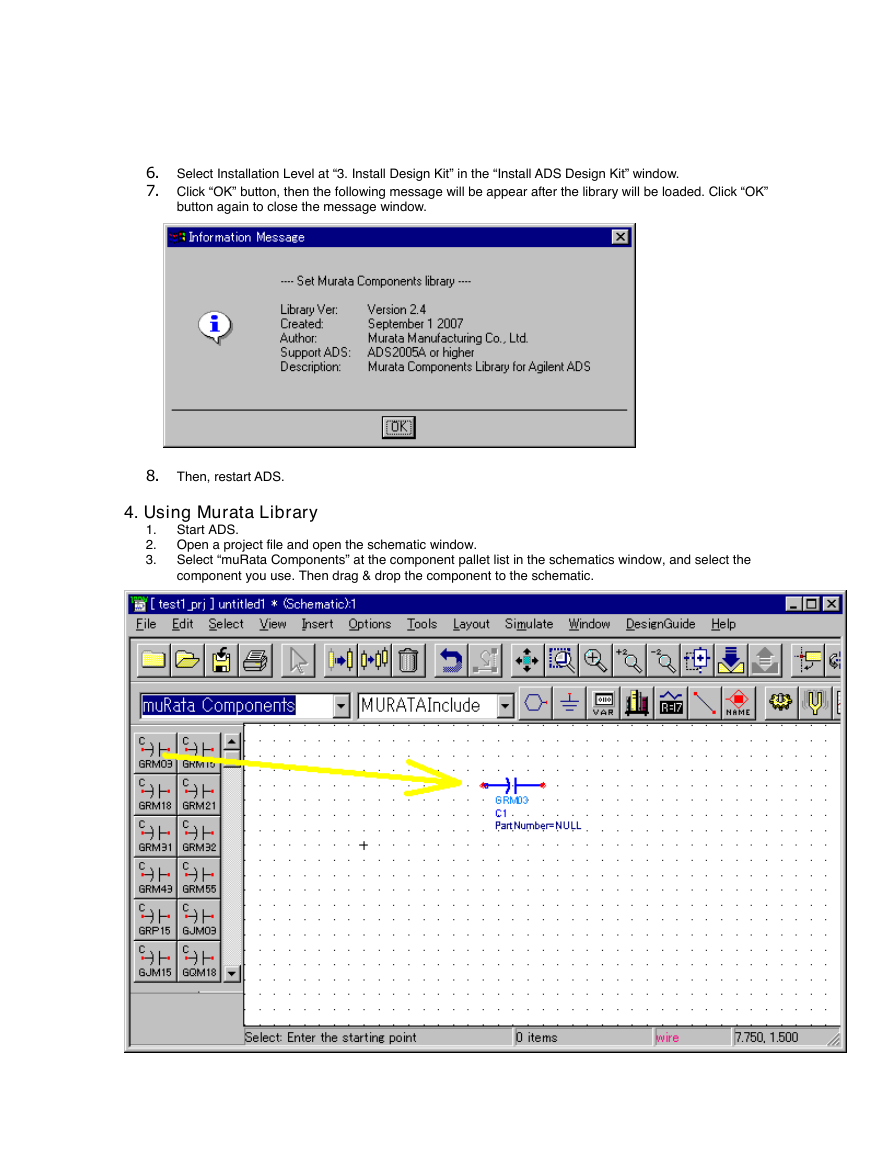
7. Click “OK” button, then the following message will be appear after the library will be loaded. Click “OK”
button again to close the message window.
8. Then, restart ADS.
4. Using Murata Library
1. Start ADS.
2. Open a project file and open the schematic window.
3. Select “muRata Components” at the component pallet list in the schematics window, and select the
component you use. Then drag & drop the component to the schematic.
�
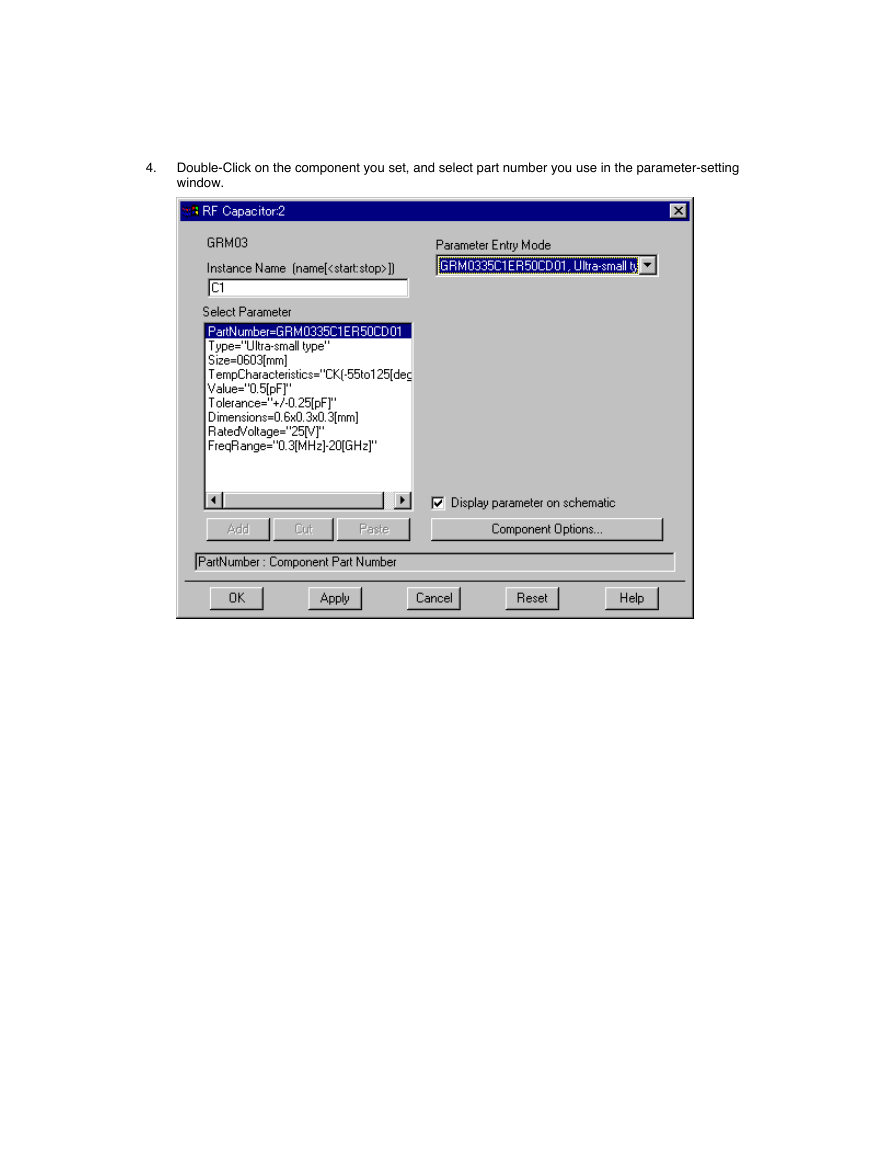
4. Double-Click on the component you set, and select part number you use in the parameter-setting
window.
�
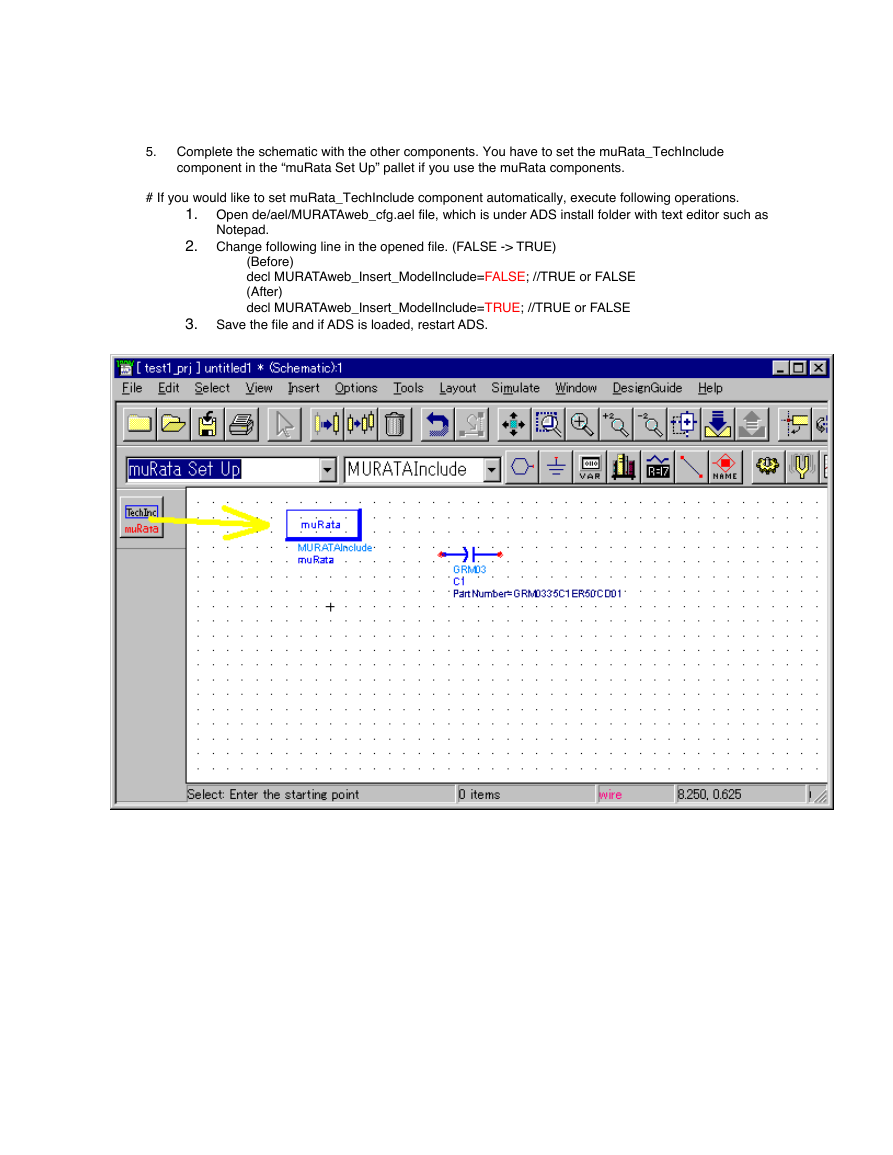
5. Complete the schematic with the other components. You have to set the muRata_TechInclude
component in the “muRata Set Up” pallet if you use the muRata components.
# If you would like to set muRata_TechInclude component automatically, execute following operations.
1. Open de/ael/MURATAweb_cfg.ael file, which is under ADS install folder with text editor such as
Notepad.
2. Change following line in the opened file. (FALSE -> TRUE)
(Before)
decl MURATAweb_Insert_ModelInclude=FALSE; //TRUE or FALSE
(After)
decl MURATAweb_Insert_ModelInclude=TRUE; //TRUE or FALSE
3. Save the file and if ADS is loaded, restart ADS.
�
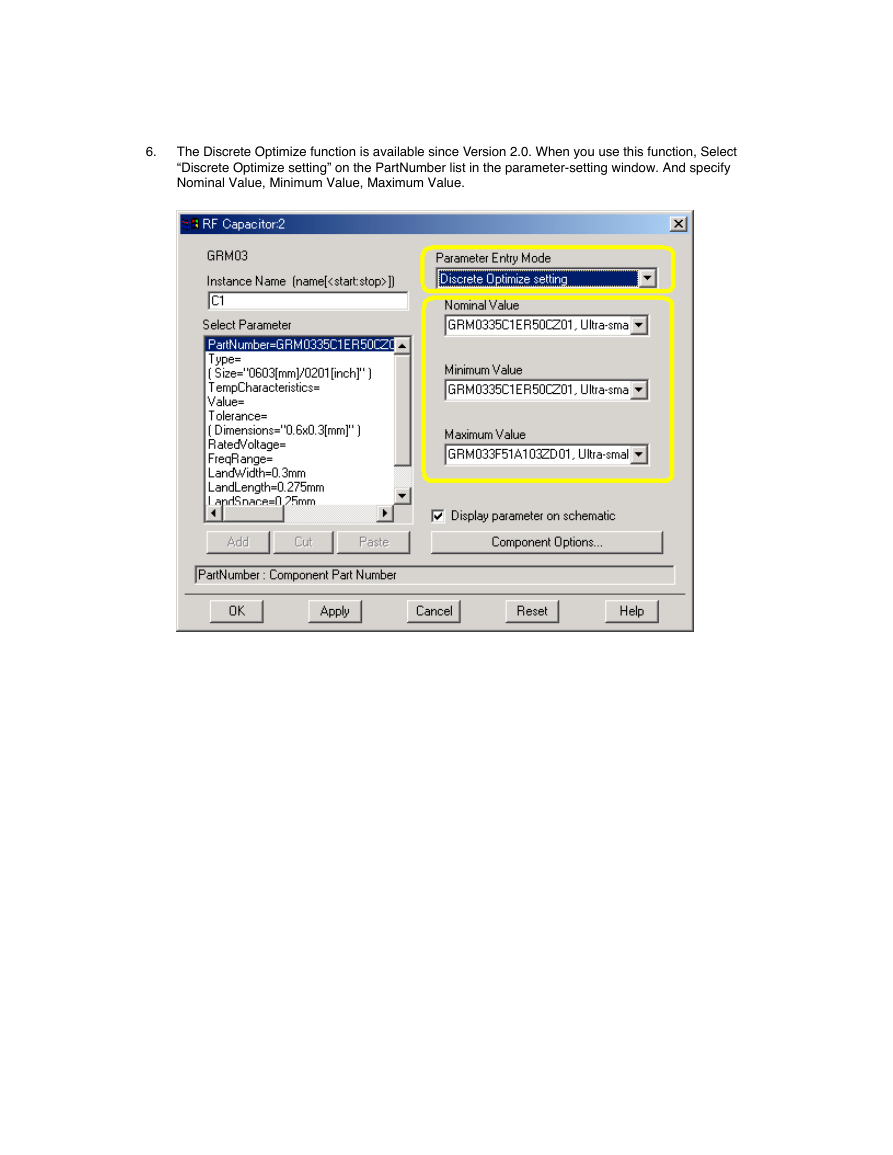
6.
The Discrete Optimize function is available since Version 2.0. When you use this function, Select
“Discrete Optimize setting” on the PartNumber list in the parameter-setting window. And specify
Nominal Value, Minimum Value, Maximum Value.
�


 2023年江西萍乡中考道德与法治真题及答案.doc
 2012年重庆南川中考生物真题及答案.doc
 2013年江西师范大学地理学综合及文艺理论基础考研真题.doc
 2020年四川甘孜小升初语文真题及答案I卷.doc
 2020年注册岩土工程师专业基础考试真题及答案.doc
 2023-2024学年福建省厦门市九年级上学期数学月考试题及答案.doc
 2021-2022学年辽宁省沈阳市大东区九年级上学期语文期末试题及答案.doc
 2022-2023学年北京东城区初三第一学期物理期末试卷及答案.doc
 2018上半年江西教师资格初中地理学科知识与教学能力真题及答案.doc
 2012年河北国家公务员申论考试真题及答案-省级.doc
 2020-2021学年江苏省扬州市江都区邵樊片九年级上学期数学第一次质量检测试题及答案.doc
 2022下半年黑龙江教师资格证中学综合素质真题及答案.doc