logo资料库

三星笔记本电脑-N830 User Manual (ver.1.0)说明书.pdf

第1页 / 共136页
第2页 / 共136页
第3页 / 共136页
第4页 / 共136页
第5页 / 共136页
第6页 / 共136页
第7页 / 共136页
第8页 / 共136页
资料共136页,剩余部分请下载后查看
Using Your Documentation
Special Features of the User’s Manual
Using the Software User Documentation
Introducing Your Computer
Using Your Computer for the First Time
Attaching the AC Adapter
Turning On the Computer
Understanding POST
Adjusting the LCD Display
Turning Off Your Computer
APM(Advanced Power Management) mode
ACPI(Advanced Configuration and Power Interface) mode
Restarting Your Computer
Tips for Using Your Computer
Travelling with Your Computer
Handling Spills
Storing the Computer for Long Periods
Using the Keyboard
Using the Numeric Keypad
Using Special Function Keys
Quick Start Buttons
Using the Touchpad
Reading the System Status Lights
Connecting Peripheral Devices
Using the Flex-Bay
To remove a device from the Flex-Bay
To install a device in the Flex-Bay:
Using the SwapBay Utility
Using the Floppy Drive
Using the CD-ROM Drive
Using the DVD-ROM Drive
Installing the DVD Player MPEG-2 Software
Using the Hard Drive
Removing the Hard Drive
Installing a Hard Drive
Using the Battery
Charging the Battery
Safely Using the Battery
Removing the Battery
Installing the Battery
Monitoring the Battery Charge
Using the Battery Gauge
Battery Warnings
Using the Modem
SENS Modem Naming Convention
Precautions before use
Description of 56K
Specification
Installing the Modem Driver in Windows Me (Modem Module Driver)
Install the Modem Driver
Selecting a Country
Confirming Installation of the Modem Driver
Deleting the Modem Driver
Installing the Modem Driver in Windows 98 (Modem Module Driver)
Install the Modem Driver
Selecting a Country
Confirming Installation of the Modem Driver
Installing Modem Driver in Windows NT 4.0 (Modem Module Driver)
Install the Modem Driver
Modem driver installation confirmation
Installing the Modem Driver in Windows Millennium (Modem/LAN Module Driver)
Install the Modem Driver
Selecting a Country
Confirming Installation of the Modem Driver
Installing the Modem Driver in Windows 98 (Modem/LAN Module Driver)
Install the Modem Driver
Selecting a Country
Confirming Installation of the Modem Driver
Installing Modem Driver in Windows NT 4.0 (Modem/LAN Module Driver)
Remove Existing Modem Driver
Install the Modem Driver
Modem driver installation confirmation and country selection.
Modem Commands
What are AT commands?
Before Using AT Commands
Using AT commands
Basic AT Commands
Using the LAN
Installing the LAN Driver in Windows Me
Install the LAN Driver
Configuring Network Environment
Installing the LAN Driver in Windows 98
Install the LAN Driver
Configuring Network Environment
Using System Setup
Starting System Setup
Main Menu
Advanced Menu
Security Menu
Power Menu
Boot Menu
Exit Menu
Using System Security
System Passwords
Creating a Password
Deleting a Password
Requiring a Boot Password
Locking the Keyboard
Using Power Management Options
Maximum Power Saving Mode
Suspend Mode
Suspend Mode Precautions
Using PowerProfiler
Creating a Save to Disk Partition
Restoring your Operating System and Original Applications and Drivers
To (re)install your operating system
To (re)install your original applications and drivers:
Video Features and Configuration
Resolution and Color Depth
Configuring Display Features
Selecting a Monitor Type
Changing Color Depth and Resolution
Changing the Video Driver
Windows 98/ Me:
Windows NT 4.0:
Windows 2000
Using the TV-Out Port
Using Duo View mode
Setting Duo View mode
Limits and cautions of using Duo View mode
Working with PC Cards
Maintaining PC Cards
Using PC Cards
Windows 98/ Me
Windows NT
Using Options
AC Adapter
Battery Pack
Hard Drives
Auto Adapter
Memory Modules
Before You Install Memory
Installing a Memory Module
CD-ROM Drive
DVD-ROM Drive Module
Superdisk LS-120 Drive
Docking Options
About Drivers and System Resources
Drivers
IRQs
Service Pack 4 for Windows NT 4.0
Troubleshooting
Operating Problem
Infrared Problems
Modem Problems
Specifications
Abbreviations
Glossary
Recording the Computer Hardware Configuration
Using Your Documentation Congratulations on your purchase of a Notebook computer. Whether you are new to using a portable computer or are an experienced user, this user’s manual can help you get the most from your computer. Special Features of the User’s Manual Three types of messages with icons appear in the manual: A note informs you of special circumstances. A caution warns you of possible damage to equipment. A warning indicates the possibility of personal injury. Keys that you need to press to perform certain functions are shown in the manual enclosed in angle brackets. For example, indicates the control key (Ctrl on the computer’s keyboard). If you need to press two keys at the same time, the key names are shown joined by a plus sign. For example, means that you should press the Fn key and hold it and then press the F11 key. If you are new to using computers, see “Glossary”. The “Glossary” explains general computing terms that are used in this manual and tells you about some of the differences between notebook computers and desktop computers. Using Your Documentation 1
Using the Software User Documentation Your computer shipped from the factory with several software programs installed. The software may include its own online or printed documentation. Refer to the documentation or the Help options in the software for more information. The figures illustrated in this manual may not be identical to those on your system. 2 Using Your Documentation
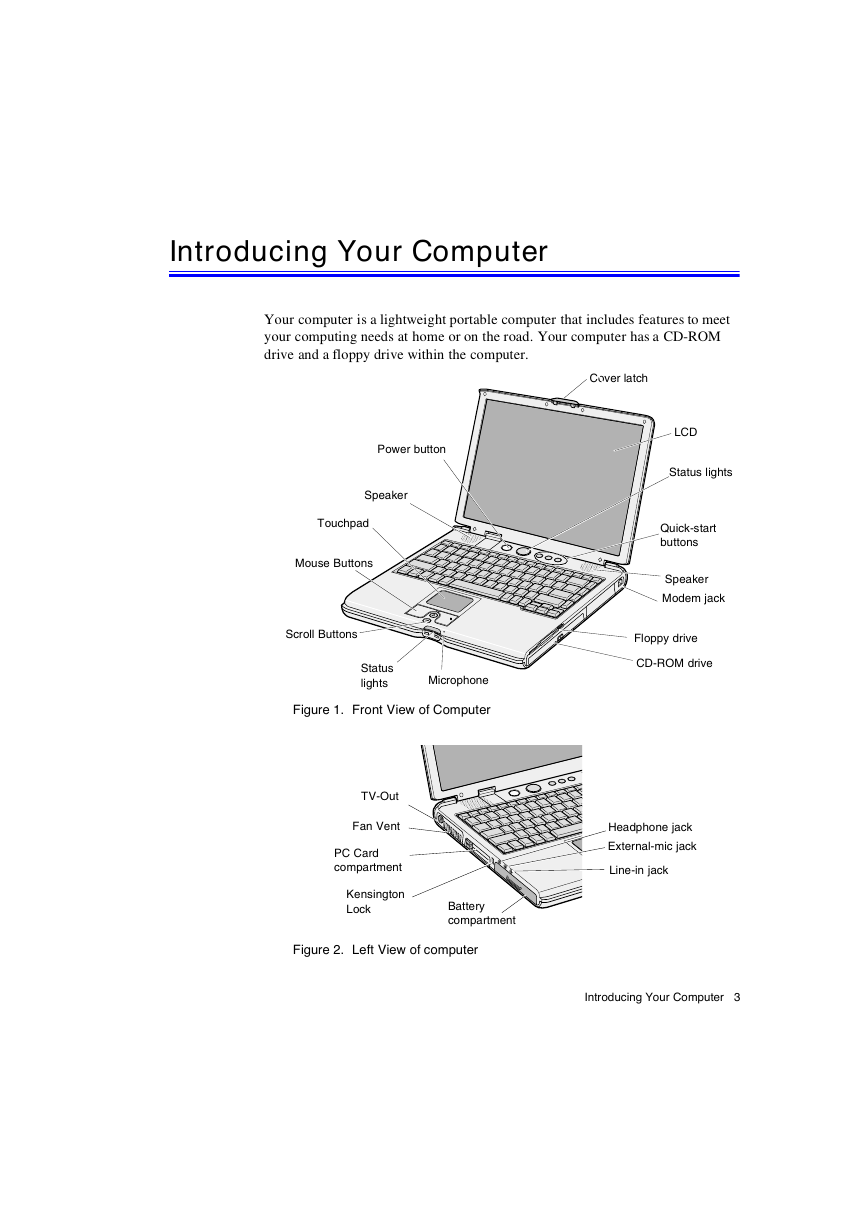
Introducing Your Computer Your computer is a lightweight portable computer that includes features to meet your computing needs at home or on the road. Your computer has a CD-ROM drive and a floppy drive within the computer. Cover latch Power button Speaker Touchpad Mouse Buttons Scroll Buttons Status lights Microphone Figure 1. Front View of Computer TV-Out Fan Vent PC Card compartment Kensington Lock Battery compartment Figure 2. Left View of computer LCD Status lights Quick-start buttons Speaker Modem jack Floppy drive CD-ROM drive Headphone jack External-mic jack Line-in jack Introducing Your Computer 3
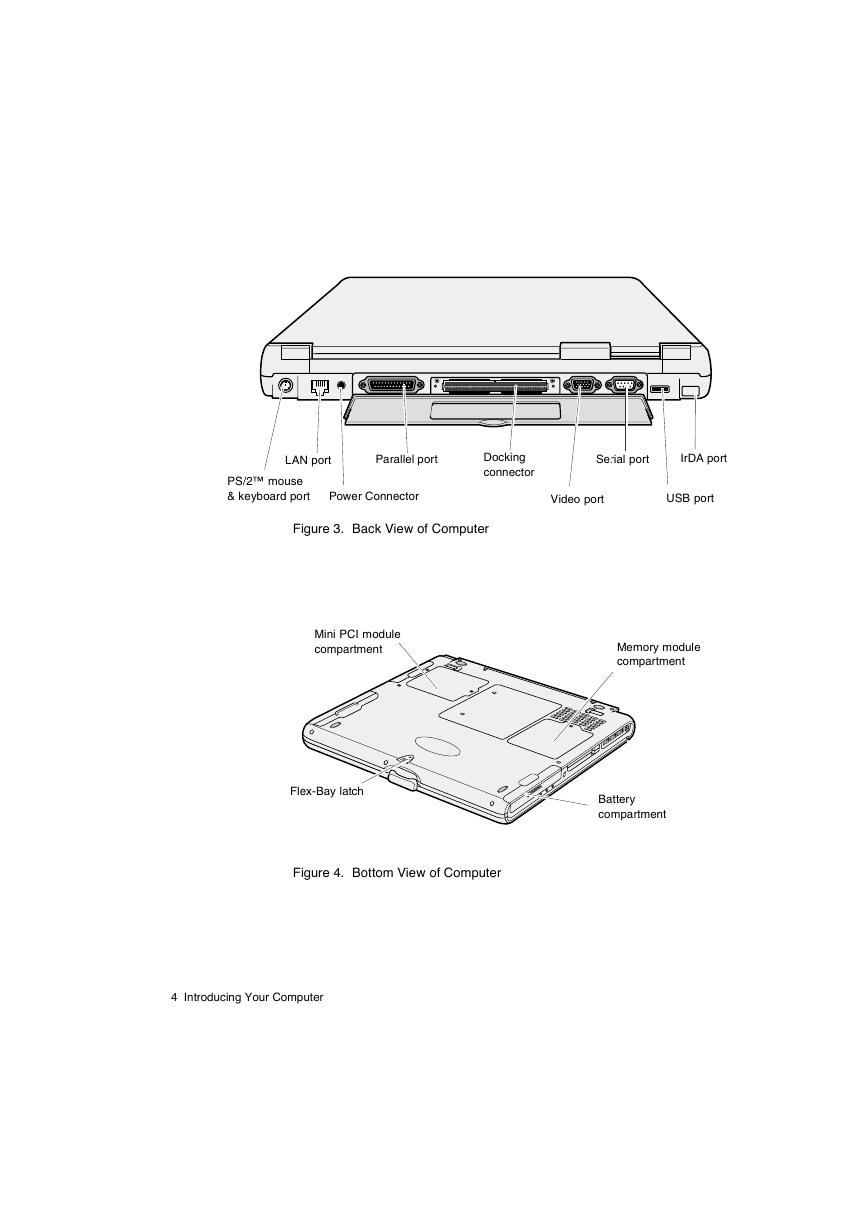
LAN port Parallel port PS/2™ mouse & keyboard port Power Connector Docking connector Serial port IrDA port Video port USB port Figure 3. Back View of Computer Mini PCI module compartment Memory module compartment Flex-Bay latch Battery compartment Figure 4. Bottom View of Computer 4 Introducing Your Computer
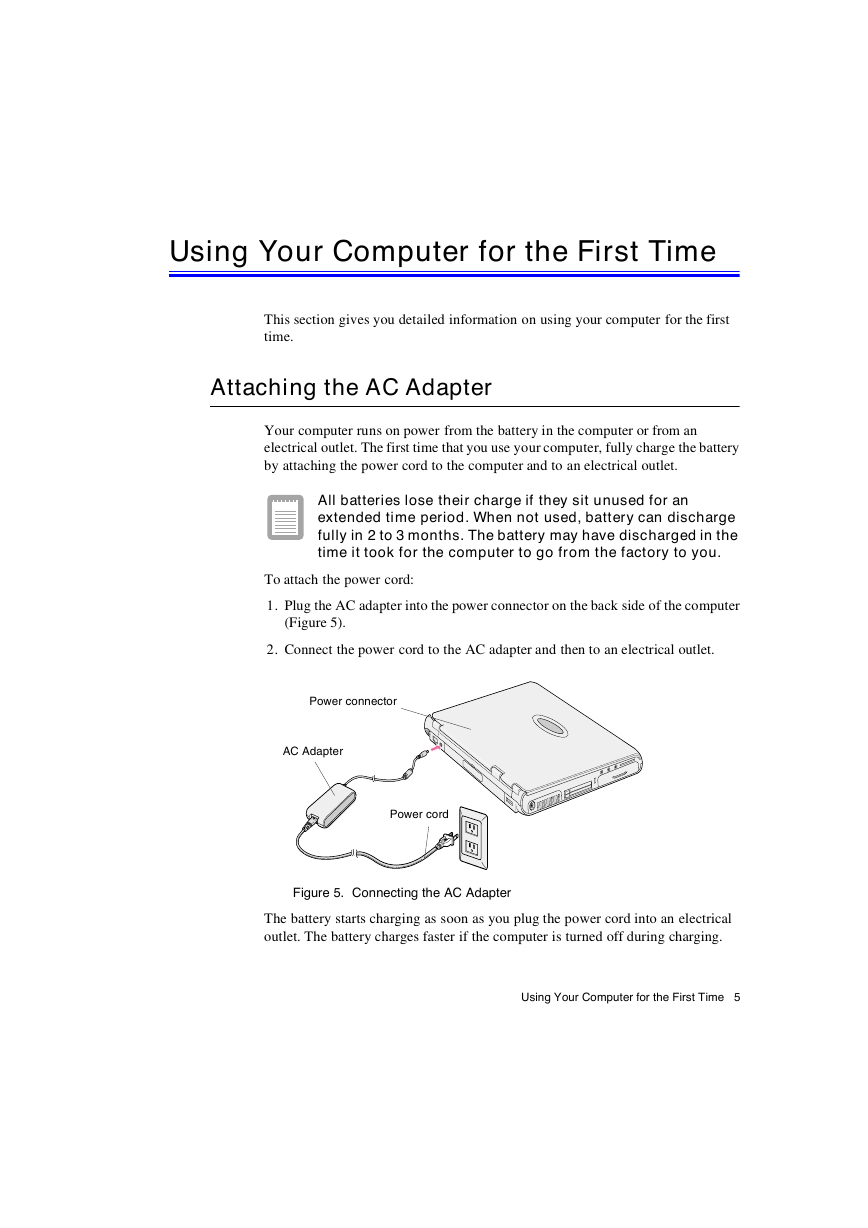
Using Your Computer for the First Time This section gives you detailed information on using your computer for the first time. Attaching the AC Adapter Your computer runs on power from the battery in the computer or from an electrical outlet. The first time that you use your computer, fully charge the battery by attaching the power cord to the computer and to an electrical outlet. All batteries lose their charge if they sit unused for an extended time period. When not used, battery can discharge fully in 2 to 3 months. The battery may have discharged in the time it took for the computer to go from the factory to you. To attach the power cord: 1. Plug the AC adapter into the power connector on the back side of the computer (Figure 5). 2. Connect the power cord to the AC adapter and then to an electrical outlet. Power connector AC Adapter Power cord Figure 5. Connecting the AC Adapter The battery starts charging as soon as you plug the power cord into an electrical outlet. The battery charges faster if the computer is turned off during charging. Using Your Computer for the First Time 5
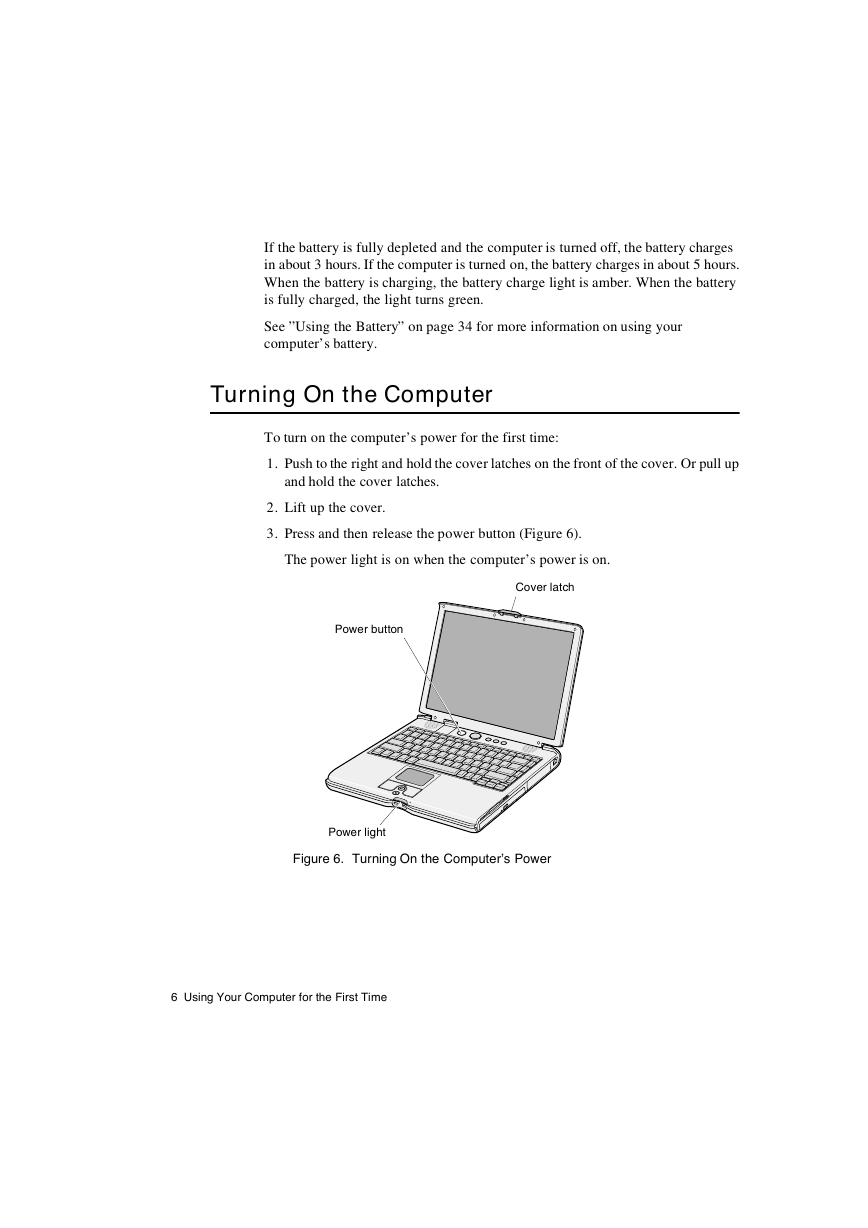
If the battery is fully depleted and the computer is turned off, the battery charges in about 3 hours. If the computer is turned on, the battery charges in about 5 hours. When the battery is charging, the battery charge light is amber. When the battery is fully charged, the light turns green. See ”Using the Battery” on page 34 for more information on using your computer’s battery. Turning On the Computer To turn on the computer’s power for the first time: 1. Push to the right and hold the cover latches on the front of the cover. Or pull up and hold the cover latches. 2. Lift up the cover. 3. Press and then release the power button (Figure 6). The power light is on when the computer’s power is on. Cover latch Power button Power light Figure 6. Turning On the Computer’s Power 6 Using Your Computer for the First Time
Understanding POST When you turn on your computer, a routine called POST (Power-On Self-Test) automatically runs to test the computer components. Several messages appear on the screen during POST. Screen messages are built into the computer to report both normal and abnormal system conditions. If an error message appears, take any action suggested in the message. If the message identifies the error condition but does not suggest any corrective action, write down the message and contact manufacturer or an authorised service center for assistance. (See ”Troubleshooting” on page 111.) Adjusting the LCD Display You may wish to adjust the LCD (Liquid-Crystal Display) when you begin using your computer. A TFT (Thin-Film Transistor) LCD does not require adjustment for contrast because the contrast is set to remain at maximum. To adjust the LCD: • Press to increase the display brightness. • Press to decrease the display brightness. Turning Off Your Computer If your computer has a Windows operating system, turn off your computer by performing the shutdown procedure described in this section. Otherwise, you may lose data. APM(Advanced Power Management) mode To turn off the computer: 1. Click Start on the taskbar. 2. Click Shut Down. 3. Select the shut down option. Using Your Computer for the First Time 7
4. Click OK or Yes. • If the operating system is Windows 98/ Me, the computer turns off. • If the operating system is Windows NT, you receive a shutdown message and you must press the power button to turn off the computer. ACPI(Advanced Configuration and Power Interface) mode Your computer supports ACPI mode. If your operating system supports ACPI and you want to shut down the computer just by pressing the power button, then follow next steps to set the menu in Power Management Properties. Also see “Using Power Management Options” on page 77 and the documentation accompanying your operating system. To set the menu; 1. Select Power Management Properties in Control Panel. 2. Select the operations of power button. • Suspend mode: operates as Save to RAM mode. (See ”Suspend Mode” on page 78 for more information.) • Hibernate mode: operates as Save To Disk mode. Set Hibernate submenu to enabled to use Hibernate mode. (See ”Suspend Mode” on page 78 for more information.) If the system does not power off, then press and hold the power button for over 4 seconds. Restarting Your Computer You may need to restart (reboot) your computer when installing hardware or software or if the computer does not respond to your input. A warm (or soft) boot prompts you to save your files, turns off the computer, and then restarts the computer. A cold boot turns off the computer without saving your files. To perform a warm (or soft) boot: 1. Click Start on the taskbar. 2. Click Shut Down. 8 Using Your Computer for the First Time
分享到:
收藏