Downloaded from www.Manualslib.com manuals search engine
LIQUID CRYSTAL DISPLAY CAMCORDERVL-WD250EENGLISHOPERATION MANUALOPERATION MANUALVL-WD250E/hyou; 01/3/22/18:00VL-WD250EVL-WD250E�
Downloaded from www.Manualslib.com manuals search engine
Before using the camcorder, please read this operation manual carefully,especially page v.WARNINGTO PREVENT SHOCKHAZARD, DO NOT EXPOSETHIS APPLIANCE TO RAINOR MOISTURE.This equipment should be used withthe recommended AC adapter/batterycharger or battery pack.CAUTIONTo prevent electric shocks and firehazards, do NOT use any other powersource.CAUTIONTo prevent shock, do not open thecabinet. No user serviceable partsinside. Refer servicing to qualifieddealer or service centre.Important:Audio-visual material may consist ofcopyrighted works which must not berecorded without the authority of theowner of the copyright. Please refer torelevant laws in your country.Power supply:This unit can be operated byconnecting it to either the AC adapter/battery charger or battery pack. TheAC adapter/battery chargerincorporates the AUTO VOLTAGE (AC110–240 V, 50/60Hz) function.NOTEThe LCD panel of this camcorder is a very high technology product with more than61,000 thin-film transistors*, giving you fine picture detail. Occasionally, a pixel mayappear on the screen as a fixed point of blue, green, red, or black. Please note thatthis does not affect the performance of your camcorder.OPERATION MANUALENGLISH*Specifications are subject to change without notice.�
Downloaded from www.Manualslib.com manuals search engine
WARNING:This Camcorder must be supplied only with DC 7.4 volts from a BT-L221, BT-L441, BT-LS222 or BT-LS442A battery or the AC adapter/battery charger (UADP-0321TAZZ).CAUTION:As there are no user-serviceable parts inside the Camcorder or AC adapter/battery charger, do NOT remove their cabinets as touching parts inside couldresult in electric shock. Please refer servicing to a qualified dealer or aCamcorder service centre approved by Sharp.Information for Australia/New Zealand OnlyENGLISHNOTEThis Camcorder is a high technology product.The LCD Panel comprises 61,600 TFT Transistors. Due to the high density oftransistors, it is possible that some pixels may fail.Important:Copyright may exist in material you wish to record.Copying such material without permission of the relevant licensees or owners of thecopyright is prohibited by law.Sharp is not in a position to authorize the recording of copyright works and nothingin this operation manual should be read or implied as giving that authority.�
Downloaded from www.Manualslib.com manuals search engine
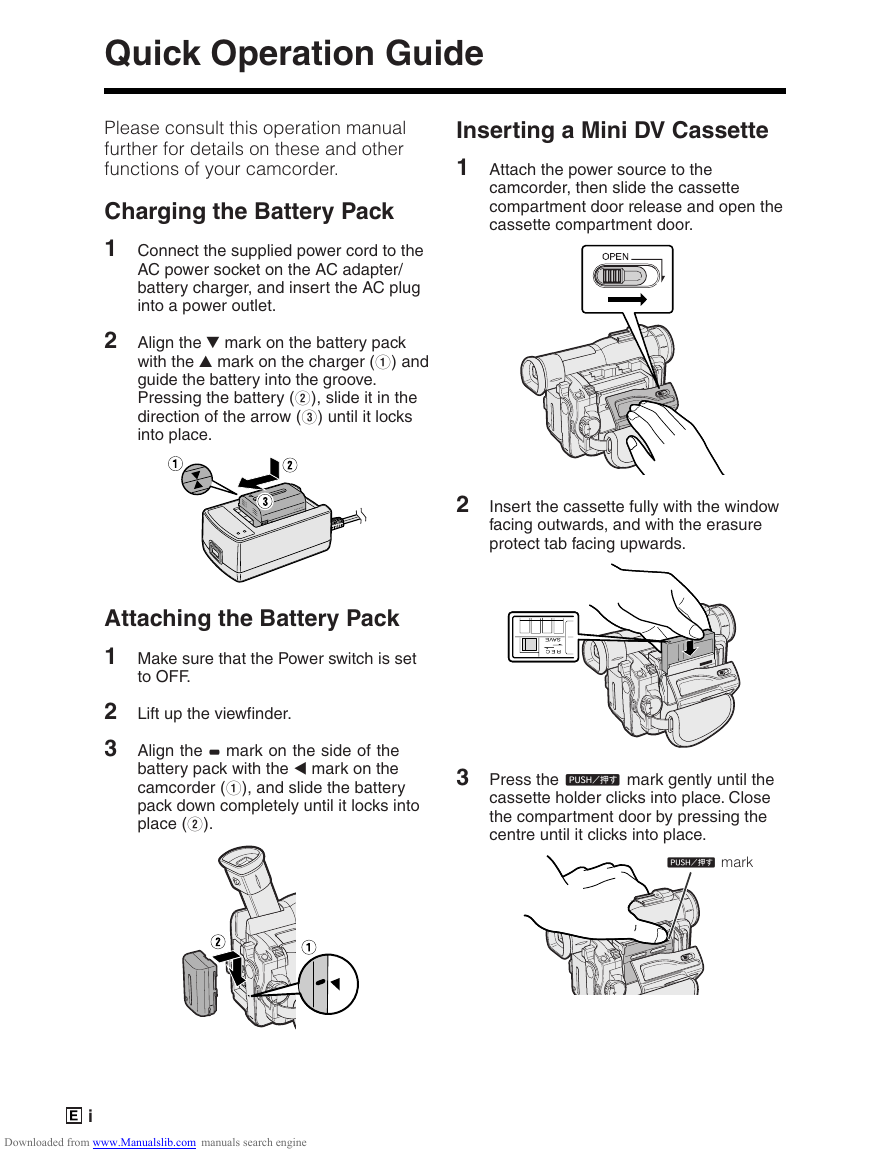
iQuick Operation GuidePlease consult this operation manualfurther for details on these and otherfunctions of your camcorder.SAVERECSAVERECCharging the Battery Pack1Connect the supplied power cord to theAC power socket on the AC adapter/battery charger, and insert the AC pluginto a power outlet.2Align the s mark on the battery packwith the a mark on the charger (1) andguide the battery into the groove.Pressing the battery (2), slide it in thedirection of the arrow (3) until it locksinto place.Inserting a Mini DV Cassette1Attach the power source to thecamcorder, then slide the cassettecompartment door release and open thecassette compartment door.2Insert the cassette fully with the windowfacing outwards, and with the erasureprotect tab facing upwards.3Press the W mark gently until thecassette holder clicks into place. Closethe compartment door by pressing thecentre until it clicks into place.Attaching the Battery Pack1Make sure that the Power switch is setto OFF.2Lift up the viewfinder.3Align the - mark on the side of thebattery pack with the q mark on thecamcorder (1), and slide the batterypack down completely until it locks intoplace (2).W mark�
Downloaded from www.Manualslib.com manuals search engine
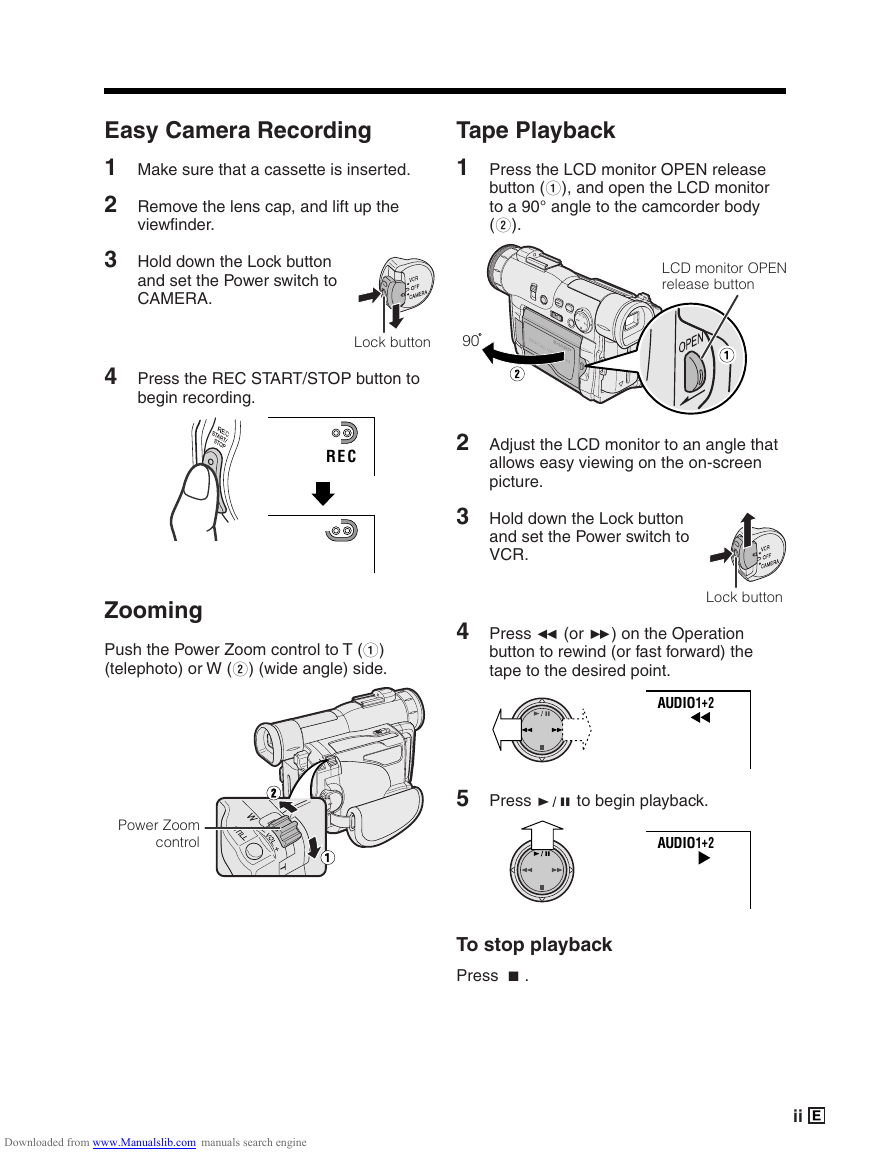
ii Easy Camera Recording1Make sure that a cassette is inserted.2Remove the lens cap, and lift up theviewfinder.3Hold down the Lock buttonand set the Power switch toCAMERA.4Press the REC START/STOP button tobegin recording.Lock buttonRECPower ZoomcontrolTape Playback1Press the LCD monitor OPEN releasebutton (1), and open the LCD monitorto a 90° angle to the camcorder body(2).2Adjust the LCD monitor to an angle thatallows easy viewing on the on-screenpicture. 903Hold down the Lock buttonand set the Power switch toVCR.4Press e (or r) on the Operationbutton to rewind (or fast forward) thetape to the desired point.5Press y to begin playback.AUDIO12+AUDIO12+To stop playbackPress d.ZoomingPush the Power Zoom control to T (1)(telephoto) or W (2) (wide angle) side.LCD monitor OPENrelease buttonLock button�
Downloaded from www.Manualslib.com manuals search engine
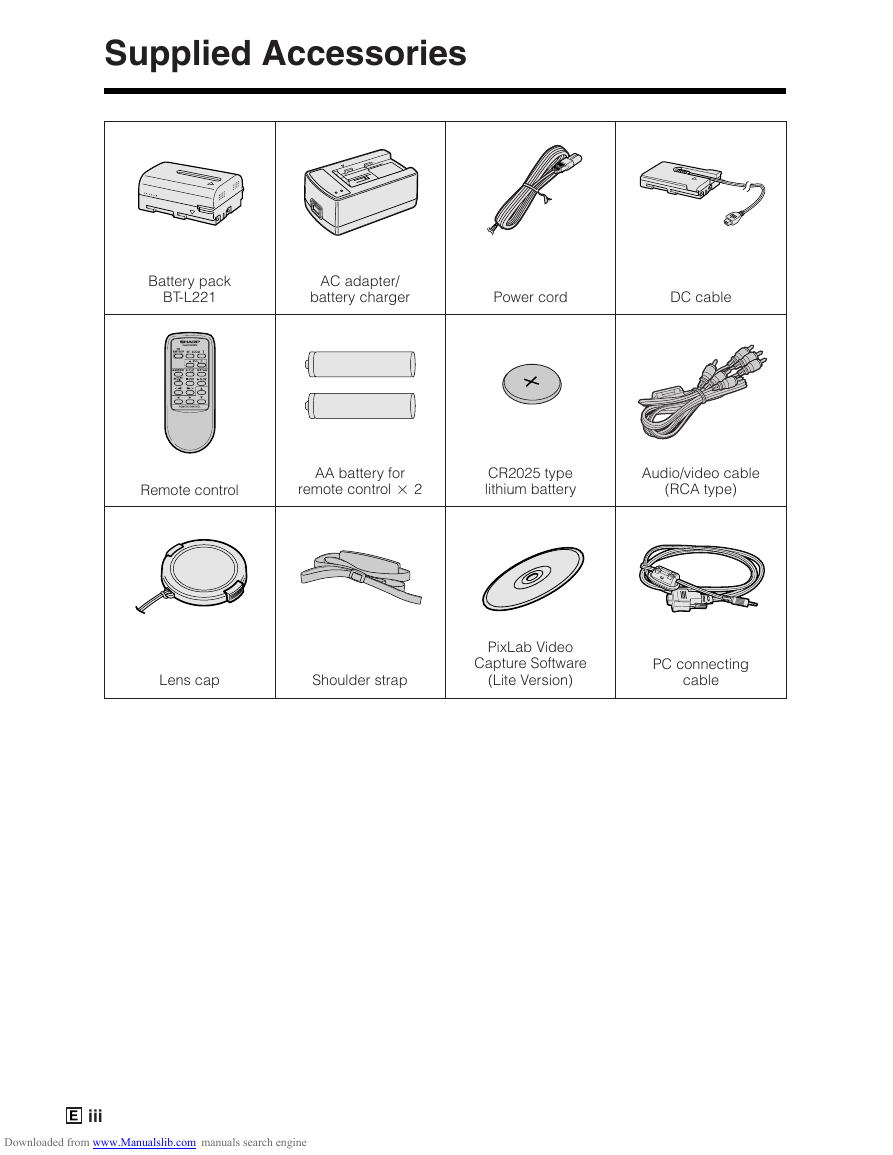
iiiSupplied AccessoriesBattery packBT-L221AC adapter/battery chargerPower cordDC cableRemote controlAA battery forremote control K 2CR2025 typelithium batteryAudio/video cable(RCA type)Lens capShoulder strapPixLab VideoCapture Software(Lite Version)PC connectingcable�
Downloaded from www.Manualslib.com manuals search engine
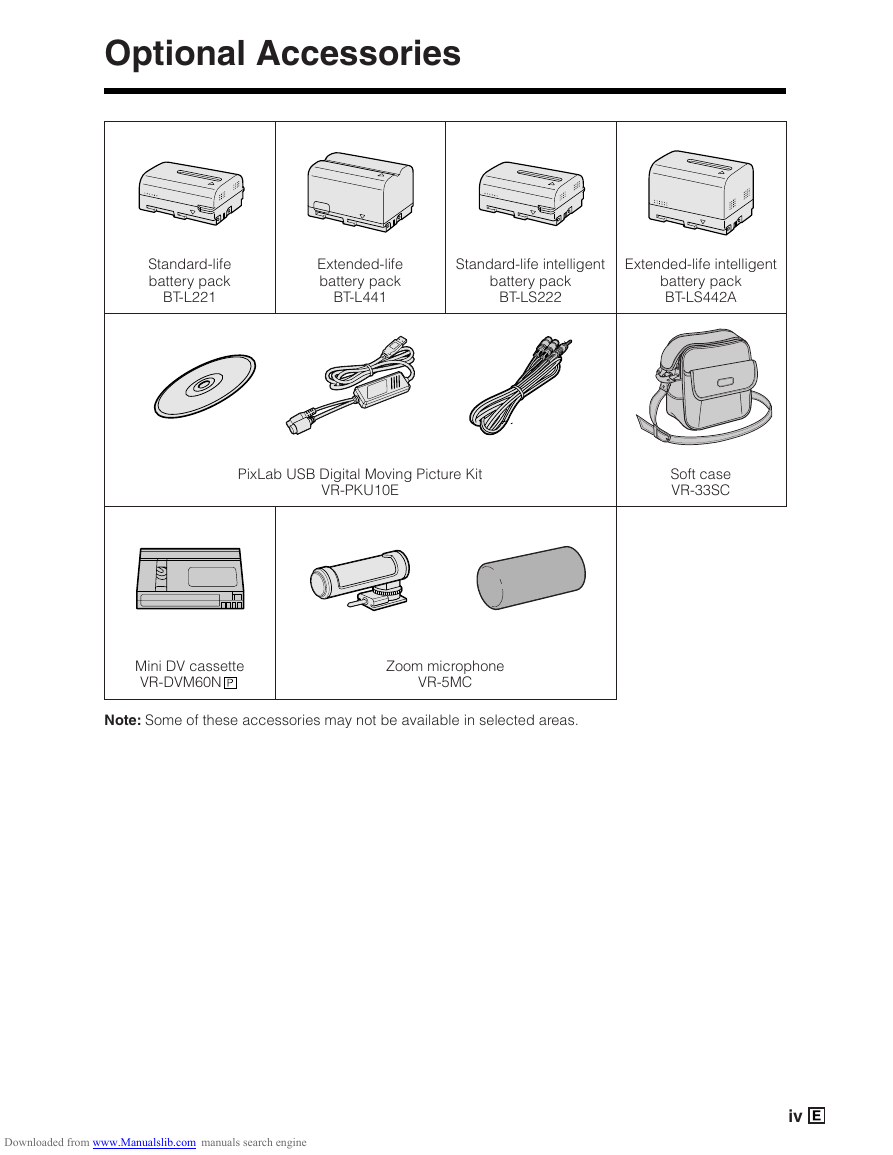
iv Optional AccessoriesStandard-lifebattery packBT-L221Extended-lifebattery packBT-L441Standard-life intelligentbattery packBT-LS222Extended-life intelligentbattery packBT-LS442AZoom microphoneVR-5MCNote: Some of these accessories may not be available in selected areas.PixLab USB Digital Moving Picture KitVR-PKU10ESoft caseVR-33SCMini DV cassetteVR-DVM60N�
Downloaded from www.Manualslib.com manuals search engine
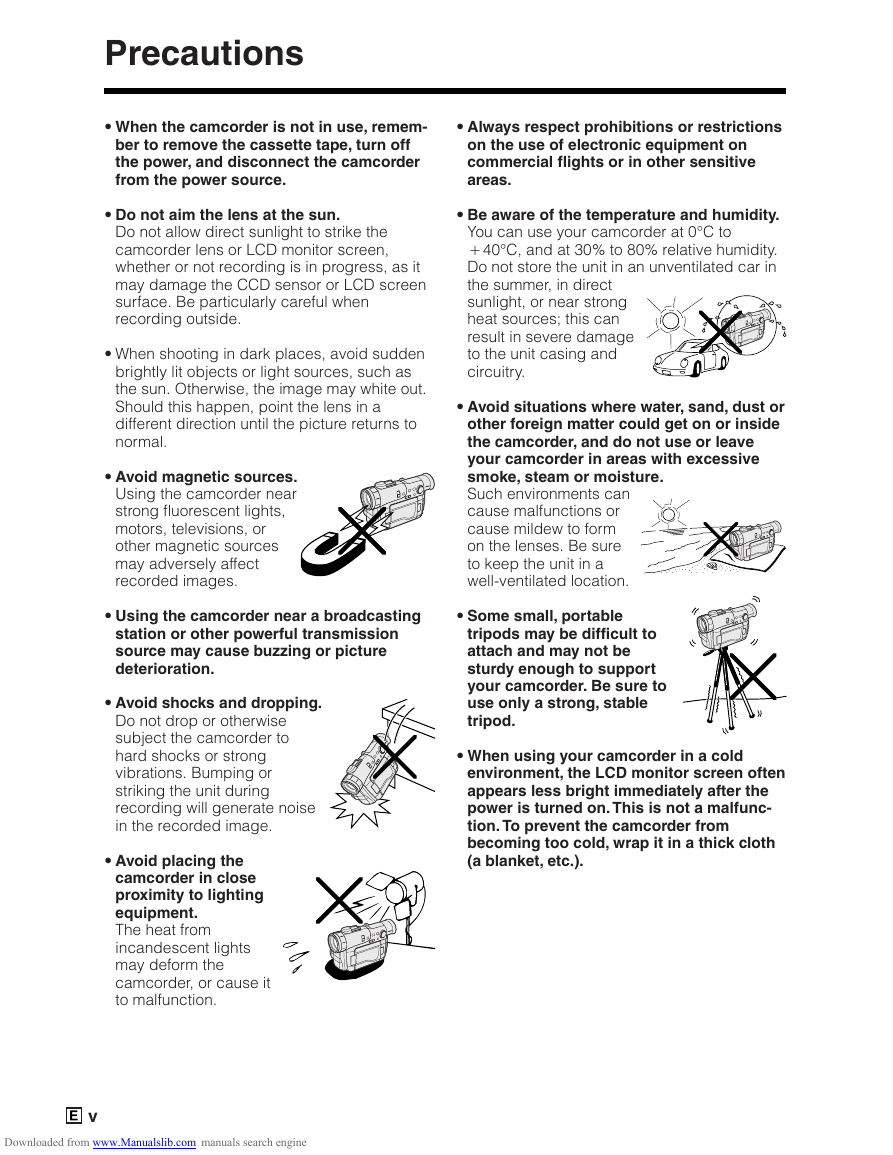
v•When the camcorder is not in use, remem-ber to remove the cassette tape, turn offthe power, and disconnect the camcorderfrom the power source.•Do not aim the lens at the sun.Do not allow direct sunlight to strike thecamcorder lens or LCD monitor screen,whether or not recording is in progress, as itmay damage the CCD sensor or LCD screensurface. Be particularly careful whenrecording outside.•When shooting in dark places, avoid suddenbrightly lit objects or light sources, such asthe sun. Otherwise, the image may white out.Should this happen, point the lens in adifferent direction until the picture returns tonormal.•Avoid magnetic sources.Using the camcorder nearstrong fluorescent lights,motors, televisions, orother magnetic sourcesmay adversely affectrecorded images.•Using the camcorder near a broadcastingstation or other powerful transmissionsource may cause buzzing or picturedeterioration.•Avoid shocks and dropping.Do not drop or otherwisesubject the camcorder tohard shocks or strongvibrations. Bumping orstriking the unit duringrecording will generate noisein the recorded image.•Avoid placing thecamcorder in closeproximity to lightingequipment.The heat fromincandescent lightsmay deform thecamcorder, or cause itto malfunction.•Always respect prohibitions or restrictionson the use of electronic equipment oncommercial flights or in other sensitiveareas.•Be aware of the temperature and humidity.You can use your camcorder at 0°C toL40°C, and at 30% to 80% relative humidity.Do not store the unit in an unventilated car inthe summer, in directsunlight, or near strongheat sources; this canresult in severe damageto the unit casing andcircuitry.•Avoid situations where water, sand, dust orother foreign matter could get on or insidethe camcorder, and do not use or leaveyour camcorder in areas with excessivesmoke, steam or moisture.Such environments cancause malfunctions orcause mildew to formon the lenses. Be sureto keep the unit in awell-ventilated location.•Some small, portabletripods may be difficult toattach and may not besturdy enough to supportyour camcorder. Be sure touse only a strong, stabletripod.•When using your camcorder in a coldenvironment, the LCD monitor screen oftenappears less bright immediately after thepower is turned on. This is not a malfunc-tion. To prevent the camcorder frombecoming too cold, wrap it in a thick cloth(a blanket, etc.).Precautions�



 2023年江西萍乡中考道德与法治真题及答案.doc
 2012年重庆南川中考生物真题及答案.doc
 2013年江西师范大学地理学综合及文艺理论基础考研真题.doc
 2020年四川甘孜小升初语文真题及答案I卷.doc
 2020年注册岩土工程师专业基础考试真题及答案.doc
 2023-2024学年福建省厦门市九年级上学期数学月考试题及答案.doc
 2021-2022学年辽宁省沈阳市大东区九年级上学期语文期末试题及答案.doc
 2022-2023学年北京东城区初三第一学期物理期末试卷及答案.doc
 2018上半年江西教师资格初中地理学科知识与教学能力真题及答案.doc
 2012年河北国家公务员申论考试真题及答案-省级.doc
 2020-2021学年江苏省扬州市江都区邵樊片九年级上学期数学第一次质量检测试题及答案.doc
 2022下半年黑龙江教师资格证中学综合素质真题及答案.doc