�
1. Camera Precautions
2. Technical Specifications
3. Computer System Requirement
4. Camera Description
5. Quick Start
. Battery Installation
. Power On/Off
. Taking Photos
. Mode Selection
. Different Modes
Content
6. World AC Electrical Power Frequency Reference Table
7. Installing the Software Precaution
8. Install the Twain Driver
9. Install Application Software
10. Download Images
11. Open Images
12. PC Camera
E
n
g
l
i
s
h
2
3
4
5
6
6
7
8
9
10~13
14
15
16~17
18
19
20
21
1
�
1.Camera Precautions
Notice the following guidelines when you use the camera:
?? To avoid a fire or electric shock, do not put this camera in damp or dusty
location.
?? Do not leave the camera in places subject to extremely high temperatures,
such as in direct sunlight. This may affect the camera’s case and its internal
components.
?? After the camera is activated, avoid bumping it against hard surface. This may
cause malfunction.
soft cloth.
?? Choose a flat surface free from vibration when the camera stands on it.
?? If the lens or the viewfinder is dirty, clean them with a lens brush or a piece of
?? Under the following situations, let the camera repaired by qualified personnel:
a) Its cable or plug is damaged or worn.
b) It has been dropped and/or the casing has been damaged.
c) Liquid has entered the camera.
2
�
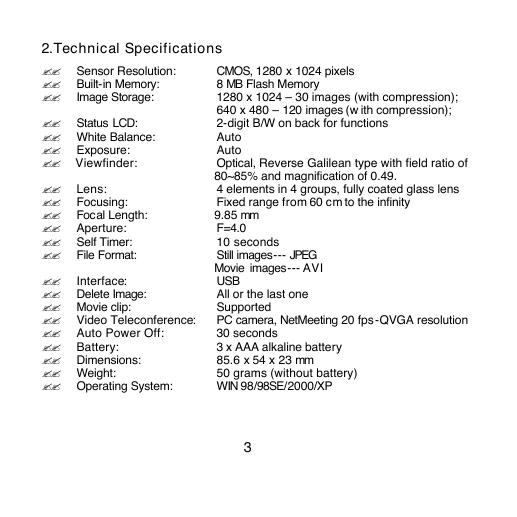
2.Technical Specifications
?? Sensor Resolution:
?? Built-in Memory:
?? Image Storage:
?? Status LCD:
?? White Balance:
?? Exposure:
?? Viewfinder:
CMOS, 1280 x 1024 pixels
8 MB Flash Memory
1280 x 1024 – 30 images (with compression);
640 x 480 – 120 images (w ith compression);
2-digit B/W on back for functions
Auto
Auto
Optical, Reverse Galilean type with field ratio of
4 elements in 4 groups, fully coated glass lens
Fixed range from 60 cm to the infinity
80~85% and magnification of 0.49.
?? Lens:
?? Focusing:
9.85 mm
?? Focal Length:
F=4.0
?? Aperture:
10 seconds
?? Self Timer:
?? File Format:
Still images--- JPEG
Movie images --- AVI
?? Interface:
?? Delete Image:
?? Movie clip:
?? Video Teleconference:
?? Auto Power Off:
?? Battery:
?? Dimensions:
?? Weight:
?? Operating System:
3
USB
All or the last one
Supported
PC camera, NetMeeting 20 fps-QVGA resolution
30 seconds
3 x AAA alkaline battery
85.6 x 54 x 23 mm
50 grams (without battery)
WIN 98/98SE/2000/XP
�
3.Computer System Requirement
?? Personal computer designed for Win98, 98SE, 2000, ME or XP
?? Minimum 200 MHz CPU
?? At least a 8x CD-ROM drive to install software
?? Available USB ports
?? Color monitor with a minimum resolution of 640 x 480 24-bit true color (1024 x
768 is recommended)
?? Minimum 48 MB RA M for WIN98; 64 MB for WIN 2000 and WIN XP
?? At least 120 MB of available hard disk space
?? Graphic Card: 2 MB memory or above
4
�
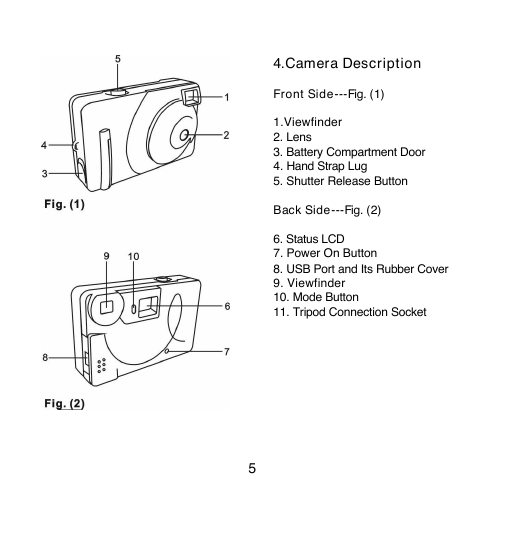
4.Camera Description
Front Side---Fig. (1)
1.Viewfinder
2. Lens
3. Battery Compartment Door
4. Hand Strap Lug
5. Shutter Release Button
Back Side---Fig. (2)
6. Status LCD
7. Power On Button
8. USB Port and Its Rubber Cover
9. Viewfinder
10. Mode Button
11. Tripod Connection Socket
5
�
6
5.Quick Start
Battery Installation
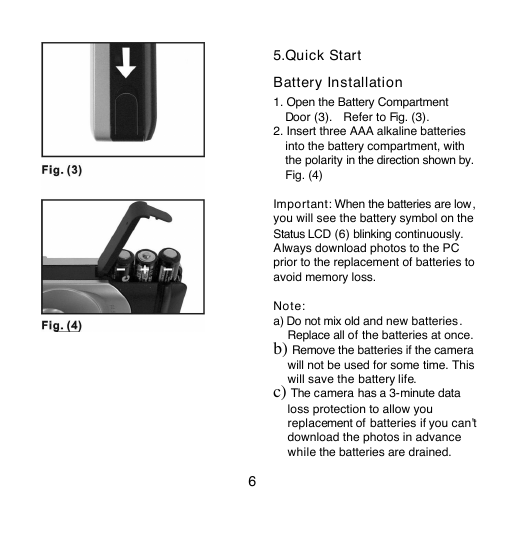
1. Open the Battery Compartment
Door (3). Refer to Fig. (3).
2. Insert three AAA alkaline batteries
into the battery compartment, with
the polarity in the direction shown by.
Fig. (4)
Important: When the batteries are low,
you will see the battery symbol on the
Status LCD (6) blinking continuously.
Always download photos to the PC
prior to the replacement of batteries to
avoid memory loss.
Note:
a) Do not mix old and new batteries.
Replace all of the batteries at once.
b) Remove the batteries if the camera
will not be used for some time. This
will save the battery life.
c) The camera has a 3-minute data
loss protection to allow you
replacement of batteries if you can’t
download the photos in advance
while the batteries are drained.
�
Power On/Off
Power On
Method 1
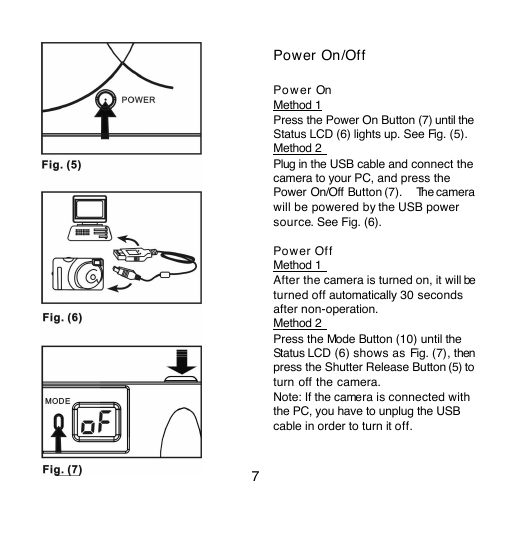
Press the Power On Button (7) until the
Status LCD (6) lights up. See Fig. (5).
Method 2
Plug in the USB cable and connect the
camera to your PC, and press the
Power On/Off Button (7). The camera
will be powered by the USB power
source. See Fig. (6).
Power Off
Method 1
After the camera is turned on, it will be
turned off automatically 30 seconds
after non-operation.
Method 2
Press the Mode Button (10) until the
Status LCD (6) shows as Fig. (7), then
press the Shutter Release Button (5) to
turn off the camera.
Note: If the camera is connected with
the PC, you have to unplug the USB
cable in order to turn it off.
7
�


 2023年江西萍乡中考道德与法治真题及答案.doc
 2012年重庆南川中考生物真题及答案.doc
 2013年江西师范大学地理学综合及文艺理论基础考研真题.doc
 2020年四川甘孜小升初语文真题及答案I卷.doc
 2020年注册岩土工程师专业基础考试真题及答案.doc
 2023-2024学年福建省厦门市九年级上学期数学月考试题及答案.doc
 2021-2022学年辽宁省沈阳市大东区九年级上学期语文期末试题及答案.doc
 2022-2023学年北京东城区初三第一学期物理期末试卷及答案.doc
 2018上半年江西教师资格初中地理学科知识与教学能力真题及答案.doc
 2012年河北国家公务员申论考试真题及答案-省级.doc
 2020-2021学年江苏省扬州市江都区邵樊片九年级上学期数学第一次质量检测试题及答案.doc
 2022下半年黑龙江教师资格证中学综合素质真题及答案.doc