FOREWORD
This wiring diagram manual has been prepared to provide
information on the electrical system of the 2002 PRIUS.
Applicable models: NHW11 Series
For service specifications and repair procedures of the above
models other than those listed in this manual, refer to the
following manuals;
Manual Name
2002 PRIUS Repair Manual
Volume 1
Volume 2
2002 TOYOTA New Car Features
Pub. No.
RM883U1
RM883U2
NCF214U
All information in this manual is based on the latest product
information at the time of publication. However, specifications
and procedures are subject to change without notice.
CAUTION
When repairing the hybrid vehicle (HV), always follow the direction given in
the repair manual listed above to prevent electrical shock, leakage or
explosion.
NOTICE
When handling supplemental restraint system components (removal,
installation or inspection, etc.), always follow the direction given in the repair
manuals listed above to prevent accidents and supplemental restraint
system malfunction.
2002 PRIUS (EWD464U)
�
A INTRODUCTION
This manual consists of the following 13 sections:
No.
Section
Description
INDEX
Index of the contents of this manual.
INTRODUCTION
Brief explanation of each section.
HOW TO USE THIS
MANUAL
Instructions on how to use this manual.
TROUBLE–
SHOOTING
Describes the basic inspection procedures for electrical circuits.
ABBREVIATIONS
Defines the abbreviations used in this manual.
GLOSSARY OF
TERMS AND
SYMBOLS
Defines the symbols and functions of major parts.
RELAY LOCATIONS Shows position of the Electronic Control Unit, Relays, Relay Block, etc.
This section is closely related to the system circuit.
A
A
B
C
D
E
F
G ELECTRICAL
WIRING ROUTING
Describes position of Parts Connectors, Splice points, Ground points, etc.
This section is closely related to the system circuit.
INDEX
Index of the system circuits.
H
I
J
SYSTEM CIRCUITS
Electrical circuits of each system are shown from the power supply through ground
points. Wiring connections and their positions are shown and classified by code
according to the connection method. (Refer to the section, ”How to use this manual”).
The ”System Outline” and ”Service Hints” useful for troubleshooting are also contained
in this section.
GROUND POINT
Shows ground positions of all parts described in this manual.
POWER SOURCE
(Current Flow Chart) Describes power distribution from the power supply to various electrical loads.
K
CONNECTOR LIST
Describes the form of the connectors for the parts appeared in this book.
This section is closely related to the system circuit.
L
M
PART NUMBER OF
CONNECTORS
OVERALL
ELECTRICAL
WIRING DIAGRAM
Indicates the part number of the connectors used in this manual.
Provides circuit diagrams showing the circuit connections.
2002 PRIUS (EWD464U)
�
HOW TO USE THIS MANUAL B
This manual provides information on the electrical circuits installed on vehicles by
dividing them into a circuit for each system.
The actual wiring of each system circuit is shown from the point where the power
source is received from the battery as far as each ground point. (All circuit
diagrams are shown with the switches in the OFF position.)
When troubleshooting any problem, first understand the operation of the circuit
where the problem was detected (see System Circuit section), the power source
supplying power to that circuit (see Power Source section), and the ground points
(see Ground Point section). See the System Outline to understand the circuit
operation.
When the circuit operation is understood, begin troubleshooting of the problem
circuit to isolate the cause. Use Relay Location and Electrical Wiring Routing
sections to find each part, junction block and wiring harness connectors, wiring
harness and wiring harness connectors, splice points, and ground points of each
system circuit. Internal wiring for each junction block is also provided for better
understanding of connection within a junction block.
Wiring related to each system is indicated in each system circuit by arrows
(from__, to__). When overall connections are required, see the Overall Electrical
Wiring Diagram at the end of this manual.
2002 PRIUS (EWD464U)
�
B HOW TO USE THIS MANUAL
[A]
STOP LIGHT
* The system shown here is an EXAMPLE ONLY. It is different to the actual
circuit shown in the SYSTEM CIRCUITS SECTION.
FROM POWER SOURCE SYSTEM (SEE PAGE 66)
15A
STOP
S 6
STOP LIGHT SW
2
1
R
–
W
2
1
W
–
G
[B]
[D]
TO ABS ECU
G–W
I 5
W
–
G
7
2
R
–
G
[I]
1
BV1
G–R
B18
[J]
R
–
G
4
3
B
–
W
]
H
R
T
H
G
I
L
.
H
R
T
H
G
I
L
P
O
T
S
B
M
O
C
R
A
E
R
[
7
R
R
–
G
4
3
B
–
W
]
H
L
T
H
G
I
L
.
B
M
O
C
R
A
E
R
[
H
R
T
H
G
I
L
P
O
T
S
6
R
[G]
C 7
REAR LIGHTS
WARNING LIGHT
[COMB. METER]
[H]
7
3C
@@@@
PPPP
����
@@@@
PPPP
����
@@@@
PPPP
����
@@@@
PPPP
����
@@@@
PPPP
����
@@@@
PPPP
����
@@@@
PPPP
����
3C
15
L
–
R
4
13
G
–
Y
4
7. 5A
GAUGE
4
IB
IB
3
[C]
R–L
)
/
G
W
(
R
)
/
D
S
(
L
14
IE1
[E]
)
/
D
S
(
L
[F]
L 4
LIGHT FAILURE SENSOR
11
H17
HIGH MOUNTED
STOP LIGHT
B
–
W
8
DELAY
CIRCUIT
[K]
(SHIELDED)
[L]
1
G
2
1
B
–
W
1
BV1
W–B
B18
B
–
W
BO
50
[N]
[M]
BL
2002 PRIUS (EWD464U)
�
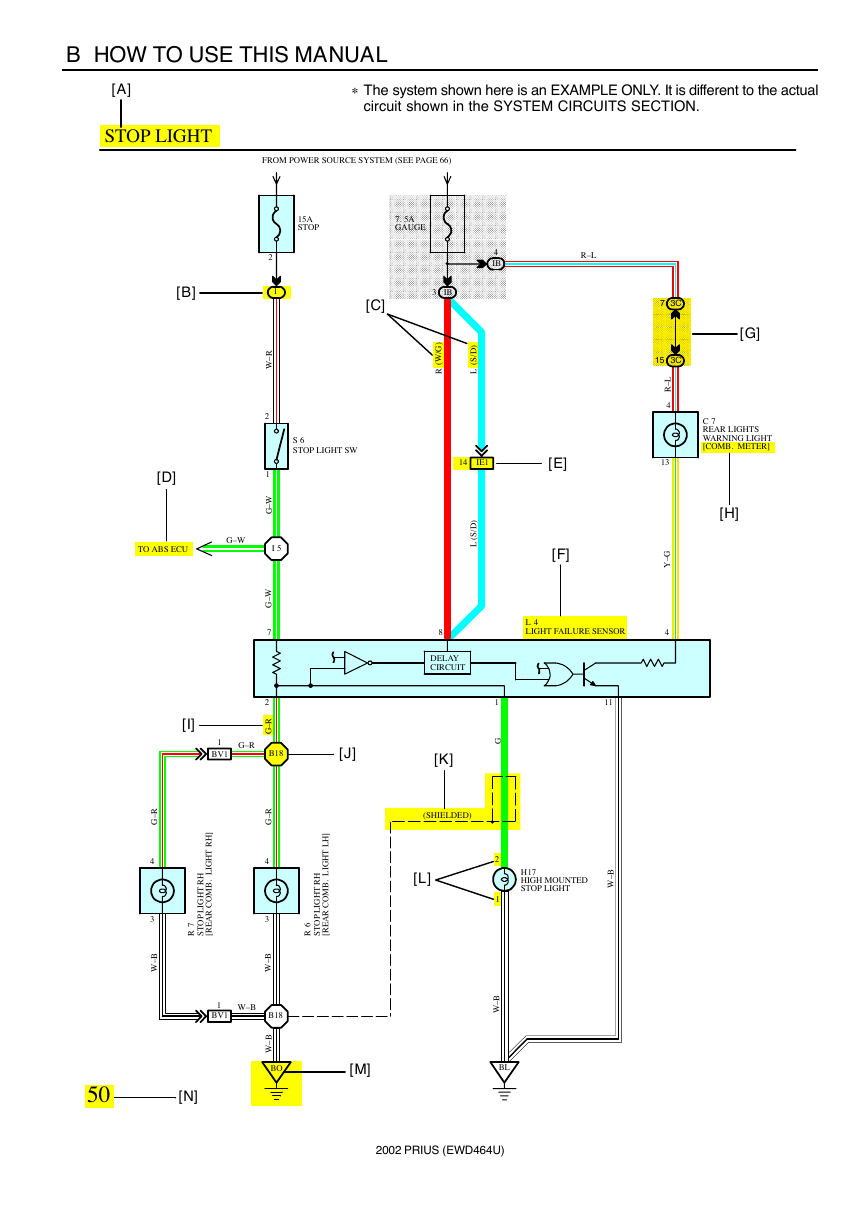
[A] : System Title
[B] : Indicates a Relay Block. No shading is used and
only the Relay Block No. is shown to distinguish it
from the J/B
Example: Indicates Relay Block No.1
[C] : ( ) is used to indicate different wiring and
connector, etc. when the vehicle model, engine
type, or specification is different.
[D] : Indicates related system.
[E] : Indicates the wiring harness and wiring harness
connector. The wiring harness with male terminal is
shown with arrows (
Outside numerals are pin numbers.
).
Female
Male ( )
The first letter of the code for each wiring harness
and wiring harness connector(s) indicates the
component’s location, e.g, ”E” for the Engine
Compartment, ”I” for the Instrument Panel and
Surrounding area, and ”B” for the Body and
Surrounding area.
When more than one code has the first and second
letters in common, followed by numbers (e.g, IH1,
IH2), this indicates the same type of wiring harness
and wiring harness connector.
: Represents a part (all parts are shown in sky blue).
The code is the same as the code used in parts
position.
[F]
[G] : Junction Block (The number in the circle is the J/B
No. and the connector code is shown beside it).
Junction Blocks are shaded to clearly separate
them from other parts.
Example:
3C indicates
that it is inside
Junction Block
No.3
[H] : When 2 parts both use one connector in common,
the parts connector name used in the wire routing
section is shown in square brackets [ ].
B
[I]
: Indicates the wiring color.
Wire colors are indicated by an alphabetical code.
B = Black W = White
V = Violet
L = Blue
R = Red
G = Green
P = Pink
Y = Yellow GR = Gray
O = Orange
The first letter indicates the basic wire color and the
second letter indicates the color of the stripe.
BR = Brown
SB = Sky Blue
LG = Light Green
Example: L – Y
L
(Blue)
Y
(Yellow)
[J]
: Indicates a wiring Splice Point (Codes are ”E” for the
Engine Room, ”I” for the Instrument Panel, and ”B”
for the Body).
The Location of splice Point I 5 is indicated by the
shaded section.
[K] : Indicates a shielded cable.
[L]
: Indicates the pin number of the connector.
The numbering system is different for female and
male connectors.
Example: Numbered in order
from upper left to
lower right
Numbered in order
from upper right to
lower left
[M] : Indicates a ground point.
Female
Male
The first letter of the code for each ground point(s)
indicates the component’s location, e.g, ”E” for the
Engine Compartment, ”I” for the Instrument Panel
and Surrounding area, and ”B” for the Body and
Surrounding area.
[N] : Page No.
2002 PRIUS (EWD464U)
�
B HOW TO USE THIS MANUAL
[O]
SYSTEM OUTLINE
Current is applied at all times through the STOP fuse to TERMINAL 2 of the stop light SW.
When the ignition SW is turned on, current flows from the GAUGE fuse to TERMINAL 8 of the light failure sensor, and also flows
through the rear lights warning light to TERMINAL 4 of the light failure sensor.
STOP LIGHT DISCONNECTION WARNING
When the ignition SW is turned on and the brake pedal is pressed (Stop light SW on), if the stop light circuit is open, the current
flowing from TERMINAL 7 of the light failure sensor to TERMINALS 1, 2 changes, so the light failure sensor detects the
disconnection and the warning circuit of the light failure sensor is activated.
As a result, the current flows from TERMINAL 4 of the light failure sensor to TERMINAL 11 to GROUND and turns the rear lights
warning light on. By pressing the brake pedal, the current flowing to TERMINAL 8 of the light failure sensor keeps the warning
circuit on and holds the warning light on until the ignition SW is turned off.
[P]
SERVICE HINTS
S6 STOP LIGHT SW
2–1 : Closed with the brake pedal depressed
L4 LIGHT FAILURE SENSOR
1, 2, 7–GROUND : Approx. 12 volts with the stop light SW on
4, 8–GROUND : Approx. 12 volts with the ignition SW at ON position
11–GROUND : Always continuity
[Q]
: PARTS LOCATION
Code
C7
H17
34
36
See Page
Code
L4
R6
36
37
See Page
Code
R7
S6
37
35
See Page
[R]
: RELAY BLOCKS
Code
1
18
See Page
Relay Blocks (Relay Block Location)
R/B No.1 (Instrument Panel Left)
[S]
@@@
PPP
���
@@@
PPP
���
@@@
PPP
���
Code
: JUNCTION BLOCK AND WIRE HARNESS CONNECTOR
IB
3C
20
22
See Page
Junction Block and Wire Harness (Connector Location)
Instrument Panel Wire and Instrument Panel J/B (Lower Finish Panel)
Instrument Panel Wire and J/B No.3 (Instrument Panel Left Side)
[T]
[U]
: CONNECTOR JOINING WIRE HARNESS AND WIRE HARNESS
See Page
Code
IE1
BV1
42
50
Joining Wire Harness and Wire Harness (Connector Location)
Floor Wire and Instrument Panel Wire (Left Kick Panel)
Luggage Room Wire and Floor Wire (Luggage Compartment Left)
: GROUND POINTS
See Page
Code
BL
BO
50
50
Ground Points Location
Under the Left Quarter Pillar
Back Panel Center
[V]
: SPLICE POINTS
Code
I5
44
See Page
Wire Harness with Splice Points
Cowl Wire
Code
B18
50
See Page
Wire Harness with Splice Points
Luggage Room Wire
2002 PRIUS (EWD464U)
�
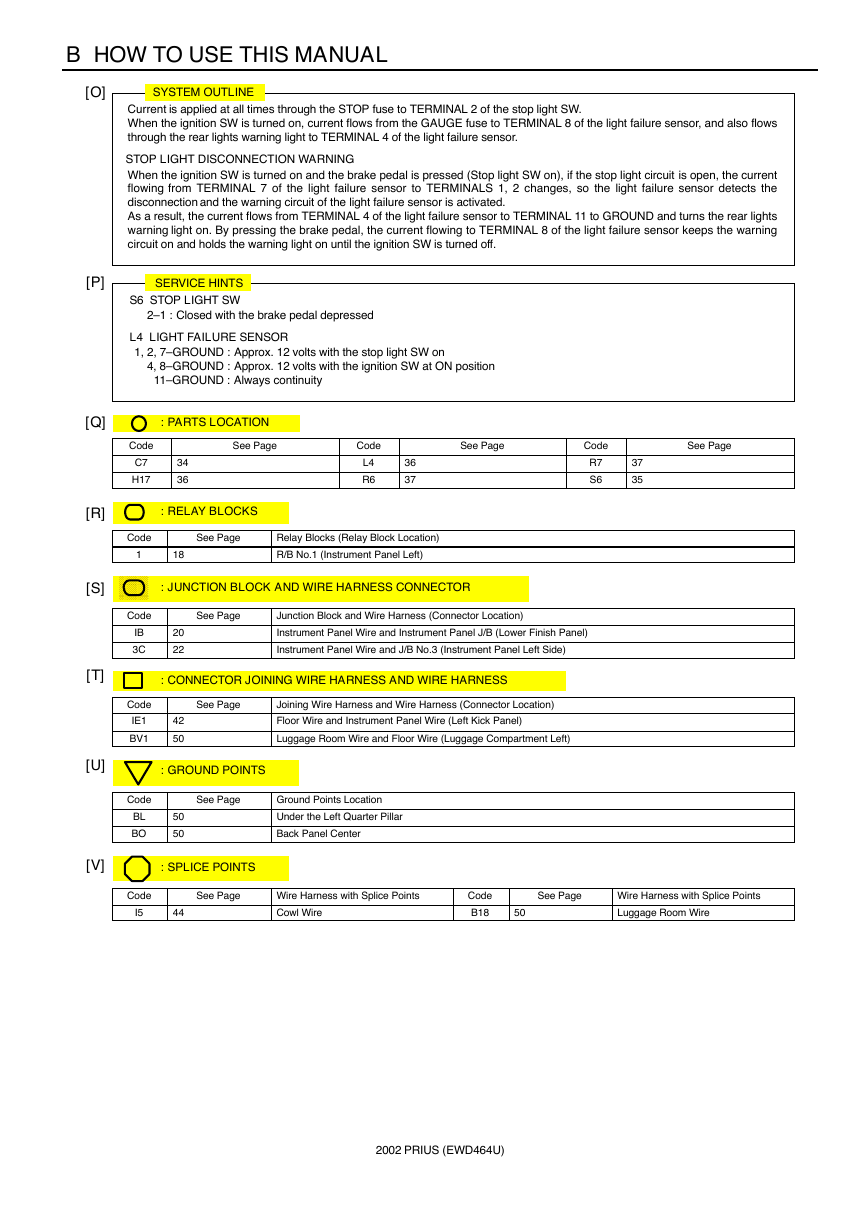
[O] : Explains the system outline.
[P] :
Indicates values or explains the function for reference during troubleshooting.
B
[Q] :
[R] :
[S] :
[T] :
Indicates the reference page showing the position on the vehicle of the parts in the system circuit.
Example : Part ”L4” (Light Failure Sensor) is on page 36 of the manual.
* The letter in the code is from the first letter of the part, and the number indicates its order in parts
starting with that letter.
Example : L 4 Á
Á
Parts is 4th in order
Light Failure Sensor
Indicates the reference page showing the position on the vehicle of Relay Block Connectors in the system circuit.
Example : Connector ”1” is described on page 18 of this manual and is installed on the left side of the instrument
panel.
Indicates the reference page showing the position on the vehicle of J/B and Wire Harness in the system circuit.
Example : Connector ”3C” connects the Instrument Panel Wire and J/B No.3. It is described on page 22 of this
manual, and is installed on the instrument panel left side.
Indicates the reference page describing the wiring harness and wiring harness connector (the female wiring
harness is shown first, followed by the male wiring harness).
Example : Connector ”IE1” connects the floor wire (female) and Instrument panel wire (male). It is described on
page 42 of this manual, and is installed on the left side kick panel.
[U] :
Indicates the reference page showing the position of the ground points on the vehicle.
Example : Ground point ”BO” is described on page 50 of this manual and is installed on the back panel center.
[V] :
Indicates the reference page showing the position of the splice points on the vehicle.
Example : Splice point ”I5” is on the Cowl Wire Harness and is described on page 44 of this manual.
2002 PRIUS (EWD464U)
�
B HOW TO USE THIS MANUAL
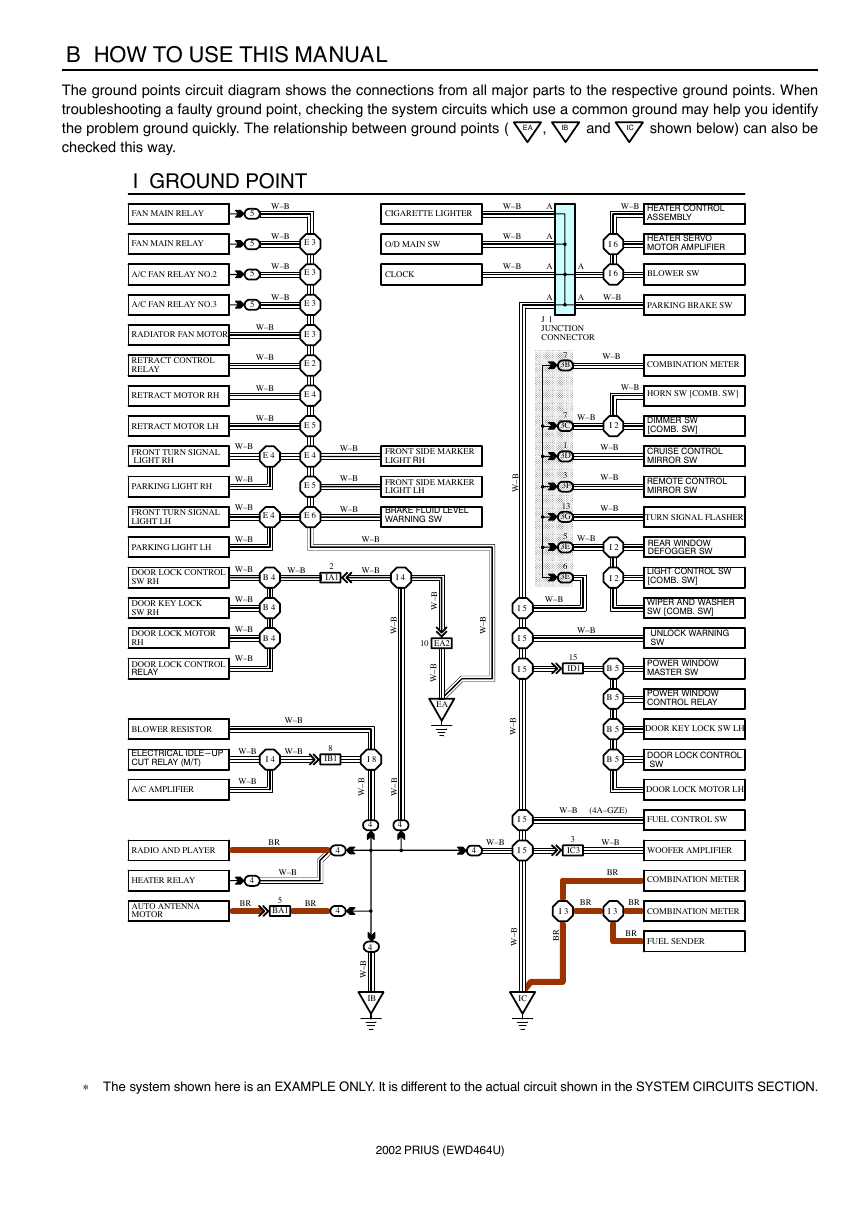
The ground points circuit diagram shows the connections from all major parts to the respective ground points. When
troubleshooting a faulty ground point, checking the system circuits which use a common ground may help you identify
shown below) can also be
the problem ground quickly. The relationship between ground points (
checked this way.
and
,
EA
IC
IB
I GROUND POINT
E 3
E 3
E 3
E 3
E 2
E 4
E 5
E 4
E 5
E 6
FAN MAIN RELAY
FAN MAIN RELAY
A/C FAN RELAY NO.2
A/C FAN RELAY NO.3
RADIATOR FAN MOTOR
RETRACT CONTROL
RELAY
RETRACT MOTOR RH
RETRACT MOTOR LH
FRONT TURN SIGNAL
LIGHT RH
PARKING LIGHT RH
FRONT TURN SIGNAL
LIGHT LH
PARKING LIGHT LH
DOOR LOCK CONTROL
SW RH
DOOR KEY LOCK
SW RH
DOOR LOCK MOTOR
RH
DOOR LOCK CONTROL
RELAY
W–B
W–B
W–B
W–B
5
5
5
5
W–B
W–B
W–B
W–B
E 4
E 4
B 4
B 4
B 4
W–B
W–B
W–B
W–B
W–B
W–B
W–B
W–B
CIGARETTE LIGHTER
O/D MAIN SW
CLOCK
W–B
W–B
W–B
A
A
A
A
A
A
W–B
HEATER CONTROL
ASSEMBLY
I 6
I 6
W–B
W–B
HEATER SERVO
MOTOR AMPLIFIER
BLOWER SW
PARKING BRAKE SW
COMBINATION METER
W–B
HORN SW [COMB. SW]
I 2
W–B
W–B
W–B
I 2
I 2
B 5
B 5
B 5
B 5
DIMMER SW
[COMB. SW]
CRUISE CONTROL
MIRROR SW
REMOTE CONTROL
MIRROR SW
TURN SIGNAL FLASHER
REAR WINDOW
DEFOGGER SW
LIGHT CONTROL SW
[COMB. SW]
WIPER AND WASHER
SW [COMB. SW]
UNLOCK WARNING
SW
POWER WINDOW
MASTER SW
POWER WINDOW
CONTROL RELAY
DOOR KEY LOCK SW LH
DOOR LOCK CONTROL
SW
DOOR LOCK MOTOR LH
W–B
7
3B
7
3C
J 1
JUNCTION
CONNECTOR
13
3G
1
3D
6
3E
3
3F
5
3E
W–B
W–B
W–B
15
ID1
B
–
W
I 5
I 5
I 5
B
–
W
W–B
W–B
W–B
FRONT SIDE MARKER
LIGHT RH
FRONT SIDE MARKER
LIGHT LH
BRAKE FLUID LEVEL
WARNING SW
B
–
W
W–B
W–B
W–B
2
IA1
I 4
B
–
W
B
–
W
10
EA2
B
–
W
EA
BLOWER RESISTOR
ELECTRICAL IDLE-UP
CUT RELAY (M/T)
A/C AMPLIFIER
I 4
W–B
W–B
W–B
W–B
8
IB1
I 8
B
–
W
B
–
W
4
4
RADIO AND PLAYER
HEATER RELAY
AUTO ANTENNA
MOTOR
BR
W–B
5
BA1
BR
4
4
4
BR
I 5
I 5
W–B
4
W–B (4A–GZE)
FUEL CONTROL SW
3
IC3
W–B
WOOFER AMPLIFIER
BR
I 3
BR
BR
COMBINATION METER
COMBINATION METER
FUEL SENDER
BR
I 3
R
B
4
B
–
W
IB
B
–
W
IC
The system shown here is an EXAMPLE ONLY. It is different to the actual circuit shown in the SYSTEM CIRCUITS SECTION.
2002 PRIUS (EWD464U)
*
�


 2023年江西萍乡中考道德与法治真题及答案.doc
 2012年重庆南川中考生物真题及答案.doc
 2013年江西师范大学地理学综合及文艺理论基础考研真题.doc
 2020年四川甘孜小升初语文真题及答案I卷.doc
 2020年注册岩土工程师专业基础考试真题及答案.doc
 2023-2024学年福建省厦门市九年级上学期数学月考试题及答案.doc
 2021-2022学年辽宁省沈阳市大东区九年级上学期语文期末试题及答案.doc
 2022-2023学年北京东城区初三第一学期物理期末试卷及答案.doc
 2018上半年江西教师资格初中地理学科知识与教学能力真题及答案.doc
 2012年河北国家公务员申论考试真题及答案-省级.doc
 2020-2021学年江苏省扬州市江都区邵樊片九年级上学期数学第一次质量检测试题及答案.doc
 2022下半年黑龙江教师资格证中学综合素质真题及答案.doc