0
�
Note: Please recharge the player before using it!
1.
Please use your player properly in case of explosion, fire, electric shock, etc.
1. Do not repair the player by yourself, or it will cause damage.
2. Do avoid getting the player wet or drop it in water.
3. Do not use the player while raining.
4. As Udisk, it will be writeprotected if you switch the 【HOLD 】button to “Lock”
5. Please backup important data onto your personal computer as repair or other
position.
causes may result in data loss.
When using your MP4 player, pay attention to your health, especially the power
of hearing.
1. Do not use the earphones while driving or riding a bicycle.
2. It may cause traffic accident if you turn up the volume of the earphones while
walking down the street.
high volume.
spray water on the player.
3. Do not turn up the volume too high, doctors warn against prolonged exposure to
4. Stop using the device or turn down the volume if you have ringing in your ears.
5. Always use the accessories provided by or approved by our company, also do not
1
�
Function features
The player supports MP3 and WMA music file formats. Including WMA files with
DRM (Digital Rights Management) function.
Support USB 2.0 capability, much faster than USB 1.1, to enable faster
communication with your PC.
The player can record outside voice and FM radio.
The player has repeat functions.
The player has Video Playback, Photo Viewer, Ebook, slide show function, etc.
The player can power off automatically after a preset time.
Accessories
Installation CD
USB Cable
Earphones
User Guide
2
�
Components and Button functions
1. 【 】: Menu button
2. 【 】:Play/Pause/Confirm button.
3. 【+】: Forward/Volume up
4. 【 】: Record/volume :
5. 【-】: Backward/Volume down
11. 【HOLD】: Lock/Unlock button (write protection) switch.
6. LCD display
7. Microphone/RESET button
8. USB port
9. Earphone jack
10. Hang strip hole
3
�
Charging Li –polymer battery safely
1.
2.
Connect the PC USB port and the MP3 USB port with the provided USB cable.
The power sign is shown dynamic when charging, once full charged, the power
sign will stop moving, power is full, please shut off the power. The charging time is
approximately 2 hours.
To stop recharging, disconnect the USB cable.
3.
Notes
CAUTION
1.
2.
Before your first time use, please recharge your player.
Your computer must be turned on while connected to your player for charging.
Do not overcharge your player, or it may shorten the battery’s life.
Danger of explosion if battery is incorrectly replaced. Replace only with the same
or equivalent type.
Do not disassemble, crush, shortcircuit or incinerate your battery as it may cause
fire, injury, burns, or other hazards.
Connect earphone to earphone jack.
Switch【HOLD】button to unlock position
Press and hold
Basic operations
Turn power on and play music
1.
2.
3.
default is “MUSIC” mode).
4.
5.
Short press
To return main menu: Press and hold
To Pause/Play: Short press
button to enter music menu.
button.
button.
button to turn power on and enter main menu interface (the
4
�
To change tracks: Short press【+/-】button.
To turn unit off: Press and hold
.
NOTE:
or hanging up in power on mode.
button.
Please reset your player by pressing the RESET hole while failing to power on
Volume Adjustment:
In music or MTV files playing, Voice, FM tuner mode, short press
button to pitch on
the volume rim, at this time press【+/-】button to turn down or turn up volume.
Menu Navigation
button: Enter main menu, submenu or return.
Skip button【+/-】: Shift menus.
Play/Pause button (
1.
2.
): Play, Pause, or confirm.
Press and hold
Press【+/-】buttons to select your desired option (e.g. MUSIC, FILE, VOICE,
PHOTO, FM, SETUP, VIDEO, EBOOK.).
button to enter main menu.
MUSIC
Press and hold
button to turn power on and enter main menu interface, then
select “Music” menu and enter by pressing
button.
Select the music files and press
button to playback it.
Music Playback Submenu
Short press
button to enter into submenu in music play mode and short
5
�
button and you can select: “Add to list" or “Delete”.
button to confirm.
Select File mode and short press
Short press【+/-】buttons to select the music files.
Press
Press
You can select one of the music files and press
Press
press 【+/-】buttons to select your desired mode (e.g. File, Classified, Play List,
Repeat, Equalizer, 3D, Slide Show, AB, Play Rate).
File
1.
2.
3.
4.
5.
6.
Classified
1.
2.
3.
NOTE:
1.
process.
2.
lists.
After classify, the “Classified” menu will appear “Genre”, “Artist”, “Album”, “Title”
Select Classified mode and short press
Short press【+/-】buttons to select “No” or “Yes”.
Press
button to confirm.
button to enter.
It will take longer time to build classify list. you can press
button to cancel the
button to return to previous list.
button to playback.
button to enter.
You also can use Music Classification AP to download, create or delete music
classification database on PC.
3.
ClassifyMusic_V1.5 will download music files into Root\MUSIC folder automatically.
AP Usage Step:
1.
Connect your player to the PC (Require the PC operating system: Windows 2000,
XP, Vista).
6
�
2.
3.
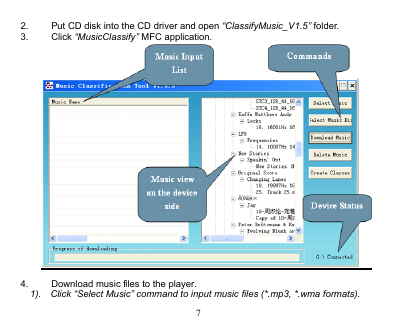
Put CD disk into the CD driver and open “ClassifyMusic_V1.5” folder.
Click “MusicClassify” MFC application.
4.
Download music files to the player.
1). Click “Select Music” command to input music files (*.mp3, *.wma formats).
7
�




 2023年江西萍乡中考道德与法治真题及答案.doc
 2012年重庆南川中考生物真题及答案.doc
 2013年江西师范大学地理学综合及文艺理论基础考研真题.doc
 2020年四川甘孜小升初语文真题及答案I卷.doc
 2020年注册岩土工程师专业基础考试真题及答案.doc
 2023-2024学年福建省厦门市九年级上学期数学月考试题及答案.doc
 2021-2022学年辽宁省沈阳市大东区九年级上学期语文期末试题及答案.doc
 2022-2023学年北京东城区初三第一学期物理期末试卷及答案.doc
 2018上半年江西教师资格初中地理学科知识与教学能力真题及答案.doc
 2012年河北国家公务员申论考试真题及答案-省级.doc
 2020-2021学年江苏省扬州市江都区邵樊片九年级上学期数学第一次质量检测试题及答案.doc
 2022下半年黑龙江教师资格证中学综合素质真题及答案.doc