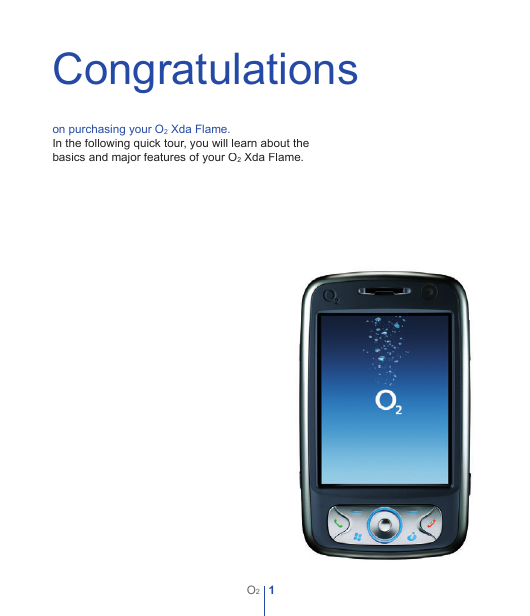
Congratulations
on purchasing your O2 Xda Flame.
In the following quick tour, you will learn about the
basics and major features of your O2 Xda Flame.
1O2
�
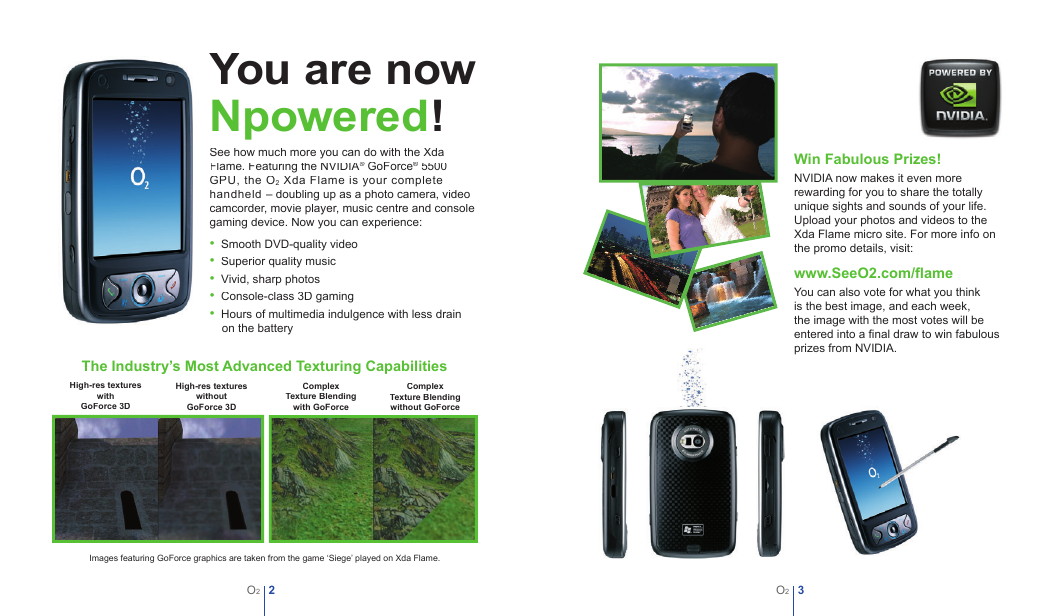
You are now
Npowered!
See how much more you can do with the Xda
Flame. Featuring the NVIDIA GoForce
Flame. Featuring the NVIDIA®
Flame. Featuring the NVIDIA®
® 5500
® 5500
® GoForce
®
®
GPU, the O2 Xda Flame is your complete
handheld – doubling up as a photo camera, video
camcorder, movie player, music centre and console
gaming device. Now you can experience:
• Smooth DVD-quality video
• Superior quality music
• Vivid, sharp photos
• Console-class 3D gaming
• Hours of multimedia indulgence with less drain
on the battery
Win Fabulous Prizes!
NVIDIA now makes it even more
rewarding for you to share the totally
unique sights and sounds of your life.
Upload your photos and videos to the
Xda Flame micro site. For more info on
the promo details, visit:
www.SeeO2.com/fl ame
You can also vote for what you think
is the best image, and each week,
the image with the most votes will be
entered into a fi nal draw to win fabulous
prizes from NVIDIA.
The Industry’s Most Advanced Texturing Capabilities
Complex
High-res textures
Complex
High-res textures
Texture Blending
with GoForce
Texture Blending
without GoForce
with
GoForce 3D
without
GoForce 3D
Images featuring GoForce graphics are taken from the game ‘Siege’ played on Xda Flame.
2O2
3O2
�
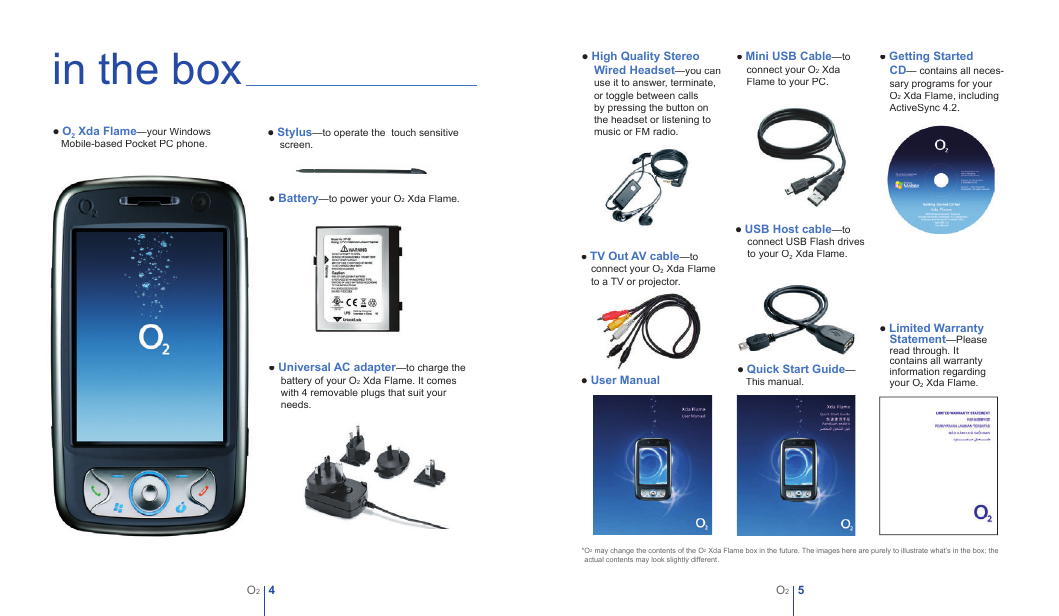
in the box
● O2 Xda Flame—your Windows
● Mobile-based Pocket PC phone.
● Stylus—to operate the touch sensitive
screen.
● Battery—to power your O2 Xda Flame.
● High Quality Stereo
Wired Headset—you can
use it to answer, terminate,
or toggle between calls
by pressing the button on
the headset or listening to
music or FM radio.
● Mini USB Cable—to
connect your O2 Xda
Flame to your PC.
● Getting Started
CD— contains all neces-
sary programs for your
O2 Xda Flame, including
ActiveSync 4.2.
● USB Host cable—to
connect USB Flash drives
to your O2 Xda Flame.
● TV Out AV cable—to
connect your O2 Xda Flame
to a TV or projector.
Universal AC adapter—to charge the
● Universal AC adapter—to charge the
Universal AC adapter
battery of your O2 Xda Flame. It comes
with 4 removable plugs that suit your
needs.
● User Manual
● Quick Start Guide—
● This manual.
● Limited Warranty
Statement—Please
read through. It
contains all warranty
information regarding
your O2 Xda Flame.
4O2
5O2
*O2 may change the contents of the O2 Xda Flame box in the future. The images here are purely to illustrate what’s in the box; the
*actual contents may look slightly different.
�
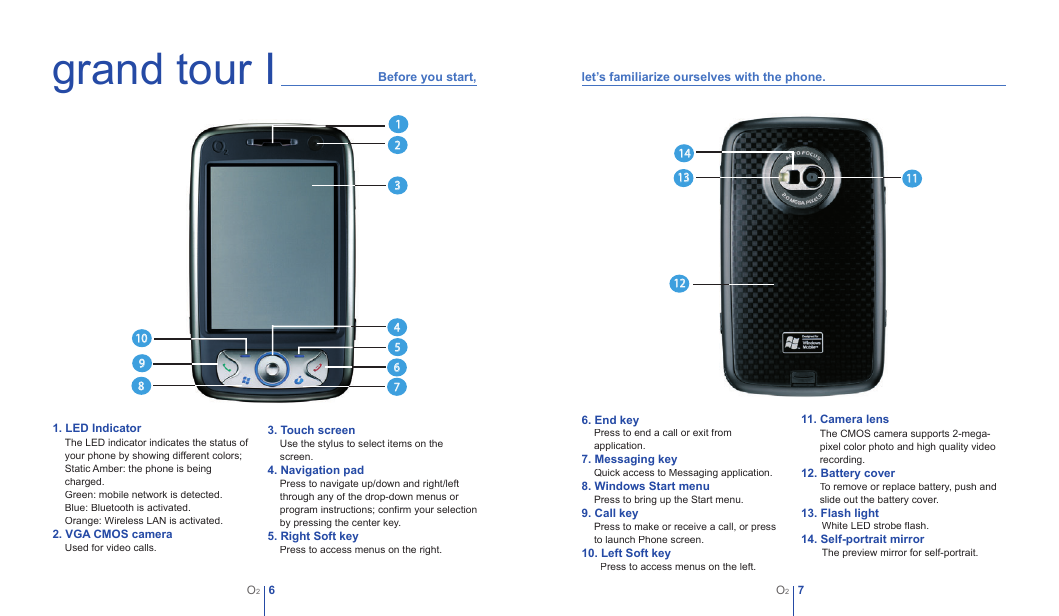
grand tour I
Before you start,
let’s familiarize ourselves with the phone.
1
2
3
4
5
6
7
10
9
8
11
14
13
12
1. LED Indicator
The LED indicator indicates the status of
your phone by showing different colors;
Static Amber: the phone is being
charged.
Green: mobile network is detected.
Blue: Bluetooth is activated.
Orange: Wireless LAN is activated.
2. VGA CMOS camera
Used for video calls.
3. Touch screen
Use the stylus to select items on the
screen.
4. Navigation pad
Press to navigate up/down and right/left
through any of the drop-down menus or
program instructions; confi rm your selection
by pressing the center key.
5. Right Soft key
Press to access menus on the right.
6. End key
Press to end a call or exit from
application.
7. Messaging key
Quick access to Messaging application.
8. Windows Start menu
Press to bring up the Start menu.
9. Call key
Press to make or receive a call, or press
to launch Phone screen.
10. Left Soft key
Press to access menus on the left.
11. Camera lens
The CMOS camera supports 2-mega-
pixel color photo and high quality video
recording.
12. Battery cover
To remove or replace battery, push and
slide out the battery cover.
13. Flash light
White LED strobe fl ash.
14. Self-portrait mirror
The preview mirror for self-portrait.
6O2
7O2
�
grand tour I
1
2
3
4
5
6
7
8
9
11
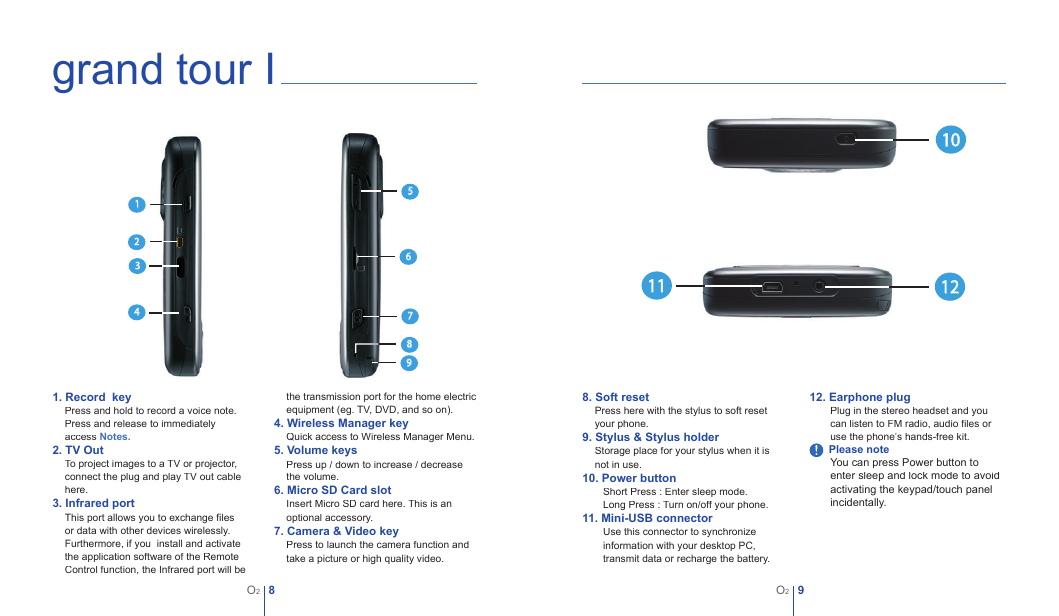
1. Record key
Press and hold to record a voice note.
Press and release to immediately
access Notes.
2. TV Out
To project images to a TV or projector,
connect the plug and play TV out cable
here.
3. Infrared port
This port allows you to exchange fi les
or data with other devices wirelessly.
Furthermore, if you install and activate
the application software of the Remote
Control function, the Infrared port will be
the transmission port for the home electric
equipment (eg. TV, DVD, and so on).
4. Wireless Manager key
Quick access to Wireless Manager Menu.
5. Volume keys
Press up / down to increase / decrease
the volume.
6. Micro SD Card slot
Insert Micro SD card here. This is an
optional accessory.
7. Camera & Video key
Press to launch the camera function and
take a picture or high quality video.
8. Soft reset
Press here with the stylus to soft reset
your phone.
9. Stylus & Stylus holder
Storage place for your stylus when it is
not in use.
10. Power button
Short Press : Enter sleep mode.
Long Press : Turn on/off your phone.
11. Mini-USB connector
Use this connector to synchronize
information with your desktop PC,
transmit data or recharge the battery.
8O2
9O2
10
12
12. Earphone plug
Plug in the stereo headset and you
can listen to FM radio, audio fi les or
use the phone’s hands-free kit.
Please note
You can press Power button to
enter sleep and lock mode to avoid
activating the keypad/touch panel
incidentally.
�
grand tour II
Status & icon area
Start menu
Start menu
Pop up
menu
Main
Display
Command bar
● Windows Start menu
● Tap to bring up the Start menu.
● Status & icon area
● Indicates your current mode and
● displays notifi cation icons.
● Main Display
● Depending on the current mode or
● program, this area shows the major
● features of the mode. On the Today ● ●
screen, this area contains shortcuts to
● certain programs.
● Command bar
● Depending on the mode, this area
● contains different features such as input
● panel and commands to create or edit
● fi les.
● Pop up menu
● This allows you to quickly access an
● item. Tap on the icon and tap again to
● perform an action. To cancel it, tap
● other places on the screen.
A standard Windows
Today Screen displays the following information:
Type
Icons
Connection
Description
GPRS in range
Building
connection to
GPRS
GPRS Sync
Strong signal in
GPRS
Wi-Fi network
in range
Wi-Fi on
Wi-Fi
connected
3G in range
3G Sync
Building
connection
to 3G
Sync
Sync error
Bluetooth
Data connected
Data
disconnected
No SIM card
Type
Icons
Battery
Calls
Volume
Message
Signal Strength
Description
Battery full
Battery alert
Battery charging
Battery empty
Call forward
Call on hold
Data call
Missed call
Voice call
Make a call
System volume
Phone volume
Ringer on
Ringer off
Vibrate on
Alarm
New SMS
/ MMS
message(s)
New voice
mail(s)
Push
Messages
New instant
message(s)
Strong signal
No signal
Roaming
O2
10
O2
11
�
get ready
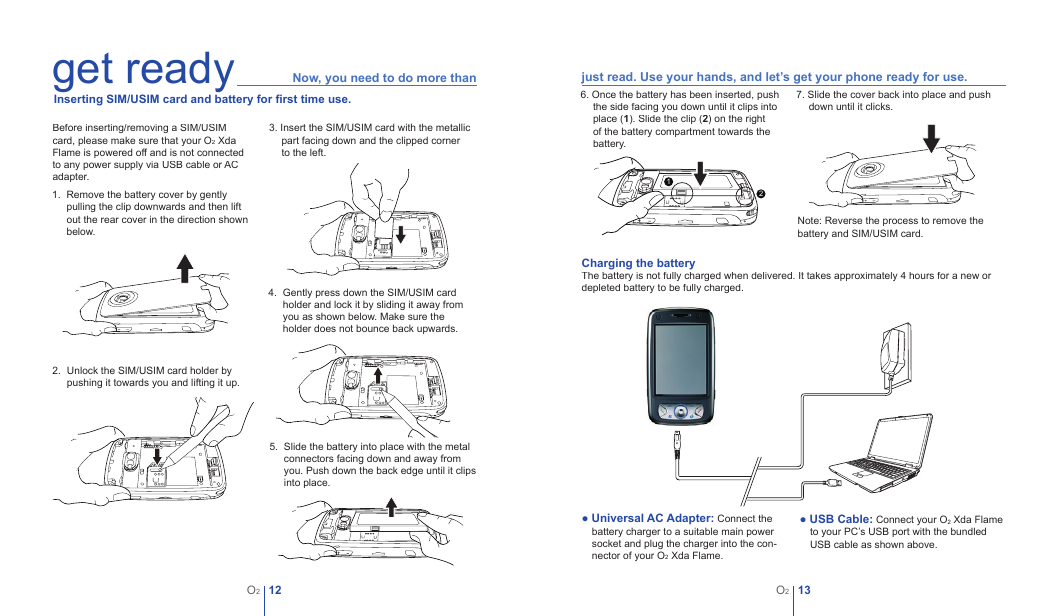
Inserting SIM/USIM card and battery for fi rst time use.
Now, you need to do more than
3. Insert the SIM/USIM card with the metallic
part facing down and the clipped corner
to the left.
Before inserting/removing a SIM/USIM
card, please make sure that your O2 Xda
Flame is powered off and is not connected
to any power supply via USB cable or AC
adapter.
1. Remove the battery cover by gently
pulling the clip downwards and then lift
out the rear cover in the direction shown
below.
2. Unlock the SIM/USIM card holder by
pushing it towards you and lifting it up.
4. Gently press down the SIM/USIM card
holder and lock it by sliding it away from
you as shown below. Make sure the
holder does not bounce back upwards.
5. Slide the battery into place with the metal
connectors facing down and away from
you. Push down the back edge until it clips
into place.
just read. Use your hands, and let’s get your phone ready for use.
6. Once the battery has been inserted, push
the side facing you down until it clips into
place (1). Slide the clip (2) on the right
of the battery compartment towards the
battery.
down until it clicks.
7. Slide the cover back into place and push
1
2
Note: Reverse the process to remove the
battery and SIM/USIM card.
Charging the battery
The battery is not fully charged when delivered. It takes approximately 4 hours for a new or
depleted battery to be fully charged.
O2
12
O2
13
● Universal AC Adapter: Connect the
battery charger to a suitable main power
socket and plug the charger into the con-
nector of your O2 Xda Flame.
● USB Cable: Connect your O2 Xda Flame
to your PC’s USB port with the bundled
USB cable as shown above.
�
power on
Power on your O2 Xda Flame by pressing
the power button on top of the phone.
A welcome screen will appear and prompt
you to perform the touch-screen
introduction and calibration test.
Please note
If you enter the wrong PIN three times, the
SIM/USIM card will be blocked
automatically. To unblock your SIM/USIM,
contact your service provider.
Enter your PIN number for your SIM/USIM
card if prompted. You can enable/disable
or change the PIN of the SIM/USIM card in
your O2 Xda Flame.
To copy SIM/USIM Contacts to your phone,
tap the required contact from Contacts and
tap Menu > Copy Contact.
synchronization
Your O2 Xda Flame is designed to
complement your PC as a PDA so that you
can synchronize information between a PC
or Microsoft® Exchange ServerTM
Exchange ServerTM
and your
Exchange Server
O2 Xda Flame.
● First, install ActiveSync 4.2 or later on ●
the PC.
● Choose a connection type between your
O2 Xda Flame and your PC: USB cable,
Bluetooth or infrared.
● Select the type of information (Contacts,
Calendar, Task, Note, Outlook Email) you
wish to synchronize.
● Start synchronizing information.
connectivity
Your O2 Xda Flame has powerful network-
ing functions that enable you to connect to
the Internet or Intranet by using a number
of different methods: GPRS / WCDMA,
Bluetooth, Wireless LAN, Network card, and
Terminal Server Client.
play & go
If your friends happen to see your cool new device, they might ask you: “What’s so special
about your phone?” Well, here are the answers.
● Surfi ng
You can access the Internet using Internet
Explorer. Moreover, the O2 Connect
program links you to the O2 homepage
(seeo2.com) and provides you with the
latest software updates.
● Video Calling
You can make video calls by tapping the
Video Call button.
● Basic calling
Press the call key to enter the Phone
Dialer screen, so your O2 Xda Flame can
make/receive calls.
● Messaging
Your O2 Xda Flame supports all major
types of messaging services: SMS, MMS,
Chat, Voicemail, E-mail and MSN Serv-
ices, enabling you to exploit the full range
of communication possibilities.
● Pictures & Videos
● The built-in digital camera allows you
● to snap photos and take video clips
● with accompanying audio. You can
● store them in your phone’s Album and
● send them via MMS or E-mail.
● O2 MediaPlus
● This user-friendly interface allows you
● to easily manage media fi les and
● gives easy access to different players
● such as FM Radio and Windows
● Media Player.
O2
14
O2
15
�



 2023年江西萍乡中考道德与法治真题及答案.doc
 2012年重庆南川中考生物真题及答案.doc
 2013年江西师范大学地理学综合及文艺理论基础考研真题.doc
 2020年四川甘孜小升初语文真题及答案I卷.doc
 2020年注册岩土工程师专业基础考试真题及答案.doc
 2023-2024学年福建省厦门市九年级上学期数学月考试题及答案.doc
 2021-2022学年辽宁省沈阳市大东区九年级上学期语文期末试题及答案.doc
 2022-2023学年北京东城区初三第一学期物理期末试卷及答案.doc
 2018上半年江西教师资格初中地理学科知识与教学能力真题及答案.doc
 2012年河北国家公务员申论考试真题及答案-省级.doc
 2020-2021学年江苏省扬州市江都区邵樊片九年级上学期数学第一次质量检测试题及答案.doc
 2022下半年黑龙江教师资格证中学综合素质真题及答案.doc