ENGLISH
Pending
The Components Guide
Preparations
Shooting
Playback/Erasing
Menus and Settings
Printing
Downloading Images
Basic
to a Computer
Camera User Guide
Please Read This First
This guide explains how to prepare the camera and use its basic features.
CDI-E274-010
xxxxxxx
© 2007 CANON INC.
PRINTED IN JAPAN
�
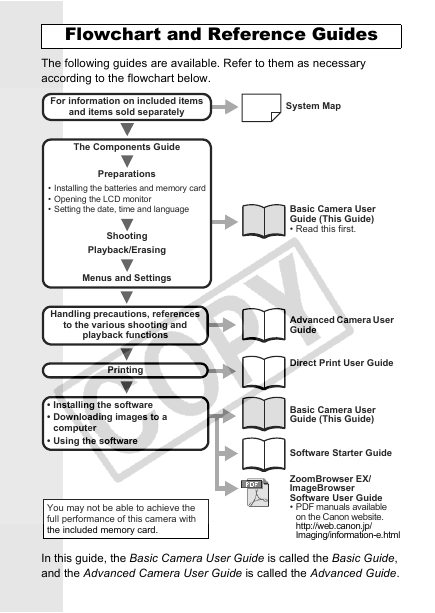
Flowchart and Reference Guides
The following guides are available. Refer to them as necessary
according to the flowchart below.
For information on included items
and items sold separately
System Map
The Components Guide
Preparations
• Installing the batteries and memory card
• Opening the LCD monitor
• Setting the date, time and language
Shooting
Playback/Erasing
Menus and Settings
Handling precautions, references
to the various shooting and
playback functions
Printing
• Installing the software
• Downloading images to a
computer
• Using the software
You may not be able to achieve the
full performance of this camera with
the included memory card.
Basic Camera User
Guide (This Guide)
• Read this first.
Advanced Camera User
Guide
Direct Print User Guide
Basic Camera User
Guide (This Guide)
Software Starter Guide
ZoomBrowser EX/
ImageBrowser
Software User Guide
• PDF manuals available
on the Canon website.
http://web.canon.jp/
Imaging/information-e.html
In this guide, the Basic Camera User Guide is called the Basic Guide,
and the Advanced Camera User Guide is called the Advanced Guide.
�
The Components Guide
Front View
Shooting:
Playback:
(Telephoto) /
(Magnify) /
(Wide Angle)
(Index)
bShutter Button (p. 9)
c (Continuous) /
(Self-Timer) Button
(Advanced Guide p. 46, Basic Guide p. 18)
aZoom Lever (p. 14, Advanced Guide pp. 104, 105)
dNeck Strap Mount
ePower/Mode Indicator (p. 4)
fSelf-Timer Lamp/Red-Eye Reduction Lamp/Tally Lamp
(p. 18, Advanced Guide pp. 42, 51)
gFlash (p. 14)
hMicrophone (Advanced Guide pp. 119, 121)
iAF-assist Beam (Advanced Guide pp. 29, 148)
jSpeaker
kMF (Manual Focus) Button (Advanced Guide p. 75)
l (Macro) Button (p. 16)
mLens
nRing Release Button (Advanced Guide p. 169)
T
h
e
C
o
m
p
o
n
e
n
t
s
G
u
d
e
i
1
�
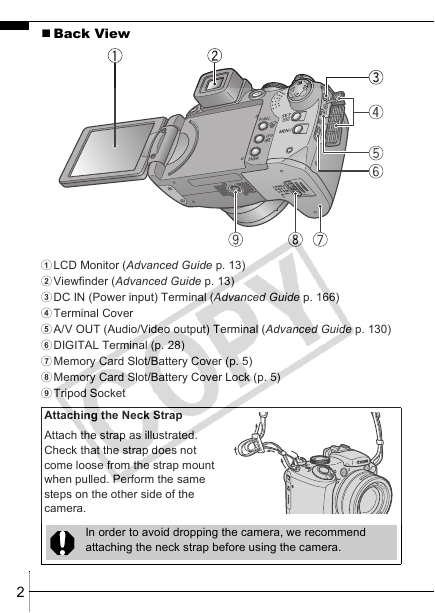
Back View
aLCD Monitor (Advanced Guide p. 13)
bViewfinder (Advanced Guide p. 13)
cDC IN (Power input) Terminal (Advanced Guide p. 166)
dTerminal Cover
eA/V OUT (Audio/Video output) Terminal (Advanced Guide p. 130)
fDIGITAL Terminal (p. 28)
gMemory Card Slot/Battery Cover (p. 5)
hMemory Card Slot/Battery Cover Lock (p. 5)
iTripod Socket
Attaching the Neck Strap
Attach the strap as illustrated.
Check that the strap does not
come loose from the strap mount
when pulled. Perform the same
steps on the other side of the
camera.
In order to avoid dropping the camera, we recommend
attaching the neck strap before using the camera.
2
�
Controls
(Print/Share) /
(Shortcut) (p. 23, Advanced Guide p. 98)
a
b (Flash) /
(Microphone) Button
(p. 14, Advanced Guide pp. 119, 121)
cDiopter Adjustment Dial (Advanced Guide p. 14)
dHot Shoe (Advanced Guide p. 172)
eMovie Button (p. 10, Advanced Guide p. 50)
fMode Dial (pp. 9, 11)
gOFF Button
hMode Lever (p. 7)
iOmni Selector
(Exposure) Button (Advanced Guide p. 83)
(Up) /
(Down) Button
(Left) Button
(Right) Button
jSET/
(AF Frame Selector) Button
(p. 21, Advanced Guide pp. 26, 69)
kMENU Button (p. 22, Advanced Guide p. 27)
lIndicator (p. 4)
mDISP. (Display) Button (Advanced Guide p. 13)
nISO/
oFUNC. (Function) /
(Jump) Button (Advanced Guide pp. 80, 107)
(Single Image Erase) Button
(p. 21, Advanced Guide p. 26)
T
h
e
C
o
m
p
o
n
e
n
t
s
G
u
d
e
i
3
�
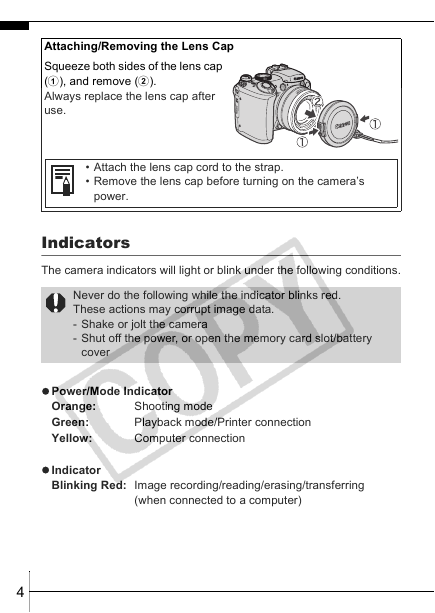
Attaching/Removing the Lens Cap
Squeeze both sides of the lens cap
(a), and remove (b).
Always replace the lens cap after
use.
• Attach the lens cap cord to the strap.
• Remove the lens cap before turning on the camera’s
power.
Indicators
The camera indicators will light or blink under the following conditions.
Never do the following while the indicator blinks red.
These actions may corrupt image data.
- Shake or jolt the camera
- Shut off the power, or open the memory card slot/battery
cover
Power/Mode Indicator
Orange:
Green:
Yellow:
Indicator
Shooting mode
Playback mode/Printer connection
Computer connection
Blinking Red: Image recording/reading/erasing/transferring
(when connected to a computer)
4
�
Preparations
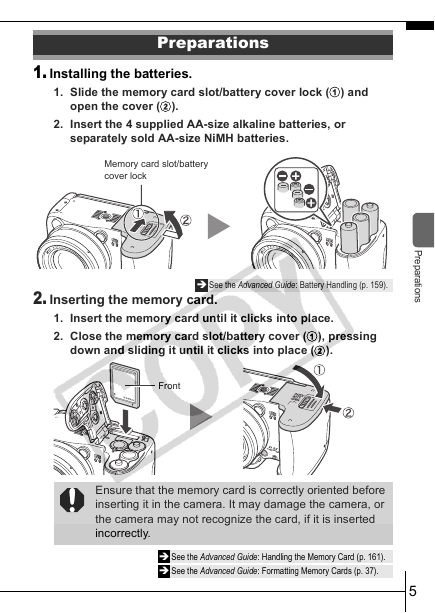
1. Installing the batteries.
1. Slide the memory card slot/battery cover lock (a) and
2.
open the cover (b).
Insert the 4 supplied AA-size alkaline batteries, or
separately sold AA-size NiMH batteries.
Memory card slot/battery
cover lock
See the Advanced Guide: Battery Handling (p. 159).
2. Inserting the memory card.
Insert the memory card until it clicks into place.
1.
2. Close the memory card slot/battery cover (a), pressing
down and sliding it until it clicks into place (b).
P
r
e
p
a
r
a
t
i
o
n
s
Front
Ensure that the memory card is correctly oriented before
inserting it in the camera. It may damage the camera, or
the camera may not recognize the card, if it is inserted
incorrectly.
See the Advanced Guide: Handling the Memory Card (p. 161).
See the Advanced Guide: Formatting Memory Cards (p. 37).
5
�
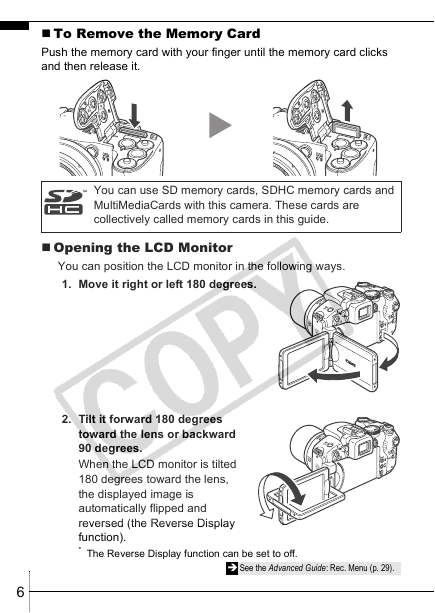
To Remove the Memory Card
Push the memory card with your finger until the memory card clicks
and then release it.
You can use SD memory cards, SDHC memory cards and
MultiMediaCards with this camera. These cards are
collectively called memory cards in this guide.
Opening the LCD Monitor
You can position the LCD monitor in the following ways.
1. Move it right or left 180 degrees.
2. Tilt it forward 180 degrees
toward the lens or backward
90 degrees.
When the LCD monitor is tilted
180 degrees toward the lens,
the displayed image is
automatically flipped and
reversed (the Reverse Display
function).
* The Reverse Display function can be set to off.
6
See the Advanced Guide: Rec. Menu (p. 29).
�




 2023年江西萍乡中考道德与法治真题及答案.doc
 2012年重庆南川中考生物真题及答案.doc
 2013年江西师范大学地理学综合及文艺理论基础考研真题.doc
 2020年四川甘孜小升初语文真题及答案I卷.doc
 2020年注册岩土工程师专业基础考试真题及答案.doc
 2023-2024学年福建省厦门市九年级上学期数学月考试题及答案.doc
 2021-2022学年辽宁省沈阳市大东区九年级上学期语文期末试题及答案.doc
 2022-2023学年北京东城区初三第一学期物理期末试卷及答案.doc
 2018上半年江西教师资格初中地理学科知识与教学能力真题及答案.doc
 2012年河北国家公务员申论考试真题及答案-省级.doc
 2020-2021学年江苏省扬州市江都区邵樊片九年级上学期数学第一次质量检测试题及答案.doc
 2022下半年黑龙江教师资格证中学综合素质真题及答案.doc