SL-855GEI-FDGR Chapter 3 BIOS Setup
Chapter 3 AWARD BIOS Setup
3-1 To Update BIOS
• System BIOS is incorporated into a Flash memory component. Flash
BIOS allows user to update BIOS without the need to replace an
EPROM component.
• The Update Utility should be loaded on a floppy diskette for updating,
saving, and verifying the system BIOS.
• Please follow the steps below for updating the system BIOS:
Step 1. Please visit Soltek website: www.soltek.com.tw, download the
.zip files of the latest BIOS and BIOS-update utility into your
hard disk for your mainboard.
Choose the Model you want to update here.
Click on “Go” to download the BIOS and BIOS-
update Utility to your hard disk first.
Step 2. Create a bootable diskette. Then copy the BIOS file and BIOS-
Update utility (an execution file) into the diskette.
Step 3. Insert the diskette into drive A, boot your system from the
diskette.
Step 4. Under “ A “ prompt, type on the DOS screen the BIOS-Update
Execution file name and the BIOS file name with a space
between them and then press to run BIOS update
program.
A:\> BIOS-update Execution file name BIOS file name.Extension
Should type a space here
Step 5. When the message “Flash ROM Update Completed - Pass.”
appears, please restart your system.You have now updated
the system BIOS successfully.
19
�
SL-855GEI-FDGR Chapter 3 BIOS Setup
3-2 BIOS SETUP with CMOS Setup Utility
1. Power on your system.
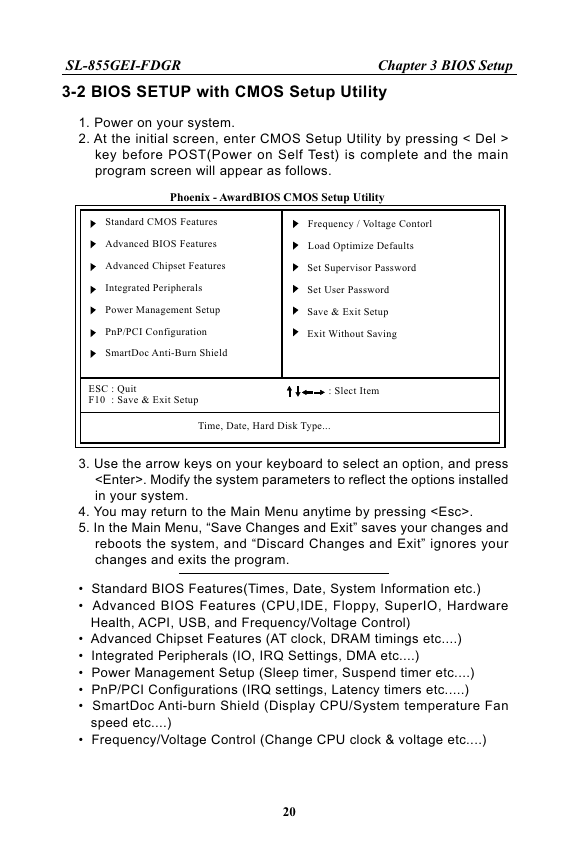
2. At the initial screen, enter CMOS Setup Utility by pressing < Del >
key before POST(Power on Self Test) is complete and the main
program screen will appear as follows.
Phoenix - AwardBIOS CMOS Setup Utility
Standard CMOS Features
Advanced BIOS Features
Frequency / Voltage Contorl
Load Optimize Defaults
Advanced Chipset Features
Set Supervisor Password
Integrated Peripherals
Power Management Setup
PnP/PCI Configuration
SmartDoc Anti-Burn Shield
Set User Password
Save & Exit Setup
Exit Without Saving
ESC : Quit
F10 : Save & Exit Setup
: Slect Item
Time, Date, Hard Disk Type...
3. Use the arrow keys on your keyboard to select an option, and press
. Modify the system parameters to reflect the options installed
in your system.
4. You may return to the Main Menu anytime by pressing .
5. In the Main Menu, “Save Changes and Exit” saves your changes and
reboots the system, and “Discard Changes and Exit” ignores your
changes and exits the program.
• Standard BIOS Features(Times, Date, System Information etc.)
• Advanced BIOS Features (CPU,IDE, Floppy, SuperIO, Hardware
Health, ACPI, USB, and Frequency/Voltage Control)
• Advanced Chipset Features (AT clock, DRAM timings etc....)
• Integrated Peripherals (IO, IRQ Settings, DMA etc....)
• Power Management Setup (Sleep timer, Suspend timer etc....)
• PnP/PCI Configurations (IRQ settings, Latency timers etc.....)
• SmartDoc Anti-burn Shield (Display CPU/System temperature Fan
speed etc....)
• Frequency/Voltage Control (Change CPU clock & voltage etc....)
20
�


 2023年江西萍乡中考道德与法治真题及答案.doc
 2012年重庆南川中考生物真题及答案.doc
 2013年江西师范大学地理学综合及文艺理论基础考研真题.doc
 2020年四川甘孜小升初语文真题及答案I卷.doc
 2020年注册岩土工程师专业基础考试真题及答案.doc
 2023-2024学年福建省厦门市九年级上学期数学月考试题及答案.doc
 2021-2022学年辽宁省沈阳市大东区九年级上学期语文期末试题及答案.doc
 2022-2023学年北京东城区初三第一学期物理期末试卷及答案.doc
 2018上半年江西教师资格初中地理学科知识与教学能力真题及答案.doc
 2012年河北国家公务员申论考试真题及答案-省级.doc
 2020-2021学年江苏省扬州市江都区邵樊片九年级上学期数学第一次质量检测试题及答案.doc
 2022下半年黑龙江教师资格证中学综合素质真题及答案.doc