PUB.DIE-263
DVD Camcorder
Instruction Manual
English
Introduction
Prerparations
Basic
Functions
Advanced
Functions
Editing
Functions
Playing Back
the Disc on an
External Device
External
Connections
Additional
Information
Digital Video Software
Instruction Manual
Manuel d’instruction
Manual de Instrucciones
PUB.DIM-717
Version 19
E
F
Es
This instruction manual explains how to install the software, connect the camcorder to a
computer, and download still images from a disc or a memory card to a computer.
Ce manuel d’instruction explique comment installer le logiciel, connecter le caméscope à
l’ordinateur et transférer des photos à partir d’un disque ou d’une carte mémoire sur un
ordinateur.
En este manual de instrucciones se explica cómo instalar el software, conectar la
videocámara a un ordenador, y descargar imágenes fijas de un disco o una tarjeta de
memoria a un ordenador.
PAL
Please read also the following instruction manual
(electronic version on PDF file).
• Digital Video Software
�
2
IntroductionImportant Usage Instructions
WARNING!
TO REDUCE THE RISK OF ELECTRIC SHOCK, DO NOT REMOVE COVER (OR
BACK). NO USER SERVICEABLE PARTS INSIDE. REFER SERVICING TO
QUALIFIED SERVICE PERSONNEL.
WARNING!
TO REDUCE THE RISK OF FIRE OR ELECTRIC SHOCK, DO NOT EXPOSE
THIS PRODUCT TO RAIN OR MOISTURE.
CAUTION:
TO REDUCE THE RISK OF ELECTRIC SHOCK AND TO REDUCE ANNOYING
INTERFERENCE, USE THE RECOMMENDED ACCESSORIES ONLY.
CAUTION:
DISCONNECT THE MAINS PLUG FROM THE SUPPLY SOCKET WHEN NOT IN USE.
The Mains plug is used as the disconnect device. The Mains plug shall remain readily
operable to disconnect the plug in case of an accident.
While using the compact power adapter, do not wrap it or cover it with a piece of cloth, and do
not place it in confined narrow spaces. Heat may build up, the plastic case may deform and it
could result in electric shock or fire.
CA-570 identification plate is located on the bottom.
Using any device other than the Compact Power Adapter CA-570 may damage the
camcorder.
This product has been classified under IEC60825-1:1993 and EN60825-1:1994.
CLASS 1 LASER PRODUCT
European Union (and EEA) only.
This symbol indicates that this product is not to be disposed of with your household
waste, according to the WEEE Directive (2002/96/EC) and your national law. This
product should be handed over to a designated collection point, e.g., on an
authorized one-for-one basis when you buy a new similar product or to an authorized
collection site for recycling waste electrical and electronic equipment (EEE).
Improper handling of this type of waste could have a possible negative impact on the
environment and human health due to potentially hazardous substances that are generally
associated with EEE. At the same time, your cooperation in the correct disposal of this product
will contribute to the effective usage of natural resources. For more information about where
you can drop off your waste equipment for recycling, please contact your local city office,
waste authority, approved WEEE scheme or your household waste disposal service. For more
information regarding return and recycling of WEEE products, please visit
www.canon-europe.com/environment.
(EEA: Norway, Iceland and Liechtenstein)
�
The Advantages of DVDs
RECORDING
With a DVD you just press the recording start/
stop button and the camcorder will find the empty
space on the disc (
28). Don’t waste time fast
forwarding and rewinding a tape to find from
where to start a new recording.
Never worry about mistakenly
recording over a precious memory!
PLAYING
Just select a scene from the index
screen!
Just insert your finalized* disc into a DVD player
and immediately find the scene you want to play
back from the index (
the disc from the beginning or to run a tape
forward and back to find the scene you want to see.
* Disc finalization is the processing of the free space (the unrecorded area) on the
31). No need to play
disc in order to make it playable on external DVD devices (
70).
SHARING YOUR VIDEOS
With the supplied software MyDVD for Canon**
you can easily create copies of your DVDs to
share with family and friends and transfer your
recordings to a computer for further editing.
** Windows 2000/Me/XP systems only. The
software is not compatible with Macintosh
systems.
For inquiries regarding Roxio MyDVD for Canon, please contact directly the
customer support centers of Sonic Solutions (
77).
3
3
�
4
An Introduction to DVDs
DVD discs are available in various types and two sizes (12 cm and 8 cm discs). This
camcorder uses the following types of commercially available 8 cm mini DVD discs:
DVD-R (
DVD-RW discs.
: one disc supplied with the camcorder), DVD-R DL* or
Choose the Disc Type...
DVD-R
Discs can be recorded
only once. Recordings
cannot be edited or
deleted.
DVD-R DL*
Discs can be recorded
only once. Recordings
cannot be edited or
deleted.
...and the Disc Specification
VIDEO Mode
(only)
Once finalized, DVD-R
discs recorded in VIDEO
mode can be played back
in most common DVD
players.
VIDEO Mode
(only)
DVD-R DL* discs can
only be played back with
DVD players capable of
reading dual-layered
DVD discs.
* DL - Dual Layered.
**VR - Video Recording.
DVD-RW
Discs can be initialized or
recordings can be
deleted to allow the discs
to be recorded over
numerous times.
VIDEO Mode
Once finalized, discs
recorded in VIDEO mode
can be played back in
most common DVD
players. However, in
VIDEO mode recordings
cannot be edited.
or
VR** Mode
You can easily edit the
recordings. However,
DVD-RW discs can only
be played back with DVD
players compatible with
VR** mode.
• Attempting to record or play with this camcorder DVD discs that were recorded,
initialized or finalized with other digital devices can result in lost data.
�
DVD-R
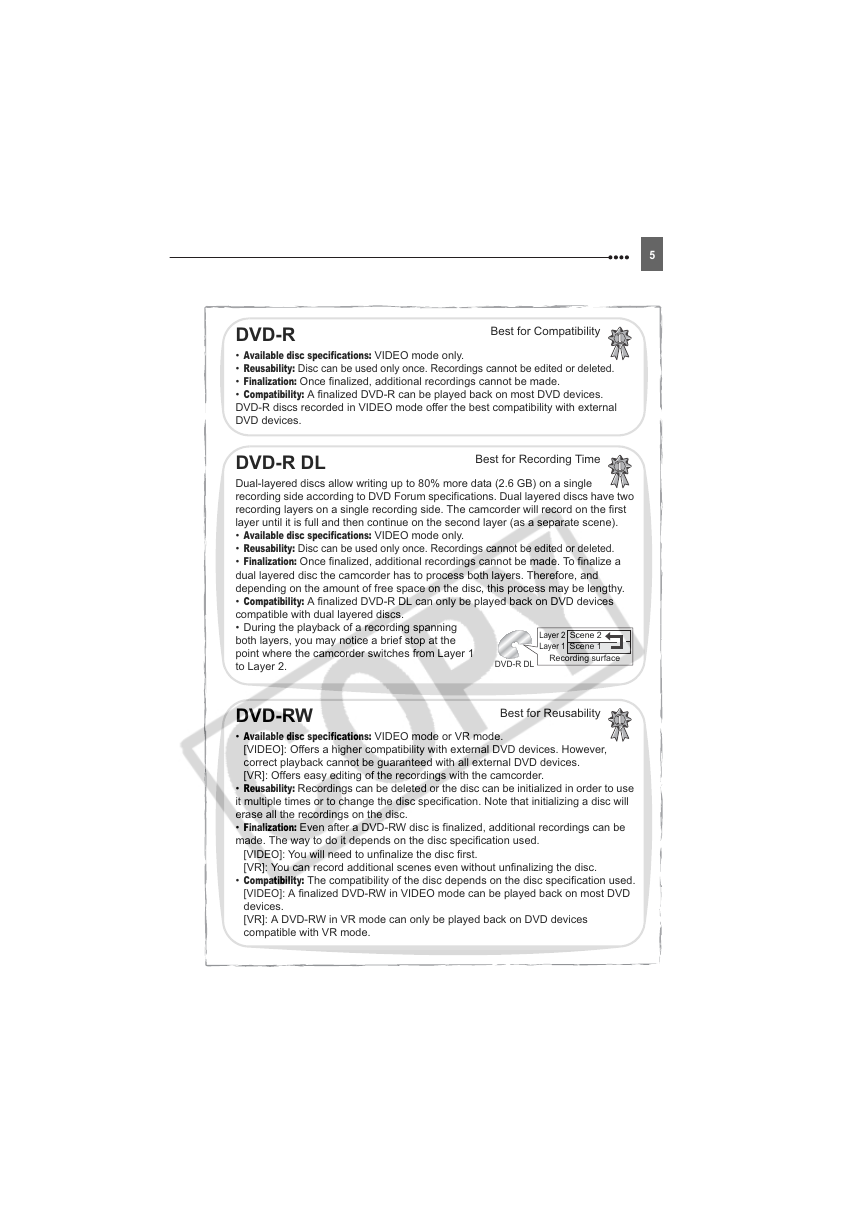
• Available disc specifications: VIDEO mode only.
• Reusability: Disc can be used only once. Recordings cannot be edited or deleted.
• Finalization: Once finalized, additional recordings cannot be made.
• Compatibility: A finalized DVD-R can be played back on most DVD devices.
DVD-R discs recorded in VIDEO mode offer the best compatibility with external
DVD devices.
Best for Compatibility
Best for Recording Time
DVD-R DL
Dual-layered discs allow writing up to 80% more data (2.6 GB) on a single
recording side according to DVD Forum specifications. Dual layered discs have two
recording layers on a single recording side. The camcorder will record on the first
layer until it is full and then continue on the second layer (as a separate scene).
• Available disc specifications: VIDEO mode only.
• Reusability: Disc can be used only once. Recordings cannot be edited or deleted.
• Finalization: Once finalized, additional recordings cannot be made. To finalize a
dual layered disc the camcorder has to process both layers. Therefore, and
depending on the amount of free space on the disc, this process may be lengthy.
• Compatibility: A finalized DVD-R DL can only be played back on DVD devices
compatible with dual layered discs.
• During the playback of a recording spanning
both layers, you may notice a brief stop at the
point where the camcorder switches from Layer 1
to Layer 2.
Recording surface
Layer 2
Layer 1
Scene 2
Scene 1
DVD-R DL
DVD-RW
• Available disc specifications: VIDEO mode or VR mode.
Best for Reusability
[VIDEO]: Offers a higher compatibility with external DVD devices. However,
correct playback cannot be guaranteed with all external DVD devices.
[VR]: Offers easy editing of the recordings with the camcorder.
• Reusability: Recordings can be deleted or the disc can be initialized in order to use
it multiple times or to change the disc specification. Note that initializing a disc will
erase all the recordings on the disc.
• Finalization: Even after a DVD-RW disc is finalized, additional recordings can be
made. The way to do it depends on the disc specification used.
[VIDEO]: You will need to unfinalize the disc first.
[VR]: You can record additional scenes even without unfinalizing the disc.
• Compatibility: The compatibility of the disc depends on the disc specification used.
[VIDEO]: A finalized DVD-RW in VIDEO mode can be played back on most DVD
devices.
[VR]: A DVD-RW in VR mode can only be played back on DVD devices
compatible with VR mode.
5
5
�
6
Differences in Available
Features Depending on the Disc
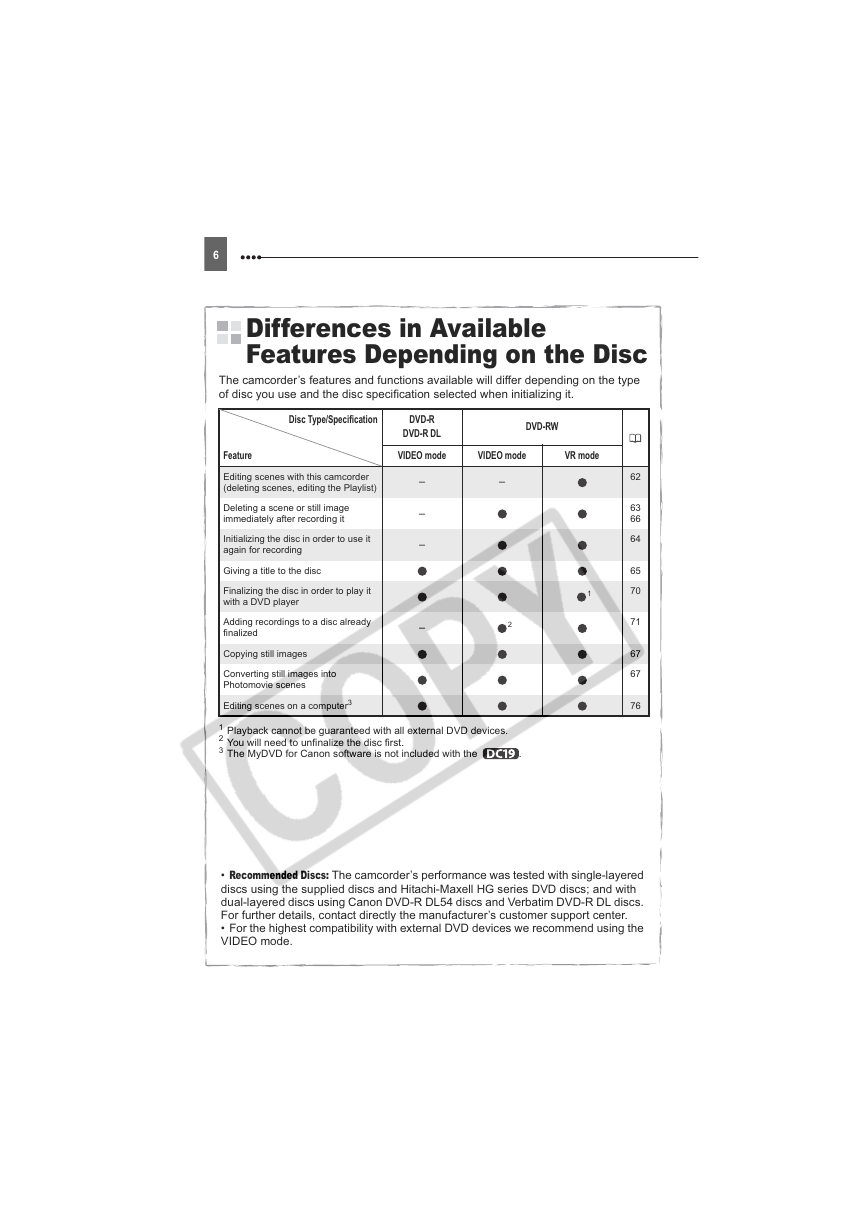
The camcorder’s features and functions available will differ depending on the type
of disc you use and the disc specification selected when initializing it.
Disc Type/Specification
Feature
Editing scenes with this camcorder
(deleting scenes, editing the Playlist)
Deleting a scene or still image
immediately after recording it
Initializing the disc in order to use it
again for recording
Giving a title to the disc
Finalizing the disc in order to play it
with a DVD player
Adding recordings to a disc already
finalized
Copying still images
Converting still images into
Photomovie scenes
Editing scenes on a computer3
DVD-R
DVD-R DL
VIDEO mode
DVD-RW
VIDEO mode
VR mode
–
–
–
–
–
2
1
62
63
66
64
65
70
71
67
67
76
1 Playback cannot be guaranteed with all external DVD devices.
2 You will need to unfinalize the disc first.
3 The MyDVD for Canon software is not included with the
.
• Recommended Discs: The camcorder’s performance was tested with single-layered
discs using the supplied discs and Hitachi-Maxell HG series DVD discs; and with
dual-layered discs using Canon DVD-R DL54 discs and Verbatim DVD-R DL discs.
For further details, contact directly the manufacturer’s customer support center.
• For the highest compatibility with external DVD devices we recommend using the
VIDEO mode.
�
7
E
I
n
t
r
o
d
u
c
t
i
o
n
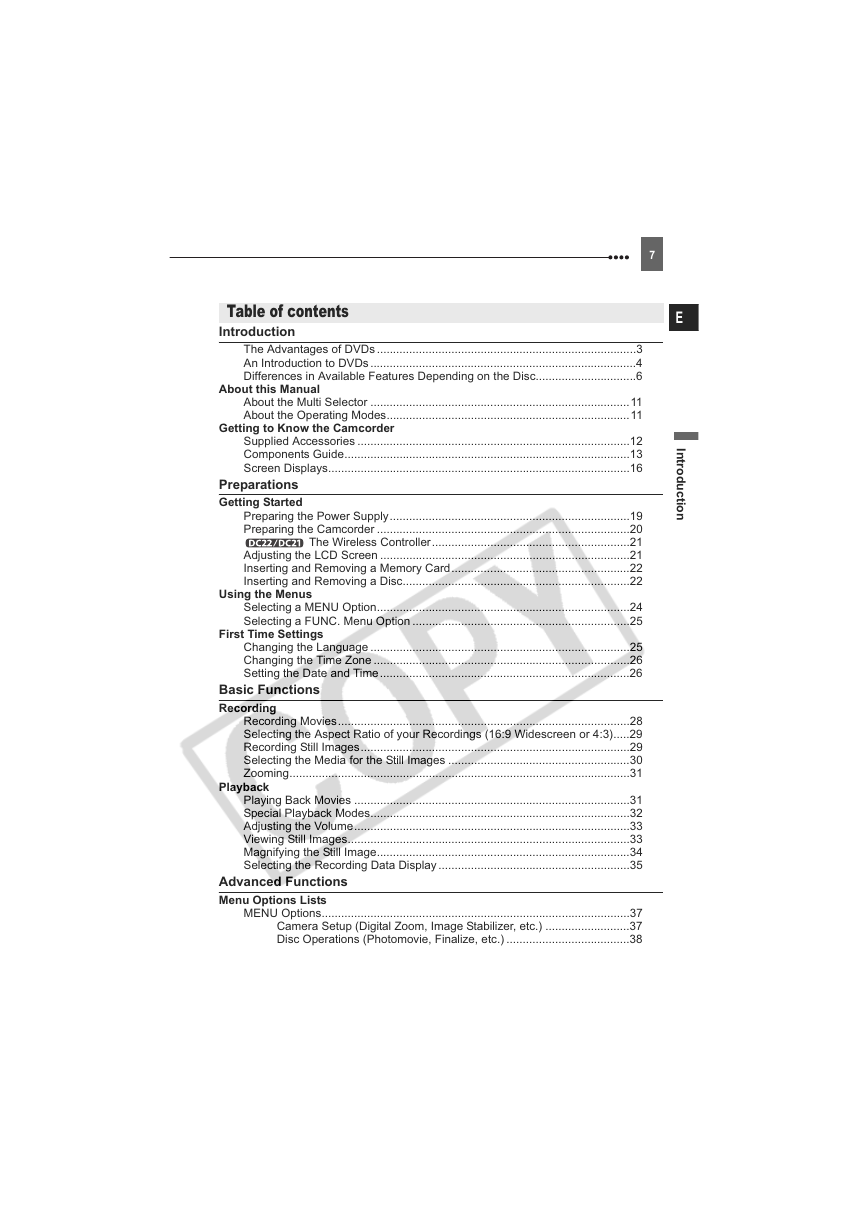
Table of contents
Introduction
The Advantages of DVDs ................................................................................3
An Introduction to DVDs..................................................................................4
Differences in Available Features Depending on the Disc...............................6
About this Manual
About the Multi Selector ................................................................................11
About the Operating Modes...........................................................................11
Getting to Know the Camcorder
Supplied Accessories ....................................................................................12
Components Guide........................................................................................13
Screen Displays.............................................................................................16
Preparations
Getting Started
Using the Menus
First Time Settings
Basic Functions
Recording
Preparing the Power Supply..........................................................................19
Preparing the Camcorder ..............................................................................20
The Wireless Controller.............................................................21
Adjusting the LCD Screen .............................................................................21
Inserting and Removing a Memory Card.......................................................22
Inserting and Removing a Disc......................................................................22
Selecting a MENU Option..............................................................................24
Selecting a FUNC. Menu Option ...................................................................25
Changing the Language ................................................................................25
Changing the Time Zone ...............................................................................26
Setting the Date and Time.............................................................................26
Playback
Recording Movies..........................................................................................28
Selecting the Aspect Ratio of your Recordings (16:9 Widescreen or 4:3).....29
Recording Still Images...................................................................................29
Selecting the Media for the Still Images ........................................................30
Zooming.........................................................................................................31
Playing Back Movies .....................................................................................31
Special Playback Modes................................................................................32
Adjusting the Volume.....................................................................................33
Viewing Still Images.......................................................................................33
Magnifying the Still Image..............................................................................34
Selecting the Recording Data Display ...........................................................35
Advanced Functions
Menu Options Lists
MENU Options...............................................................................................37
Camera Setup (Digital Zoom, Image Stabilizer, etc.) ..........................37
Disc Operations (Photomovie, Finalize, etc.) ......................................38
�
8
Still Image Operations (Card Initialization, Disc-Card Copy, etc.)....... 39
Display Setup (LCD Brightness, Language, etc.) ............................... 40
System Setup (Volume, Beep, Media Select
, etc.)........................ 41
Date/Time Setup................................................................................. 42
FUNC. Menu Options.................................................................................... 42
Recording Programs
Using the Recording Programs..................................................................... 45
Selecting the Recording Program ................................................................. 46
Programmed Auto Exposure...................................................................... 46
Shutter-Priority AE ................................................................................... 47
Aperture-Priority AE................................................................................. 47
Adjusting the Picture: Exposure, Focus and Color
Manual Exposure Adjustment ....................................................................... 48
Light Metering Mode ..................................................................................... 49
Automatic Focus Modes ............................................................................... 49
Manual Focus Adjustment ............................................................................ 49
White Balance............................................................................................... 50
Image Effects ................................................................................................ 51
Still Image Recording Options
Selecting the Size and Quality of Still Images............................................... 52
Capturing a Still Image while Recording Movies........................................... 53
Continuous Shooting and Exposure Bracketing ........................................... 54
Creating Panoramic Images ......................................................................... 55
Other Recording Options
Self Timer...................................................................................................... 56
LED Light ...................................................................................................... 57
Flash ............................................................................................................. 57
Digital Effects ................................................................................................ 58
Editing Functions
Editing the Scenes
Adding Scenes to the Playlist ....................................................................... 62
Moving Scenes in the Playlist ....................................................................... 62
Deleting Scenes............................................................................................ 62
Dividing a Scene ........................................................................................... 64
Disc Options
Protecting the Disc........................................................................................ 64
Initializing the Disc ........................................................................................ 64
Changing the Disc Title................................................................................. 65
Still Image Options
Erasing Still Images ...................................................................................... 66
Copying Still Images ..................................................................................... 67
Converting Still Images into Photomovie Scenes ......................................... 67
Protecting Still Images on the Memory Card................................................. 68
Initializing the Memory Card ......................................................................... 69
Playing Back the Disc on an External Device
Finalizing the Disc......................................................................................... 70
Playing Back your Disc on a DVD Player or a Computer’s DVD Drive......... 71
Unfinalizing the Disc - Additional Recordings on a Finalized Disc................ 71
�


 2023年江西萍乡中考道德与法治真题及答案.doc
 2012年重庆南川中考生物真题及答案.doc
 2013年江西师范大学地理学综合及文艺理论基础考研真题.doc
 2020年四川甘孜小升初语文真题及答案I卷.doc
 2020年注册岩土工程师专业基础考试真题及答案.doc
 2023-2024学年福建省厦门市九年级上学期数学月考试题及答案.doc
 2021-2022学年辽宁省沈阳市大东区九年级上学期语文期末试题及答案.doc
 2022-2023学年北京东城区初三第一学期物理期末试卷及答案.doc
 2018上半年江西教师资格初中地理学科知识与教学能力真题及答案.doc
 2012年河北国家公务员申论考试真题及答案-省级.doc
 2020-2021学年江苏省扬州市江都区邵樊片九年级上学期数学第一次质量检测试题及答案.doc
 2022下半年黑龙江教师资格证中学综合素质真题及答案.doc