1
Gmini™ XS100
Gmini™ XS100
MP3 & WMA Digital Music Player & USB 2.0 Hard Disk
English user manual
Version 2.1 - Please see the Archos web site (www.archos.com) for the most recent manual
and software updates for your Gmini™.
2
An introductory note from ARCHOS
Dear Customer,
1
2
Archos thanks you for choosing our new ultra-small Gmini™ XS100. Check out our web site www.archos.com
to fi nd the available accessories for this product (car adapter, carrying cases, etc.). Also, while at our web site,
check for free downloads of updated and improved software for your device.
The principal function of the Gmini™ is, of course, to play music. Because it has a real hard disk inside of it,
you can store hundreds of songs. Using a standard audio cable, you can also play your music through a home
entertainment system. You can bring your entire CD collection with you anywhere and play it over anyone’s
sound system.
Putting music onto your Gmini™ is as easy as ‘drag and drop’ for your unprotected music fi les. And for protected
purchased music from PlaysForSure web sites, it is as easy as clicking the Sync button in Windows Media®
Player. Plus, with its USB 2 high speed port, transfers are fi nished before you know it. The Gmini™ is also ID3
compatible. This means that the ARCLibrary will sort your music so that you can listen to it by artist, album, title,
year, or genre. Click on Shuffl e, and listen to your music at random.
Finally, you can always use the Gmini™ as a portable hard drive to carry your important fi les with you. You can
even use the Archos double-browser to rename, create, copy, move, and delete fi les and folders.
This manual gives you all the information you need to know on using your Gmini™. Read though it carefully, you
just may fi nd out it can do some neat things that you didn’t expect. If you are stuck, you can always call our help
line or e-mail support to get a friendly Archos agent to give you a hand.
Wishing you the best music listening experience,
The Archos Team
__________
As our engineers are always updating and improving the software, your device’s software may have a slightly
different appearance or modifi ed functionality than presented in this manual.
�
3
CContents
ontents
1 Ports, Buttons, and Connections
2 First Time Usage
Charging the Battery
Turning the Gmini™ XS100 ON and OFF
Changing the Interface language
Caring for the Gmini™
Foreign Character Sets
3 Playing Music
Playing a Music File
Play Screen and Button Control
Playback Menu Items
ARCLibrary Specifi cs
ARCLibrary Updating
Setting a Bookmark
The Resume Function
Locking the Gmini™ Buttons
4 Putting Music onto your Gmini™ XS100
Synchronizing Music from Windows Media® Player (WMP) to the Gmini™ XS100
Comparison of Windows Media Player 10 to Windows Media Player 9
Transferring your CD collection to the Gmini™ XS100
Installing Windows Media® Player (WMP) 9
Installing Windows Media® Player (WMP) 10
5 Playlists
Creating a new Playlist
Loading a Playlist
Playing a Playlist
Playlist Menu Options
2.1
2.2
2.3
2.4
2.5
3.1
3.2
3.3
3.4
3.5
3.6
3.7
3.8
4.1
4.2
4.3
4.3
4.4
5.1
5.2
5.3
5.4
6.1
6.2
6.3
6.4
6.5
6.6
7.1
7.2
7.3
7.4
9.1
9.2
9.3
4
6 Settings
Changing the Sound Settings
Changing the PlayMode Settings
Changing the time & date settings
Changing the Display Settings
Changing the Power Settings
Changing the System Settings
7 Using the Browser
Inside the MUSIC Folder
Navigating the Directory Structure
File and Folder Operations in Browser Mode
7.3.1 Contextual Menu on a File
7.3.2 Contextual Menu on a Folder
7.3.3 Contextual Menu while in the Double Browser
Using the Virtual Keyboard
8 Connecting the Gmini™ XS100 to a Stereo system
9 Connecting/Disconnecting the Gmini™ to/from your Computer
USB Connection Type (‘Hard Drive’ or ‘Windows Device’)
Connecting the Gmini™ XS100
Disconnecting the Gmini™ from your Computer
10 Using iTunes™ with your Gmini™ XS100
11 Updating the Gmini™ XS100 Firmware
11.1
11.2
11.3
11.4
Download the Update_GminiXS100.AOS fi le
Copy to Gmini™ root and Update
‘Hard Drive’ or ‘Windows Device’?
Activate the Update
12 Troubleshooting
12.1 USB Connection issues
12.2
File issues, corrupted data, formatting, and partitioning.
12.2.1 Windows® ME Running Scan-Disk (Error Checking)
12.2.2 Windows® XP & 2000 Running Check Disk Utility (ChkDsk)
13 Technical Specifi cations
14 Technical Support
15 Legal and Safety Notices
4
6
7
7
7
7
8
9
11
11
12
12
12
13
14
15
15
16
16
17
18
18
18
20
22
23
24
25
26
27
28
29
30
33
34
34
38
38
39
39
40
42
3
5
6
8
14
17
20
27
32
33
37
38
40
44
45
48
29
29
30
42
43
�
5
Ports, Buttons, and Connections
1 1 Ports, Buttons, and Connections
A Power jack – to connect an optional AC adapter/charger
B USB 2.0 port – To connect to your computer to transfer fi les to Gmini™ and to
charge its battery
C Headphone Jack
D On button (hold 3 seconds) & Menu options
E Off button (hold 3 seconds) & Stop/Escape
Navigation pad
F Move Up & increase volume
G Move Down & decrease volume
H Move Left (decrease value) or audio rewind
I Move Right (increase value) or audio fast forward
J Play/Pause/Enter
a CHG – Battery charging indicator
b HDD – Hard drive activity indicator
6
5
First Time Usage
2 2 First Time Usage
2.1 Charging the Battery
2.1 Charging the Battery
Before using your Gmini XS100 for the fi rst time, completely charge the battery for two hours.
• The Gmini™ XS100 is charged through its USB connector. Connect the included USB cable to a running
computer and plug the other end into the Gmini™ while it is off. This will charge its internal battery. The CHG
indicator will also light up to show that its battery is charging.
• The battery is fully charged when the full battery icon appears.
Animated battery:
The battery is currently being charged.
• You can purchase an Archos charger/adapter to charge the battery from a wall outlet. The blue CHG indicator
lights up to indicate that the external adapter is connected. The battery will charge automatically when it is
plugged in.
Full battery:
The battery is fully charged.
• After the fi rst initial full charge, you may use the Gmini while the AC adapter is plugged in.
6
�
7
2.2 Turning the Gmini™ XS100 ON and OFF
2.2 Turning the Gmini™ XS100 ON and OFF
• Press and hold the ON/Menu button until the screen comes on.
• The Gmini will automatically shut off after a given amount of time if no buttons are pressed. To conserve battery
energy, the backlight will automatically shut off. You can change these parameters in Setup > Power .
• Press and hold the Stop/off button until the Gmini shuts off.
2.3 Changing the Interface language
2.3 Changing the Interface language
• English is selected as the default language for your Gmini user interface. You can choose another language by
going to Setup > Display .
2.4 Caring for the Gmini™
2.4 Caring for the Gmini™
The Gmini is an electronic product that needs to be treated with care.
• Do not subject it to unnecessary shock or vibration.
• Do not subject it to heat. Keep it ventilated (especially when connected to a computer).
• Keep the Gmini away from water and excessively humid areas.
• Keep the Gmini away from high electromagnetic fi elds.
2.5 Foreign Character Sets
2.5 Foreign Character Sets
You have the possibility to display your fi le names, folder names, and MP3 ID3 tags in various character sets
(ex: Korean, Japanese, Simplifi ed Chinese, etc.). You can fi nd the language fi les CodePage_name.4fz in the font
folder under /Data on the Gmini XS100 hard disk or on the Archos website under the heading Software.
If, for example, you would like to have the Japanese language display, you would copy the fi le Cp932.4fz into
the folder /system on the Gmini XS100. Shut down and restart the Gmini XS100. File names, folder names,
and ID3 tags written using the Microsoft® codepage for the language will now be displayed in that character set.
Only one.4fz fi le can be used at a time, thus you should only put one.4fz fi le into the /system folder. When an.4fz
language fi le is used, the interface language will be set to English.
8
Playing Music
33 Playing Music
7
Once the Gmini has been turned on, the following screen is displayed. You can select
the major functions from this main menu.
• Music : Browse through the folder Music or use the ARCLibrary music selection
system.
• Browser : Browse through and manage all of the other fi les on your Gmini.
• Resume : Resume playing from the last place you stopped.
• Setup : Set the parameters of your Gmini to your personal taste.
3.1 Playing a Music File
3.1 Playing a Music File
By clicking on the Music icon in the main menu screen, you will enter into a ‘music only’
mode. File types other than WMA, WAV, and MP3 that may be in those folders will be
fi ltered from view.
There are two ways to access your music, by selecting Browse hard disk or by searching
the songs’ tag information, Artist, Album, title, etc . In the case of Browse hard drive,
you will be sent directly to the Music folder of your Gmini. Here you can look at all your
music fi les and the folders on your Gmini’s hard drive as if you were browsing fi les with a
computer. The other way is to browse your music by tag information, artist, album, song
name, year, or genre. The Unknown category indicates that the fi le has no tag data.
To select a music fi le, use the navigation controls UP and DOWN to move upwards or downwards and ENTER
to enter a highlighted subfolder or tag category. Click ENTER to play the highlighted song. Use LEFT to leave a
folder and go back to the previous level.
8
�
9
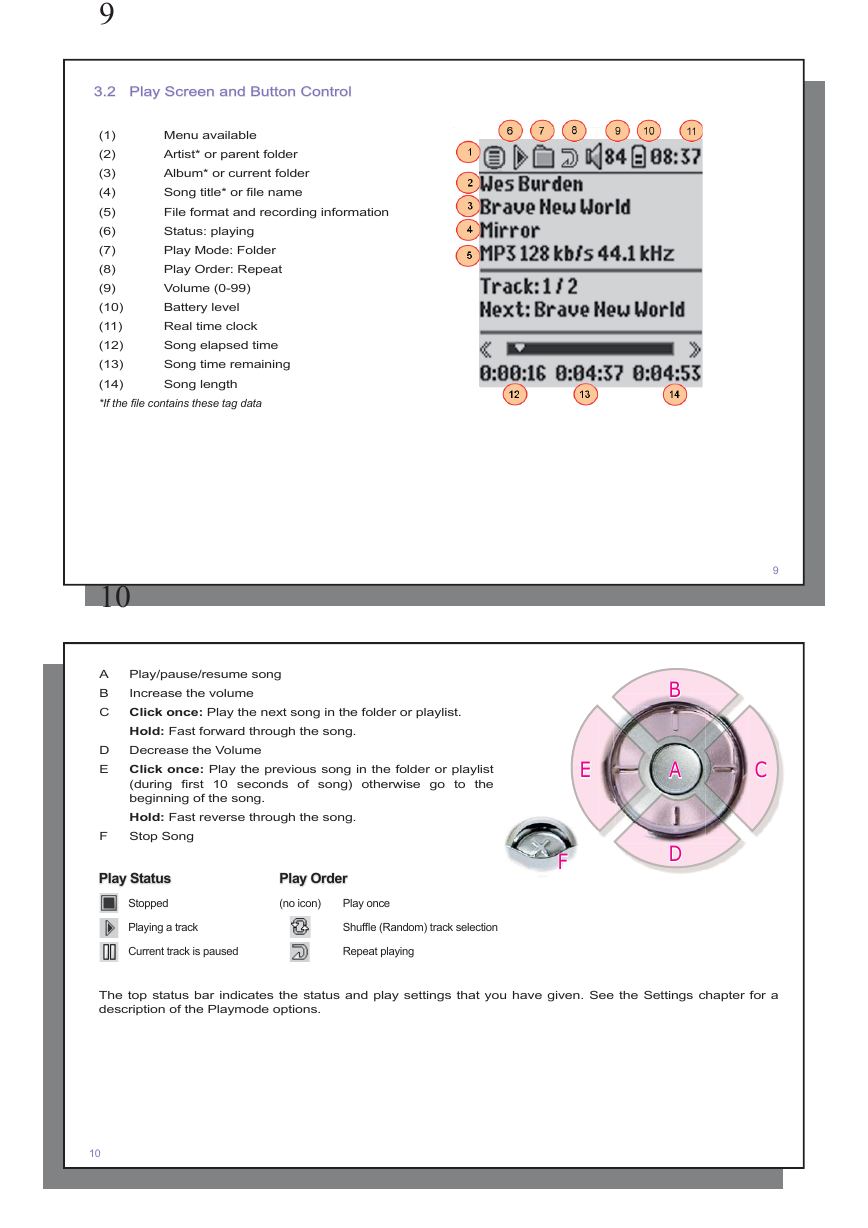
3.2 Play Screen and Button Control
3.2 Play Screen and Button Control
(1)
(2)
(3)
(4)
(5)
(6)
(7)
(8)
(9)
(10)
(11)
(12)
(13)
(14)
*If the fi le contains these tag data
Menu available
Artist* or parent folder
Album* or current folder
Song title* or fi le name
File format and recording information
Status: playing
Play Mode: Folder
Play Order: Repeat
Volume (0-99)
Battery level
Real time clock
Song elapsed time
Song time remaining
Song length
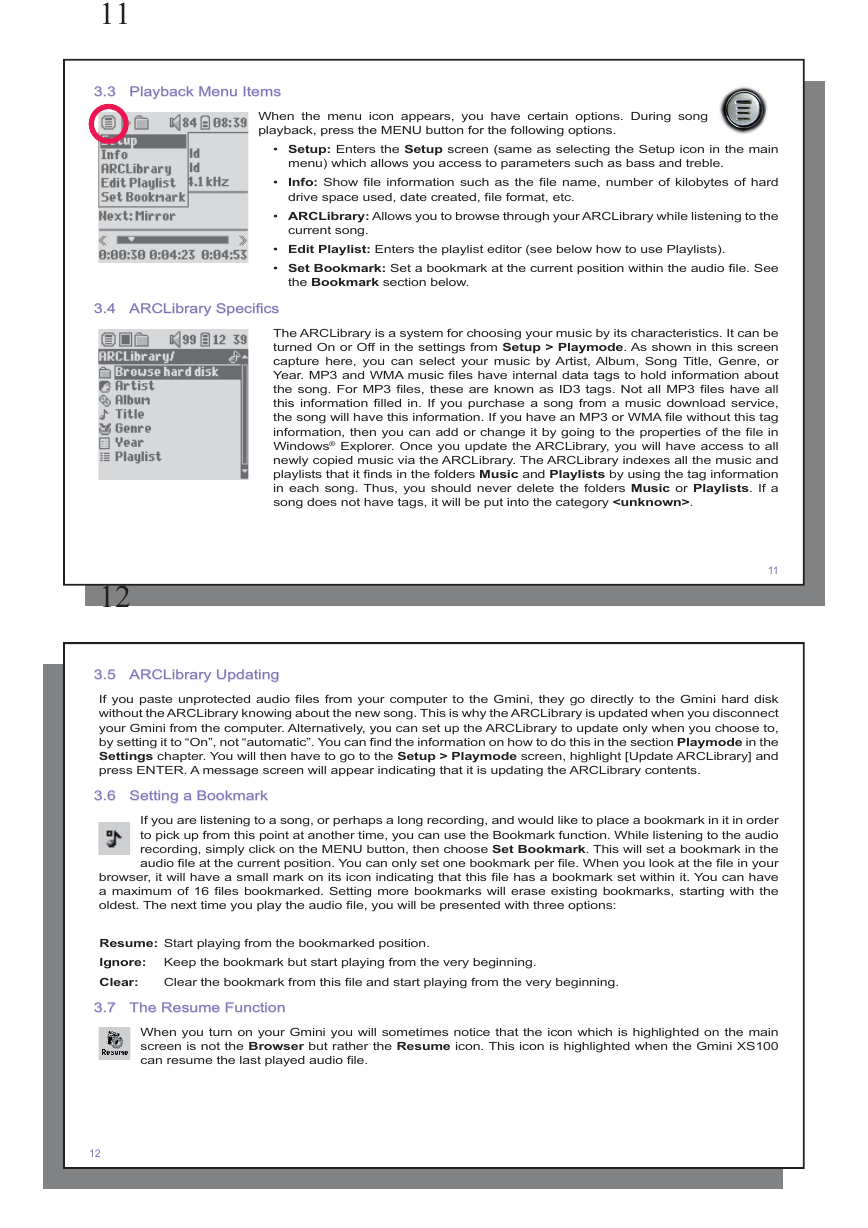
10
Increase the volume
Click once: Play the next song in the folder or playlist.
Hold: Fast forward through the song.
A Play/pause/resume song
B
C
D Decrease the Volume
E
Click once: Play the previous song in the folder or playlist
(during fi rst 10 seconds of song) otherwise go to the
beginning of the song.
Hold: Fast reverse through the song.
F Stop Song
Play Status
Play Status
Stopped
Play Order
Play Order
(no icon)
Play once
Shuffl e (Random) track selection
Repeat playing
Playing a track
Current track is paused
9
C C
B B
A A
D D
E E
F F
The top status bar indicates the status and play settings that you have given. See the Settings chapter for a
description of the Playmode options.
10
�
11
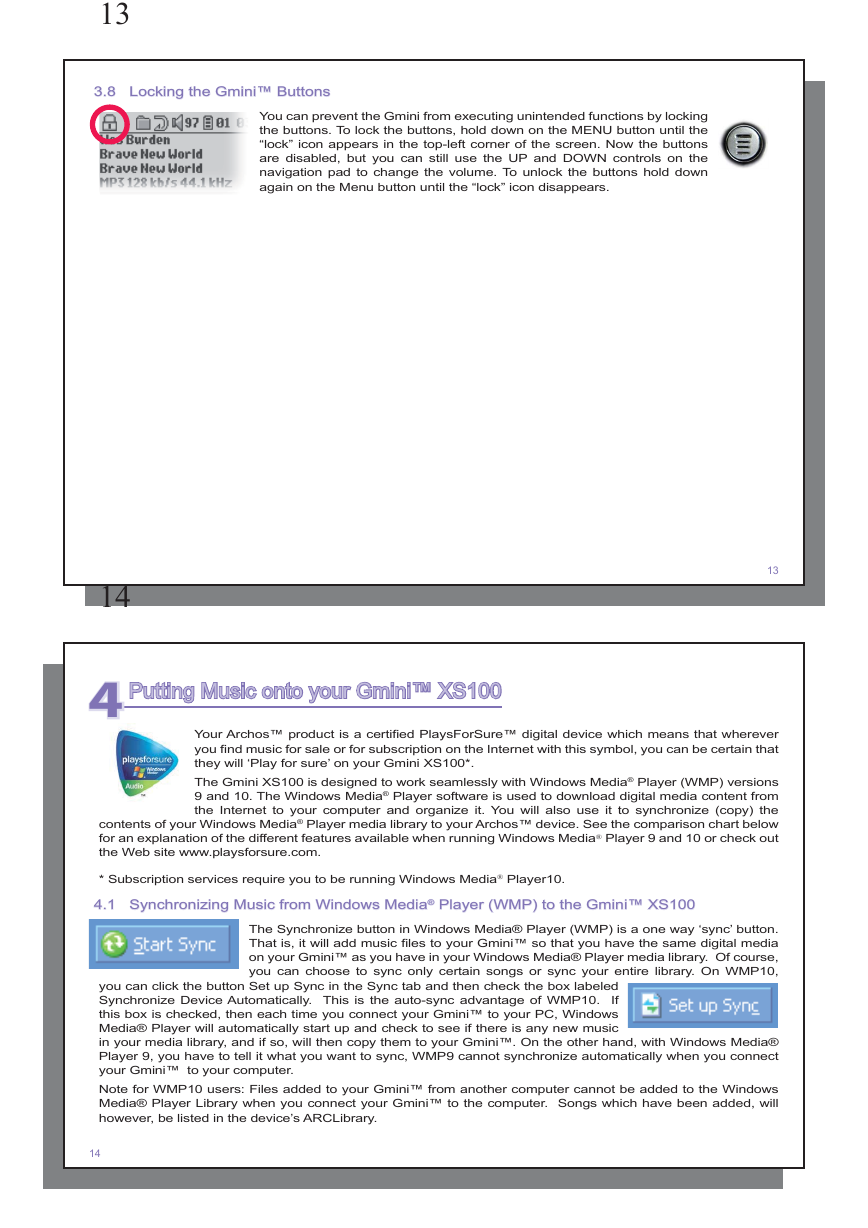
3.3 Playback Menu Items
3.3 Playback Menu Items
C
When the menu icon appears, you have certain options. During song
playback, press the MENU button for the following options.
• Setup: Enters the Setup screen (same as selecting the Setup icon in the main
menu) which allows you access to parameters such as bass and treble.
• Info: Show fi le information such as the fi le name, number of kilobytes of hard
drive space used, date created, fi le format, etc.
• ARCLibrary: Allows you to browse through your ARCLibrary while listening to the
current song.
• Edit Playlist: Enters the playlist editor (see below how to use Playlists).
• Set Bookmark: Set a bookmark at the current position within the audio fi le. See
the Bookmark section below.
3.4 ARCLibrary Specifi cs
3.4 ARCLibrary Specifi cs
The ARCLibrary is a system for choosing your music by its characteristics. It can be
turned On or Off in the settings from Setup > Playmode . As shown in this screen
capture here, you can select your music by Artist, Album, Song Title, Genre, or
Year. MP3 and WMA music fi les have internal data tags to hold information about
the song. For MP3 fi les, these are known as ID3 tags. Not all MP3 fi les have all
this information fi lled in. If you purchase a song from a music download service,
the song will have this information. If you have an MP3 or WMA fi le without this tag
information, then you can add or change it by going to the properties of the fi le in
Windows® Explorer. Once you update the ARCLibrary, you will have access to all
newly copied music via the ARCLibrary. The ARCLibrary indexes all the music and
playlists that it fi nds in the folders Music and Playlists by using the tag information
in each song. Thus, you should never delete the folders Music or Playlists . If a
song does not have tags, it will be put into the category .
11
12
3.5 ARCLibrary Updating
3.5 ARCLibrary Updating
If you paste unprotected audio fi les from your computer to the Gmini, they go directly to the Gmini hard disk
without the ARCLibrary knowing about the new song. This is why the ARCLibrary is updated when you disconnect
your Gmini from the computer. Alternatively, you can set up the ARCLibrary to update only when you choose to,
by setting it to “On”, not “automatic”. You can fi nd the information on how to do this in the section Playmode in the
Settings chapter. You will then have to go to the Setup > Playmode screen, highlight [Update ARCLibrary] and
press ENTER. A message screen will appear indicating that it is updating the ARCLibrary contents.
3.6 Setting a Bookmark
3.6 Setting a Bookmark
If you are listening to a song, or perhaps a long recording, and would like to place a bookmark in it in order
to pick up from this point at another time, you can use the Bookmark function. While listening to the audio
recording, simply click on the MENU button, then choose Set Bookmark . This will set a bookmark in the
audio fi le at the current position. You can only set one bookmark per fi le. When you look at the fi le in your
browser, it will have a small mark on its icon indicating that this fi le has a bookmark set within it. You can have
a maximum of 16 fi les bookmarked. Setting more bookmarks will erase existing bookmarks, starting with the
oldest. The next time you play the audio fi le, you will be presented with three options:
Resume: Start playing from the bookmarked position.
Ignore: Keep the bookmark but start playing from the very beginning.
Clear:
Clear the bookmark from this fi le and start playing from the very beginning .
3.7 The Resume Function
3.7 The Resume Function
When you turn on your Gmini you will sometimes notice that the icon which is highlighted on the main
screen is not the Browser but rather the Resume icon. This icon is highlighted when the Gmini XS100
can resume the last played audio fi le.
12
�
13
3.8 Locking the Gmini™ Buttons
3.8 Locking the Gmini™ Buttons
You can prevent the Gmini from executing unintended functions by locking
the buttons. To lock the buttons, hold down on the MENU button until the
“lock” icon appears in the top-left corner of the screen. Now the buttons
are disabled, but you can still use the UP and DOWN controls on the
navigation pad to change the volume. To unlock the buttons hold down
again on the Menu button until the “lock” icon disappears.
14
13
Putting Music onto your Gmini™ XS100
4 4 Putting Music onto your Gmini™ XS100
Your Archos™ product is a certifi ed PlaysForSure™ digital device which means that wherever
you fi nd music for sale or for subscription on the Internet with this symbol, you can be certain that
they will ‘Play for sure’ on your Gmini XS100*.
The Gmini XS100 is designed to work seamlessly with Windows Media® Player (WMP) versions
9 and 10. The Windows Media® Player software is used to download digital media content from
the Internet to your computer and organize it. You will also use it to synchronize (copy) the
contents of your Windows Media® Player media library to your Archos™ device. See the comparison chart below
for an explanation of the different features available when running Windows Media® Player 9 and 10 or check out
the Web site www.playsforsure.com.
* Subscription services require you to be running Windows Media® Player10.
4.1 Synchronizing Music from Windows Media®® Player (WMP) to the Gmini™ XS100
4.1 Synchronizing Music from Windows Media
Player (WMP) to the Gmini™ XS100
The Synchronize button in Windows Media® Player (WMP) is a one way ‘sync’ button.
That is, it will add music fi les to your Gmini™ so that you have the same digital media
on your Gmini™ as you have in your Windows Media® Player media library. Of course,
you can choose to sync only certain songs or sync your entire library. On WMP10,
you can click the button Set up Sync in the Sync tab and then check the box labeled
Synchronize Device Automatically. This is the auto-sync advantage of WMP10. If
this box is checked, then each time you connect your Gmini™ to your PC, Windows
Media® Player will automatically start up and check to see if there is any new music
in your media library, and if so, will then copy them to your Gmini™. On the other hand, with Windows Media®
Player 9, you have to tell it what you want to sync, WMP9 cannot synchronize automatically when you connect
your Gmini™ to your computer.
Note for WMP10 users: Files added to your Gmini™ from another computer cannot be added to the Windows
Media® Player Library when you connect your Gmini™ to the computer. Songs which have been added, will
however, be listed in the device’s ARCLibrary.
14
�
15
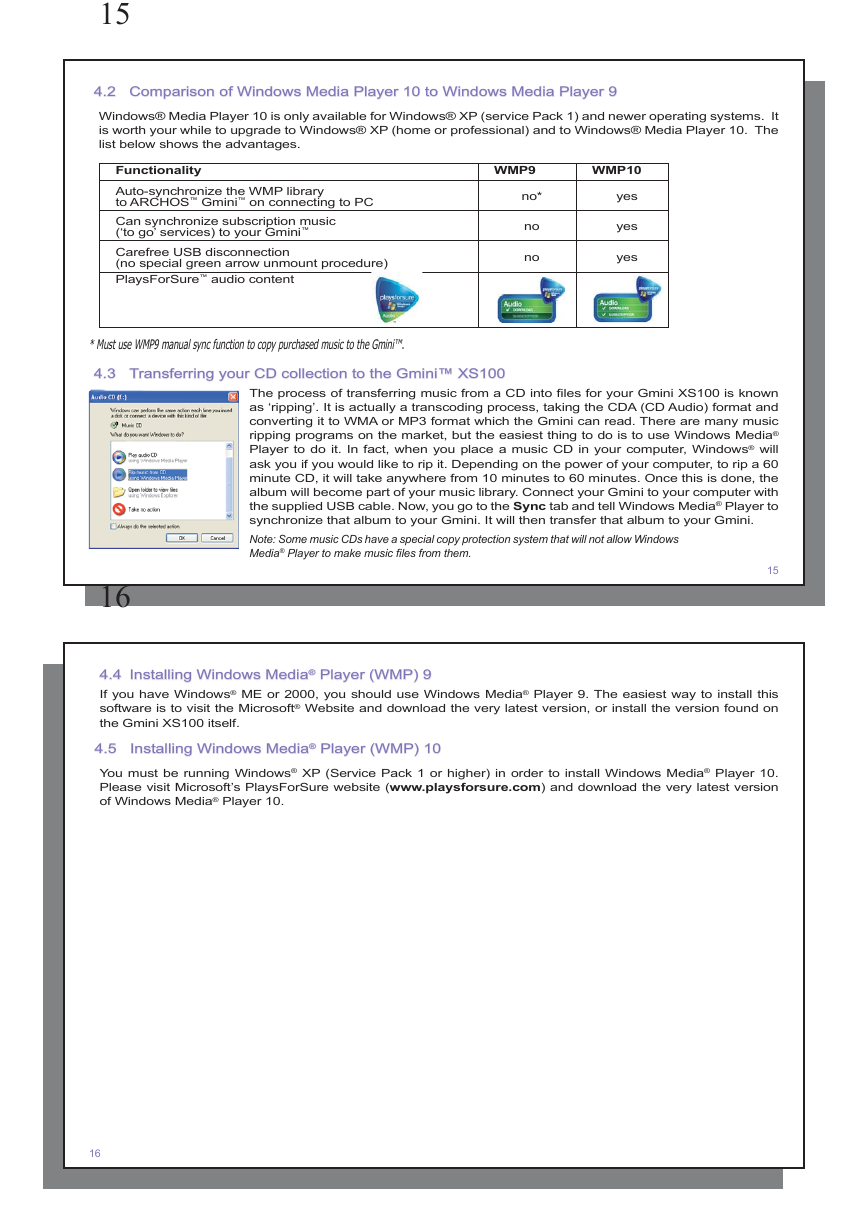
4.2 Comparison of Windows Media Player 10 to Windows Media Player 9
4.2 Comparison of Windows Media Player 10 to Windows Media Player 9
Windows® Media Player 10 is only available for Windows® XP (service Pack 1) and newer operating systems. It
is worth your while to upgrade to Windows® XP (home or professional) and to Windows® Media Player 10. The
list below shows the advantages.
Functionality
Auto-synchronize the WMP library
to ARCHOS™ Gmini™ on connecting to PC
Can synchronize subscription music
(‘to go’ services) to your Gmini™
Carefree USB disconnection
(no special green arrow unmount procedure)
PlaysForSure™ audio content
WMP9
WMP10
no*
no
no
yes
yes
yes
* Must use WMP9 manual sync function to copy purchased music to the Gmini™.
4.3 Transferring your CD collection to the Gmini™ XS100
4.3 Transferring your CD collection to the Gmini™ XS100
The process of transferring music from a CD into fi les for your Gmini XS100 is known
as ‘ripping’. It is actually a transcoding process, taking the CDA (CD Audio) format and
converting it to WMA or MP3 format which the Gmini can read. There are many music
ripping programs on the market, but the easiest thing to do is to use Windows Media®
Player to do it. In fact, when you place a music CD in your computer, Windows® will
ask you if you would like to rip it. Depending on the power of your computer, to rip a 60
minute CD, it will take anywhere from 10 minutes to 60 minutes. Once this is done, the
album will become part of your music library. Connect your Gmini to your computer with
the supplied USB cable. Now, you go to the Sync tab and tell Windows Media® Player to
synchronize that album to your Gmini. It will then transfer that album to your Gmini.
Note: Some music CDs have a special copy protection system that will not allow Windows
Media® Player to make music fi les from them.
15
16
4.4 Installing Windows Media
4.4 Installing Windows Media®® Player (WMP) 9
Player (WMP) 9
If you have Windows® ME or 2000, you should use Windows Media® Player 9. The easiest way to install this
software is to visit the Microsoft® Website and download the very latest version, or install the version found on
the Gmini XS100 itself.
Installing Windows Media®® Player (WMP) 10
Installing Windows Media
Player (WMP) 10
4.5
4.5
You must be running Windows® XP (Service Pack 1 or higher) in order to install Windows Media® Player 10.
Please visit Microsoft’s PlaysForSure website ( www.playsforsure.com ) and download the very latest version
of Windows Media® Player 10.
16
�


 2023年江西萍乡中考道德与法治真题及答案.doc
 2012年重庆南川中考生物真题及答案.doc
 2013年江西师范大学地理学综合及文艺理论基础考研真题.doc
 2020年四川甘孜小升初语文真题及答案I卷.doc
 2020年注册岩土工程师专业基础考试真题及答案.doc
 2023-2024学年福建省厦门市九年级上学期数学月考试题及答案.doc
 2021-2022学年辽宁省沈阳市大东区九年级上学期语文期末试题及答案.doc
 2022-2023学年北京东城区初三第一学期物理期末试卷及答案.doc
 2018上半年江西教师资格初中地理学科知识与教学能力真题及答案.doc
 2012年河北国家公务员申论考试真题及答案-省级.doc
 2020-2021学年江苏省扬州市江都区邵樊片九年级上学期数学第一次质量检测试题及答案.doc
 2022下半年黑龙江教师资格证中学综合素质真题及答案.doc