DIGITAL CAMERA
STYLUS TOUGH-8000 /
μ TOUGH-8000
Basic Manual
ENGLISH
2
FRANÇAIS 32
ESPAÑOL
62
DEUTSCH
92
РУССКИЙ
122
�
Contents
Contents
Preparing the Camera ...........................3
Checking the contents of the box ............3
Attaching the camera strap ......................3
Loading the battery and the
xD-Picture Card™ (sold separately) into
the camera ...............................................3
Charging the battery ................................4
Using a microSD card/microSDHC card
(sold separately) ......................................6
Setting the date and time .........................6
Changing the display language ...............7
Shooting, Viewing, and Erasing ...........8
Shooting with optimum aperture value
and shutter speed (K mode) .................8
Viewing images .......................................9
Erasing images during playback
(Single image erase) .............................10
Using Shooting Modes ........................11
Using the best mode for the shooting
scene (s mode) ...............................11
Enhancing skin tone and texture
(b mode) .......................................12
Shooting with automatic settings
(A mode) .........................................12
Shooting movies (n mode) ..................13
Using Shooting Functions ..................14
Using the optical zoom ..........................14
Using the fl ash .......................................14
Adjusting the brightness
(Exposure compensation) ......................15
Shooting closeups (Macro shooting) .....15
Using the self-timer ................................16
Quickly calling and using shooting
functions ................................................16
Printing .................................................17
Using OLYMPUS Master 2...................18
Appendix ..............................................20
Using a microSD Attachment .................20
Important information about water and
shock resistant features .........................20
SAFETY PRECAUTIONS ......................22
SPECIFICATIONS .................................28
● Thank you for purchasing an Olympus digital
camera. Before you start to use your new
camera, please read these instructions carefully
to enjoy optimum performance and a longer
service life. Keep this manual in a safe place for
future reference.
● We recommend that you take test shots to
get accustomed to your camera before taking
important photographs.
● In the interest of continually improving products,
Olympus reserves the right to update or modify
information contained in this manual.
● The screen and camera illustrations shown in this
manual were produced during the development
stages and may differ from the actual product.
The reference pages are based on the Instruction Manual (provided CD-ROM). Please see the CD-ROM
Instruction Manual for your reference.
2 EN
�
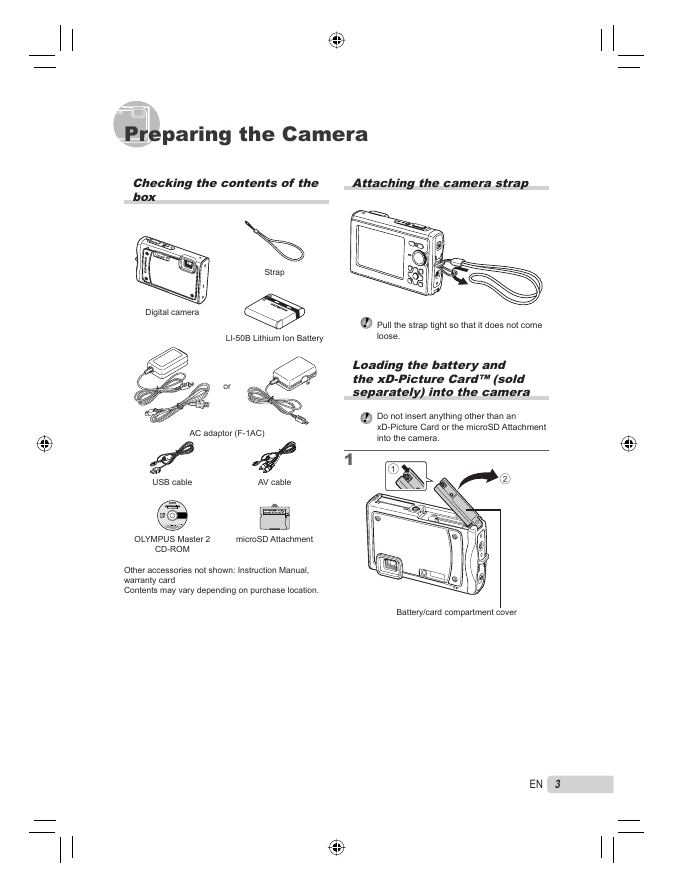
Preparing the Camera
Checking the contents of the
box
Attaching the camera strap
Strap
Digital camera
LI-50B Lithium Ion Battery
Pull the strap tight so that it does not come
loose.
or
AC adaptor (F-1AC)
USB cable
AV cable
Loading the battery and
the xD-Picture Card™ (sold
separately) into the camera
Do not insert anything other than an
xD-Picture Card or the microSD Attachment
into the camera.
1
1
2
OLYMPUS Master 2
CD-ROM
microSD Attachment
Other accessories not shown: Instruction Manual,
warranty card
Contents may vary depending on purchase location.
Battery/card compartment cover
EN
3
�
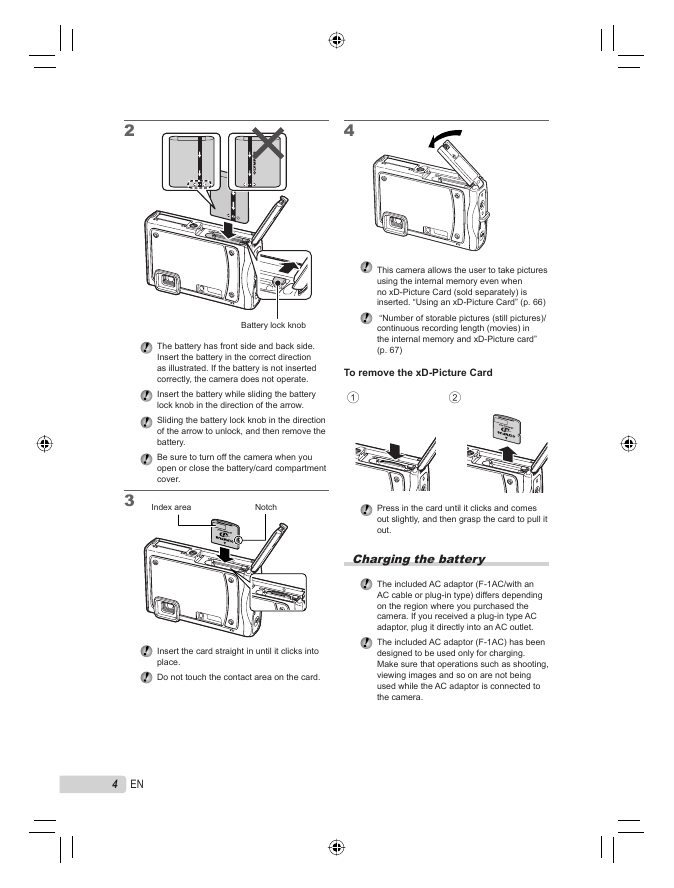
2
4
This camera allows the user to take pictures
using the internal memory even when
no xD-Picture Card (sold separately) is
inserted. “Using an xD-Picture Card” (p. 66)
“Number of storable pictures (still pictures)/
continuous recording length (movies) in
the internal memory and xD-Picture card”
(p. 67)
To remove the xD-Picture Card
1
2
Press in the card until it clicks and comes
out slightly, and then grasp the card to pull it
out.
Charging the battery
The included AC adaptor (F-1AC/with an
AC cable or plug-in type) differs depending
on the region where you purchased the
camera. If you received a plug-in type AC
adaptor, plug it directly into an AC outlet.
The included AC adaptor (F-1AC) has been
designed to be used only for charging.
Make sure that operations such as shooting,
viewing images and so on are not being
used while the AC adaptor is connected to
the camera.
Battery lock knob
The battery has front side and back side.
Insert the battery in the correct direction
as illustrated. If the battery is not inserted
correctly, the camera does not operate.
Insert the battery while sliding the battery
lock knob in the direction of the arrow.
Sliding the battery lock knob in the direction
of the arrow to unlock, and then remove the
battery.
Be sure to turn off the camera when you
open or close the battery/card compartment
cover.
3
Index area
Notch
Insert the card straight in until it clicks into
place.
Do not touch the contact area on the card.
4 EN
�
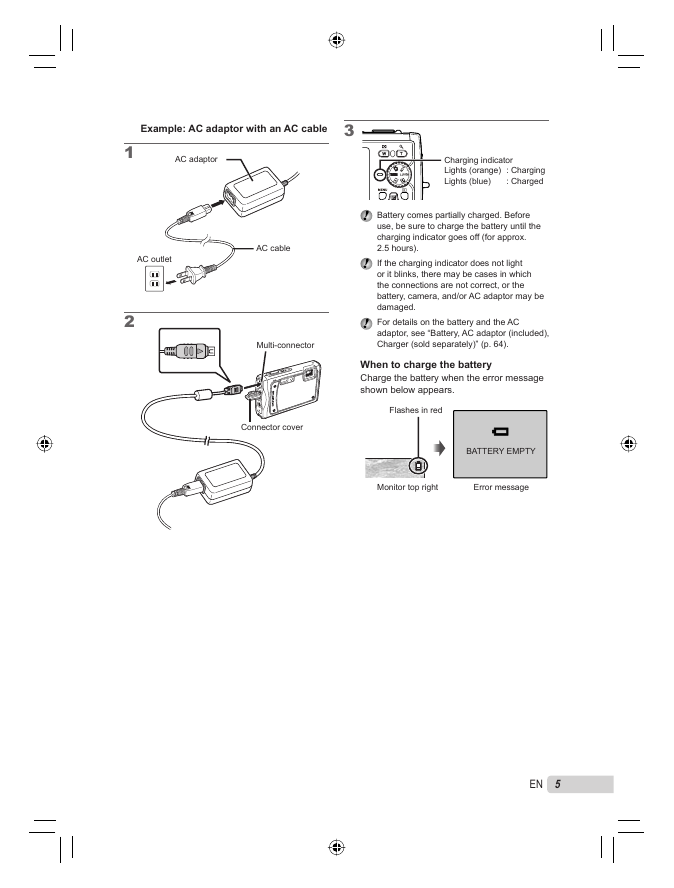
Example: AC adaptor with an AC cable
3
1
AC adaptor
AC outlet
AC cable
2
Multi-connector
Connector cover
Charging indicator
Lights (orange) : Charging
Lights (blue)
: Charged
Battery comes partially charged. Before
use, be sure to charge the battery until the
charging indicator goes off (for approx.
2.5 hours).
If the charging indicator does not light
or it blinks, there may be cases in which
the connections are not correct, or the
battery, camera, and/or AC adaptor may be
damaged.
For details on the battery and the AC
adaptor, see “Battery, AC adaptor (included),
Charger (sold separately)” (p. 64).
When to charge the battery
Charge the battery when the error message
shown below appears.
Flashes in red
BATTERY EMPTY
Monitor top right
Error message
EN
5
�
Setting the date and time
The date and time set here are saved to image
fi le names, date prints, and other data.
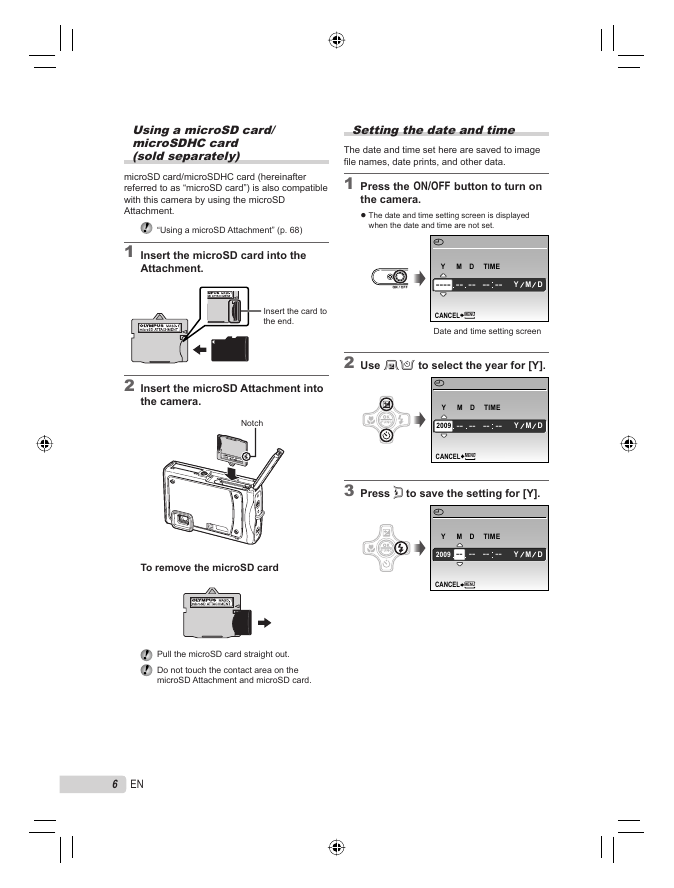
1 Press the n button to turn on
the camera.
●
The date and time setting screen is displayed
when the date and time are not set.
X
Y M
D TIME
---- -- -- -- --
Y M D
MENU
CANCEL
Date and time setting screen
2 Use EF to select the year for [Y].
X
Y M
D TIME
2009 -- --
-- --
Y M D
CANCEL
MENU
3 Press H to save the setting for [Y].
X
Y M
D TIME
2009 -- --
-- --
Y M D
CANCEL
MENU
Using a microSD card/
microSDHC card
(sold separately)
microSD card/microSDHC card (hereinafter
referred to as “microSD card”) is also compatible
with this camera by using the microSD
Attachment.
“Using a microSD Attachment” (p. 68)
1 Insert the microSD card into the
Attachment.
Insert the card to
the end.
2 Insert the microSD Attachment into
the camera.
Notch
To remove the microSD card
Pull the microSD card straight out.
Do not touch the contact area on the
microSD Attachment and microSD card.
6 EN
�
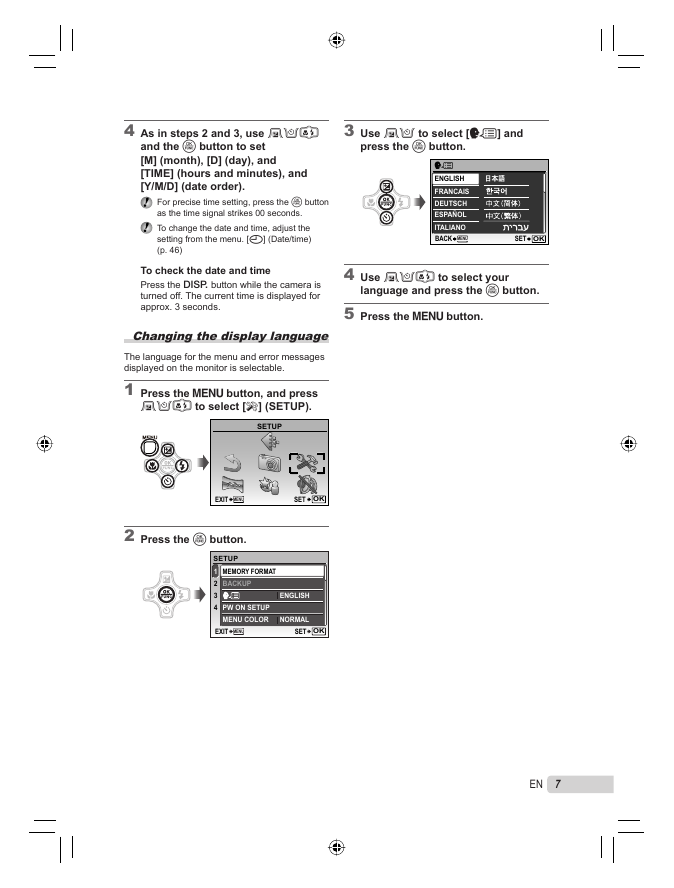
3 Use EF to select [W] and
press the o button.
W
ENGLISH
FRANCAIS
DEUTSCH
ESPAÑOL
ITALIANO
BACK MENU
SET
OK
4 Use EFGH to select your
language and press the o button.
5 Press the m button.
4 As in steps 2 and 3, use EFGH
and the o button to set
[M] (month), [D] (day), and
[TIME] (hours and minutes), and
[Y/M/D] (date order).
For precise time setting, press the o button
as the time signal strikes 00 seconds.
To change the date and time, adjust the
setting from the menu. [X] (Date/time)
(p. 46)
To check the date and time
Press the g button while the camera is
turned off. The current time is displayed for
approx. 3 seconds.
Changing the display language
The language for the menu and error messages
displayed on the monitor is selectable.
1 Press the m button, and press
EFGH to select [E] (SETUP).
SETUP
EXIT
MENU
SET OK
2 Press the o button.
SETUP
1
2
3
4
MEMORY FORMAT
BACKUP
PW ON SETUP
MENU COLOR
EXIT
MENU
ENGLISH
NORMAL
SET OK
EN
7
�
Shooting, Viewing, and Erasing
Shooting with optimum
aperture value and shutter
speed (K mode)
In this mode, automatic camera shooting can
be used while also allowing changes to a wide
range of other shooting menu functions, such as
exposure compensation, white balance, and so
on when needed.
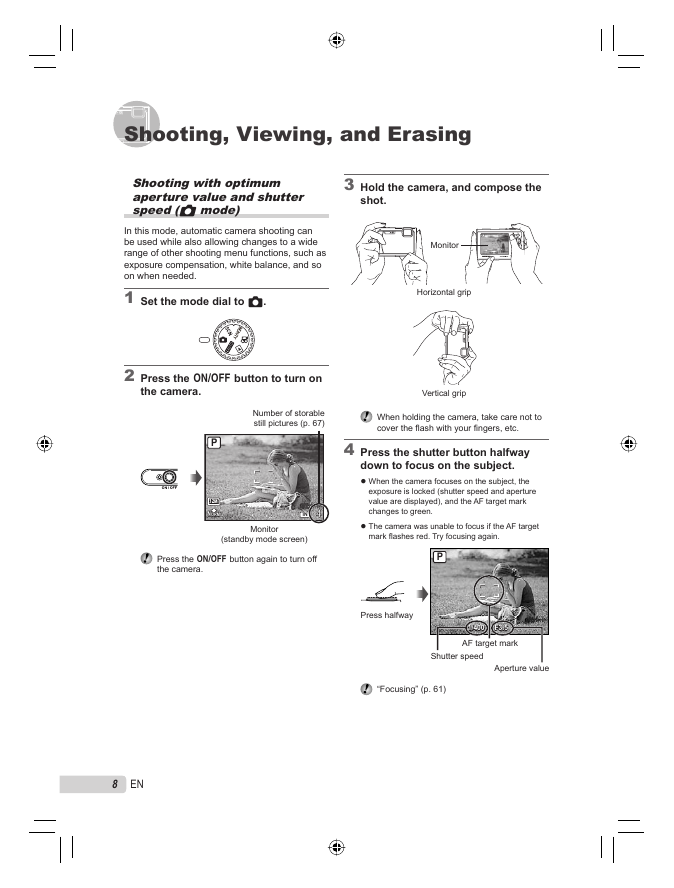
1 Set the mode dial to K.
3 Hold the camera, and compose the
shot.
Monitor
P
1/400
F3.5
Horizontal grip
2 Press the n button to turn on
the camera.
Vertical grip
Number of storable
still pictures (p. 67)
When holding the camera, take care not to
cover the flash with your fingers, etc.
4 Press the shutter button halfway
P
12M
NORM
down to focus on the subject.
●
When the camera focuses on the subject, the
exposure is locked (shutter speed and aperture
value are displayed), and the AF target mark
changes to green.
The camera was unable to focus if the AF target
mark fl ashes red. Try focusing again.
IN
4
Monitor
(standby mode screen)
●
Press the n button again to turn off
the camera.
P
Press halfway
1/400
1/400
F3.5F3.5
AF target mark
Shutter speed
Aperture value
“Focusing” (p. 61)
8 EN
�


 2023年江西萍乡中考道德与法治真题及答案.doc
 2012年重庆南川中考生物真题及答案.doc
 2013年江西师范大学地理学综合及文艺理论基础考研真题.doc
 2020年四川甘孜小升初语文真题及答案I卷.doc
 2020年注册岩土工程师专业基础考试真题及答案.doc
 2023-2024学年福建省厦门市九年级上学期数学月考试题及答案.doc
 2021-2022学年辽宁省沈阳市大东区九年级上学期语文期末试题及答案.doc
 2022-2023学年北京东城区初三第一学期物理期末试卷及答案.doc
 2018上半年江西教师资格初中地理学科知识与教学能力真题及答案.doc
 2012年河北国家公务员申论考试真题及答案-省级.doc
 2020-2021学年江苏省扬州市江都区邵樊片九年级上学期数学第一次质量检测试题及答案.doc
 2022下半年黑龙江教师资格证中学综合素质真题及答案.doc