在 Docker 容器中使用 GNS3 来进行 Cisco 网络仿真
Cisco Network Emulation with GNS3 in a Docker
container
GNS3 是一款有趣软件,它将不同的开放源代码软件粘和起来,实现对由思科路由器(使用真实思
科固件)、思科交换机(使用 IOU,思科 IOS on Unix)、思科 ASA(adaptive security
appliance, 下一代防火墙)以及其它任何可以运行在 Qemu 或者 VirtualBox 仿真软件上的设备所组
成的计算机网络的仿真。
GNS3 is a fantastic piece of software, it glues together different open source software and
allows to emulate a network that includes Cisco routers (using real Cisco firmware), Cisco
switches (using IOU, Cisco IOS on Unix), Cisco ASA and any other devices that can run on
Qemu or Virtual Box emulator.
它允许将虚拟网络连接到物理网络,从仿真网络到互联网的访问以及从互联网访问仿真网络都是可
以的。GNS3 可以在 Windows、Mac OSX 以及 Linux 上运行,但运行在 Linux 上是最好的,因
为要用上 IOU,如果不是在 Linux 上,你就需要一个运行于 VirtualBox 上的 Linux 虚拟机。
It also allows to connect the virtual network to the physical network, it is possible to access
Internet in the emulated world and vice-versa. GNS3 is available on Windows, Mac OSX and
on Linux, but it shines on Linux because, to use IOU, if you are not on Linux you need a Linux
virtual machine running on VirtualBox.
又因为 GNS3 粘和了许多正处于变动中的部件,所以要将所有东西都安装好并让它们无缝的一起工
作起来,就成为了一件棘手的事情,为此我创建了一个已安装好所有东西、功能完整且可立即使用
的 Docker 镜像,运行于 Linux 上(或是在 Windows 或 Mac OSX 上的 Linux 虚拟机中)。
But, because GNS3 glues together many moving parts, it can be troublesome to install
everything and to have everything working seamlessly, for this reason i created a Docker image
with everything installed, functioning and ready to be used on Linux (or in a Linux virtual
machine running in Windows or Mac OSX).
Docker 是另一款有趣软件,与 CoreOS 和比如 Google Kubernetes 一样的云计算基础项目一道,
是目前正在到来的云计算革命的构筑物。
Docker is another fantastic piece of software that, together with CoreOS and other cloud
orchestration projects, like Google's Kubernetes, is one of the building blocks for the incoming
Cloud Revolution.
Docker 容器(或者 Docker 镜像)与虚拟机有一些相似之处,但它们是在一个经由 Cgroups 以及命
名空间隔离(namespace isolation)两种技术得到的,从而实现资源限制(对 CPU 和 RAM 的使用),
以及与宿主机的其它进程隔离,Docker 容器内部不可见这些宿主机的进程,的“chrooted”环境中,
与宿主机使用同一个 Linux 内核。Docker 容器的巨大优势在于其毫秒级的启动速度,而不是虚拟
机的数十秒,同时由于诸多容器都是共享同一内核,而不必模拟整个的系统,所以它们在主机资源
的使用上是更为高效的。在宿主机上你会看到 Docker 容器中的进程与宿主机普通进程是一样的。
Docker containers (or Docker images) have similarities with virtual machines, but they run on
same Linux kernel as the host, in a "chrooted" environment using Cgroups and namespace
isolation to provide resource limitation (on cpu and or RAM usage) and isolation from the
other host processes that are invisible inside the Docker container. The huge advantage of
Docker containers against virtual machines is that they spin-up in milliseconds instead of tens
wxPython.cn, unisko at gmail.com�
of seconds and, because they share same kernel, don't have to simulate the entire operating
system, so they are much more
efficient in terms of host resource usage. On the host you see the processe(s) running in a
docker container as normal processes.
Docker 容器的另一重要特性是在它们停止后,任何东西都不会保存下来,所以在它们重启时,就如
同你在启动一个全新的镜像一样。如你需要留存数据,你必须显式地在 Dockerfile 中声明永久卷
(一些文件夹),或者在启动该 Docker 镜像时以-v 参数形式显式挂载宿主机的某个文件夹到
docker 镜像上去。在我们的用例中,我们会显式地将用户整个主目录挂载到 docker 镜像的同样目
录上去。
Another important feature of docker containers is that when they stop nothing is saved so that
when they restart it is as if you are starting a new fresh image. If you need persistence you have
to explicitly declare persistent volumes (folders) on the Dockerfile or you have to explicitly
mount a folder, on the host, on a folder, in the docker image, when you start the docker image
(-v option); in our case we explicitly mount the user's entire home directory inside same
directory in the docker image.
Docker 容器的构建
Building the Docker Container
我之所以将该容器称为 gns3-large,是因为它实在是很大块头的,它包含了用于构建那些该镜像中
的软件所需要的所有东西。其对应的 Dockerfile 在 gns3-large 的 GitHub 代码仓库上有,该文件包
含了实现以下目的的指令:
I called the container gns3-large, because it is quite fat, it contains everything needed to build
some software included in the image. The Docker file is available on the GitHub repository for
the gns3-large project and contains instructions to
• 从 Docker Registry 官方的最新版 Ubuntu(14.04)基础上建立出该镜像
build the image starting from the latest version of Ubuntu (14.04) officially available on
the Docker Registry
• 安装 GNS3 及有关软件所需的那些软件
install software required by GNS3 and related software
• 为实现从 GNS3 内部抓取和分析封包而安装 Wireshark
install Wireshark for packet capture and analysis from inside GNS3
• 编译并安装 Dynamips(GNS3 用到的模拟引擎)
compile and install Dynamips (the simulation engine used by GNS3)
• 安装 gns3-gui 以及 gns3-server,它们是 GNS3 的两个部件
install gns3-gui and gns3-server, the two components of GNS3
wxPython.cn, unisko at gmail.com�
• 编译并安装 VPCS,它是一类 PC 模拟器,所模拟出的计算机仅具备基本的网络测试功能,
如 dhcp 客户端、ping 等
compile and install VPCS, a sort of pc simulator that implements basic network testing
functions like dhcp client, ping etc.
• 编译并安装 iouyap, 它是在 GNS3 中得以执行 IOU 的接口
compile and install iouyap, it is needed to interface the IOU executable with GNS3
• 安装 QEMU,一个类似 VirtualBox 的仿真软件
install QEMU, an emulator similar to VirtualBox
• 安装 Gnome
连接管理器及 gcmconf 脚本
install Gnome Connection Manager and the gcmconf script
• 将 startup.sh 设置为在容器启动时可执行
set startup.sh as the executable that runs when the container starts
该 docker 容器可通过 mybuild 脚本来构建,或者:
The docker container can be built using the mybuild script or:
$ sudo docker build -t="digiampietro/gns3-large" .
你也可以直接从 Docker Registry 上拉下该镜像:
or the image can be pulled from the Docker Registry with:
$ docker pull digiampietro/gns3-large
这两种方式都需要在你的 Linux 系统中事先安装 Docker。
in both cases you need Docker already installed on your Linux system.
GNS3 和容器网络通信的一些问题
Networking GNS3 and container
一个 docker 容器有一个虚拟网络接口 eth0,并由 docker 从 172.17.0.0/16 网络中随机选择了一个
ip 地址分配给它,同时该接口已经管线连接(piped)到宿主机的一个对应接口上,该接口通常有着
“vethb1ed276”这样的名字。而在宿主机上,与其它容器所属的类似接口一起,都在网桥 docker0
上进行桥接,网桥 docker0 的 ip 地址是 172.17.42.1/16。
A docker container has a virtual interface, eth0, with an ip assigned to it randomly chosen by
docker from the network 172.17.0.0/16, this interface is "piped" to a corresponding interface
on the host with a name similar to vethb1ed276; on the host this interface, together with similar
interfaces of other docking containers, are bridged together on the docker0 bridge, that has the
wxPython.cn, unisko at gmail.com�
ip address 172.17.42.1/16.
这样的配置允许每个容器都能与宿主机及其它容器实现通信。而为实现与外部世界的网络通信,
docker 干了下面两件事情:
This configuration allows each container to talk to the host and to the other containers. To
allow networking to the outside world docker does two things:
• 在容器里,它添加了一条到宿主机 ip 地址 172.17.42.1 的默认路由
on the container it adds a default route to the host ip address of 172.17.42.1
• 在宿主机上往 iptables 里添加了一条 NAT 规则:
on the host it adds a NAT rule to iptables:
# You can see that the Docker server creates a masquerade rule that let containers
connect to IP addresses in the outside world:
$ sudo iptables -t nat -L -n
...
Chain POSTROUTING (policy ACCEPT)
target prot opt source
destination
MASQUERADE all -- 172.17.0.0/16
!172.17.0.0/16
…
在 docker 网站上有更多关于 Docker
网络配置的资料。
More details on Docker Network Configuration on the docker site.
在我们的用例中,我既想要从仿真的 GNS3 网络内部到达外部世界,又要从外部世界抵达到仿真的
网络,特别要从宿主机能够使用浏览器和 ASDM Launcher 上来配置仿真出的思科 ASA 设备。为
此我不希望仿真网络是经由 NAT 连接上来的。
In our case I want to be able to reach the outside world from inside the emulated GNS3
network, but I also want to be able to reach the emulated network from the outside world,
especially from the host: I want, for example, be able to use my browser and ASDM Launcher
to configure the emulated Cisco ASA device. For this reason I don't want that the emulated
network is NATted.
为将仿真网络接连至外部世界,GNS3 提供了云符号(Cloud symbol):在其一侧有一个标准接口,
通过该接口可以连接上一台路由器,而另一侧就可以接到某个形如 eth0 这样的物理设备上;但如真
要连接到 eth0 的话,gns3 必须以 root 方式运行;我是不想以 root 方式运行 gns3 的(文件访问权
限和所属关系问题是主要的原因),为此我在容器中创建了一个归运行 gns3 的那个用户所有的
tap0 接口。网络结构如下图所示。
To connect the emulated network to the outside world GNS3 provides the Cloud symbol: on
wxPython.cn, unisko at gmail.com�
one side it has a standard interface that you can connect to a router, on the other side it can be
attached to a physical device like eth0; but to attach it to eth0 gns3 must be run as root; I don't
want to run gns3 as root (mainly because of file access rights and ownership issues), for this
reason I created a tap0 interface, inside the container, owned by the user running gns3. The
picture below shows the network diagram:
启动该 docker 容器
Starting the docker container
此 docker 容器通常通过 myrun.sh 脚本来启动,可以修改这个脚本中的一些设置而满足不同需求,
在 gns3-large
仓库上可以下载到这个脚本。
的 github
The docker container is normally started using the script myrun.sh , that can be personalized to
change settings, available on the gns3large github repository.
为简化在 Docker 容器和宿主机之间的数据共享,我们做了以下设定:
To simplify sharing of data between the Docker container and the host what happens is:
• 在 docker 容器启动的过程中,与当前用户有着相同用户名及 userid 的用户会在容器中创建
出来,其口令为”docker”。这将使得文件的共享十分容易
during the startup of the docker container a user, with same username and userid of
current user, is added to the container, but with the password of docker. This allows
easy sharing of files
• 以-v 选项的方式,当前用户的整个主目录被挂载到容器中,从而实现 gns3 的运行能够取得
主目录的完全访问,免除文件访问权限和所属关系的问题
with the -v option the entire current user's home directory is "mounted" inside the
container, this allows to run gns3 with full access to user's home directory without any
issues related to file access rights and file ownership
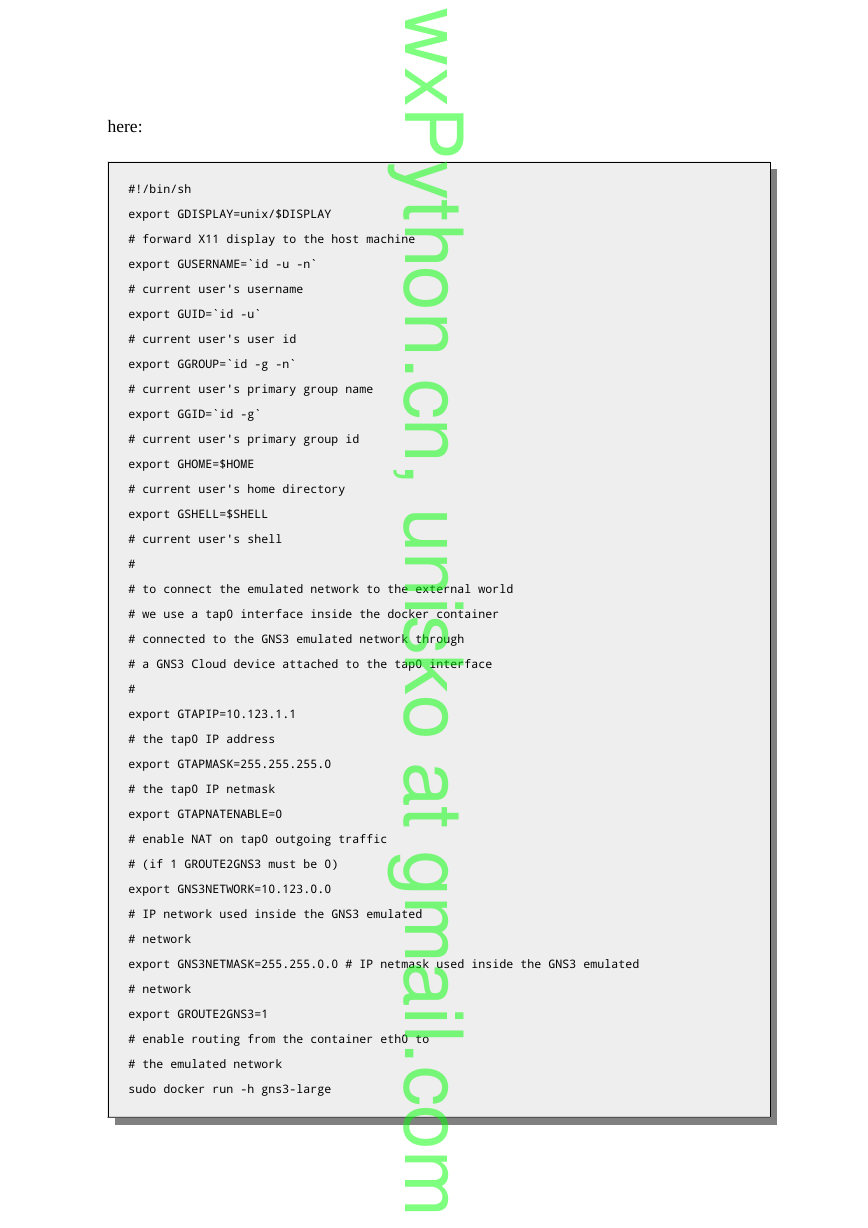
在 myrun.sh 脚本中使用到了许多可以定制的环境变量,该脚本如下所示:
The myrun.sh uses many environment variables that can be personalized, this script is included
wxPython.cn, unisko at gmail.com�
here:
#!/bin/sh
export GDISPLAY=unix/$DISPLAY
# forward X11 display to the host machine
export GUSERNAME=`id -u -n`
# current user's username
export GUID=`id -u`
# current user's user id
export GGROUP=`id -g -n`
# current user's primary group name
export GGID=`id -g`
# current user's primary group id
export GHOME=$HOME
# current user's home directory
export GSHELL=$SHELL
# current user's shell
#
# to connect the emulated network to the external world
# we use a tap0 interface inside the docker container
# connected to the GNS3 emulated network through
# a GNS3 Cloud device attached to the tap0 interface
#
export GTAPIP=10.123.1.1
# the tap0 IP address
export GTAPMASK=255.255.255.0
# the tap0 IP netmask
export GTAPNATENABLE=0
# enable NAT on tap0 outgoing traffic
# (if 1 GROUTE2GNS3 must be 0)
export GNS3NETWORK=10.123.0.0
# IP network used inside the GNS3 emulated
# network
export GNS3NETMASK=255.255.0.0 # IP netmask used inside the GNS3 emulated
# network
export GROUTE2GNS3=1
# enable routing from the container eth0 to
# the emulated network
sudo docker run -h gns3-large
wxPython.cn, unisko at gmail.com�
\
-v /tmp/.X11-unix:/tmp/.X11-unix \
-v $HOME:$HOME
\
-e DISPLAY=$GDISPLAY
\
-e GUSERNAME=$GUSERNAME
\
-e GUID=$GUID
\
-e GGROUP=$GGROUP
\
-e GGID=$GGID
\
-e GHOME=$HOME
\
-e GSHELL=$SHELL
\
-e GTAPIP=$GTAPIP
\
-e GTAPMASK=$GTAPMASK
\
-e GTAPNATENABLE=$GTAPNATENABLE \
-e GNS3NETWORK=$GNS3NETWORK
\
-e GNS3NETMASK=$GNS3NETMASK
\
-e GROUTE2GNS3=$GROUTE2GNS3
\
--privileged
\
-it digiampietro/gns3-large
此脚本运行 digiampietro/gns3-large 容器,需要注意的一下重要的地方:
This script runs the digiampietro/gns3-large container, the important things to note are:
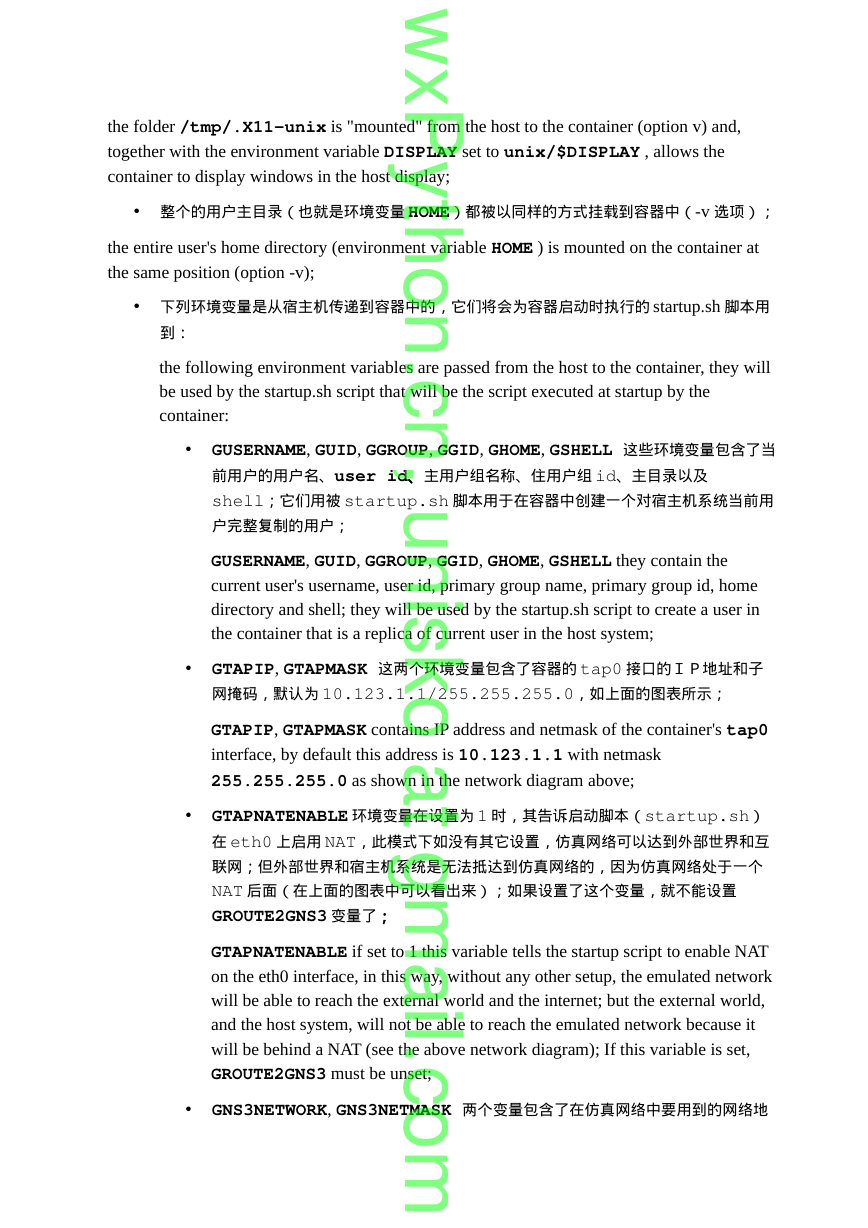
• /tmp/.X11unix 文件夹以-v 选项的方式从宿主机挂载到容器,同时将环境变量
DISPLAY 设置为 unix/$DISPLAY,以允许容器在宿主机的显示屏上显示出窗口;
wxPython.cn, unisko at gmail.com�
the folder /tmp/.X11unix is "mounted" from the host to the container (option v) and,
together with the environment variable DISPLAY set to unix/$DISPLAY , allows the
container to display windows in the host display;
• 整个的用户主目录(也就是环境变量 HOME)都被以同样的方式挂载到容器中(-v 选项);
the entire user's home directory (environment variable HOME ) is mounted on the container at
the same position (option -v);
• 下列环境变量是从宿主机传递到容器中的,它们将会为容器启动时执行的 startup.sh 脚本用
到:
the following environment variables are passed from the host to the container, they will
be used by the startup.sh script that will be the script executed at startup by the
container:
• GUSERNAME, GUID, GGROUP, GGID, GHOME, GSHELL 这些环境变量包含了当
前用户的用户名、user id、主用户组名称、住用户组 id、主目录以及
shell;它们用被 startup.sh 脚本用于在容器中创建一个对宿主机系统当前用
户完整复制的用户;
GUSERNAME, GUID, GGROUP, GGID, GHOME, GSHELL they contain the
current user's username, user id, primary group name, primary group id, home
directory and shell; they will be used by the startup.sh script to create a user in
the container that is a replica of current user in the host system;
• GTAPIP, GTAPMASK 这两个环境变量包含了容器的 tap0 接口的IP地址和子
网掩码,默认为 10.123.1.1/255.255.255.0,如上面的图表所示;
GTAPIP, GTAPMASK contains IP address and netmask of the container's tap0
interface, by default this address is 10.123.1.1 with netmask
255.255.255.0 as shown in the network diagram above;
• GTAPNATENABLE 环境变量在设置为 1 时,其告诉启动脚本(startup.sh)
在 eth0 上启用 NAT,此模式下如没有其它设置,仿真网络可以达到外部世界和互
联网;但外部世界和宿主机系统是无法抵达到仿真网络的,因为仿真网络处于一个
NAT 后面(在上面的图表中可以看出来);如果设置了这个变量,就不能设置
GROUTE2GNS3 变量了;
GTAPNATENABLE if set to 1 this variable tells the startup script to enable NAT
on the eth0 interface, in this way, without any other setup, the emulated network
will be able to reach the external world and the internet; but the external world,
and the host system, will not be able to reach the emulated network because it
will be behind a NAT (see the above network diagram); If this variable is set,
GROUTE2GNS3 must be unset;
• GNS3NETWORK, GNS3NETMASK 两个变量包含了在仿真网络中要用到的网络地
wxPython.cn, unisko at gmail.com�




 2023年江西萍乡中考道德与法治真题及答案.doc
 2012年重庆南川中考生物真题及答案.doc
 2013年江西师范大学地理学综合及文艺理论基础考研真题.doc
 2020年四川甘孜小升初语文真题及答案I卷.doc
 2020年注册岩土工程师专业基础考试真题及答案.doc
 2023-2024学年福建省厦门市九年级上学期数学月考试题及答案.doc
 2021-2022学年辽宁省沈阳市大东区九年级上学期语文期末试题及答案.doc
 2022-2023学年北京东城区初三第一学期物理期末试卷及答案.doc
 2018上半年江西教师资格初中地理学科知识与教学能力真题及答案.doc
 2012年河北国家公务员申论考试真题及答案-省级.doc
 2020-2021学年江苏省扬州市江都区邵樊片九年级上学期数学第一次质量检测试题及答案.doc
 2022下半年黑龙江教师资格证中学综合素质真题及答案.doc