�����������
�����������������������
iCN 330
�
�
�
���
�
���
�
en
fc
�
�
Contents
1. Introduction ............................................................................................ 5
2. Setting Up Your iCN ................................................................................. 6
3. Navigation .............................................................................................. 7
A. New Destinations .............................................................................. 7
B. Saved Destinations .........................................................................10
4. Preferences ..........................................................................................12
5. GPS Status ...........................................................................................13
Appendices ...............................................................................................14
Resetting your iCN ..............................................................................14
Troubleshooting ..................................................................................14
Support Information ..................................................................................14
© 2006 Brunswick New Technologies Asia Pte Limited. Navman is a registered trademark of Brunswick New Technologies Asia Pte Limited and is used under
license by Navman New Zealand. Navman is part of the Bruswick Corporation, headquarters Chicago, IL. All rights reserved.
The software contains proprietary information of Navman; it is provided under a license agreement containing restrictions on use and disclosure and is also
protected by copyright law. Reverse engineering of the software is prohibited.
No part of this publication may be reproduced, stored in a retrieval system, or transmitted in any form or by any means, electronic, mechanical, photocopying,
recording or otherwise without the prior written permission of Navman.
Back-On-Track, Drive-Away, Smart and Turn-by-Turn are either registered trademarks or trademarks of Brunswick New Technologies Asia Pte Limited and
are used under license by Navman New Zealand. All rights reserved.
All other trademarks and registrations are the property of their respective owners.
Published in New Zealand.
Disclaimer
Due to continued product development this information may change without notice. Navman does not warrant that this document is error-free.
The screenshots and other presentations shown in this User Manual may differ from the actual screens and presentations generated by the actual product. All
such differences are minor and the actual product will deliver the described functionality as presented in this User Manual in all material respects.
Compliance
WARNING This product, its packaging and its components contain chemicals known to the State of California to cause cancer, birth defects or reproductive
harm. This Notice is being provided in accordance with California’s Proposition 65.
NOTICE TO DRIVERS IN CALIFORNIA AND MINNESOTA: State law prohibits drivers in California and Minnesota from mounting objects on their windshields
while driving. Other Navman mounting options are recommended and an alternative mounting option is included in this box. Navman does not take any
responsibility for any fines, penalties, or damages that maybe incurred as a result of disregarding this notice. See California Vehicle Code Section 26708(a);
Minnesota Statutes 2005, Section 169.71.
The manufacturer is not responsible for any radio or TV interference caused by unauthorized modifications to this equipment. Such modifications could void
the user’s authority to operate the equipment.
This device complies with part 15 of the FCC Rules. Operation is subject to the following two conditions: (1) This device may not cause harmful interference,
and (2) this device must accept any interference received, including interference that may cause undesired operation.
3
�
Important safety information
PLEASE READ CAREFULLY BEFORE INSTALLING PRODUCT IN VEHICLE
This is the safety alert symbol. It is used to alert you to potential personal injury hazards.
Obey all safety messages that follow this symbol to avoid possible injury or death.
WARNING indicates a potentially hazardous situation which, if not avoided, could result
in death or serious injury.
CAUTION indicates a potentially hazardous situation which, if not avoided, may result in
minor or moderate injury.
CAUTION used without the safety alert symbol indicates a potentially hazardous
situation which, if not avoided, may result in property damage.
Removing original equipment, adding accessories or modifying your vehicle could affect the vehicle’s safety or make it illegal to operate
in some jurisdictions. Follow all product instructions and all instructions in your vehicle owner’s manual regarding accessories or
modifications. Consult your country’s and/or state’s laws regarding operation of a vehicle with any accessories or modifications.
It is your sole responsibility to place, secure and use the iCN in a manner that will not cause accidents, personal injury or property
damage. Always observe safe driving practices.
Mount the iCN in a position that is secure and does not obstruct the driver’s view.
Do not mount the iCN in a way that may interfere with the safe operation of the vehicle, the deployment of air bags or other safety
equipment.
Do not operate the iCN while driving.
Before you use your iCN for the first time, make yourself familiar with your device and its operation.
On main roads, the distance to an exit calculated by the iCN may be further than the distance shown on road signs. Road signs show
the distance to the start of an exit while your iCN shows the distance to the next intersection, i.e., the end of the exit ramp or road. To
prepare to exit a road, always follow distance information on road signs.
Do not handle the iCN while it is hot. Let the product cool, out of direct sunlight.
Do not expose the iCN to direct sunlight in an unattended vehicle for prolonged periods. Overheating may damage the unit.
To discourage theft, do not leave the iCN, mounting bracket or any cables in plain view in an unattended vehicle.
Failure to adhere to these warnings and cautions may lead to death, serious injury, or property damage. Navman disclaims
all liability for installation or use of the iCN that causes or contributes to death, injury, or property damage or that violates
any law.
4
�
1. Introduction
Welcome
Thank you for purchasing the Navman iCN. This user manual has been prepared to guide you through the operation of your Navman iCN from first set-up
through to continuous use. Please read this manual carefully before using your device for the first time. Keep this manual available for future reference.
How Your iCN Works
The Global Positioning System (GPS) is a network of satellites that transmit accurate time and position information worldwide. GPS receivers receive signals
from these satellites and use the information to determine an exact location. Satellites orbit the earth at 20,200 kilometers (around 12,000 miles). While a
GPS receiver can detect signals from up to 12 satellites at any time, only three signals are needed to provide a position or “GPS fix” (latitude and longitude) for
vehicle navigation systems. Your iCN GPS antenna receives GPS signals and uses these to calculate your position on the maps stored on its memory card. To
receive GPS signals, ensure that the iCN is outdoors, or in a vehicle outdoors, and the GPS antenna has an unobstructed view of the sky. The iCN can operate
in all weather types except extreme precipitation (rain, snowfall).
The first time you switch on your iCN, it may take a few minutes to get a GPS fix. This may also be the case when you activate your iCN after the battery has
completely drained.
For more information about GPS and your iCN, see page 13 of this manual or consult the GPS Navigation Frequently Asked Questions guide.
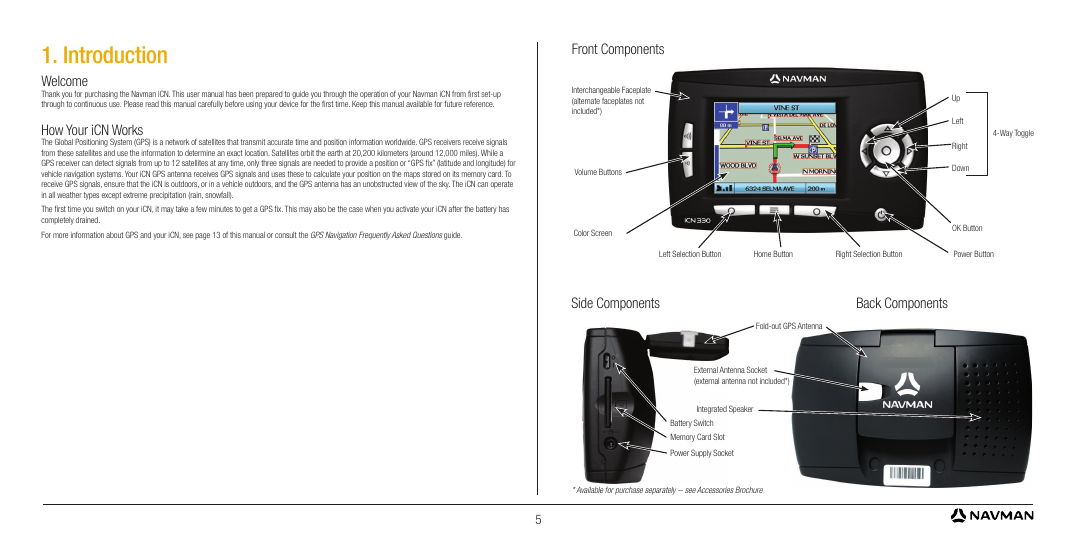
Front Components
Interchangeable Faceplate
(alternate faceplates not
included*)
Volume Buttons
Color Screen
4-Way Toggle
Up
Left
Right
Down
OK Button
Left Selection Button
Home Button
Right Selection Button
Power Button
Side Components
Back Components
Fold-out GPS Antenna
External Antenna Socket
(external antenna not included*)
Integrated Speaker
Battery Switch
Memory Card Slot
Power Supply Socket
* Available for purchase separately - see Accessories Brochure
5
�
2. Setting up your iCN
Using your iCN for the first time
1. Position your iCN in your vehicle as shown in your In-Car Installation Guide. Ensure that the GPS Antenna is pulled out to the horizontal position and
the Battery Switch is in the On position.
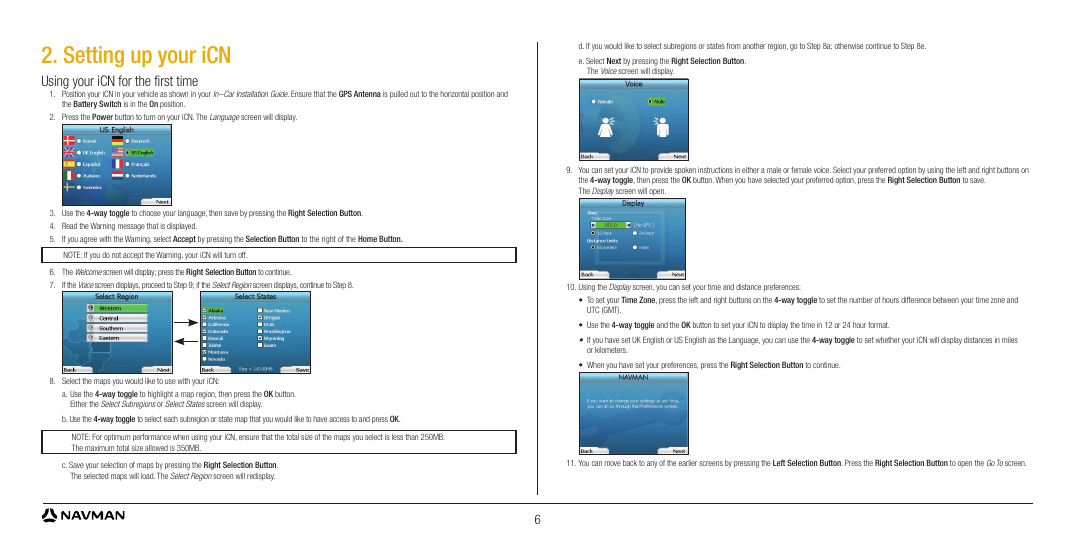
2. Press the Power button to turn on your iCN. The Language screen will display.
d. If you would like to select subregions or states from another region, go to Step 8a; otherwise continue to Step 8e.
e. Select Next by pressing the Right Selection Button.
The Voice screen will display.
3. Use the 4-way toggle to choose your language, then save by pressing the Right Selection Button.
4. Read the Warning message that is displayed.
5. If you agree with the Warning, select Accept by pressing the Selection Button to the right of the Home Button.
NOTE: If you do not accept the Warning, your iCN will turn off.
6. The Welcome screen will display; press the Right Selection Button to continue.
7.
If the Voice screen displays, proceed to Step 9; if the Select Region screen displays, continue to Step 8.
8. Select the maps you would like to use with your iCN:
a. Use the 4-way toggle to highlight a map region, then press the OK button.
Either the Select Subregions or Select States screen will display.
b. Use the 4-way toggle to select each subregion or state map that you would like to have access to and press OK.
NOTE: For optimum performance when using your iCN, ensure that the total size of the maps you select is less than 250MB.
The maximum total size allowed is 350MB.
c. Save your selection of maps by pressing the Right Selection Button.
The selected maps will load. The Select Region screen will redisplay.
9. You can set your iCN to provide spoken instructions in either a male or female voice. Select your preferred option by using the left and right buttons on
the 4-way toggle, then press the OK button. When you have selected your preferred option, press the Right Selection Button to save.
The Display screen will open.
10. Using the Display screen, you can set your time and distance preferences:
• To set your Time Zone, press the left and right buttons on the 4-way toggle to set the number of hours difference between your time zone and
UTC (GMT).
• Use the 4-way toggle and the OK button to set your iCN to display the time in 12 or 24 hour format.
• If you have set UK English or US English as the Language, you can use the 4-way toggle to set whether your iCN will display distances in miles
or kilometers.
• When you have set your preferences, press the Right Selection Button to continue.
11. You can move back to any of the earlier screens by pressing the Left Selection Button. Press the Right Selection Button to open the Go To screen.
6
�
3. Navigation
For your safety, enter destination information before you start a journey. Never operate the iCN while driving.
Do not leave your iCN attached to your windshield when not in use as prolonged exposure to heat may damage the device.
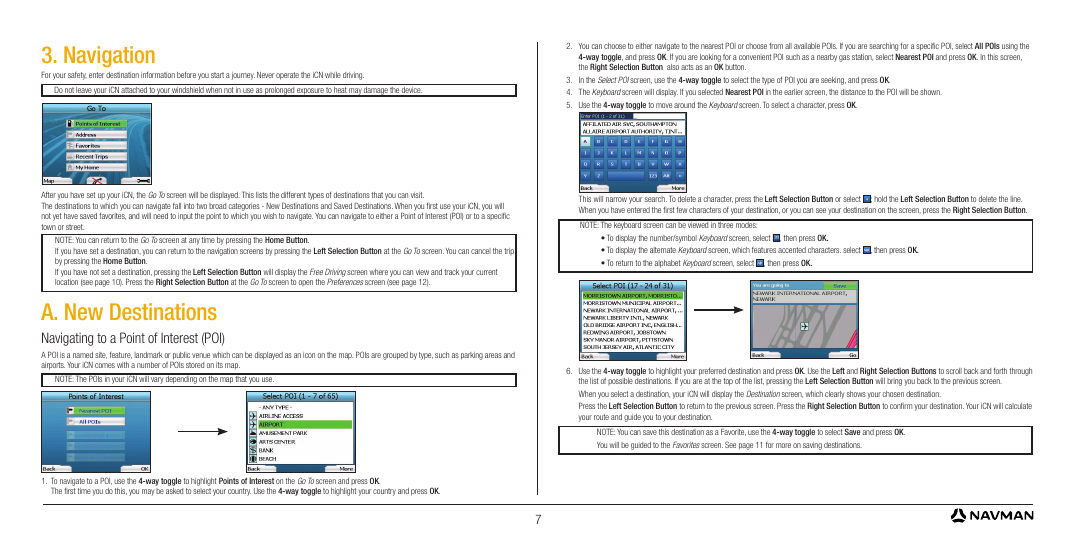
2. You can choose to either navigate to the nearest POI or choose from all available POIs. If you are searching for a specific POI, select All POIs using the
4-way toggle, and press OK. If you are looking for a convenient POI such as a nearby gas station, select Nearest POI and press OK. In this screen,
the Right Selection Button also acts as an OK button.
3. In the Select POI screen, use the 4-way toggle to select the type of POI you are seeking, and press OK.
4. The Keyboard screen will display. If you selected Nearest POI in the earlier screen, the distance to the POI will be shown.
5. Use the 4-way toggle to move around the Keyboard screen. To select a character, press OK.
After you have set up your iCN, the Go To screen will be displayed. This lists the different types of destinations that you can visit.
The destinations to which you can navigate fall into two broad categories - New Destinations and Saved Destinations. When you first use your iCN, you will
not yet have saved favorites, and will need to input the point to which you wish to navigate. You can navigate to either a Point of Interest (POI) or to a specific
town or street.
NOTE: You can return to the Go To screen at any time by pressing the Home Button.
If you have set a destination, you can return to the navigation screens by pressing the Left Selection Button at the Go To screen. You can cancel the trip
by pressing the Home Button.
If you have not set a destination, pressing the Left Selection Button will display the Free Driving screen where you can view and track your current
location (see page 10). Press the Right Selection Button at the Go To screen to open the Preferences screen (see page 12).
A. New Destinations
Navigating to a Point of Interest (POI)
A POI is a named site, feature, landmark or public venue which can be displayed as an icon on the map. POIs are grouped by type, such as parking areas and
airports. Your iCN comes with a number of POIs stored on its map.
NOTE: The POIs in your iCN will vary depending on the map that you use.
1. To navigate to a POI, use the 4-way toggle to highlight Points of Interest on the Go To screen and press OK.
The first time you do this, you may be asked to select your country. Use the 4-way toggle to highlight your country and press OK.
7
This will narrow your search. To delete a character, press the Left Selection Button or select
; hold the Left Selection Button to delete the line.
When you have entered the first few characters of your destination, or you can see your destination on the screen, press the Right Selection Button.
NOTE: The keyboard screen can be viewed in three modes:
• To display the number/symbol Keyboard screen, select
• To display the alternate Keyboard screen, which features accented characters. select
• To return to the alphabet Keyboard screen, select
, then press OK.
, then press OK.
, then press OK.
6. Use the 4-way toggle to highlight your preferred destination and press OK. Use the Left and Right Selection Buttons to scroll back and forth through
the list of possible destinations. If you are at the top of the list, pressing the Left Selection Button will bring you back to the previous screen.
When you select a destination, your iCN will display the Destination screen, which clearly shows your chosen destination.
Press the Left Selection Button to return to the previous screen. Press the Right Selection Button to confirm your destination. Your iCN will calculate
your route and guide you to your destination.
NOTE: You can save this destination as a Favorite, use the 4-way toggle to select Save and press OK.
You will be guided to the Favorites screen. See page 11 for more on saving destinations.
�
Navigating to an Address
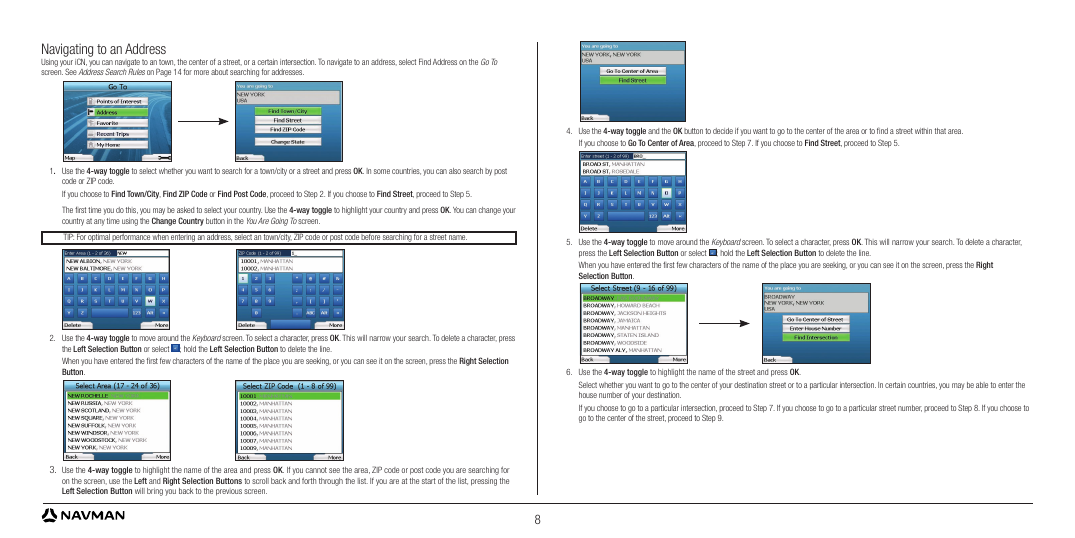
Using your iCN, you can navigate to an town, the center of a street, or a certain intersection. To navigate to an address, select Find Address on the Go To
screen. See Address Search Rules on Page 14 for more about searching for addresses.
1. Use the 4-way toggle to select whether you want to search for a town/city or a street and press OK. In some countries, you can also search by post
code or ZIP code.
If you choose to Find Town/City, Find ZIP Code or Find Post Code, proceed to Step 2. If you choose to Find Street, proceed to Step 5.
The first time you do this, you may be asked to select your country. Use the 4-way toggle to highlight your country and press OK. You can change your
country at any time using the Change Country button in the You Are Going To screen.
TIP: For optimal performance when entering an address, select an town/city, ZIP code or post code before searching for a street name.
2. Use the 4-way toggle to move around the Keyboard screen. To select a character, press OK. This will narrow your search. To delete a character, press
the Left Selection Button or select
; hold the Left Selection Button to delete the line.
When you have entered the first few characters of the name of the place you are seeking, or you can see it on the screen, press the Right Selection
Button.
3. Use the 4-way toggle to highlight the name of the area and press OK. If you cannot see the area, ZIP code or post code you are searching for
on the screen, use the Left and Right Selection Buttons to scroll back and forth through the list. If you are at the start of the list, pressing the
Left Selection Button will bring you back to the previous screen.
4. Use the 4-way toggle and the OK button to decide if you want to go to the center of the area or to find a street within that area.
If you choose to Go To Center of Area, proceed to Step 7. If you choose to Find Street, proceed to Step 5.
5. Use the 4-way toggle to move around the Keyboard screen. To select a character, press OK. This will narrow your search. To delete a character,
press the Left Selection Button or select
; hold the Left Selection Button to delete the line.
When you have entered the first few characters of the name of the place you are seeking, or you can see it on the screen, press the Right
Selection Button.
6. Use the 4-way toggle to highlight the name of the street and press OK.
Select whether you want to go to the center of your destination street or to a particular intersection. In certain countries, you may be able to enter the
house number of your destination.
If you choose to go to a particular intersection, proceed to Step 7. If you choose to go to a particular street number, proceed to Step 8. If you choose to
go to the center of the street, proceed to Step 9.
8
�



 2023年江西萍乡中考道德与法治真题及答案.doc
 2012年重庆南川中考生物真题及答案.doc
 2013年江西师范大学地理学综合及文艺理论基础考研真题.doc
 2020年四川甘孜小升初语文真题及答案I卷.doc
 2020年注册岩土工程师专业基础考试真题及答案.doc
 2023-2024学年福建省厦门市九年级上学期数学月考试题及答案.doc
 2021-2022学年辽宁省沈阳市大东区九年级上学期语文期末试题及答案.doc
 2022-2023学年北京东城区初三第一学期物理期末试卷及答案.doc
 2018上半年江西教师资格初中地理学科知识与教学能力真题及答案.doc
 2012年河北国家公务员申论考试真题及答案-省级.doc
 2020-2021学年江苏省扬州市江都区邵樊片九年级上学期数学第一次质量检测试题及答案.doc
 2022下半年黑龙江教师资格证中学综合素质真题及答案.doc