HD-EU-Eng_cover 4/9/97 11:53 AM Page 1
designing your digital dream
HD100
User’s Guide
User's Guide
Date of Publication : Apr. 2003
Date of First edition : Apr. 2003
Publishing Company : Digitalway Corporation
Address : 5F, Korea Design Center, 344-1, Yatap-dong, Bundang-gu,
Seongnam-si, 463-828, Korea
Tel : +82-31-788-7230
Fax : +82-31-788-7240
Homepage : www.mpio.com
©2003 Digitalway Corporation
Please read all instructions in this User’s Guide before using the player.
�
HD-EU-Eng 4/9/97 11:49 AM Page 2
Designing Your Digital Dream
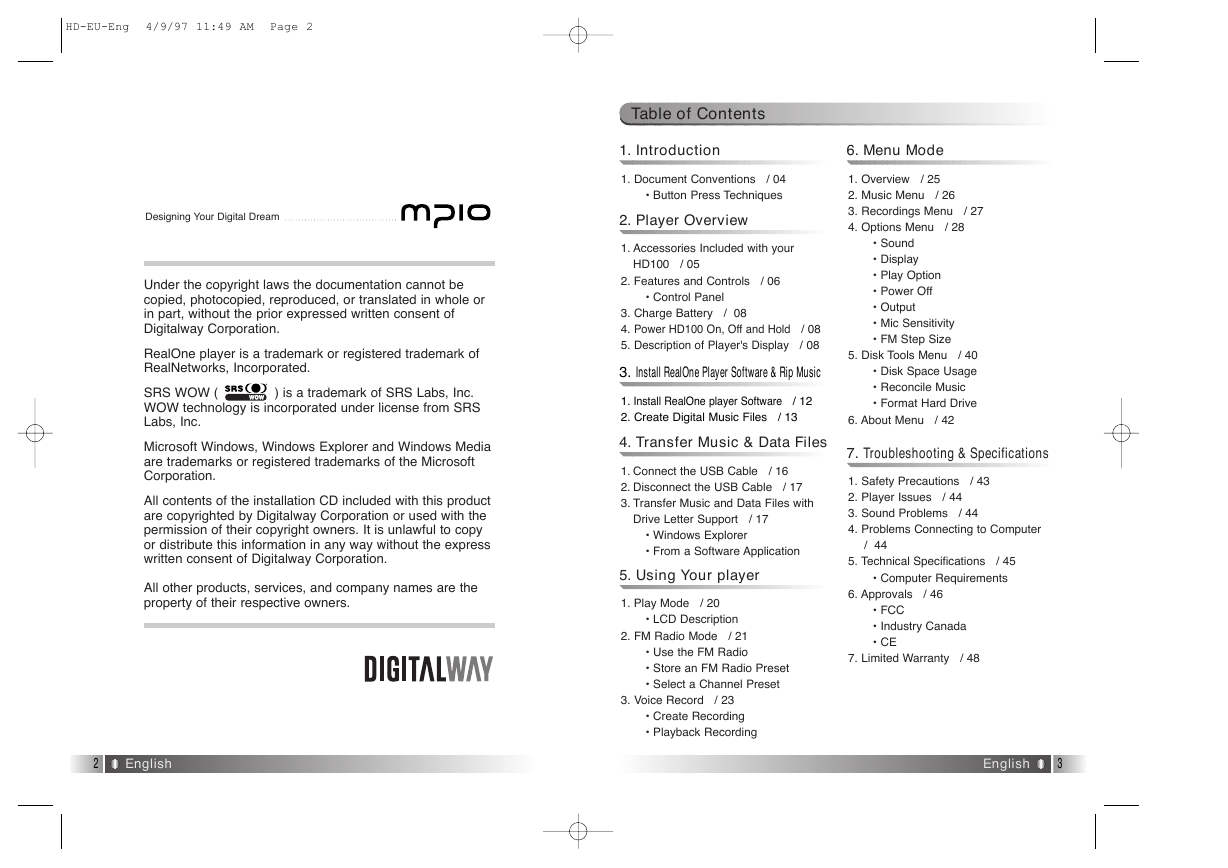
Under the copyright laws the documentation cannot be
copied, photocopied, reproduced, or translated in whole or
in part, without the prior expressed written consent of
Digitalway Corporation.
RealOne player is a trademark or registered trademark of
RealNetworks, Incorporated.
SRS WOW ( ) is a trademark of SRS Labs, Inc.
WOW technology is incorporated under license from SRS
Labs, Inc.
Microsoft Windows, Windows Explorer and Windows Media
are trademarks or registered trademarks of the Microsoft
Corporation.
All contents of the installation CD included with this product
are copyrighted by Digitalway Corporation or used with the
permission of their copyright owners. It is unlawful to copy
or distribute this information in any way without the express
written consent of Digitalway Corporation.
All other products, services, and company names are the
property of their respective owners.
Table of Contents
1. Introduction
6. Menu Mode
1. Document Conventions / 04
• Button Press Techniques
2. Player Overview
1. Overview / 25
2. Music Menu / 26
3. Recordings Menu / 27
4. Options Menu / 28
• Sound
• Display
• Play Option
• Power Off
• Output
• Mic Sensitivity
• FM Step Size
5. Disk Tools Menu / 40
• Disk Space Usage
• Reconcile Music
• Format Hard Drive
6. About Menu / 42
7. Troubleshooting & Specifications
1. Safety Precautions / 43
2. Player Issues / 44
3. Sound Problems / 44
4. Problems Connecting to Computer
/ 44
5. Technical Specifications / 45
• Computer Requirements
6. Approvals / 46
• FCC
• Industry Canada
• CE
7. Limited Warranty / 48
1. Accessories Included with your
HD100 / 05
2. Features and Controls / 06
• Control Panel
3. Charge Battery / 08
/ 08
4. Power HD100 On, Off and Hold
5. Description of Player's Display / 08
3. Install RealOne Player Software & Rip Music
1. Install RealOne player Software
2. Create Digital Music Files / 13
/ 12
4. Transfer Music & Data Files
1. Connect the USB Cable / 16
2. Disconnect the USB Cable / 17
3. Transfer Music and Data Files with
Drive Letter Support / 17
• Windows Explorer
• From a Software Application
5. Using Your player
1. Play Mode / 20
• LCD Description
2. FM Radio Mode / 21
• Use the FM Radio
• Store an FM Radio Preset
• Select a Channel Preset
3. Voice Record / 23
• Create Recording
• Playback Recording
2
English
English
3
�
HD-EU-Eng 4/9/97 11:49 AM Page 4
1
Introduction
Welcome to the world of personal music players and the digital
lifestyle. Using the latest technological advances in both hardware
and software, the HD100 allows you to carry a library of your
favorite music wherever you go.
1. Document Conventions
To use the HD100 Player and RealOne player software, you must
have at least basic skills with the Microsoft Windows operating sys-
tem. This document uses the following conventions and terminolo-
gy:
-
-
Note symbol indicates a useful tip.
Caution symbol indicates important information to prevent dam-
age to your player or avoid inconvenient situations.
- Bold Word or phrase in bold indicates a menu or button selection on
the player. For example: Click the OK button.
- ItalicsPhrase in italics typically indicates a cross-reference to a sec-
tion in the User's Guide.
- > This character is used to describe menu / submenu selections on
the HD100 or in the computer software. For example, select the File >
New menu.
Button Press Techniques Some of the HD100 buttons perform differ-
ent functions depending on how long the button is pressed before it is
released. For example, in Play Mode, a short press of the button goes
to the next track, where as a longer press of the same button fast for-
ward within the current track.
This distinction is made with the following phrases:
- PRESS Instructions that say "press" the button, signify you press and
immediately release the button; it is a short press.
- PRESS AND HOLD Instructions that say "press and hold" the button
signify that you press and momentarily hold the button before releas-
ing it; it is a long press for about one second.
2
Player Overview
This chapter describes the following topics:
• Accessories Included with your HD100 on page 5.
• Features and Controls on page 6.
• How to Charge Battery on page 8.
• How to Power HD100 On, Off and Hold on page 9.
• Description of Player's Display on page 9.
1. Accessories Included with Your HD100
• Quick Guide
• Installation CD with:
• Driver
• RealOne player
• Adobe Acrobat Reader
• User's Guide as a PDF file
• Quick Guide as a PDF file
• Compact stereo earphones
• USB Cable
• Power adaptor
• Carrying case with belt clip
• RCA audio Cable (for home stereo connection)
4
English
English
5
�
HD-EU-Eng 4/9/97 11:49 AM Page 6
2. Features and Controls
Control Panel
The following includes illustrations of the player from the front and top
perspectives and identifies features and controls.
The Control Panel performs a variety of functions depending on which
mode the player is in. The following summarizes the functionality and then
detailed information is provided in the later sections.
MODE Switch between Play and FM Radio Mode.
MENU Used to display the Main Menu from Play Mode.
SCROLL WHEEL Scroll the wheel up or down to increase or decrease
the volume. In FM Radio Mode, press the Scroll Wheel to display the pre-
set list. In Menu mode, scroll up or down to highlight a menu item and
press the wheel to select an item.
Fast forward a track or move to the next track; tune to a radio station
in FM Radio Mode. Also used to highlight the next item in Menu mode.
Used to play or pause a music track or voice recording.
BACK Go back to previous screen in Menu Mode or display / hide the FM
presets list.
The rewind / previous button is used to rewind a track, move to a pre-
vious track or tune in FM Radio Mode. Also used to highlight the previous
item in Menu Mode.
Press and holdto start a voice recording; press to stop a voice
recording.
6
English
English
7
�
HD-EU-Eng 4/9/97 11:49 AM Page 8
3. Charge Battery
4. Power HD100 ON, OFF and HOLD
The built-in Lithium-Ion battery in your HD100 will last for up to 11 hours
of play and takes about 3 hours to fully charge.
It is unnecessary to fully charge or completely discharge the battery
power each time. The Lithium-Ion battery is not subject to a memory
effect that some battery chemistries experience with partial charging.
However, you may want to fully charge the battery to maximize playing
time.
To charge the battery follows these steps:
1. Connect the Power Adaptor to the player and a power source.
POWER ON To turn on the player, move the switch at the top of the play-
er to the ON position. You will see a splash screen on the LCD followed
by Play Mode.
POWER OFF To shut off your HD100, move the switch at the
top of the player to the OFF position. Or, the player will auto-
matically shut off after one minute of inactivity, in Play Mode,
but not during FM Radio or Menu Mode. You can change the
automatic shut off time by using the player's Options> Power Off menu.
HOLD You can lock your player so that it will not respond to accidental
button pushes while the player is on.
To lock the player, move the switch at the top of the player to the HOLD
position and the icon displays on the LCD.
5. Description of Player’s Display
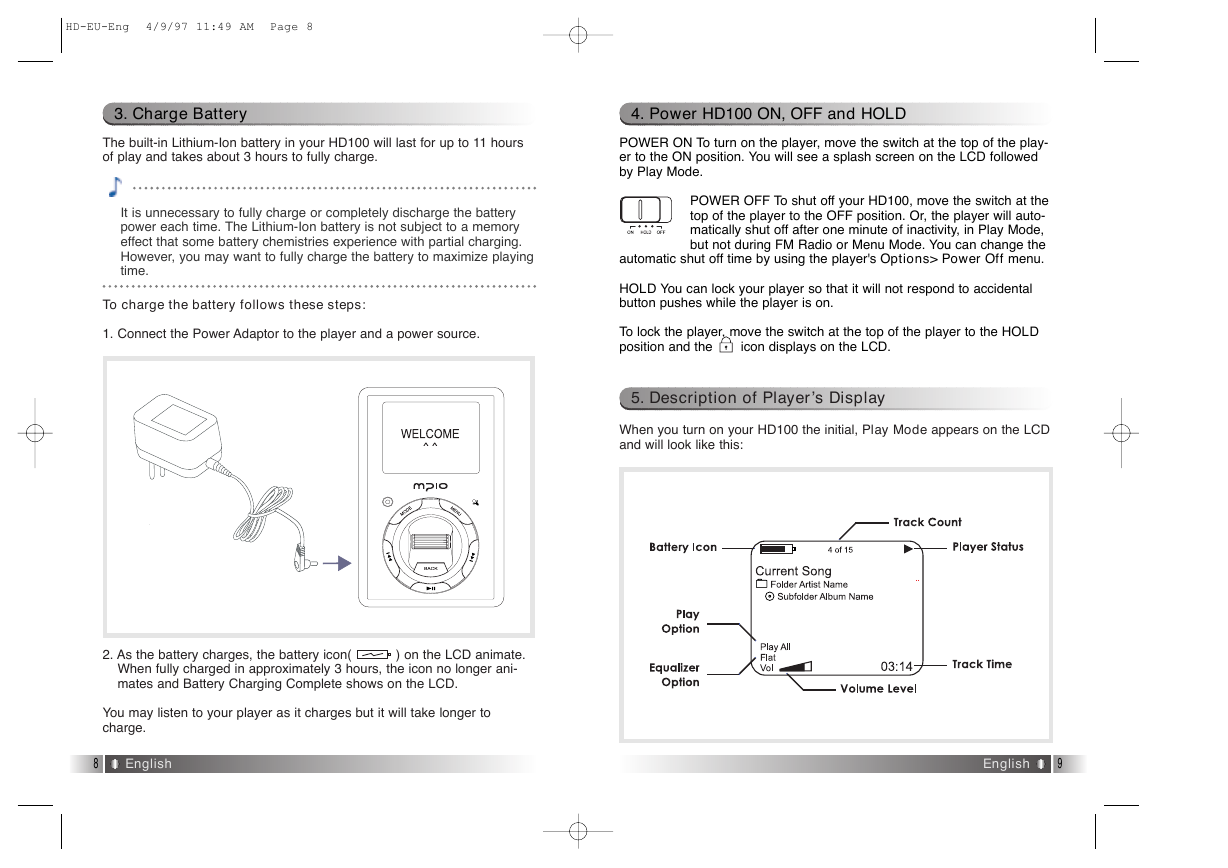
When you turn on your HD100 the initial, Play Mode appears on the LCD
and will look like this:
2. As the battery charges, the battery icon( ) on the LCD animate.
When fully charged in approximately 3 hours, the icon no longer ani-
mates and Battery Charging Complete shows on the LCD.
You may listen to your player as it charges but it will take longer to
charge.
8
English
English
9
�
VOLUME LEVEL Use Scroll Wheel to change the volume level when lis-
tening to music or a voice recording. As you move the wheel up or down,
the volume level between 0 and 30 shows on the LCD.
PLAY OPTIONS Play option signifies one of twelve settings to play fold-
ers and tracks on your HD100:
PLY To play All, Folder, Subfolder or Track.
RPT To repeat All, Folder, Subfolder or Track.
SHF To shuffle All, Folder or Subfolder.
INTRO To play the first nine seconds of all tracks starting at the track
you choose until you press the pause button.
You can change the Options > Play Option setting, for more information,
see Play Option on page 36.
HD-EU-Eng 4/9/97 11:49 AM Page 10
BATTERY ICON The battery icon indicates the amount of battery power
remaining or that the battery is being charged.
Battery is fully charged.
Battery is partially discharged.
Battery is half discharged.
Battery is almost discharged.
Battery has about three minutes of power remaining.
Battery is plugged into a power source and if the icon is animat-
ed, the battery is being charged. For more information see Charge Battery
on page 8.
TRACK COUNT Track Count at the top of the LCD shows the current
track and the total number of tracks within the selected subfolder (album).
PLAYER STATUS Player Status icons indicate the player is in a particular
mode:
Play icon indicates the player playing the selected track. For detailed
information about this topic see Play Mode on page 20.
Pause icon indicates the player is paused.
Record icon indicates the player is recording a voice file as you speak
into the built-in microphone. For detailed information about this topic see
Voice Record on page 23.
Hold icon indicates the player is locked from accidental button press-
es when the power switch is in the HOLD position; for more information
see Hold on page 9.
TRACK TIME Track time is the elapsed time for the current track.
EQUALIZER OPTIONS The HD100 equalizer adjusts bass or treble to
one of six options to enhance sound: Flat, Rock, Jazz, Classical, Dance
and User. You can change the option by using the Options > Sound >Eq
menu. For information about changing the option, see Eq on page 28.
10
English
English
11
�
HD-EU-Eng 4/9/97 11:49 AM Page 12
3
Install RealOne Player Software & Rip Music
RealOne player is third-party software to rip (create) MP3 or WMA
files from audio CD.
RealOne player software for Windows is included on the installation
CD.
If you already have a favorite CD ripping program, you can use that
instead.
This chapter describes how to:
• Install RealOne Player Software on page 12.
• Create Digital Music files page 13.
1. Install RealOne Player Software
Using the RealOne Player software, you can create (rip) digital
music files from your audio CD.
To install the RealOne player software:
1. Insert an installation CD into the PC CD drive.
2. Right-click the Windows
Start button and select Explore from the popup
menu.
3. Navigate the installation CD and open the
RealOne player folder.
4. Double-click the .exe file to begin installation.
5. The RealOne player Setup appears. Follow the setup as instructed. In
most cases, the default installation options are suitable.
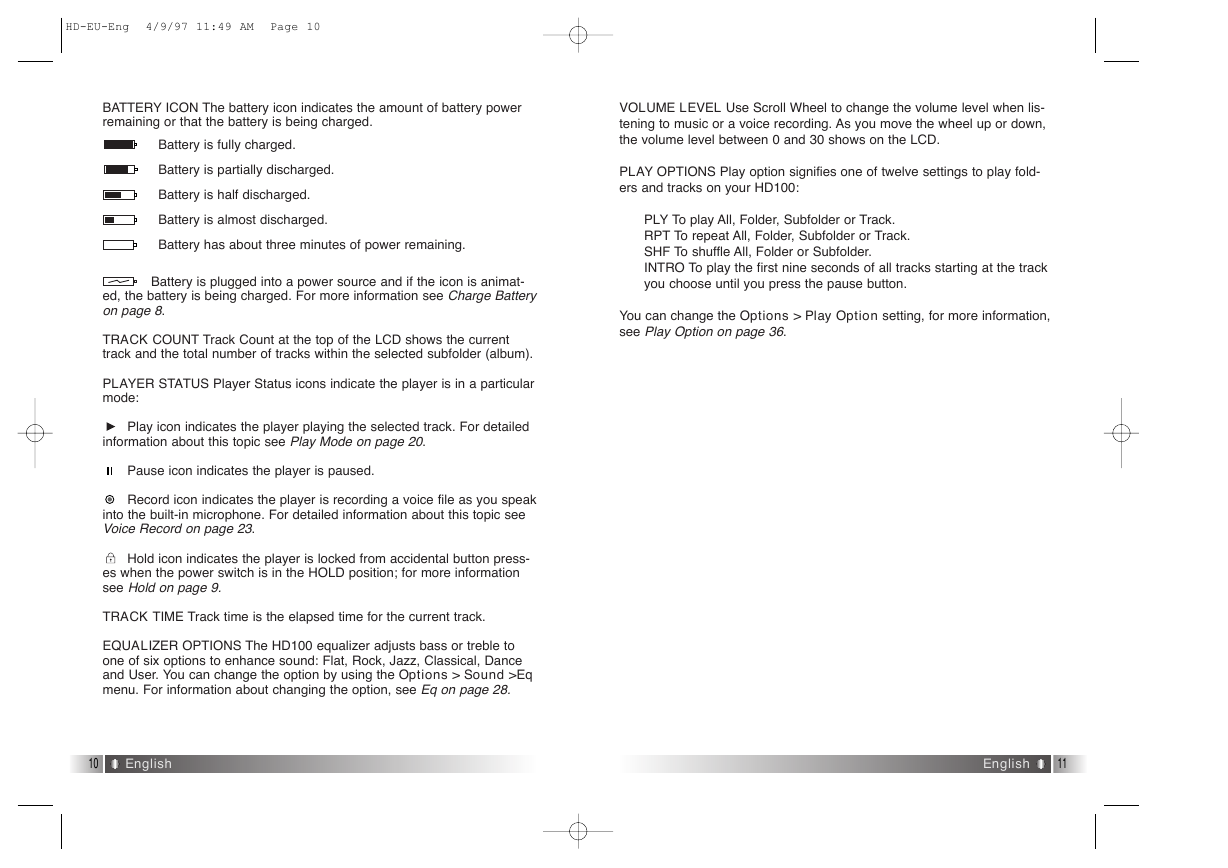
2. Create Digital Music Files
1. Insert an audio CD into the PC CD drive.
2. Start the RealOne player program if not
already started.
3. Click the CD button if music tracks are not
automatically listed.
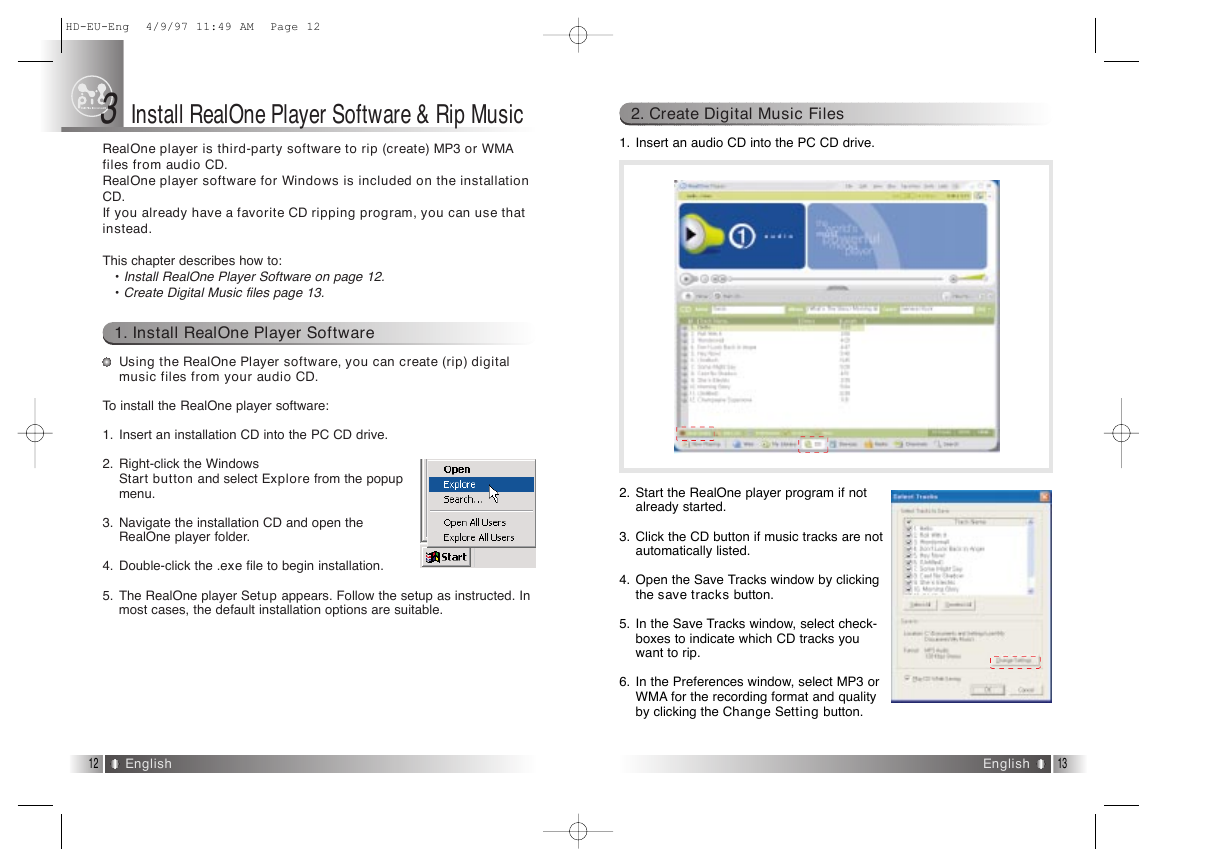
4. Open the Save Tracks window by clicking
the save tracks button.
5. In the Save Tracks window, select check-
boxes to indicate which CD tracks you
want to rip.
6. In the Preferences window, select MP3 or
WMA for the recording format and quality
by clicking the Change Setting button.
12
English
English
13
�
HD-EU-Eng 4/9/97 11:49 AM Page 14
7. Click the OK button, you are ready to rip audio CD.
RealOne player in installation CD is the special edition. It is provided
MP3 encoding function for the high bit rate(56 ~ 320kbps). Please
make sure, if you add another function supplied by the RealOne
player plus, you must pay for it.
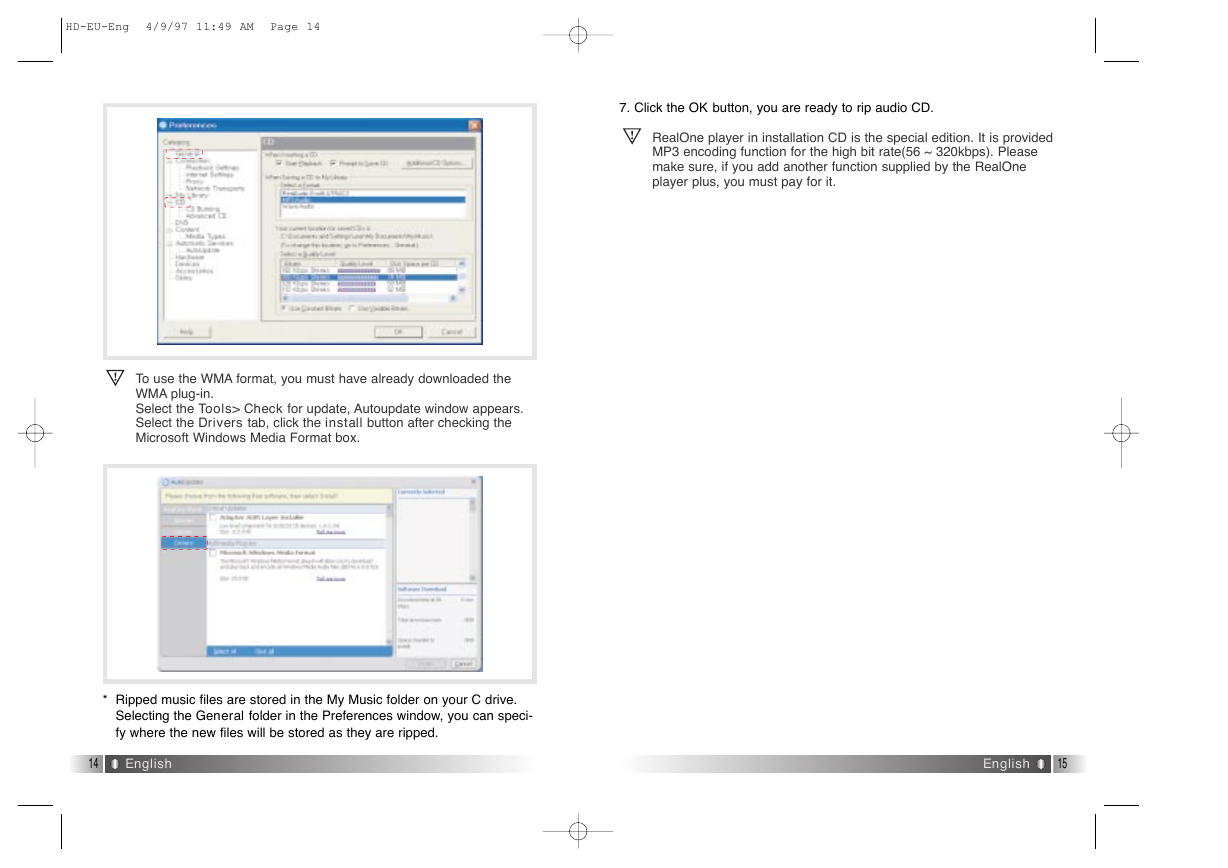
To use the WMA format, you must have already downloaded the
WMA plug-in.
Select the Tools> Check for update, Autoupdate window appears.
Select the Drivers tab, click the install button after checking the
Microsoft Windows Media Format box.
* Ripped music files are stored in the My Music folder on your C drive.
Selecting the General folder in the Preferences window, you can speci-
fy where the new files will be stored as they are ripped.
14
English
English
15
�



 2023年江西萍乡中考道德与法治真题及答案.doc
 2012年重庆南川中考生物真题及答案.doc
 2013年江西师范大学地理学综合及文艺理论基础考研真题.doc
 2020年四川甘孜小升初语文真题及答案I卷.doc
 2020年注册岩土工程师专业基础考试真题及答案.doc
 2023-2024学年福建省厦门市九年级上学期数学月考试题及答案.doc
 2021-2022学年辽宁省沈阳市大东区九年级上学期语文期末试题及答案.doc
 2022-2023学年北京东城区初三第一学期物理期末试卷及答案.doc
 2018上半年江西教师资格初中地理学科知识与教学能力真题及答案.doc
 2012年河北国家公务员申论考试真题及答案-省级.doc
 2020-2021学年江苏省扬州市江都区邵樊片九年级上学期数学第一次质量检测试题及答案.doc
 2022下半年黑龙江教师资格证中学综合素质真题及答案.doc