SL-915GPro-FGR
Chapter 5 RAID & Driver Setup
ITE RAID Controller
ITE RAID Controller IT8212F is built in this mainboard to provide RAID
configuration of Parallel IDE RAID 0, RAID 1, and RAID 0+1 modes.
RAID Drivers are enclosed in a Driver CD as well as a Floppy diskette
to support various RAID systems (Windows 98SE/Me/2000/XP) setup.
5-0 About Disk Array................................................................... 81
5-0-1 Disk Array Interpretation.......................................................... 81
5-0-2 Disk Array Member .................................................................... 81
5-0-3 Disk Array Types ......................................................................... 81
5-1 To Set up IT8212F with ITE RAID Interface ................... 82
5-2 ITE RAID Setup .................................................................... 83
5-3 To Install ITE RAID Driver ................................................. 85
5-3-1 Install RAID Driver on Windows 2000/XP ............................. 85
5-3-2 RAID Driver on Windows 98SE/Me ........................................ 88
80
�
Chapter 5 RAID & Driver Setup
5-0 About Disk Array
5-0-1 Disk Array Interpretation
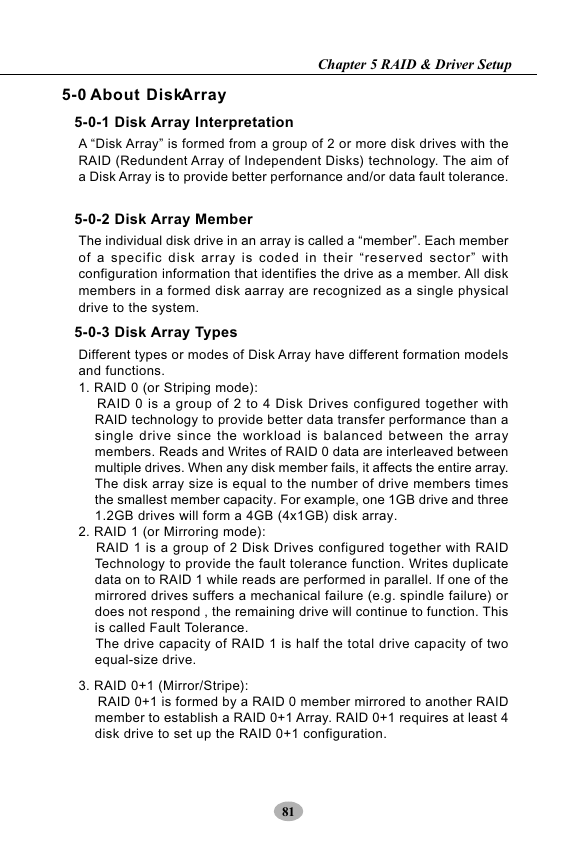
A “Disk Array” is formed from a group of 2 or more disk drives with the
RAID (Redundent Array of Independent Disks) technology. The aim of
a Disk Array is to provide better perfornance and/or data fault tolerance.
5-0-2 Disk Array Member
The individual disk drive in an array is called a “member”. Each member
of a specific disk array is coded in their “reserved sector” with
configuration information that identifies the drive as a member. All disk
members in a formed disk aarray are recognized as a single physical
drive to the system.
5-0-3 Disk Array Types
Different types or modes of Disk Array have different formation models
and functions.
1. RAID 0 (or Striping mode):
RAID 0 is a group of 2 to 4 Disk Drives configured together with
RAID technology to provide better data transfer performance than a
single drive since the workload is balanced between the array
members. Reads and Writes of RAID 0 data are interleaved between
multiple drives. When any disk member fails, it affects the entire array.
The disk array size is equal to the number of drive members times
the smallest member capacity. For example, one 1GB drive and three
1.2GB drives will form a 4GB (4x1GB) disk array.
2. RAID 1 (or Mirroring mode):
RAID 1 is a group of 2 Disk Drives configured together with RAID
Technology to provide the fault tolerance function. Writes duplicate
data on to RAID 1 while reads are performed in parallel. If one of the
mirrored drives suffers a mechanical failure (e.g. spindle failure) or
does not respond , the remaining drive will continue to function. This
is called Fault Tolerance.
The drive capacity of RAID 1 is half the total drive capacity of two
equal-size drive.
3. RAID 0+1 (Mirror/Stripe):
RAID 0+1 is formed by a RAID 0 member mirrored to another RAID
member to establish a RAID 0+1 Array. RAID 0+1 requires at least 4
disk drive to set up the RAID 0+1 configuration.
81
�
SL-915GPro-FGR
5-1 Set up IDE RAID HDDs with IT8212F RAID Interface
PS/2 Mouse
(on top)
JKB1
1
PS/2 KB (underside)
VGA
(on top)
COM1
(underside)
SPDIF
In
SPDIF
Out
IEEE1394a
(on top)
USB Port
USB Port
USB Port
USB Port
CPUFAN
Line Out / Front Speaker Out
Mic In
RTL
8110S
PCIE1
PCIE2
PCIE3
PCIE4
RJ45
(on top)
Line In
(on top)
Rear
Speaker
(on top)
Line in
(on top)
Center/
Subwoofer
Side Speaker
AC'97
ALC850
1
CD-IN1
IEEE1
10
1
1
J1
VIA
VT6307
ITE
IT8712F
RS2
1
ATX1
+12V Power
PWRFAN
PW1
ATX Power
DDR1 DDR2
DDR3 DDR4
LGA775 CPU Socket
Intel
915G
FAN1
z
H
M
3
3
3
/
0
0
4
R
D
D
l
e
n
n
a
h
C
l
a
u
D
LED1
SATA3
SATA2
IDE1
IDE2
IDE3
Li
Battery
1
JBAT1
PCI1
Intel
ICH6
0
A
T
A
S
1
A
T
A
S
LED2
PCI2
BIOS
ITE
IT8212F
LED3
LPT1
FDD1
J3
2
1
USB3
USB2
SYSFAN
1
1
HDD
LED
+ -
IR
PWR
20
1
SPK RST
-
+
PLED
NJ1
IDE2/3
PATA 133 Connector
Supported by IT8212F for 4
Parallel ATA RAID IDE Hard
Disks Setup.
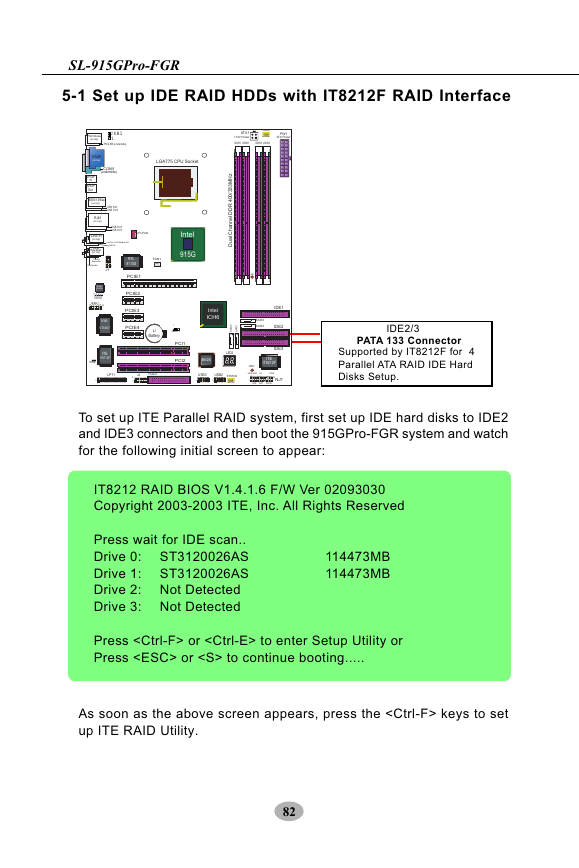
To set up ITE Parallel RAID system, first set up IDE hard disks to IDE2
and IDE3 connectors and then boot the 915GPro-FGR system and watch
for the following initial screen to appear:
IT8212 RAID BIOS V1.4.1.6 F/W Ver 02093030
Copyright 2003-2003 ITE, Inc. All Rights Reserved
Press wait for IDE scan..
Drive 0:
ST3120026AS
Drive 1:
ST3120026AS
Drive 2: Not Detected
Drive 3: Not Detected
114473MB
114473MB
Press or to enter Setup Utility or
Press or to continue booting.....
As soon as the above screen appears, press the keys to set
up ITE RAID Utility.
82
�
Chapter 5 RAID & Driver Setup
5-2 ITE RAID Setup
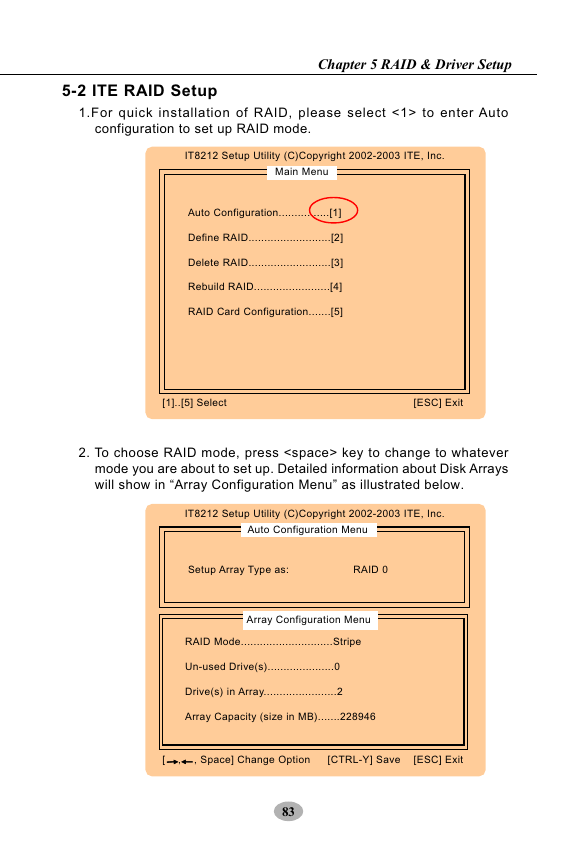
1.For quick installation of RAID, please select <1> to enter Auto
configuration to set up RAID mode.
IT8212 Setup Utility (C)Copyright 2002-2003 ITE, Inc.
Main Menu
Auto Configuration................[1]
Define RAID..........................[2]
Delete RAID..........................[3]
Rebuild RAID........................[4]
RAID Card Configuration.......[5]
[1]..[5] Select
[ESC] Exit
2. To choose RAID mode, press key to change to whatever
mode you are about to set up. Detailed information about Disk Arrays
will show in “Array Configuration Menu” as illustrated below.
IT8212 Setup Utility (C)Copyright 2002-2003 ITE, Inc.
Auto Configuration Menu
Setup Array Type as:
RAID 0
Array Configuration Menu
RAID Mode.............................Stripe
Un-used Drive(s).....................0
Drive(s) in Array.......................2
Array Capacity (size in MB).......228946
[ , , Space] Change Option
[CTRL-Y] Save [ESC] Exit
83
�
SL-915GPro-FGR
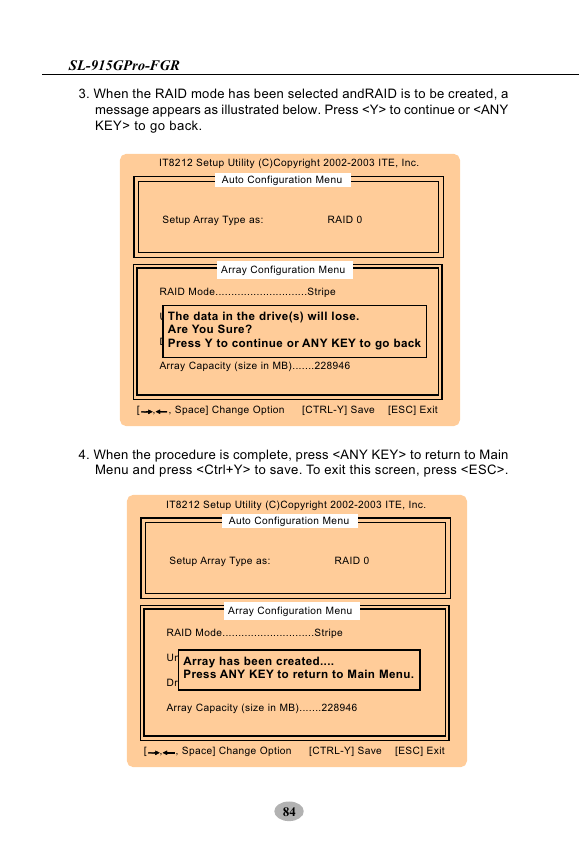
3. When the RAID mode has been selected andRAID is to be created, a
message appears as illustrated below. Press
to continue or to go back.
IT8212 Setup Utility (C)Copyright 2002-2003 ITE, Inc.
Auto Configuration Menu
Setup Array Type as:
RAID 0
Array Configuration Menu
RAID Mode.............................Stripe
Un-used Drive(s).....................0
The data in the drive(s) will lose.
Are You Sure?
Press Y to continue or ANY KEY to go back
Drive(s) in Array.......................2
Array Capacity (size in MB).......228946
[ , , Space] Change Option
[CTRL-Y] Save [ESC] Exit
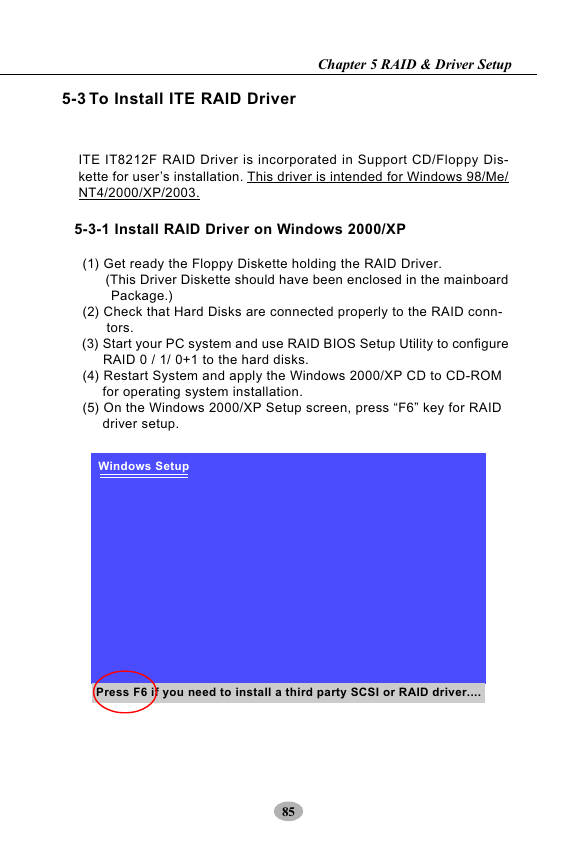
4. When the procedure is complete, press to return to Main
Menu and press to save. To exit this screen, press .
IT8212 Setup Utility (C)Copyright 2002-2003 ITE, Inc.
Auto Configuration Menu
Setup Array Type as:
RAID 0
Array Configuration Menu
RAID Mode.............................Stripe
Un-used Drive(s).....................0
Array has been created....
Press ANY KEY to return to Main Menu.
Drive(s) in Array.......................2
Array Capacity (size in MB).......228946
[ , , Space] Change Option
[CTRL-Y] Save [ESC] Exit
84
�5-3 To Install ITE RAID Driver
Chapter 5 RAID & Driver Setup
ITE IT8212F RAID Driver is incorporated in Support CD/Floppy Dis-
kette for user’s installation. This driver is intended for Windows 98/Me/
NT4/2000/XP/2003.
5-3-1 Install RAID Driver on Windows 2000/XP
(1) Get ready the Floppy Diskette holding the RAID Driver.
(This Driver Diskette should have been enclosed in the mainboard
Package.)
(2) Check that Hard Disks are connected properly to the RAID conn-
tors.
(3) Start your PC system and use RAID BIOS Setup Utility to configure
RAID 0 / 1/ 0+1 to the hard disks.
(4) Restart System and apply the Windows 2000/XP CD to CD-ROM
for operating system installation.
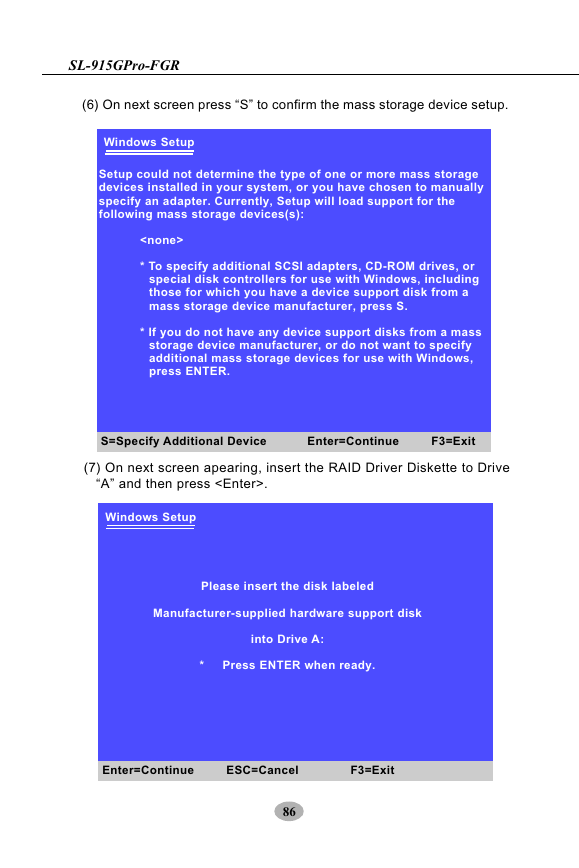
(5) On the Windows 2000/XP Setup screen, press “F6” key for RAID
driver setup.
Windows Setup
Press F6 if you need to install a third party SCSI or RAID driver....
85
�
SL-915GPro-FGR
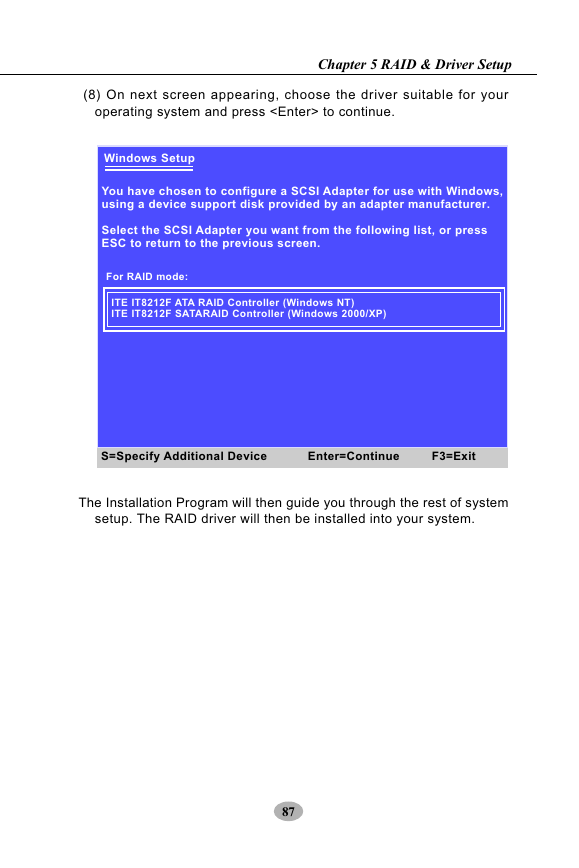
(6) On next screen press “S” to confirm the mass storage device setup.
Windows Setup
Setup could not determine the type of one or more mass storage
devices installed in your system, or you have chosen to manually
specify an adapter. Currently, Setup will load support for the
following mass storage devices(s):
* To specify additional SCSI adapters, CD-ROM drives, or
special disk controllers for use with Windows, including
those for which you have a device support disk from a
mass storage device manufacturer, press S.
* If you do not have any device support disks from a mass
storage device manufacturer, or do not want to specify
additional mass storage devices for use with Windows,
press ENTER.
S=Specify Additional Device
Enter=Continue
F3=Exit
(7) On next screen apearing, insert the RAID Driver Diskette to Drive
“A” and then press .
Windows Setup
Please insert the disk labeled
Manufacturer-supplied hardware support disk
into Drive A:
* Press ENTER when ready.
Enter=Continue
ESC=Cancel
F3=Exit
86
�
(8) On next screen appearing, choose the driver suitable for your
operating system and press to continue.
Chapter 5 RAID & Driver Setup
Windows Setup
You have chosen to configure a SCSI Adapter for use with Windows,
using a device support disk provided by an adapter manufacturer.
Select the SCSI Adapter you want from the following list, or press
ESC to return to the previous screen.
For RAID mode:
ITE IT8212F ATA RAID Controller (Windows NT)
ITE IT8212F SATARAID Controller (Windows 2000/XP)
S=Specify Additional Device
Enter=Continue
F3=Exit
The Installation Program will then guide you through the rest of system
setup. The RAID driver will then be installed into your system.
87
�


 2023年江西萍乡中考道德与法治真题及答案.doc
 2012年重庆南川中考生物真题及答案.doc
 2013年江西师范大学地理学综合及文艺理论基础考研真题.doc
 2020年四川甘孜小升初语文真题及答案I卷.doc
 2020年注册岩土工程师专业基础考试真题及答案.doc
 2023-2024学年福建省厦门市九年级上学期数学月考试题及答案.doc
 2021-2022学年辽宁省沈阳市大东区九年级上学期语文期末试题及答案.doc
 2022-2023学年北京东城区初三第一学期物理期末试卷及答案.doc
 2018上半年江西教师资格初中地理学科知识与教学能力真题及答案.doc
 2012年河北国家公务员申论考试真题及答案-省级.doc
 2020-2021学年江苏省扬州市江都区邵樊片九年级上学期数学第一次质量检测试题及答案.doc
 2022下半年黑龙江教师资格证中学综合素质真题及答案.doc