MATLAB 仿真平面电磁波在不同媒介分界面上的入射、反射和折射
一、实验目的:
1、 进一步学习 MATLAB,初步掌握 GUI 界面的编程。
2、 通过编程实现电磁波仿真效果图。
3、 进一步理解平面电磁波的入射、反射和折射现象
二、实验要求:
1、 以电场为例,动态演示平面电磁波的传播情况。
2、 可以任意设置媒介的介电常数和入射角。
3、 考虑金属导体和空气的分界面平面电磁波的入射、反射情况。
三、实验原理:
电磁波从一种媒质入射到第二种媒质时,分界面使一部分能量反射回第一种
媒质,另一部分能量折射到第二种媒质中,反射波和折射波得大小和相位取决于
分界面两侧的媒质特性、极化方向和入射角大小等,当电磁波入射到理想导体表
面时,会发生全反射。这一过程中包括的主要原理有以下三点。
1、正弦平面波在媒质分界面的反射和折射规律
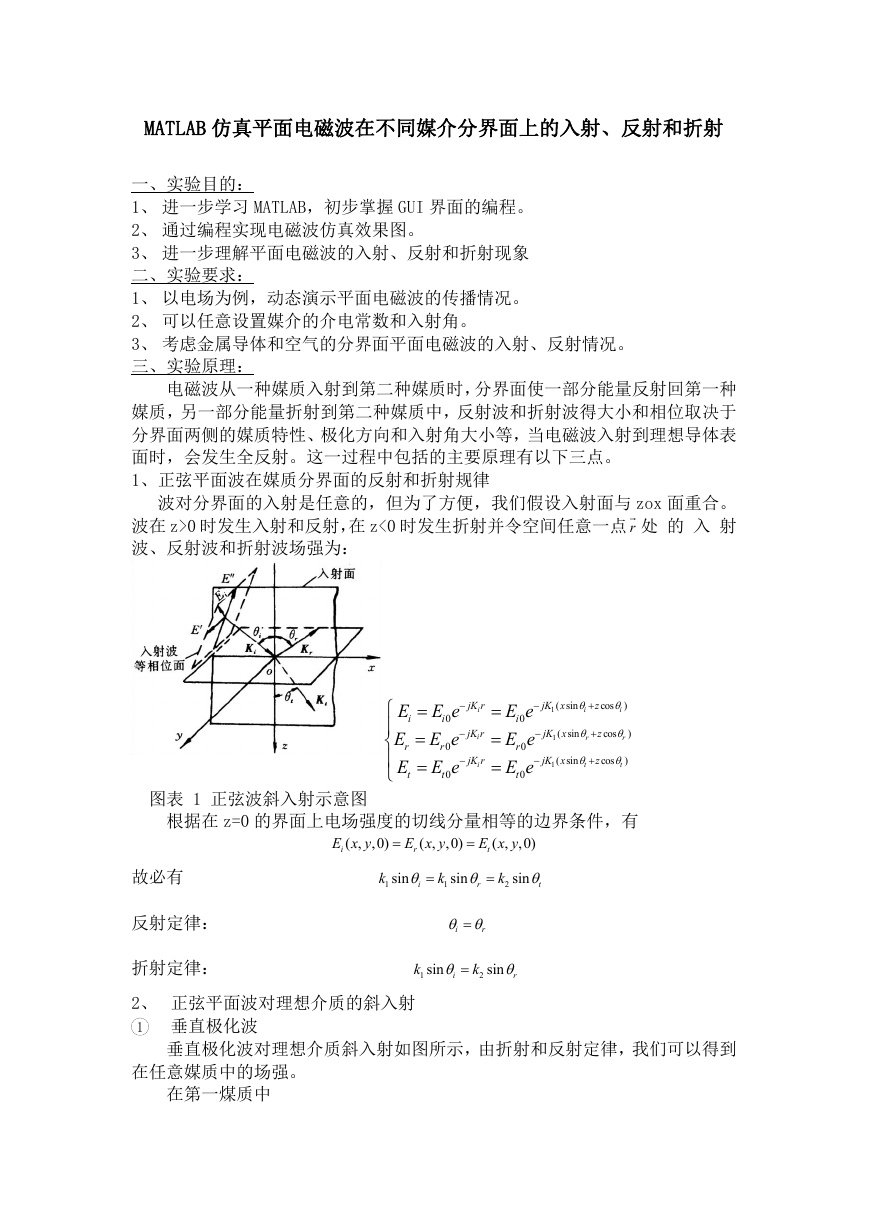
波对分界面的入射是任意的,但为了方便,我们假设入射面与 zox 面重合。
处 的 入 射
波在 z>0 时发生入射和反射,在 z<0 时发生折射并令空间任意一点 r
波、反射波和折射波场强为:
E
i
E
r
E
t
E e
0
i
E e
0
r
E e
0
t
jK r
i
jK r
i
jK r
i
E e
0
i
E e
0
r
E e
0
t
jK x
( sin
1
i
z
cos
i
)
jK x
( sin
1
r
z
cos
r
)
jK x
( sin
1
t
z
cos
t
)
图表 1 正弦波斜入射示意图
根据在 z=0 的界面上电场强度的切线分量相等的边界条件,有
故必有
反射定律:
折射定律:
( ,
E x y
i
,0)
( ,
E x y
r
,0)
( ,
E x y
t
,0)
k
1
sin
i
k
1
sin
r
k
2
sin
t
r
i
k
1
sin
k
i
sin
r
2
2、 正弦平面波对理想介质的斜入射
1 垂直极化波
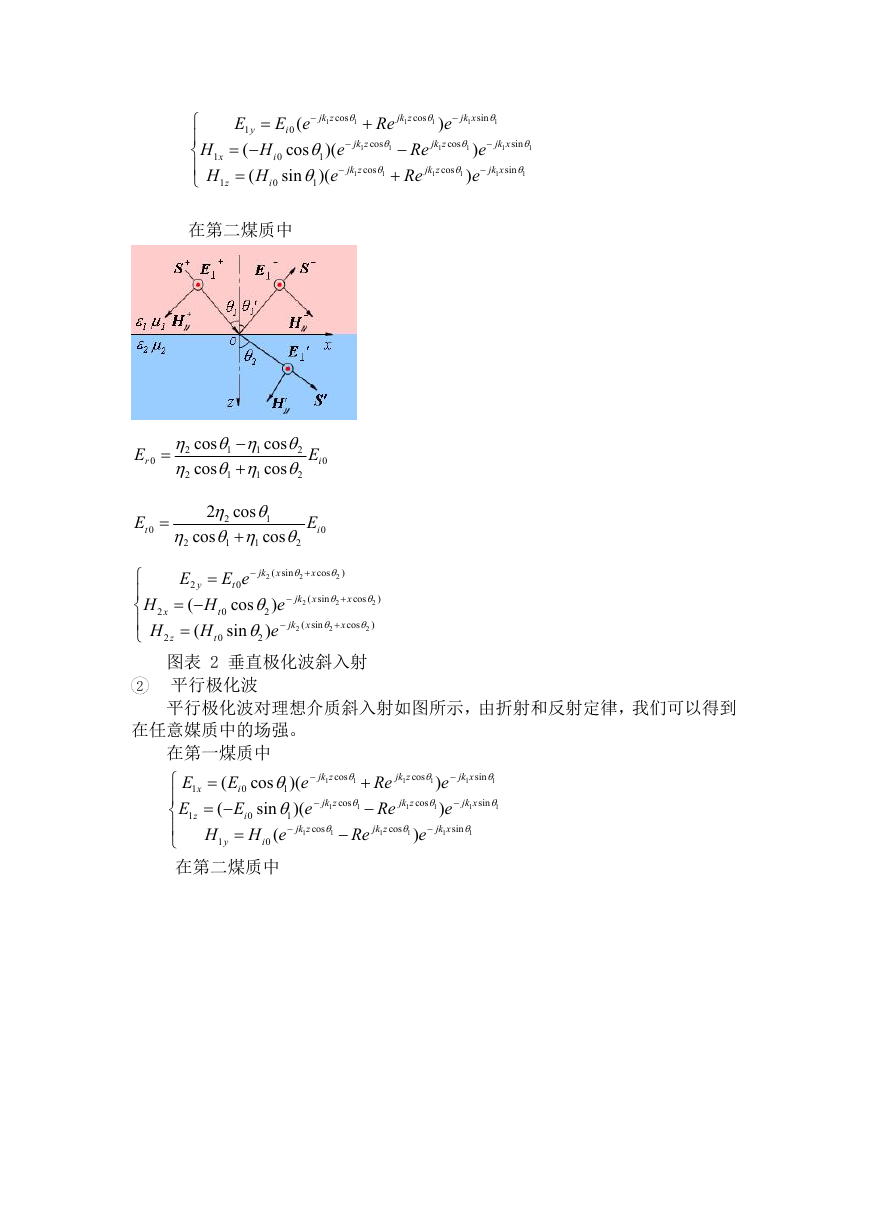
垂直极化波对理想介质斜入射如图所示,由折射和反射定律,我们可以得到
在任意媒质中的场强。
在第一煤质中
�
E
1
y
(
H
(
H
i
H
1
x
H
1
z
jk z
1
(
E e
0
i
cos
)(
e
1
0
sin )(
e
1
i
0
cos
1
Re
cos
jk z
1
1
jk z
1
cos
1
jk z
1
cos
1
jk x
1
sin
1
)
e
cos
jk z
1
1
cos
1
)
Re
jk z
Re
1
jk x
1
sin
1
jk x
1
sin
1
)
e
e
在第二煤质中
E
r
0
E
t
0
2
2
2
cos
cos
cos
cos
1
1
1
1
2
2
1
cos
cos
2
cos
2
1
1
2
E
i
0
E
i
0
E
2
y
(
H
(
H
t
H
2
H
x
2
z
2
jk
E e
0
t
cos
)
e
2
0
)
sin
e
2
t
0
( sin
x
2
x
cos
2
)
jk
2
( sin
x
2
x
cos
2
)
jk
2
( sin
x
2
x
cos
2
)
图表 2 垂直极化波斜入射
2 平行极化波
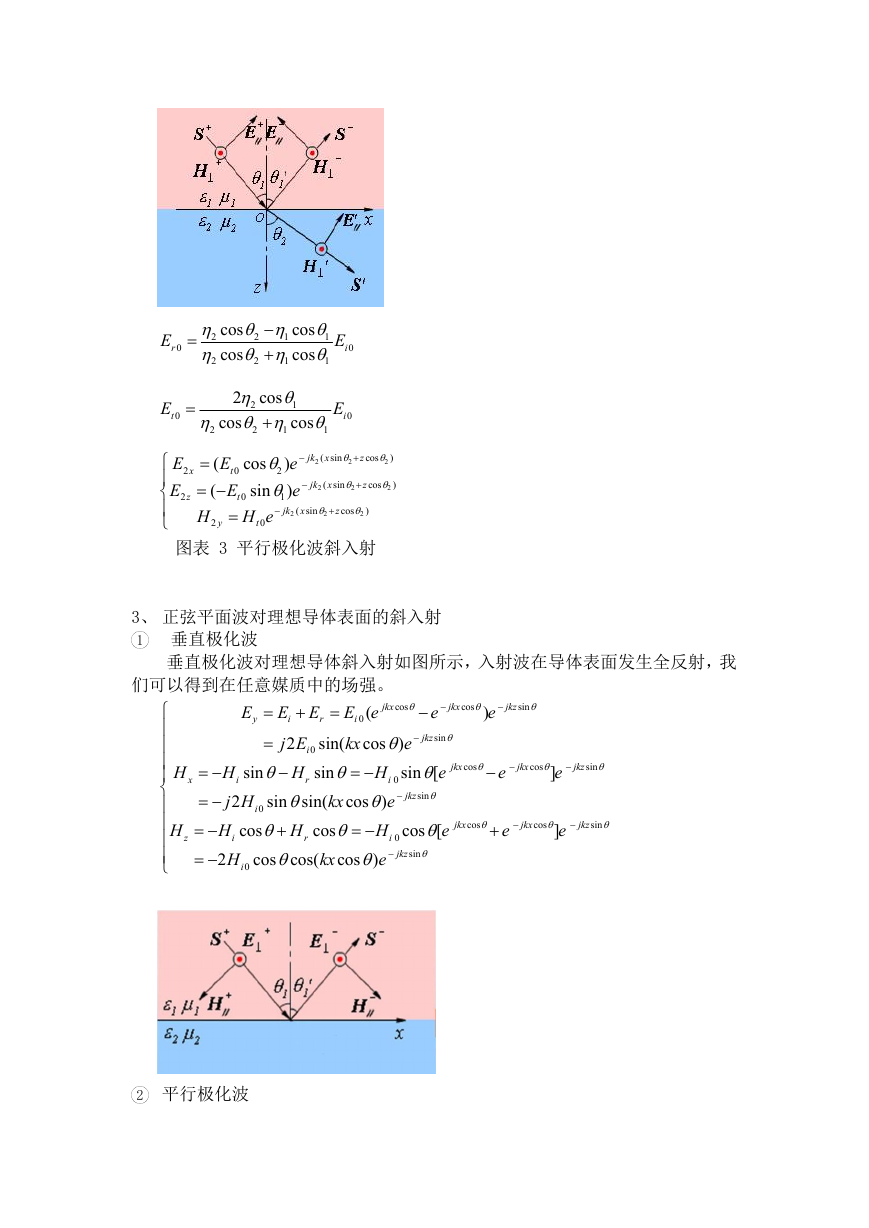
平行极化波对理想介质斜入射如图所示,由折射和反射定律,我们可以得到
在任意媒质中的场强。
x
E
1
E
1
在第一煤质中
)(
cos
e
1
sin )(
e
1
0
cos
jk z
(
H e
1
在第二煤质中
(
E
0
i
(
E
i
H
1
0
y
z
i
jk z
1
cos
1
jk z
1
cos
1
jk x
1
sin
1
1
Re
Re
cos
jk z
Re
1
jk z
1
cos
1
)
e
)
e
)
e
1
sin
jk x
1
1
jk z
1
cos
1
jk x
1
sin
1
�
E
r
0
E
t
0
2
1
1
cos
cos
cos
cos
2
1
2
2
1
2
1
cos
cos
1
cos
2
2
2
1
E
i
0
E
i
0
E
E
2
x
2
z
(
E
0
t
(
E
t
H
2
y
jk
)
cos
e
2
sin )
e
1
0
( sin
x
jk
H e
0
jk
t
2
( sin
x
2
z
cos
2
)
2
( sin
x
2
z
cos
2
)
2
2
z
cos
2
)
图表 3 平行极化波斜入射
3、 正弦平面波对理想导体表面的斜入射
1 垂直极化波
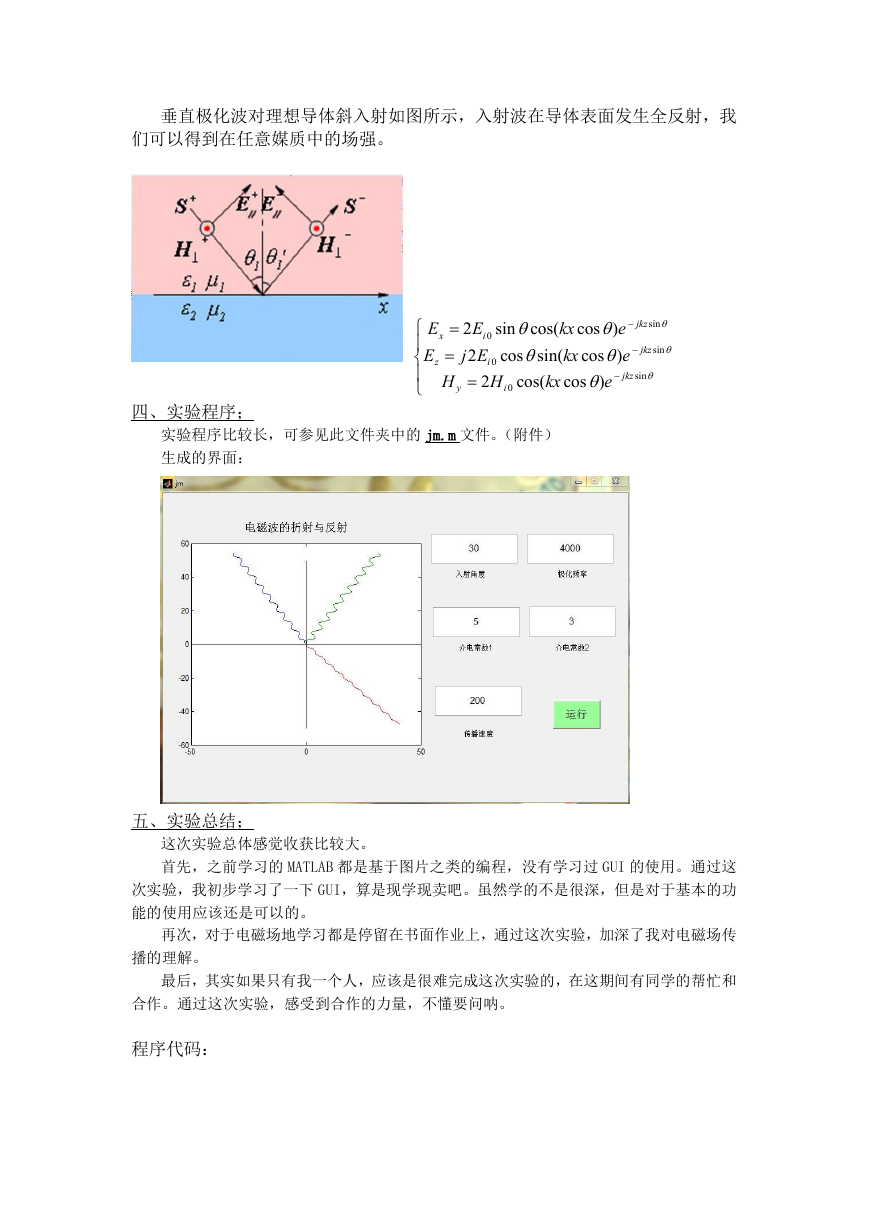
垂直极化波对理想导体斜入射如图所示,入射波在导体表面发生全反射,我
们可以得到在任意媒质中的场强。
jkx
jkx
cos
)
e
jkz
sin
H
x
H
z
y
cos
E
e
sin
jkz
(
E e
E E
0
i
r
i
sin(
cos )
2
j E
kx
e
0
i
sin
sin
sin [
H
H
e
H
0
i
i
sin
jkz
cos )
sin sin(
2
j H
kx
e
0
i
cos
cos
H
H
H
r
i
cos )
cos cos(
2
e
kx
iH
cos [
e
0
sin
jkz
i
0
r
jkx
cos
e
jkx
cos
]
e
jkz
sin
jkx
cos
e
jkx
cos
]
e
jkz
sin
2 平行极化波
�
垂直极化波对理想导体斜入射如图所示,入射波在导体表面发生全反射,我
们可以得到在任意媒质中的场强。
E
E
z
x
H
y
cos )
sin cos(
2
kx
e
E
0
i
2
cos )
cos
sin(
kx
e
j E
0
i
jkz
cos(
cos )
2
H
kx
e
i
0
jkz
sin
jkz
sin
sin
四、实验程序;
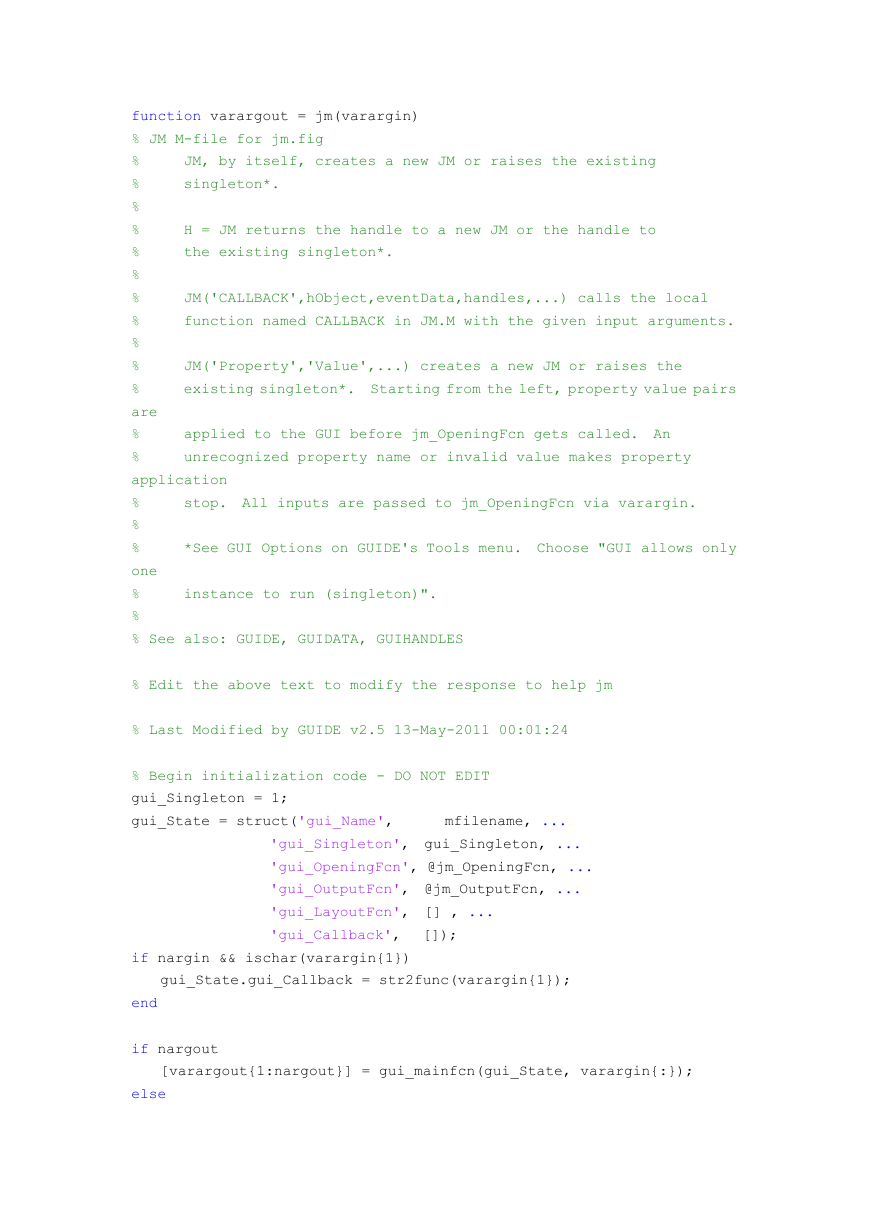
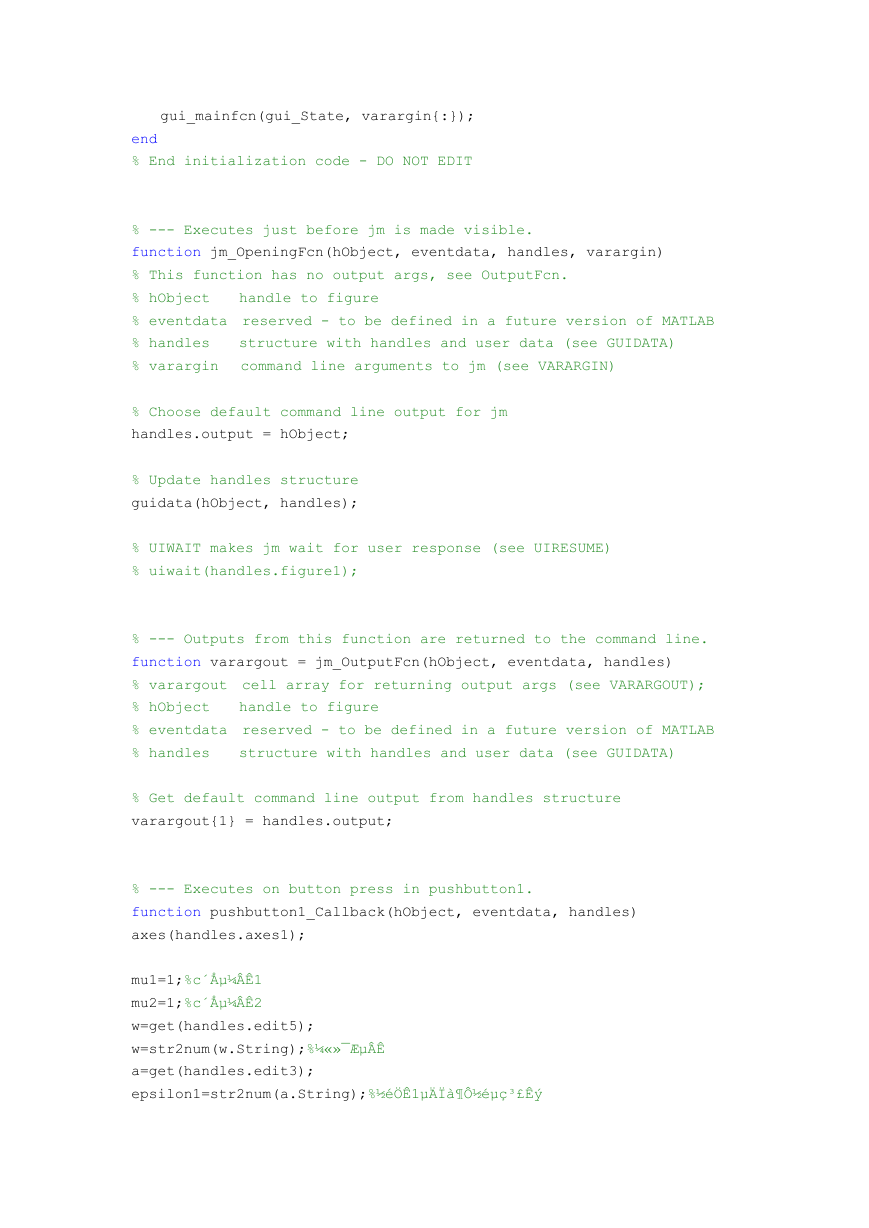
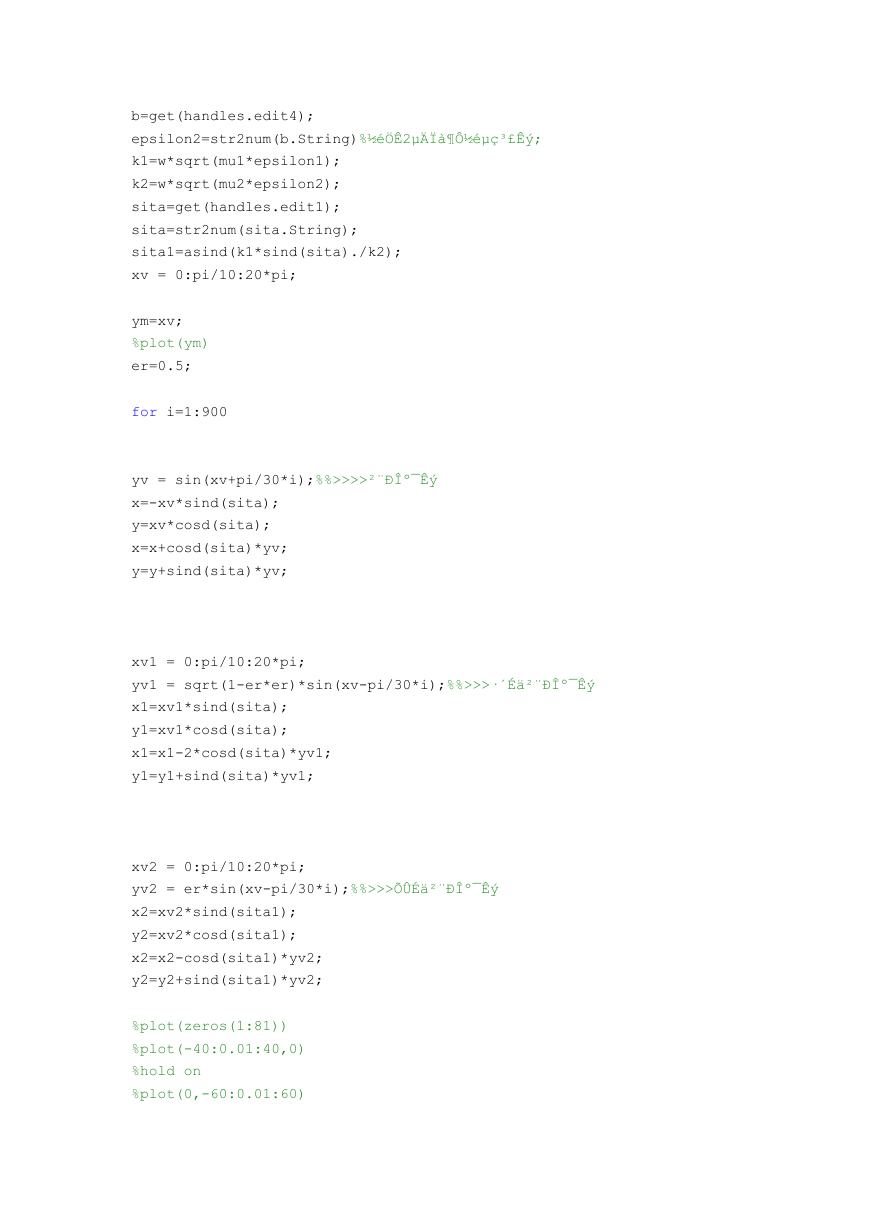
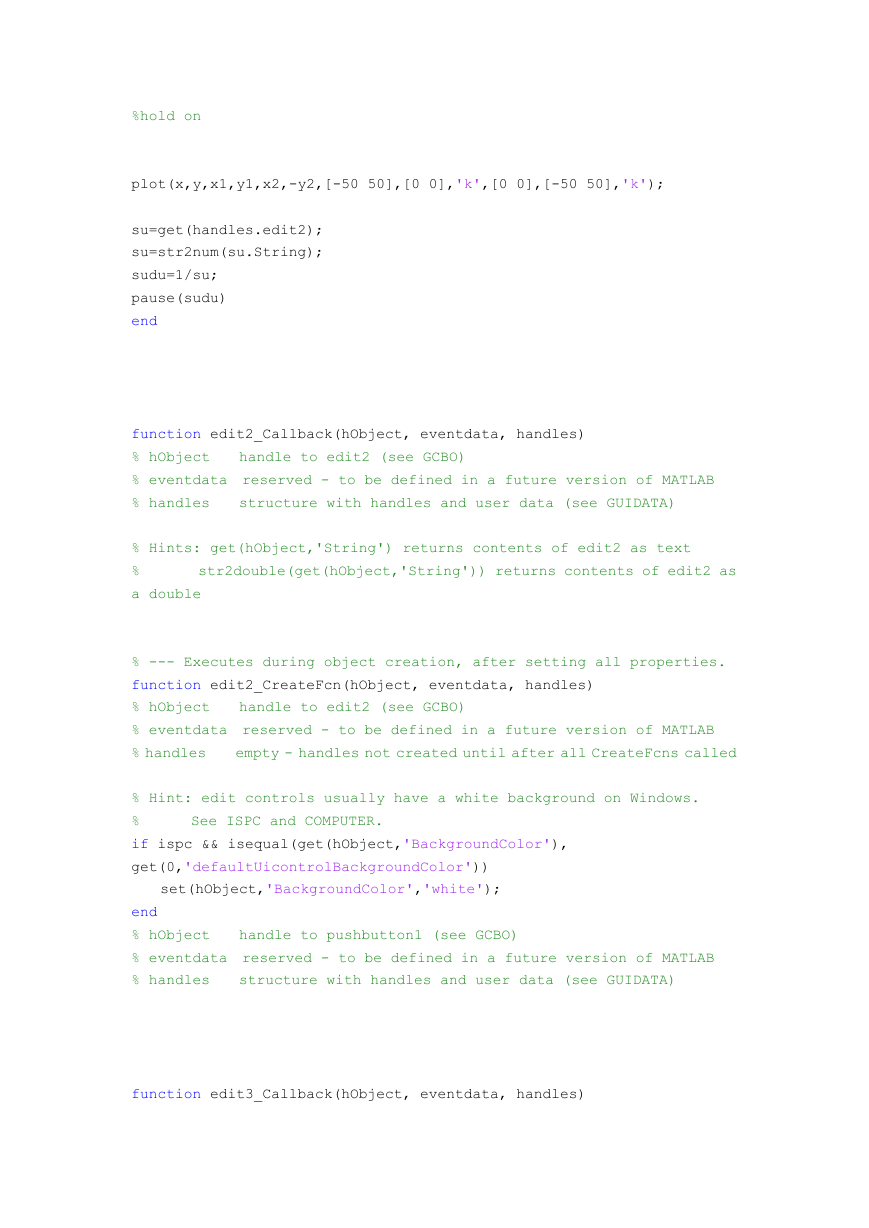
实验程序比较长,可参见此文件夹中的 jm.m 文件。(附件)
生成的界面:
五、实验总结;
这次实验总体感觉收获比较大。
首先,之前学习的 MATLAB 都是基于图片之类的编程,没有学习过 GUI 的使用。通过这
次实验,我初步学习了一下 GUI,算是现学现卖吧。虽然学的不是很深,但是对于基本的功
能的使用应该还是可以的。
再次,对于电磁场地学习都是停留在书面作业上,通过这次实验,加深了我对电磁场传
播的理解。
最后,其实如果只有我一个人,应该是很难完成这次实验的,在这期间有同学的帮忙和
合作。通过这次实验,感受到合作的力量,不懂要问呐。
程序代码:
�
JM, by itself, creates a new JM or raises the existing
singleton*.
H = JM returns the handle to a new JM or the handle to
the existing singleton*.
JM('CALLBACK',hObject,eventData,handles,...) calls the local
function named CALLBACK in JM.M with the given input arguments.
JM('Property','Value',...) creates a new JM or raises the
existing singleton*. Starting from the left, property value pairs
function varargout = jm(varargin)
% JM M-file for jm.fig
%
%
%
%
%
%
%
%
%
%
%
are
%
%
application
%
%
%
one
%
%
% See also: GUIDE, GUIDATA, GUIHANDLES
instance to run (singleton)".
applied to the GUI before jm_OpeningFcn gets called. An
unrecognized property name or invalid value makes property
stop. All inputs are passed to jm_OpeningFcn via varargin.
*See GUI Options on GUIDE's Tools menu. Choose "GUI allows only
% Edit the above text to modify the response to help jm
% Last Modified by GUIDE v2.5 13-May-2011 00:01:24
% Begin initialization code - DO NOT EDIT
gui_Singleton = 1;
gui_State = struct('gui_Name',
mfilename, ...
'gui_Singleton', gui_Singleton, ...
'gui_OpeningFcn', @jm_OpeningFcn, ...
'gui_OutputFcn', @jm_OutputFcn, ...
'gui_LayoutFcn', [] , ...
'gui_Callback',
if nargin && ischar(varargin{1})
[]);
gui_State.gui_Callback = str2func(varargin{1});
end
else
if nargout
[varargout{1:nargout}] = gui_mainfcn(gui_State, varargin{:});
�
gui_mainfcn(gui_State, varargin{:});
end
% End initialization code - DO NOT EDIT
% --- Executes just before jm is made visible.
function jm_OpeningFcn(hObject, eventdata, handles, varargin)
% This function has no output args, see OutputFcn.
% hObject
% eventdata reserved - to be defined in a future version of MATLAB
% handles
% varargin
structure with handles and user data (see GUIDATA)
command line arguments to jm (see VARARGIN)
handle to figure
% Choose default command line output for jm
handles.output = hObject;
% Update handles structure
guidata(hObject, handles);
% UIWAIT makes jm wait for user response (see UIRESUME)
% uiwait(handles.figure1);
% --- Outputs from this function are returned to the command line.
function varargout = jm_OutputFcn(hObject, eventdata, handles)
% varargout cell array for returning output args (see VARARGOUT);
% hObject
% eventdata reserved - to be defined in a future version of MATLAB
% handles
structure with handles and user data (see GUIDATA)
handle to figure
% Get default command line output from handles structure
varargout{1} = handles.output;
% --- Executes on button press in pushbutton1.
function pushbutton1_Callback(hObject, eventdata, handles)
axes(handles.axes1);
mu1=1;%c´Åµ¼ÂÊ1
mu2=1;%c´Åµ¼ÂÊ2
w=get(handles.edit5);
w=str2num(w.String);%¼«»¯ÆµÂÊ
a=get(handles.edit3);
epsilon1=str2num(a.String);%½éÖÊ1µÄÏà¶Ô½éµç³£Êý
�
b=get(handles.edit4);
epsilon2=str2num(b.String)%½éÖÊ2µÄÏà¶Ô½éµç³£Êý;
k1=w*sqrt(mu1*epsilon1);
k2=w*sqrt(mu2*epsilon2);
sita=get(handles.edit1);
sita=str2num(sita.String);
sita1=asind(k1*sind(sita)./k2);
xv = 0:pi/10:20*pi;
ym=xv;
%plot(ym)
er=0.5;
for i=1:900
yv = sin(xv+pi/30*i);%%>>>>²¨Ðκ¯Êý
x=-xv*sind(sita);
y=xv*cosd(sita);
x=x+cosd(sita)*yv;
y=y+sind(sita)*yv;
xv1 = 0:pi/10:20*pi;
yv1 = sqrt(1-er*er)*sin(xv-pi/30*i);%%>>>·´É䲨Ðκ¯Êý
x1=xv1*sind(sita);
y1=xv1*cosd(sita);
x1=x1-2*cosd(sita)*yv1;
y1=y1+sind(sita)*yv1;
xv2 = 0:pi/10:20*pi;
yv2 = er*sin(xv-pi/30*i);%%>>>ÕÛÉ䲨Ðκ¯Êý
x2=xv2*sind(sita1);
y2=xv2*cosd(sita1);
x2=x2-cosd(sita1)*yv2;
y2=y2+sind(sita1)*yv2;
%plot(zeros(1:81))
%plot(-40:0.01:40,0)
%hold on
%plot(0,-60:0.01:60)
�
%hold on
plot(x,y,x1,y1,x2,-y2,[-50 50],[0 0],'k',[0 0],[-50 50],'k');
su=get(handles.edit2);
su=str2num(su.String);
sudu=1/su;
pause(sudu)
end
function edit2_Callback(hObject, eventdata, handles)
% hObject
% eventdata reserved - to be defined in a future version of MATLAB
% handles
structure with handles and user data (see GUIDATA)
handle to edit2 (see GCBO)
% Hints: get(hObject,'String') returns contents of edit2 as text
%
a double
str2double(get(hObject,'String')) returns contents of edit2 as
% --- Executes during object creation, after setting all properties.
function edit2_CreateFcn(hObject, eventdata, handles)
% hObject
% eventdata reserved - to be defined in a future version of MATLAB
% handles
empty - handles not created until after all CreateFcns called
handle to edit2 (see GCBO)
See ISPC and COMPUTER.
% Hint: edit controls usually have a white background on Windows.
%
if ispc && isequal(get(hObject,'BackgroundColor'),
get(0,'defaultUicontrolBackgroundColor'))
set(hObject,'BackgroundColor','white');
end
% hObject
% eventdata reserved - to be defined in a future version of MATLAB
% handles
structure with handles and user data (see GUIDATA)
handle to pushbutton1 (see GCBO)
function edit3_Callback(hObject, eventdata, handles)
�


 2023年江西萍乡中考道德与法治真题及答案.doc
 2012年重庆南川中考生物真题及答案.doc
 2013年江西师范大学地理学综合及文艺理论基础考研真题.doc
 2020年四川甘孜小升初语文真题及答案I卷.doc
 2020年注册岩土工程师专业基础考试真题及答案.doc
 2023-2024学年福建省厦门市九年级上学期数学月考试题及答案.doc
 2021-2022学年辽宁省沈阳市大东区九年级上学期语文期末试题及答案.doc
 2022-2023学年北京东城区初三第一学期物理期末试卷及答案.doc
 2018上半年江西教师资格初中地理学科知识与教学能力真题及答案.doc
 2012年河北国家公务员申论考试真题及答案-省级.doc
 2020-2021学年江苏省扬州市江都区邵樊片九年级上学期数学第一次质量检测试题及答案.doc
 2022下半年黑龙江教师资格证中学综合素质真题及答案.doc