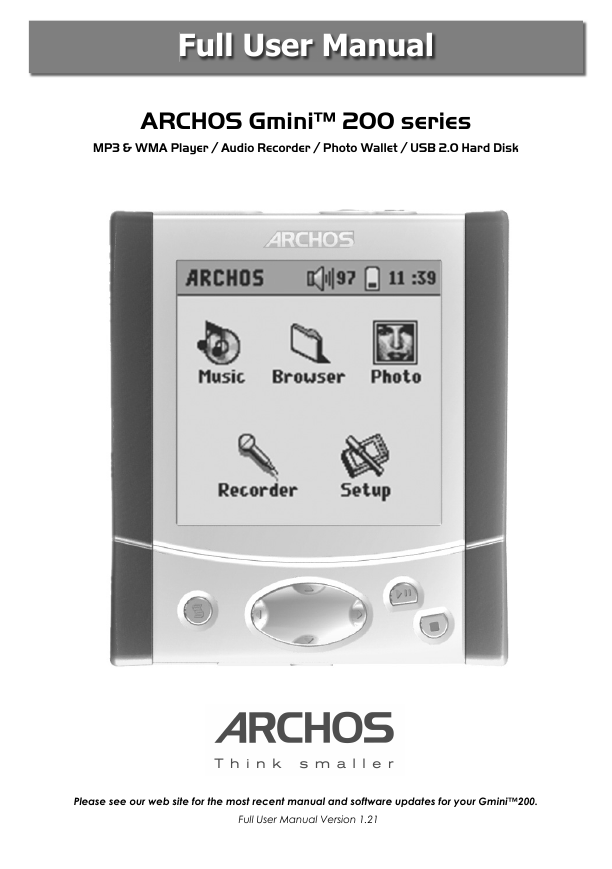
Full User Manual
ARCHOS Gmini™ 200 series
MP3 & WMA Player / Audio Recorder / Photo Wallet / USB 2.0 Hard Disk
Please see our web site for the most recent manual and software updates for your Gmini™200.
Full User Manual Version 1.21
1
�
6 Using MusicMatch™
6.1 Installing MusicMatch™
6.2 Creating MP3 files from your Audio CDs
6.3 Getting purchased MP3 files to your Gmini
6.4 The ARCLibrary and MusicMatch™ Playlists
6.4.1 ARCLibrary Updating
6.4.2 Creating and Using Playlists with MusicMatch™
7 Using iTunes® 4 with your Gmini
8 Updating your Gmini Operating System (OS) software
8.1.1 Downloading the .AOS file
8.1.2 Read the History Text File
8.1.3 Copy to Gmini Root Directory
9 Troubleshooting
9.1 USB Connection issues
9.2 File issues, corrupted data, formatting, and partitioning
9.2.1 Windows® 98SE & ME Running Scan-Disk (Error Checking)
9.2.2 Windows® XP & 2000 Running Check Disk Utility (ChkDsk)
10 Technical Specifications
11 Technical Support
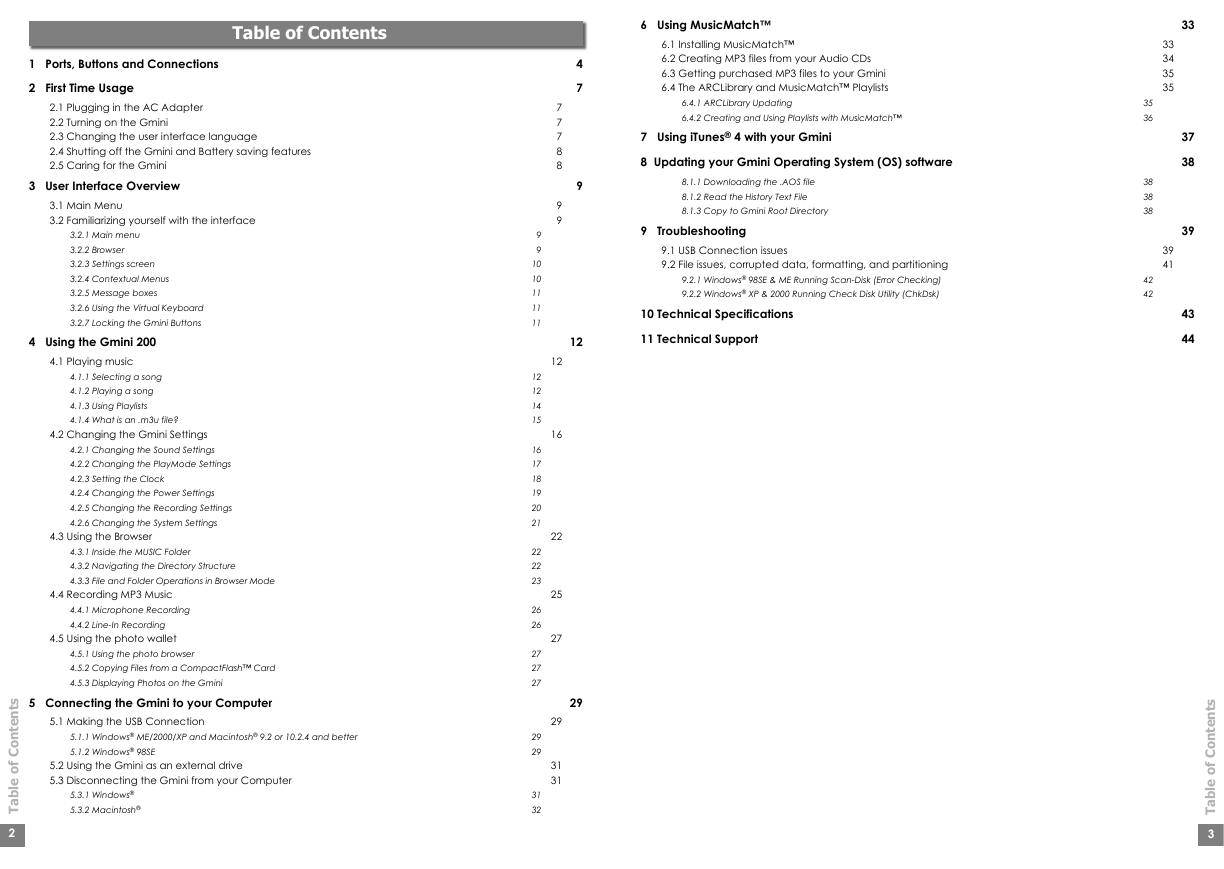
Table of Contents
1 Ports, Buttons and Connections
2 First Time Usage
2.1 Plugging in the AC Adapter
2.2 Turning on the Gmini
2.3 Changing the user interface language
2.4 Shutting off the Gmini and Battery saving features
2.5 Caring for the Gmini
3 User Interface Overview
3.1 Main Menu
3.2 Familiarizing yourself with the interface
3.2.1 Main menu
3.2.2 Browser
3.2.3 Settings screen
3.2.4 Contextual Menus
3.2.5 Message boxes
3.2.6 Using the Virtual Keyboard
3.2.7 Locking the Gmini Buttons
4 Using the Gmini 200
4.1 Playing music
4.1.1 Selecting a song
4.1.2 Playing a song
4.1.3 Using Playlists
4.1.4 What is an .m3u file?
4.2 Changing the Gmini Settings
4.2.1 Changing the Sound Settings
4.2.2 Changing the PlayMode Settings
4.2.3 Setting the Clock
4.2.4 Changing the Power Settings
4.2.5 Changing the Recording Settings
4.2.6 Changing the System Settings
4.3 Using the Browser
4.3.1 Inside the MUSIC Folder
4.3.2 Navigating the Directory Structure
4.3.3 File and Folder Operations in Browser Mode
4.4 Recording MP3 Music
4.4.1 Microphone Recording
4.4.2 Line-In Recording
4.5 Using the photo wallet
4.5.1 Using the photo browser
4.5.2 Copying Files from a CompactFlash™ Card
4.5.3 Displaying Photos on the Gmini
5 Connecting the Gmini to your Computer
5.1 Making the USB Connection
5.1.1 Windows® ME/2000/XP and Macintosh® 9.2 or 10.2.4 and better
5.1.2 Windows® 98SE
5.2 Using the Gmini as an external drive
5.3 Disconnecting the Gmini from your Computer
5.3.1 Windows®
5.3.2 Macintosh®
s
t
n
e
t
n
o
C
f
o
e
l
b
a
T
2
4
7
9
12
29
7
7
7
8
8
9
9
12
16
22
25
27
29
31
31
9
9
10
10
11
11
11
12
12
14
15
16
17
18
19
20
21
22
22
23
26
26
27
27
27
29
29
31
32
33
34
35
35
39
41
35
36
38
38
38
42
42
33
37
38
39
43
44
s
t
n
e
t
n
o
C
f
o
e
l
b
a
T
3
�
1
Ports, Buttons and Connections
appears in top left of screen, a menu is
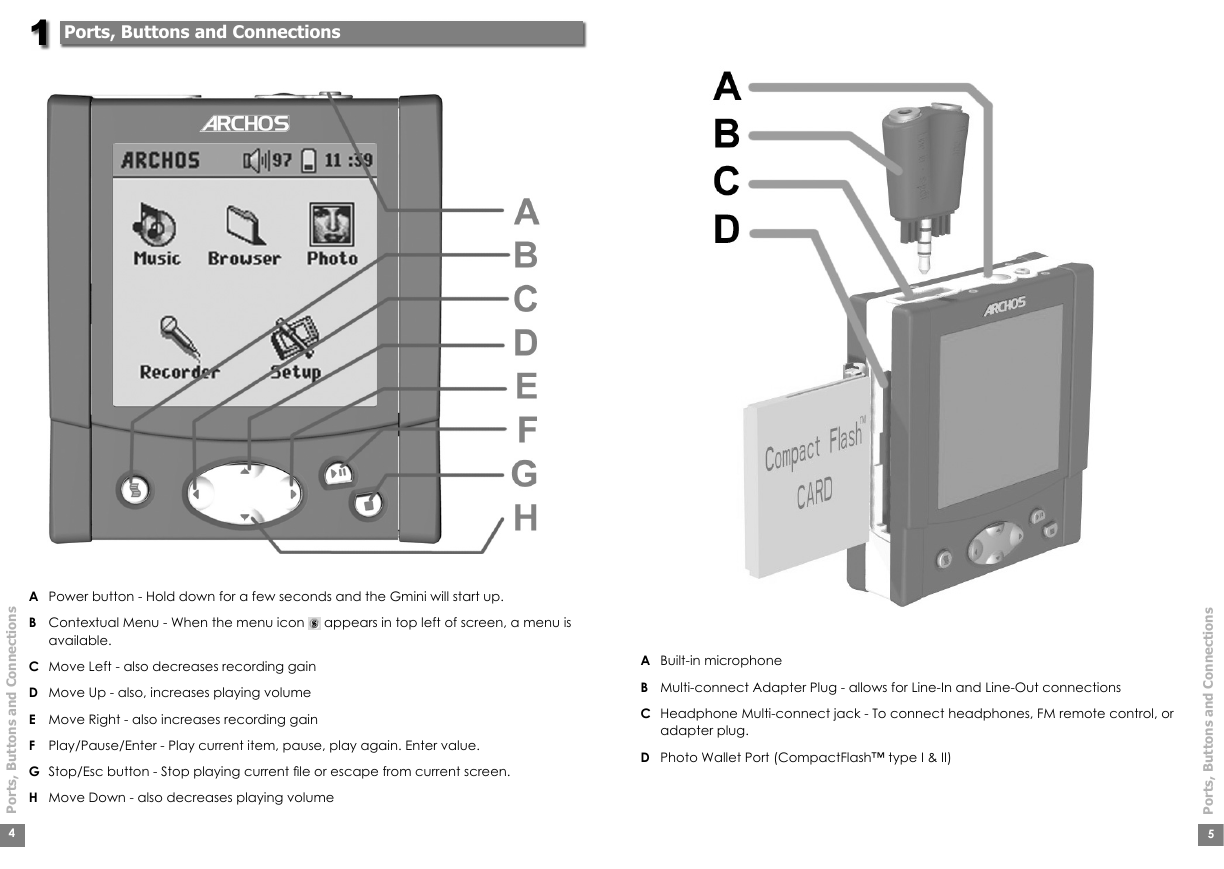
A Power button - Hold down for a few seconds and the Gmini will start up.
B Contextual Menu - When the menu icon
available.
C Move Left - also decreases recording gain
D Move Up - also, increases playing volume
E Move Right - also increases recording gain
F Play/Pause/Enter - Play current item, pause, play again. Enter value.
G Stop/Esc button - Stop playing current fi le or escape from current screen.
H Move Down - also decreases playing volume
s
n
o
i
t
c
e
n
n
o
C
d
n
a
s
n
o
t
t
u
B
,
s
t
r
o
P
4
A Built-in microphone
B Multi-connect Adapter Plug - allows for Line-In and Line-Out connections
C Headphone Multi-connect jack - To connect headphones, FM remote control, or
adapter plug.
D Photo Wallet Port (CompactFlash™ type I & II)
s
n
o
i
t
c
e
n
n
o
C
d
n
a
s
n
o
t
t
u
B
,
s
t
r
o
P
5
�
2
First Time Usage
Please understand that this device has a CPU, hard drive, and
Operating System (OS) and thus it is more like a computer than
a CD player, cassette player, or radio. If you are not familiar
with using a computer, it would be particularly useful to read
through this detailed User Manual.
2.1 Plugging in the AC Adapter
Before using your Gmini 200 for the fi rst time, completely charge the internal batteries.
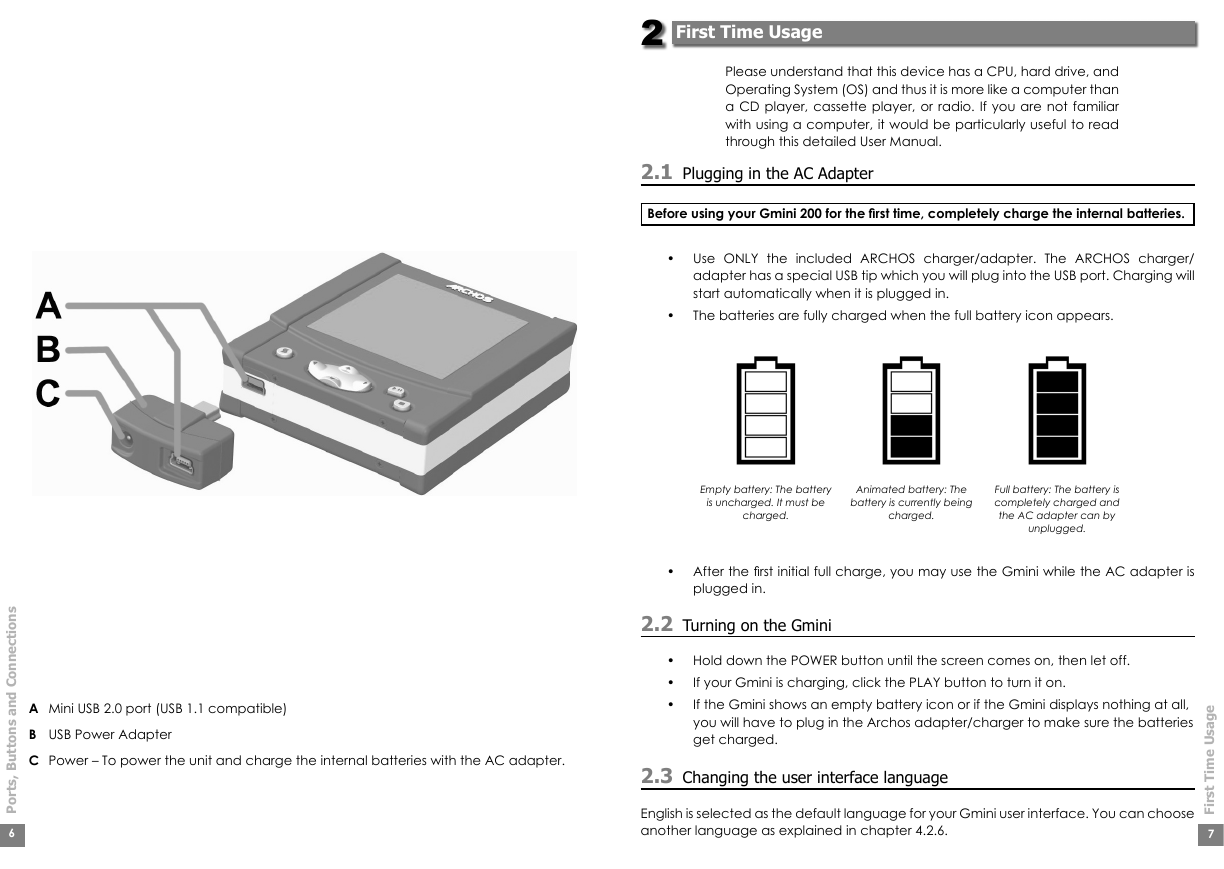
• Use ONLY the included ARCHOS charger/adapter. The ARCHOS charger/
adapter has a special USB tip which you will plug into the USB port. Charging will
start automatically when it is plugged in.
The batteries are fully charged when the full battery icon appears.
•
Empty battery: The battery
is uncharged. It must be
charged.
Animated battery: The
battery is currently being
charged.
Full battery: The battery is
completely charged and
the AC adapter can by
unplugged.
• After the fi rst initial full charge, you may use the Gmini while the AC adapter is
plugged in.
2.2 Turning on the Gmini
• Hold down the POWER button until the screen comes on, then let off.
•
•
If your Gmini is charging, click the PLAY button to turn it on.
If the Gmini shows an empty battery icon or if the Gmini displays nothing at all,
you will have to plug in the Archos adapter/charger to make sure the batteries
get charged.
2.3 Changing the user interface language
English is selected as the default language for your Gmini user interface. You can choose
another language as explained in chapter 4.2.6.
s
n
o
i
t
c
e
n
n
o
C
d
n
a
s
n
o
t
t
u
B
,
s
t
r
o
P
6
A Mini USB 2.0 port (USB 1.1 compatible)
B USB Power Adapter
C Power – To power the unit and charge the internal batteries with the AC adapter.
e
g
a
s
U
e
m
T
t
s
r
i
F
i
7
�
2.4 Shutting off the Gmini and Battery saving features
•
•
To shut off the unit, press and hold the POWER button for 3 seconds.
If left idle, the screen’s blue backlight will shut off after 20 seconds in order to
save battery power. After 30 seconds, the screen display will shut off, also to
save energy. Finally, the Gmini will shut itself off completely after 3 minutes if
left idle and no music is playing. You can change these settings under [Setup
Power].
2.5 Caring for the Gmini
The Gmini is an electronic product that needs to be treated with care.
• Do not subject it to shock. You may however go jogging with it or do sports.
• Do not subject it to heat. Keep it ventilated. Be careful that the surface it is on, is
a fl at clear surface. Placing the Gmini on a pillow, blanket, carpet, or wrapped
up to protect it will restrict the necessary ventilation that it needs. This increase in
operating temperature may cause damage to the device.
• Keep the Gmini away from water and excessively humid areas.
• Keep the Gmini away from high electromagnetic fi elds.
• Keep it plugged into the Archos AC adapter/charger when it is connected to
your computer.
e
g
a
s
U
e
m
T
t
s
r
i
F
i
8
User Interface Overview
3
3.1 Main Menu
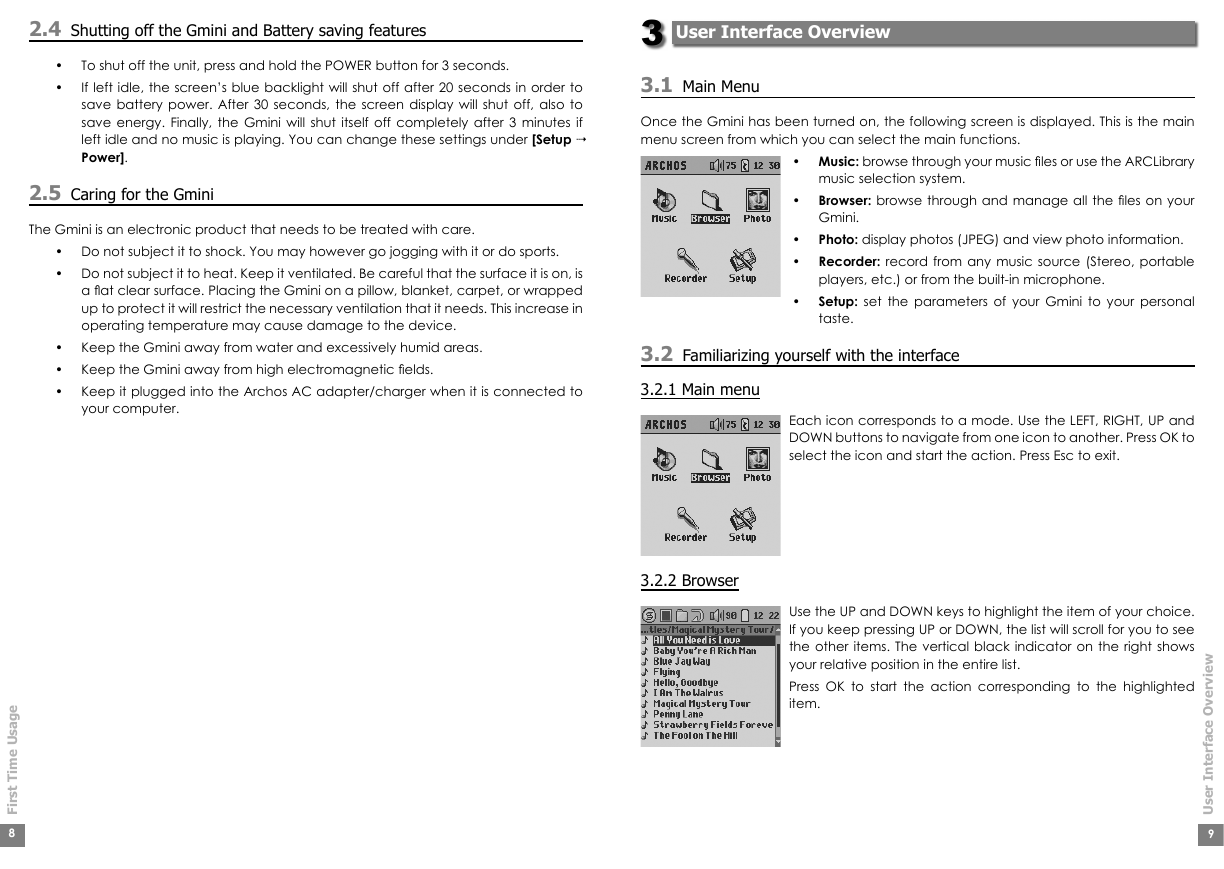
Once the Gmini has been turned on, the following screen is displayed. This is the main
menu screen from which you can select the main functions.
• Music: browse through your music fi les or use the ARCLibrary
music selection system.
• Browser: browse through and manage all the fi les on your
Gmini.
• Photo: display photos (JPEG) and view photo information.
• Recorder: record from any music source (Stereo, portable
•
players, etc.) or from the built-in microphone.
Setup: set the parameters of your Gmini to your personal
taste.
3.2 Familiarizing yourself with the interface
3.2.1 Main menu
Each icon corresponds to a mode. Use the LEFT, RIGHT, UP and
DOWN buttons to navigate from one icon to another. Press OK to
select the icon and start the action. Press Esc to exit.
3.2.2 Browser
Use the UP and DOWN keys to highlight the item of your choice.
If you keep pressing UP or DOWN, the list will scroll for you to see
the other items. The vertical black indicator on the right shows
your relative position in the entire list.
Press OK to start the action corresponding to the highlighted
item.
w
e
i
v
r
e
v
O
e
c
a
f
r
e
t
n
I
r
e
s
U
9
�
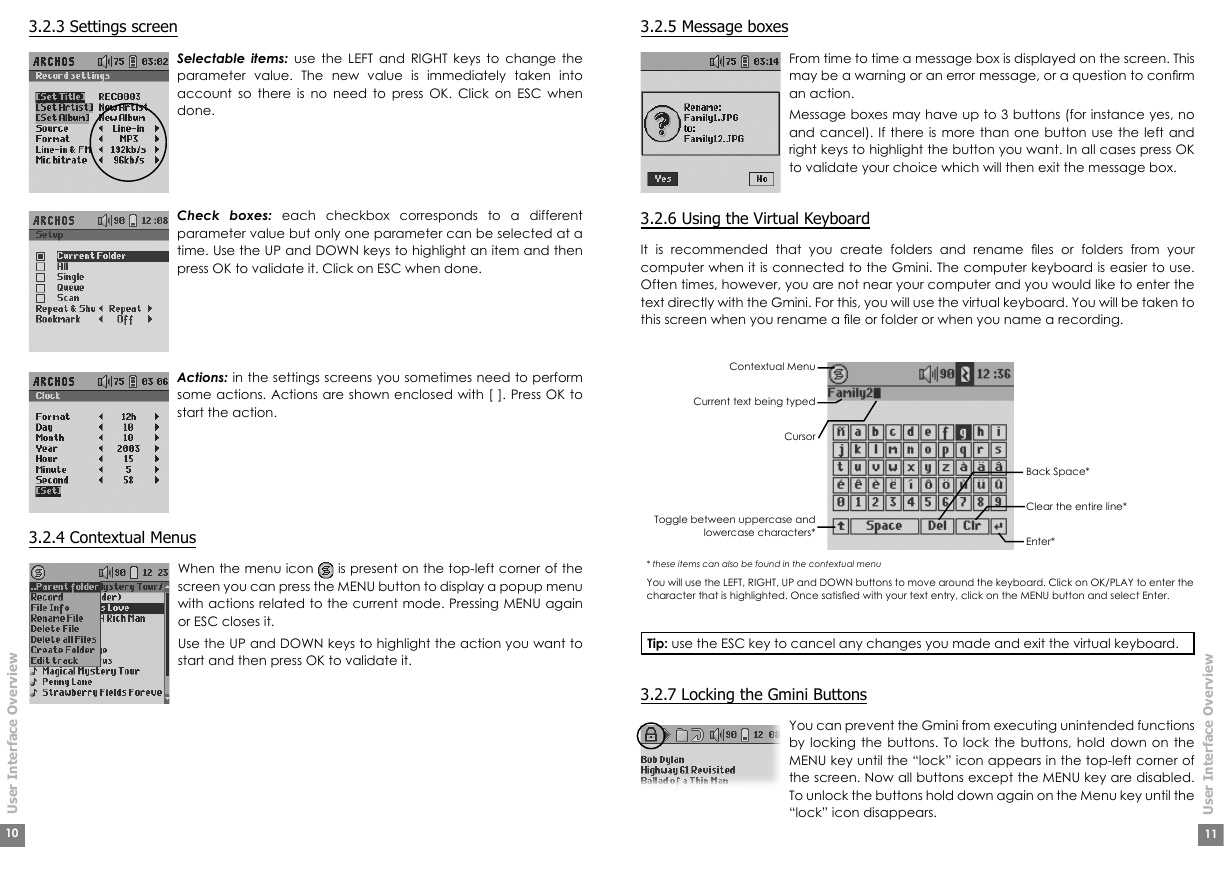
3.2.3 Settings screen
3.2.5 Message boxes
Selectable items: use the LEFT and RIGHT keys to change the
parameter value. The new value is immediately taken into
account so there is no need to press OK. Click on ESC when
done.
From time to time a message box is displayed on the screen. This
may be a warning or an error message, or a question to confi rm
an action.
Message boxes may have up to 3 buttons (for instance yes, no
and cancel). If there is more than one button use the left and
right keys to highlight the button you want. In all cases press OK
to validate your choice which will then exit the message box.
Check boxes: each checkbox corresponds to a different
parameter value but only one parameter can be selected at a
time. Use the UP and DOWN keys to highlight an item and then
press OK to validate it. Click on ESC when done.
3.2.6 Using the Virtual Keyboard
It is recommended that you create folders and rename fi les or folders from your
computer when it is connected to the Gmini. The computer keyboard is easier to use.
Often times, however, you are not near your computer and you would like to enter the
text directly with the Gmini. For this, you will use the virtual keyboard. You will be taken to
this screen when you rename a fi le or folder or when you name a recording.
Actions: in the settings screens you sometimes need to perform
some actions. Actions are shown enclosed with [ ]. Press OK to
start the action.
3.2.4 Contextual Menus
Contextual Menu
Current text being typed
Cursor
Toggle between uppercase and
lowercase characters*
Back Space*
Clear the entire line*
Enter*
When the menu icon
is present on the top-left corner of the
screen you can press the MENU button to display a popup menu
with actions related to the current mode. Pressing MENU again
or ESC closes it.
Use the UP and DOWN keys to highlight the action you want to
start and then press OK to validate it.
* these items can also be found in the contextual menu
You will use the LEFT, RIGHT, UP and DOWN buttons to move around the keyboard. Click on OK/PLAY to enter the
character that is highlighted. Once satisfi ed with your text entry, click on the MENU button and select Enter.
Tip: use the ESC key to cancel any changes you made and exit the virtual keyboard.
3.2.7 Locking the Gmini Buttons
You can prevent the Gmini from executing unintended functions
by locking the buttons. To lock the buttons, hold down on the
MENU key until the “lock” icon appears in the top-left corner of
the screen. Now all buttons except the MENU key are disabled.
To unlock the buttons hold down again on the Menu key until the
“lock” icon disappears.
w
e
i
v
r
e
v
O
e
c
a
f
r
e
t
n
I
r
e
s
U
11
w
e
i
v
r
e
v
O
e
c
a
f
r
e
t
n
I
r
e
s
U
10
�
Using the Gmini 200
4
4.1 Playing music
4.1.1 Selecting a song
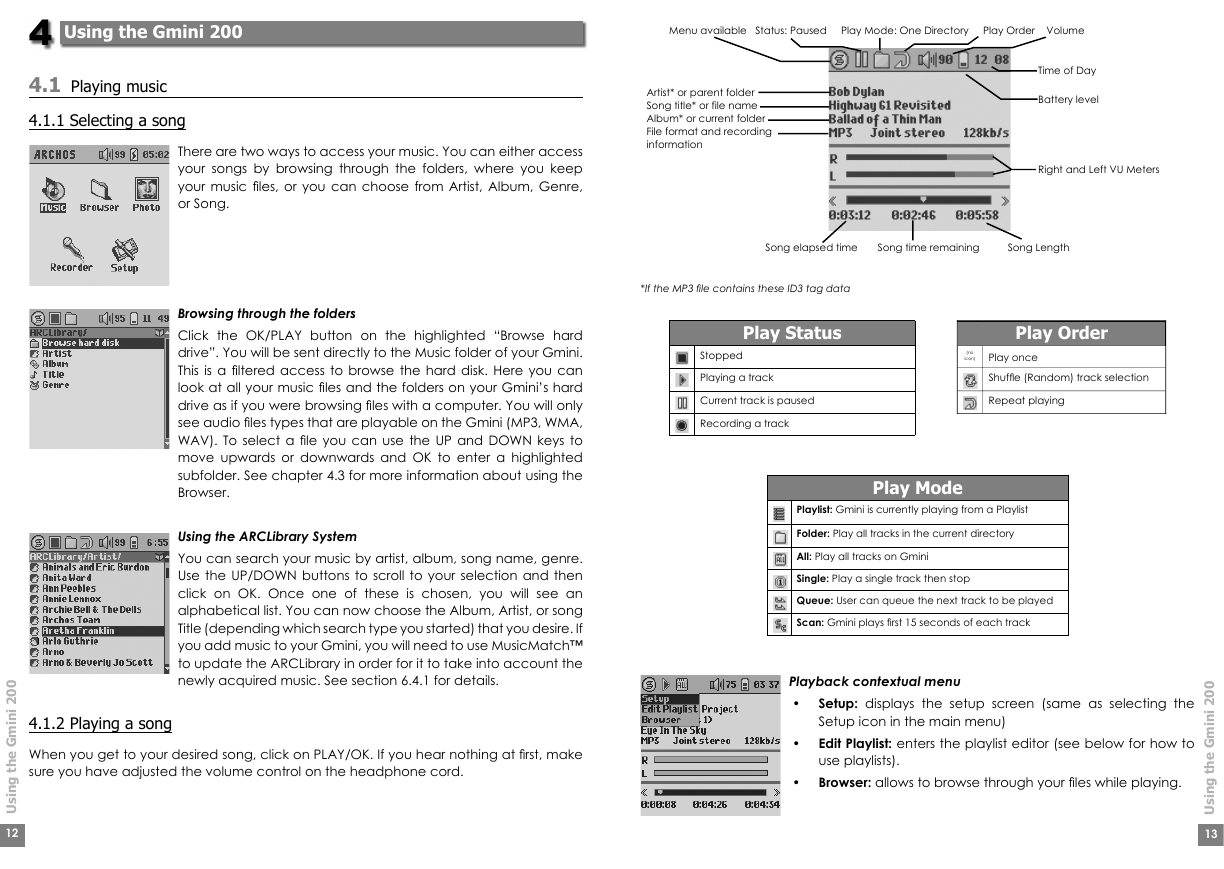
There are two ways to access your music. You can either access
your songs by browsing through the folders, where you keep
your music fi les, or you can choose from Artist, Album, Genre,
or Song.
Browsing through the folders
Click the OK/PLAY button on the highlighted “Browse hard
drive”. You will be sent directly to the Music folder of your Gmini.
This is a fi ltered access to browse the hard disk. Here you can
look at all your music fi les and the folders on your Gmini’s hard
drive as if you were browsing fi les with a computer. You will only
see audio fi les types that are playable on the Gmini (MP3, WMA,
WAV). To select a fi le you can use the UP and DOWN keys to
move upwards or downwards and OK to enter a highlighted
subfolder. See chapter 4.3 for more information about using the
Browser.
Using the ARCLibrary System
You can search your music by artist, album, song name, genre.
Use the UP/DOWN buttons to scroll to your selection and then
click on OK. Once one of these is chosen, you will see an
alphabetical list. You can now choose the Album, Artist, or song
Title (depending which search type you started) that you desire. If
you add music to your Gmini, you will need to use MusicMatch™
to update the ARCLibrary in order for it to take into account the
newly acquired music. See section 6.4.1 for details.
4.1.2 Playing a song
When you get to your desired song, click on PLAY/OK. If you hear nothing at fi rst, make
sure you have adjusted the volume control on the headphone cord.
0
0
2
i
i
n
m
G
e
h
t
g
n
i
s
U
Menu available Status: Paused Play Mode: One Directory Play Order Volume
Artist* or parent folder
Song title* or file name
Album* or current folder
File format and recording
information
Time of Day
Battery level
Right and Left VU Meters
Song elapsed time Song time remaining Song Length
*If the MP3 fi le contains these ID3 tag data
Play Status
Stopped
Playing a track
Current track is paused
Recording a track
Play Order
(no
icon)
Play once
Shuffl e (Random) track selection
Repeat playing
Play Mode
Playlist: Gmini is currently playing from a Playlist
Folder: Play all tracks in the current directory
All: Play all tracks on Gmini
Single: Play a single track then stop
Queue: User can queue the next track to be played
Scan: Gmini plays fi rst 15 seconds of each track
Playback contextual menu
•
Setup: displays the setup screen (same as selecting the
Setup icon in the main menu)
Edit Playlist: enters the playlist editor (see below for how to
use playlists).
•
• Browser: allows to browse through your fi les while playing.
0
0
2
i
i
n
m
G
e
h
t
g
n
i
s
U
12
13
�
4.1.3 Using Playlists
A Playlist is a list of songs that the Gmini will automatically play one after the other. The
Gmini can handle one Playlist at a time. You can create new Playlists, add or delete
songs from a Playlist, or Save a Playlist as a fi le (fi le type .m3u) to be used another time.
There is no limit to the number of Playlists you can save on the Gmini hard drive.
Playing a Playlist
There are two ways to play a Playlist.
1) Press the RIGHT key to go into the Playlist edition window. Then use the UP and DOWN
keys to select which song you want to start with.
2) In the Playlist window press MENU to display the contextual menu and select START
PLAYLIST. The Gmini starts playing from the fi rst track of the playlist.
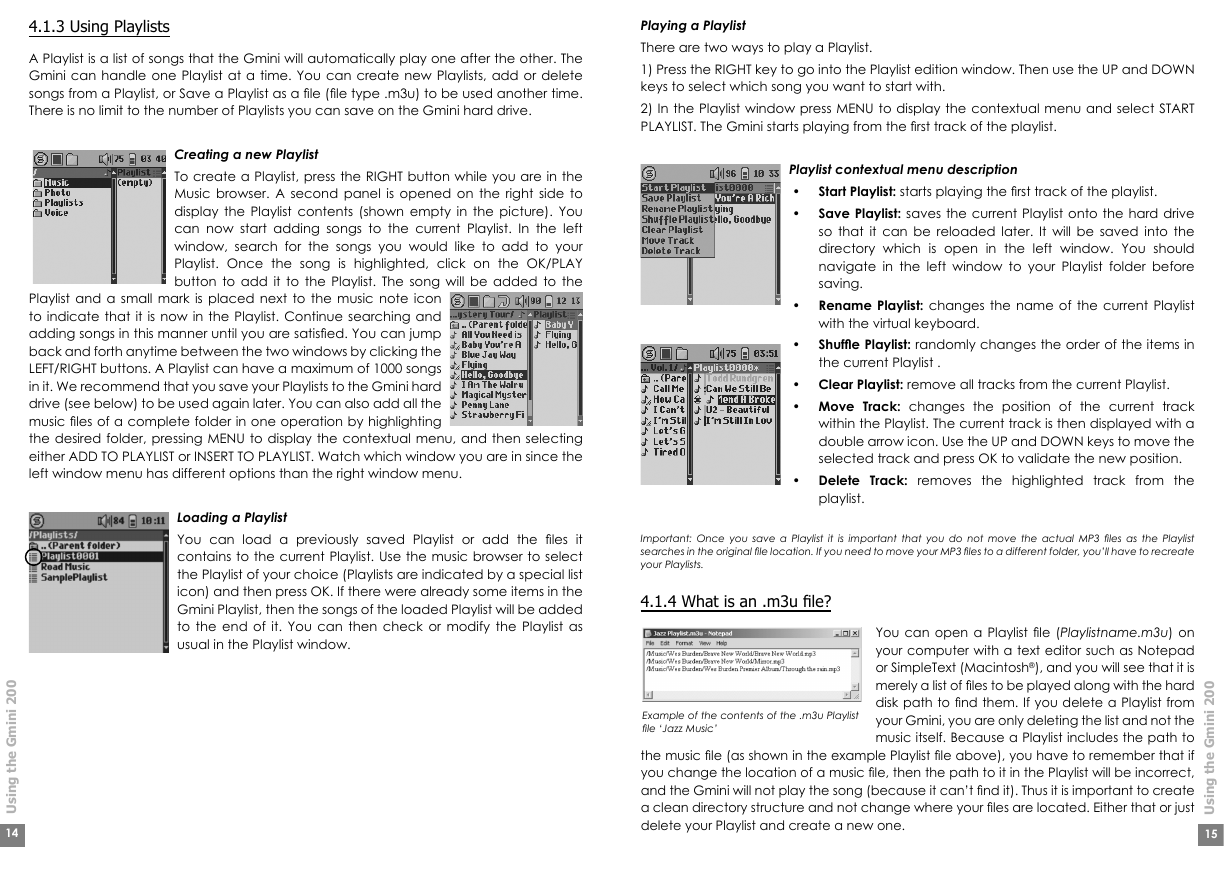
Creating a new Playlist
To create a Playlist, press the RIGHT button while you are in the
Music browser. A second panel is opened on the right side to
display the Playlist contents (shown empty in the picture). You
can now start adding songs to the current Playlist. In the left
window, search for the songs you would like to add to your
Playlist. Once the song is highlighted, click on the OK/PLAY
button to add it to the Playlist. The song will be added to the
Playlist and a small mark is placed next to the music note icon
to indicate that it is now in the Playlist. Continue searching and
adding songs in this manner until you are satisfi ed. You can jump
back and forth anytime between the two windows by clicking the
LEFT/RIGHT buttons. A Playlist can have a maximum of 1000 songs
in it. We recommend that you save your Playlists to the Gmini hard
drive (see below) to be used again later. You can also add all the
music fi les of a complete folder in one operation by highlighting
the desired folder, pressing MENU to display the contextual menu, and then selecting
either ADD TO PLAYLIST or INSERT TO PLAYLIST. Watch which window you are in since the
left window menu has different options than the right window menu.
Loading a Playlist
You can load a previously saved Playlist or add the fi les it
contains to the current Playlist. Use the music browser to select
the Playlist of your choice (Playlists are indicated by a special list
icon) and then press OK. If there were already some items in the
Gmini Playlist, then the songs of the loaded Playlist will be added
to the end of it. You can then check or modify the Playlist as
usual in the Playlist window.
0
0
2
i
i
n
m
G
e
h
t
g
n
i
s
U
14
Playlist contextual menu description
•
•
Start Playlist: starts playing the fi rst track of the playlist.
Save Playlist: saves the current Playlist onto the hard drive
so that it can be reloaded later. It will be saved into the
directory which is open in the left window. You should
navigate in the left window to your Playlist folder before
saving.
• Rename Playlist: changes the name of the current Playlist
•
with the virtual keyboard.
Shuffl e Playlist: randomly changes the order of the items in
the current Playlist .
• Clear Playlist: remove all tracks from the current Playlist.
• Move Track: changes the position of the current track
within the Playlist. The current track is then displayed with a
double arrow icon. Use the UP and DOWN keys to move the
selected track and press OK to validate the new position.
• Delete Track: removes the highlighted track from the
playlist.
Important: Once you save a Playlist it is important that you do not move the actual MP3 fi les as the Playlist
searches in the original fi le location. If you need to move your MP3 fi les to a different folder, you’ll have to recreate
your Playlists.
4.1.4 What is an .m3u fi le?
Example of the contents of the .m3u Playlist
fi le ‘Jazz Music’
You can open a Playlist fi le (Playlistname.m3u) on
your computer with a text editor such as Notepad
or SimpleText (Macintosh®), and you will see that it is
merely a list of fi les to be played along with the hard
disk path to fi nd them. If you delete a Playlist from
your Gmini, you are only deleting the list and not the
music itself. Because a Playlist includes the path to
the music fi le (as shown in the example Playlist fi le above), you have to remember that if
you change the location of a music fi le, then the path to it in the Playlist will be incorrect,
and the Gmini will not play the song (because it can’t fi nd it). Thus it is important to create
a clean directory structure and not change where your fi les are located. Either that or just
delete your Playlist and create a new one.
0
0
2
i
i
n
m
G
e
h
t
g
n
i
s
U
15
�


 2023年江西萍乡中考道德与法治真题及答案.doc
 2012年重庆南川中考生物真题及答案.doc
 2013年江西师范大学地理学综合及文艺理论基础考研真题.doc
 2020年四川甘孜小升初语文真题及答案I卷.doc
 2020年注册岩土工程师专业基础考试真题及答案.doc
 2023-2024学年福建省厦门市九年级上学期数学月考试题及答案.doc
 2021-2022学年辽宁省沈阳市大东区九年级上学期语文期末试题及答案.doc
 2022-2023学年北京东城区初三第一学期物理期末试卷及答案.doc
 2018上半年江西教师资格初中地理学科知识与教学能力真题及答案.doc
 2012年河北国家公务员申论考试真题及答案-省级.doc
 2020-2021学年江苏省扬州市江都区邵樊片九年级上学期数学第一次质量检测试题及答案.doc
 2022下半年黑龙江教师资格证中学综合素质真题及答案.doc