网络编程Tcp下下C/S架构的即时通信实例
架构的即时通信实例
QT网络编程
下面小编就为大家带来一篇QT网络编程Tcp下C/S架构的即时通信实例。小编觉得挺不错的,现在就分享给大家,也给大家
做个参考。一起跟随小编过来看看吧
先写一个客户端,实现简单的,能加入聊天,以及加入服务器的界面。
#ifndef TCPCLIENT_H
#define TCPCLIENT_H
#include
#include
#include
#include
#include
#include
#include
#include
class TcpClient : public QDialog
{
Q_OBJECT
public:
TcpClient(QWidget *parent = 0,Qt::WindowFlags f=0);
~TcpClient();
private:
QListWidget *contentListWidget;
QLineEdit *sendLineEdit;
QPushButton *sendBtn;
QLabel *userNameLabel;
QLineEdit *userNameLineEdit;
QLabel *serverIPLabel;
QLineEdit *serverIPLineEdit;
QLabel *portLabel;
QLineEdit *portLineEdit;
QPushButton *enterBtn;
QGridLayout *mainLayout;
bool status;
int port;
QHostAddress *serverIP;
QString userName;
QTcpSocket *tcpSocket;
public slots:
void slotEnter();
void slotConnected();
void slotDisconnected();
void dataReceived();
void slotSend();
};
#endif // TCPCLIENT_H
有一个加入服务器的按钮,还有一个发送消息的按钮,在头文件,先定义两个函数。
#include "tcpclient.h"
#include
#include
TcpClient::TcpClient(QWidget *parent,Qt::WindowFlags f)
: QDialog(parent,f)
{
setWindowTitle(tr("TCP Client"));
contentListWidget = new QListWidget;
sendLineEdit = new QLineEdit;
sendBtn = new QPushButton(tr("send"));
userNameLabel = new QLabel(tr("name"));
userNameLineEdit = new QLineEdit;
serverIPLabel = new QLabel(tr("server"));
serverIPLineEdit = new QLineEdit;
portLabel = new QLabel(tr("port"));
portLineEdit = new QLineEdit;
enterBtn= new QPushButton(tr("join chat"));
mainLayout = new QGridLayout(this);
mainLayout->addWidget(contentListWidget,0,0,1,2);
mainLayout->addWidget(sendLineEdit,1,0);
mainLayout->addWidget(sendBtn,1,1);
mainLayout->addWidget(userNameLabel,2,0);
mainLayout->addWidget(userNameLineEdit,2,1);
mainLayout->addWidget(serverIPLabel,3,0);
�
mainLayout->addWidget(serverIPLineEdit,3,1);
mainLayout->addWidget(portLabel,4,0);
mainLayout->addWidget(portLineEdit,4,1);
mainLayout->addWidget(enterBtn,5,0,1,2);
status = false;
port = 8010;
portLineEdit->setText(QString::number(port));
serverIP =new QHostAddress();
connect(enterBtn,SIGNAL(clicked()),this,SLOT(slotEnter()));
connect(sendBtn,SIGNAL(clicked()),this,SLOT(slotSend()));
sendBtn->setEnabled(false);
}
TcpClient::~TcpClient()
{
}
void TcpClient::slotEnter()
{
if(!status)
{
QString ip = serverIPLineEdit->text();
if(!serverIP->setAddress(ip))
{
QMessageBox::information(this,tr("error"),tr("server ip address error!"));
return;
}
if(userNameLineEdit->text()=="")
{
QMessageBox::information(this,tr("error"),tr("User name error!"));
return;
}
userName=userNameLineEdit->text();
tcpSocket = new QTcpSocket(this);
connect(tcpSocket,SIGNAL(connected()),this,SLOT(slotConnected()));
connect(tcpSocket,SIGNAL(disconnected()),this,SLOT(slotDisconnected()));
connect(tcpSocket,SIGNAL(readyRead()),this,SLOT(dataReceived()));
tcpSocket->connectToHost(*serverIP,port);
status=true;
}
else
{
int length=0;
QString msg=userName+tr(":Leave Chat Room");
if((length=tcpSocket->write(msg.toLatin1(),msg.length()))!=msg. length())
{
return;
}
tcpSocket->disconnectFromHost();
status=false;
}
}
void TcpClient::slotConnected()
{
sendBtn->setEnabled(true);
enterBtn->setText(tr("离开"));
int length=0;
QString msg=userName+tr(":Enter Chat Room");
if((length=tcpSocket->write(msg.toLatin1(),msg.length()))!=msg.length())
{
return;
}
}
void TcpClient::slotSend()
{
if(sendLineEdit->text()=="")
{
return ;
}
QString msg=userName+":"+sendLineEdit->text();
tcpSocket->write(msg.toLatin1(),msg.length());
sendLineEdit->clear();
�
}
void TcpClient::slotDisconnected()
{
sendBtn->setEnabled(false);
enterBtn->setText(tr("join chat"));
}
void TcpClient::dataReceived()
{
while(tcpSocket->bytesAvailable()>0)
{
QByteArray datagram;
datagram.resize(tcpSocket->bytesAvailable());
tcpSocket->read(datagram.data(),datagram.size());
QString msg=datagram.data();
contentListWidget->addItem(msg.left(datagram.size()));
}
}
实现界面布局。在Enter槽函数中,确定加入还是离开的服务器的功能。如果加入了,就将消息,写到tcpsocket中,构造消。
服务端的头文件:
服务端的头文件:
#ifndef TCPSERVER_H
#define TCPSERVER_H
#include
#include
#include
#include
#include
#include
#include "server.h"
class TcpServer : public QDialog
{
Q_OBJECT
public:
TcpServer(QWidget *parent = 0,Qt::WindowFlags f=0);
~TcpServer();
private:
QListWidget *ContentListWidget;
QLabel *PortLabel;
QLineEdit *PortLineEdit;
QPushButton *CreateBtn;
QGridLayout *mainLayout;
int port;
Server *server;
public slots:
void slotCreateServer();
void updateServer(QString,int);
};
#endif // TCPSERVER_H
这是服务端的界面的,把消息显示而已。实现这个布局。
#include "tcpserver.h"
TcpServer::TcpServer(QWidget *parent,Qt::WindowFlags f)
: QDialog(parent,f)
{
setWindowTitle(tr("TCP Server"));
ContentListWidget = new QListWidget;
PortLabel = new QLabel(tr(" port"));
PortLineEdit = new QLineEdit;
CreateBtn = new QPushButton(tr("create chat"));
mainLayout = new QGridLayout(this);
mainLayout->addWidget(ContentListWidget,0,0,1,2);
mainLayout->addWidget(PortLabel,1,0);
mainLayout->addWidget(PortLineEdit,1,1);
mainLayout->addWidget(CreateBtn,2,0,1,2);
port=8010;
PortLineEdit->setText(QString::number(port));
connect(CreateBtn,SIGNAL(clicked()),this,SLOT(slotCreateServer()));
}
TcpServer::~TcpServer()
{
�
}
void TcpServer::slotCreateServer()
{
server = new Server(this,port);
connect(server,SIGNAL(updateServer(QString,int)),this,SLOT(updateServer(QString,int)));
CreateBtn->setEnabled(false);
}
void TcpServer::updateServer(QString msg,int length)
{
ContentListWidget->addItem(msg.left(length));
}
创建TCP的套接字,以便实现服务端和客户端的通信。
#ifndef TCPCLIENTSOCKET_H
#define TCPCLIENTSOCKET_H
#include
#include
class TcpClientSocket : public QTcpSocket
{
Q_OBJECT
public:
TcpClientSocket();
signals:
void updateClients(QString,int);
void disconnected(int);
protected slots:
void dataReceived();
void slotDisconnected();
};
#endif // TCPCLIENTSOCKET_H
以上是头文件,具体的是:
#include "tcpclientsocket.h"
TcpClientSocket::TcpClientSocket()
{
connect(this,SIGNAL(readyRead()),this,SLOT(dataReceived()));
connect(this,SIGNAL(disconnected()),this,SLOT(slotDisconnected()));
}
void TcpClientSocket::dataReceived()
{
while(bytesAvailable()>0)
{
int length = bytesAvailable();
char buf[1024];
read(buf,length);
QString msg=buf;
emit updateClients(msg,length);
}
}
void TcpClientSocket::slotDisconnected()
{
emit disconnected(this->socketDescriptor());
}
实现服务器,头文件:
#ifndef SERVER_H
#define SERVER_H
#include
#include
#include "tcpclientsocket.h"
class Server : public QTcpServer
{
Q_OBJECT
public:
Server(QObject *parent=0,int port=0);
QList tcpClientSocketList;
signals:
void updateServer(QString,int);
public slots:
void updateClients(QString,int);
void slotDisconnected(int);
protected:
void incomingConnection(int socketDescriptor);
};
�
#endif // SERVER_H
#include "server.h"
Server::Server(QObject *parent,int port)
:QTcpServer(parent)
{
listen(QHostAddress::Any,port);
}
void Server::incomingConnection(int socketDescriptor)
{
TcpClientSocket *tcpClientSocket = new TcpClientSocket;
connect(tcpClientSocket,SIGNAL(updateClients(QString,int)),this,SLOT(updateClients(QString,int)));
connect(tcpClientSocket,SIGNAL(disconnected(int)),this,SLOT(slotDisconnected(int)));
tcpClientSocket->setSocketDescriptor(socketDescriptor);
tcpClientSocketList.append(tcpClientSocket);
}
void Server::updateClients(QString msg,int length)
{
emit updateServer(msg,length);
for(int i=0;iwrite(msg.toLatin1(),length)!=length)
{
continue;
}
}
}
void Server::slotDisconnected(int descriptor)
{
for(int i=0;isocketDescriptor()==descriptor)
{
tcpClientSocketList.removeAt(i);
return;
}
}
return;
}
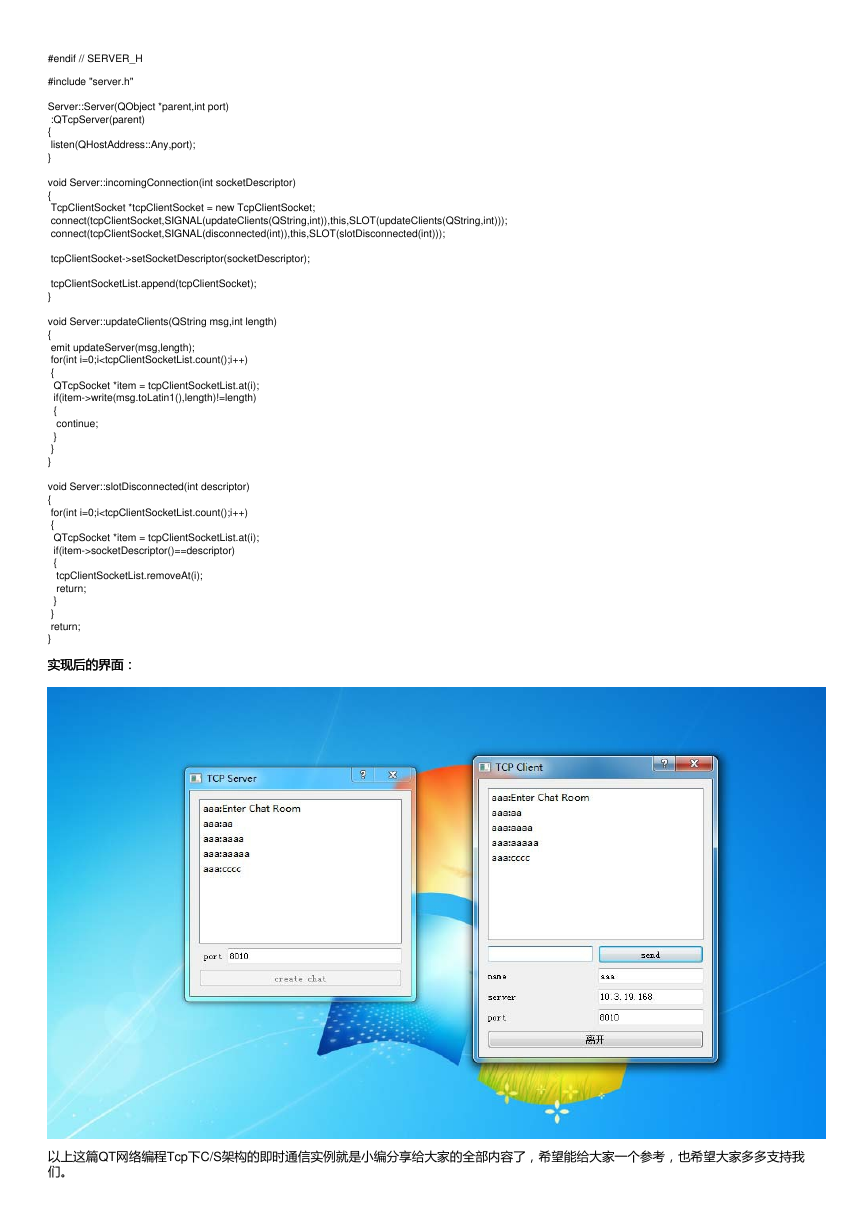
实现后的界面:
实现后的界面:
以上这篇QT网络编程Tcp下C/S架构的即时通信实例就是小编分享给大家的全部内容了,希望能给大家一个参考,也希望大家多多支持我
们。
�
�


 2023年江西萍乡中考道德与法治真题及答案.doc
 2012年重庆南川中考生物真题及答案.doc
 2013年江西师范大学地理学综合及文艺理论基础考研真题.doc
 2020年四川甘孜小升初语文真题及答案I卷.doc
 2020年注册岩土工程师专业基础考试真题及答案.doc
 2023-2024学年福建省厦门市九年级上学期数学月考试题及答案.doc
 2021-2022学年辽宁省沈阳市大东区九年级上学期语文期末试题及答案.doc
 2022-2023学年北京东城区初三第一学期物理期末试卷及答案.doc
 2018上半年江西教师资格初中地理学科知识与教学能力真题及答案.doc
 2012年河北国家公务员申论考试真题及答案-省级.doc
 2020-2021学年江苏省扬州市江都区邵樊片九年级上学期数学第一次质量检测试题及答案.doc
 2022下半年黑龙江教师资格证中学综合素质真题及答案.doc