85SD-C
Chapter 3 Software Setup
Drivers, Utilities and Software Installation
• Support CD:
This series of mainboards will always be shipped with a Support
CD which contains those necessary driver files, Application Softwares
and some helpful utilities. It is a user-friendly, auto-run CD which
will open itself up in a CD-ROM automatically.
• Contents of Support CD:
For 85SD-C, user should be able to find in the Supported CD the
following drivers and utilities supported by Intel 845 Chipset:
1. INF Utility (Intel Chipset Software Installation Utility);
2. Intel Application Accelerator ( IAA );
3. AC’97 Drivers;
4. Hardware Monitor Utility.
This chapter is devoted to describing the installations of all these
essential drivers and utilities on Windows 9X, Windows ME,
Windows 2000 and Windows XP. The installation procedures for
all these operating sistems are all programed into an auto-run mode.
What users have to do is to read and follow the pop-up instructions
to carry out the installation. We therefore take the installation on
Windows 98 as the general illustration hereby.
The priority of drivers to be installed should also be noted. Users
are recommended to take the following installation orders :
3-1 Open up the Suport CD and choose Drivers and
Utilities
3-2 Intel Chipset Software Installation Utility ( INF Utility )
3-3 Intel Application Accelerator ( IAA )
3-4 AC’97 Audio Drivers Installation
3-5 Hardware Monitor Utility
36
�
3-1 Open up the Support CD and choose Drivers and Utilities
Chapter 3 Software Setup
1
2
Please put the Support CD enclosed in your mainboard package
into the CD-ROM drive. In a few seconds, the Main Menu will
automatically appear, displaying the contents to be installed for
this series:
Intel Chipset Software Installation Utility (INF Utility)
Intel Application Accelerator (IAA)
AC’97 Drivers Installation
Hardware Monitor Utility
Install Acrobat Reader
Browse CD-ROM
Exit
In case your system does not open the Support CD automatically,
please click to the following path to enter the Main Installation
Menu:
D:\ Autorun.exe (assuming that your CD-ROM Drive is Drive D)
3
Users are recommended to install all the drivers and utilities at
a time, though they can be installed separately.
Also, we should take “Intel Chipset Software installation Utility”
as first installation priority to optimize the Intel system.
From next section, we provide detailed descriptions of all these
installations with graphical illustrations.
37
�
85SD-C
3-2 Install “Intel Chipset Software Installation Utility”
Following the procedures of opening the Support CD, click to “
Install Intel Chipset software installation Utility” to proceed.
Next
Yes
Finish
1
2
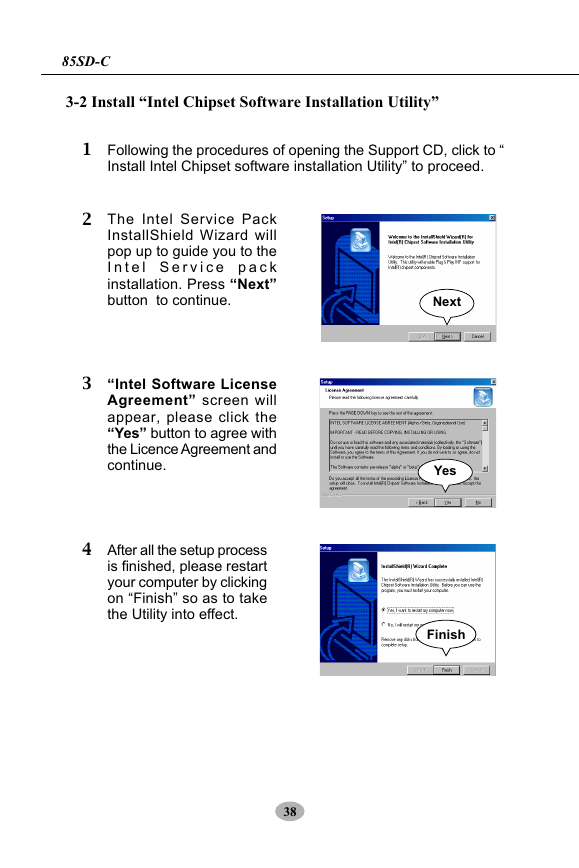
The Intel Service Pack
InstallShield Wizard will
pop up to guide you to the
I n t e l S e r v i c e p a c k
installation. Press “Next”
button to continue.
3 “Intel Software License
Agreement” screen will
appear, please click the
“Yes” button to agree with
the Licence Agreement and
continue.
4 After all the setup process
is finished, please restart
your computer by clicking
on “Finish” so as to take
the Utility into effect.
38
�
Chapter 3 Software Setup
3-3 Install “Intel Application Accelerator”
IAA supports all Windows 98/98se/Mellennium/NT4/2000/XP with
Pentium III / 4 processor. Installations of this software for these
operating systems are similarly programed to an auto-run mode, and
it is typically designed to improve performance of the storage sub-
system and overall system performance.
Below is a model installation on Windows 98. Users of Windows Me/
NT4/2000/XP can also follow this example for IAA installation.
1
2
Following the procedures of opening the Support CD, click to “
Intel Application Accelerator” to proceed.
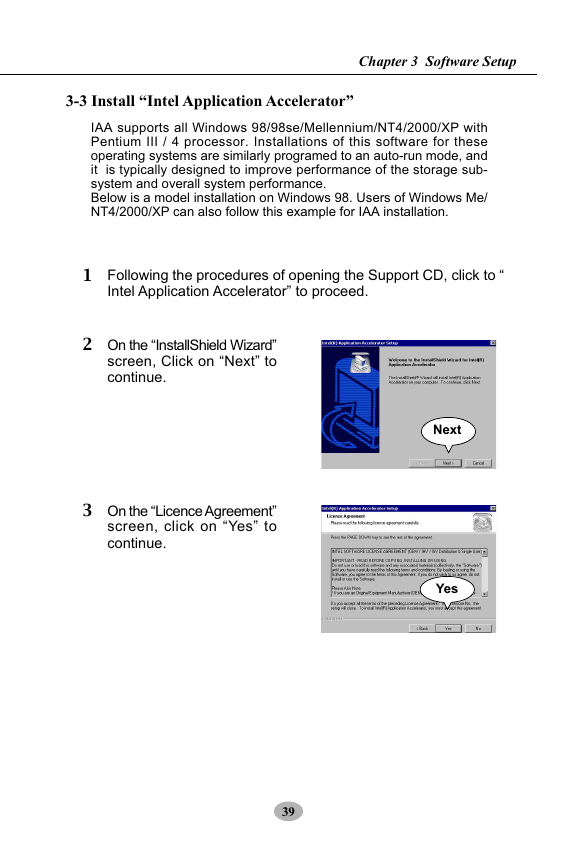
On the “InstallShield Wizard”
screen, Click on “Next” to
continue.
3 On the “Licence Agreement”
screen, click on “Yes” to
continue.
Next
Yes
39
�
85SD-C
4 On ”Choose Destination
L o c a t i o n ” screen, press
“Yes” to continue.
C:\Program Files\Intel\Intel Application Accelerator
Yes
5
On ”InstallShield Wizard
Com-plete” screen, choose
“Yes, I want to restart my
computer now” and press
“finish” to restart. Remember
you must restart computer
to put setup into effect.
Yes, I want to restart my computer now
Finish
40
�
Chapter 3 Software Setup
3-4 AC’97 Audio Driver Installation
AC’97 Codec is integrated in Chip ALC201A. You can install “ AC’97
Audio Driver” on this mainboard.
1
2
3
4
Following the procedures of opening the Support CD, click to “
AC’97 Audio Driver” to proceed.
Instantly, the “InstallShield Wizard” screen appears to guide you
through the “Avance AC’97 Audio Setup”.
Instantly, the Setup Program proceeds to install the AC’97 Driver
into system. If you want to stop setup, click the “Cancel” button.
After the setup process is finished, please check the radial but-
ton “Yes. I want to restart my computer now” and click “OK” to
restart your system.
OK
41
�
85SD-C
3-5 Install Hardware Monitor Utility
3-5.1 Installation
Hardware Monitor is built on this mainboard. Its installation is
programed to a fully automated mode on Windows 9X/Me/NT4/2000/
XP. User can follow the model installation below for its installation
on various Windows System.
1
2
3
4
Following the procedures of opening the Support CD, click to “
Hardware Monitor Utility” to proceed.
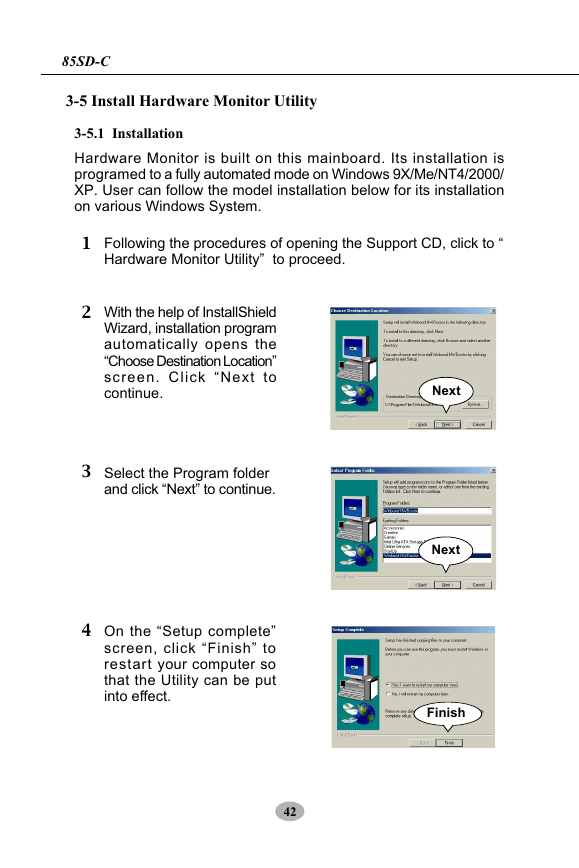
With the help of InstallShield
Wizard, installation program
automatically opens the
“Choose Destination Location”
screen. Click “Next to
continue.
Select the Program folder
and click “Next” to continue.
On the “Setup complete”
screen, click “Finish” to
restart your computer so
that the Utility can be put
into effect.
42
Next
Next
Finish
�
Chapter 3 Software Setup
3-5.2 Verification
1
A f t e r r e s t a r t i n g y o u r
computer, click “Start” and
choose the path Programs
\Winbond\Hwdoctor to open
the main window of the Hard-
ware Doctor.
2 The “Voltage/CaseOpen”
window is for CPU voltage
and temperature information.
3 The “Fan/Temperature”
window is for Fan speed
and temperature information.
4
The “CPU/Memory” window
is for Processor and memory
information.
43
�


 2023年江西萍乡中考道德与法治真题及答案.doc
 2012年重庆南川中考生物真题及答案.doc
 2013年江西师范大学地理学综合及文艺理论基础考研真题.doc
 2020年四川甘孜小升初语文真题及答案I卷.doc
 2020年注册岩土工程师专业基础考试真题及答案.doc
 2023-2024学年福建省厦门市九年级上学期数学月考试题及答案.doc
 2021-2022学年辽宁省沈阳市大东区九年级上学期语文期末试题及答案.doc
 2022-2023学年北京东城区初三第一学期物理期末试卷及答案.doc
 2018上半年江西教师资格初中地理学科知识与教学能力真题及答案.doc
 2012年河北国家公务员申论考试真题及答案-省级.doc
 2020-2021学年江苏省扬州市江都区邵樊片九年级上学期数学第一次质量检测试题及答案.doc
 2022下半年黑龙江教师资格证中学综合素质真题及答案.doc