Start Here
1
2
3
14b
USB
14b USB
14b
USB
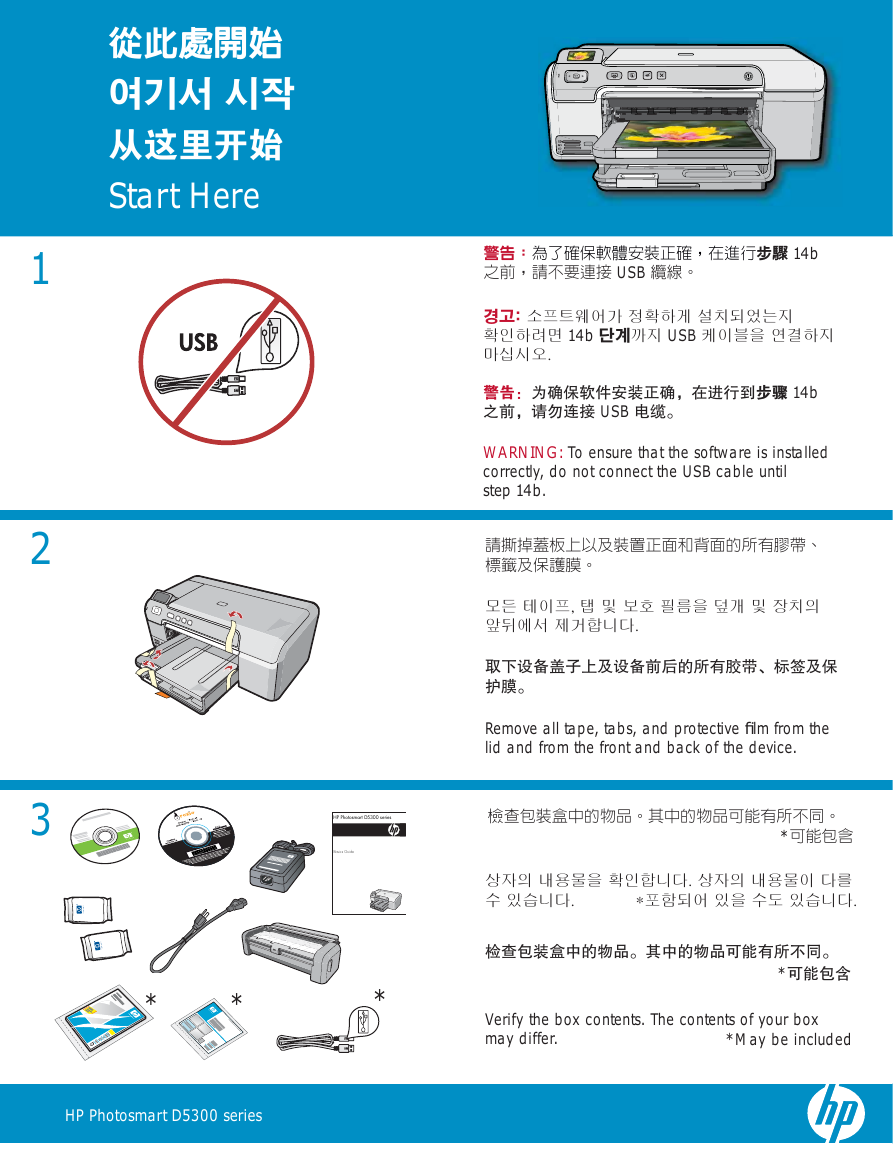
WARNING: To ensure that the software is installed
correctly, do not connect the USB cable until
step 14b .
Remove all tape, tabs, and protective fi lm from the
lid and from the front and back of the device.
HP Photosmart D5300 series
Basics Guide
*
*
Verify the box contents. The contents of your box
may differ.
*May be included
*
*
*
HP Photosmart D5300 series
�
4
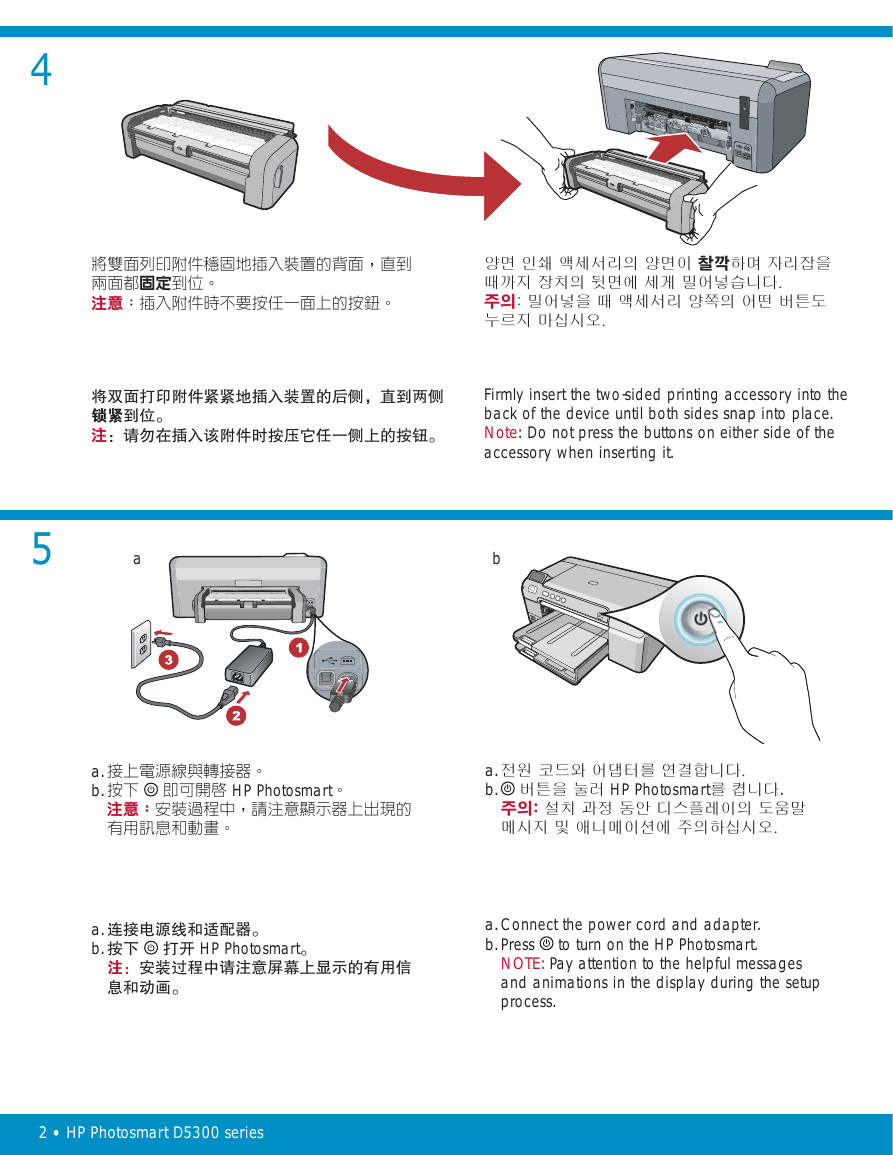
Firmly insert the two-sided printing accessory into the
back of the device until both sides snap into place.
Note : Do not press the buttons on either side of the
accessory when inserting it.
5
a
b
a.
b.
a.
b.
HP Photosmart
a.
b.
HP Photosmart.
HP Photosmart
a.
b.
Connect the power cord and adapter.
to turn on the HP Photosmart.
Press
NOTE: Pay attention to the helpful messages
and animations in the display during the setup
process.
2 • HP Photosmart D5300 series
�
6
•
/
25
OK
/ OK
•
•
/
25
OK()
. / OK()
.
.
•
•
/
25
“ OK ”
“ OK ”
•
7
Do one of the following:
•
If a prompt appears asking you to set the
language and country/region, use the arrows
to select your language from the list of up to
25 languages, press OK , and confi rm. Select
your country/region, press OK and confi rm.
If a prompt appears asking to install print
cartridges, go to the next step in this guide.
•
:
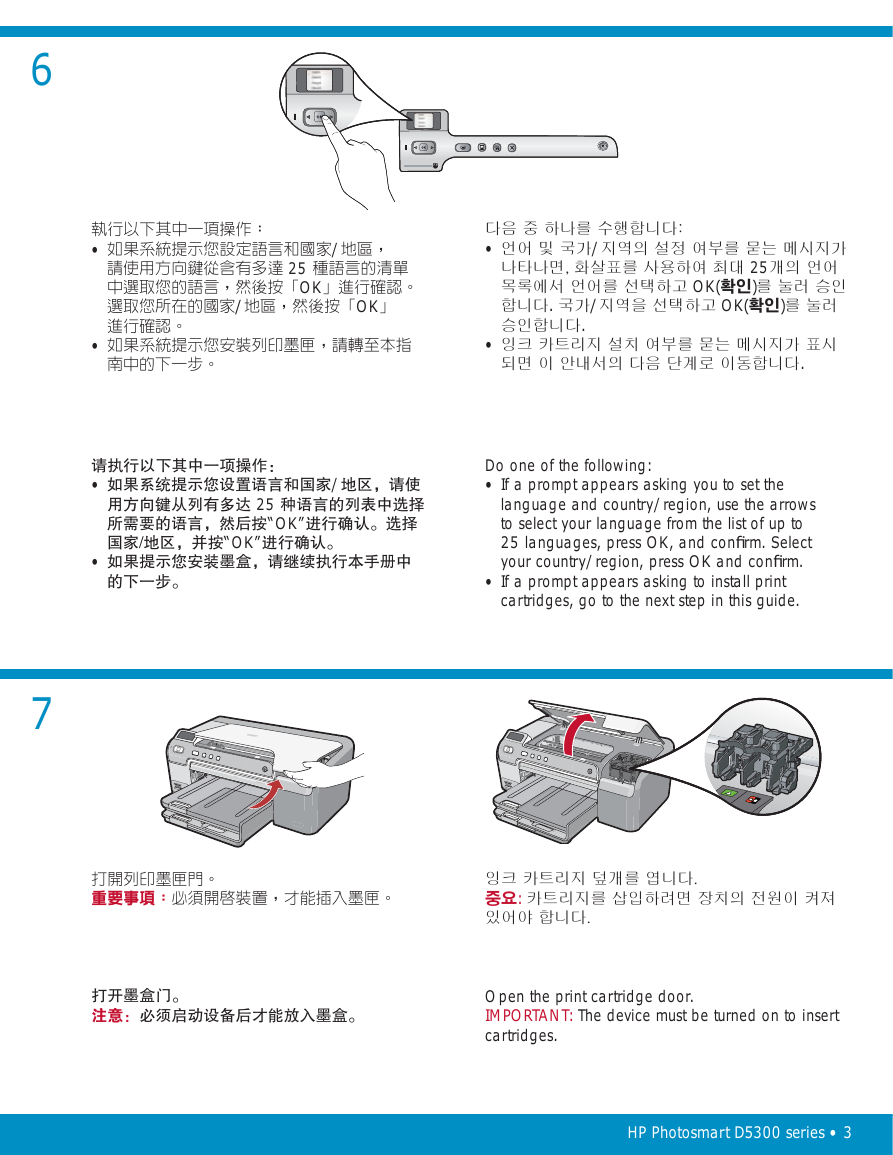
Open the print cartridge door.
IMPORTANT: The device must be turned on to insert
cartridges.
HP Photosmart D5300 series • 3
�
8
9
:
Remove the tape from both cartridges.
CAUTION: Do not touch the copper-colored contacts
or re-tape the cartridges.
a.
b.
c.
d.
e.
HP
HP
OK
a.
b.
c.
d.
e.
HP
3
HP
OK()
a.
b.
c.
d.
e.
HP
HP “ OK ”
a.
b.
c.
d.
e.
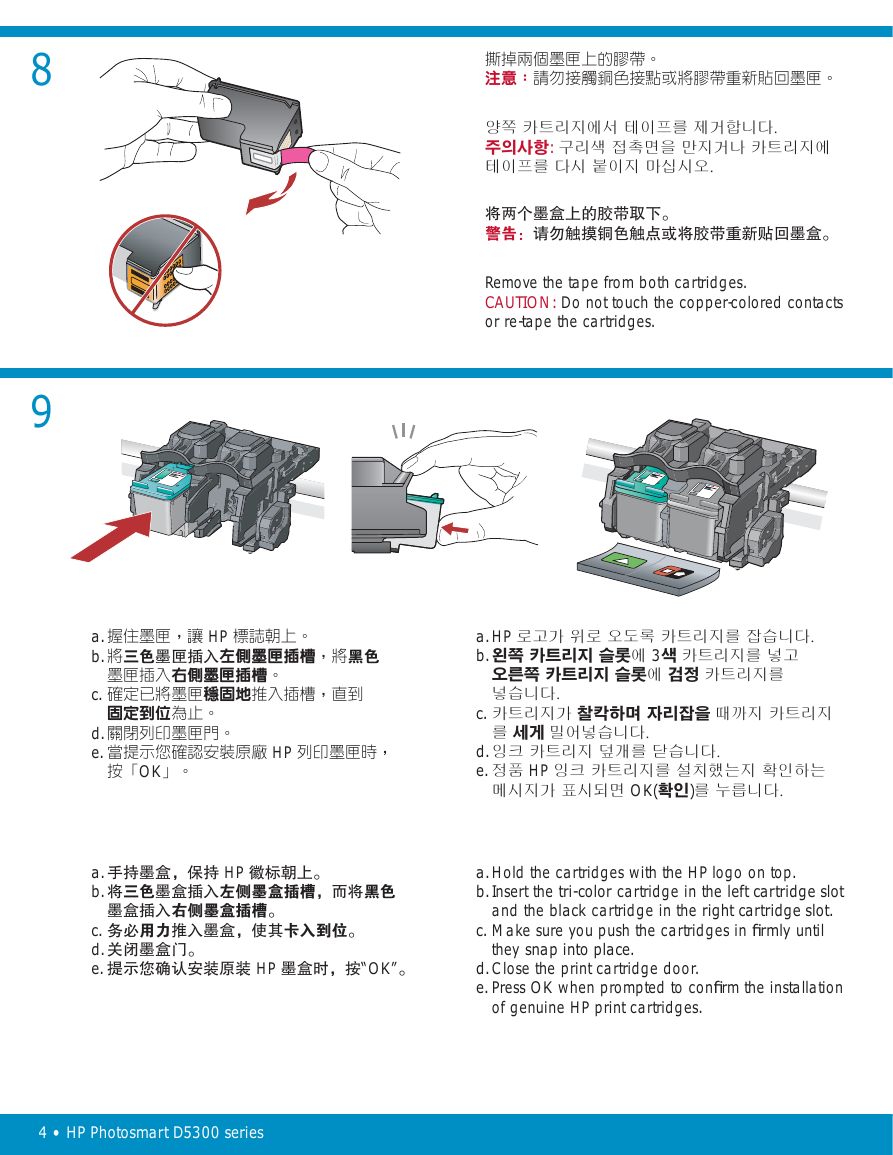
Hold the cartridges with the HP logo on top.
Insert the tri-color cartridge in the left cartridge slot
and the black cartridge in the right cartridge slot .
Make sure you push the cartridges in fi rmly until
they snap into place .
Close the print cartridge door.
Press OK when prompted to confi rm the installation
of genuine HP print cartridges.
4 • HP Photosmart D5300 series
�
10
a
c
b
d
a.
b.
c.
d.
OK
a.
b.
c.
d.
OK()
a.
b.
c.
d.
“ OK ”
a.
b.
c.
d.
Lift the output tray to load paper into the main tray.
Slide the paper-width guide to the left.
Insert plain white paper into the main tray.
Lower the output tray and press OK .
11
a
b
d
a.
b.
c.
d.
a.
b.
c.
d.
a.
b.
c.
d.
After you load plain paper, you can also load
photo paper into the photo tray. If you do not
have photo paper, continue to the next step.
a.
b.
Lift the photo tray lid.
Load photo paper with the glossy side down
in the photo tray. Slide the paper guides
against the photo paper.
Lower the photo tray lid.
Pull out the tray extender and lift up the
paper catch.
c.
d.
HP Photosmart D5300 series • 5
�
12
13
a.
b.
OK
OK
a.
b.
OK()
OK()
a.
b.
“ OK ”
“ OK ”
a.
b.
Press the OK button after you have loaded paper
in the tray, then wait a few minutes while the
alignment page is printed.
Press the OK button after the alignment page
is printed.
When the page is printed, alignment is complete.
HP Photosmart
14b ,
USB
HP Photosmart
: 14b USB
HP Photosmart
14b USB
Continue to the next page for instructions on
connecting your HP Photosmart to your computer.
IMPORTANT : Do not connect the USB cable until
you are asked to do so in step 14b .
6 • HP Photosmart D5300 series
�
14a
Windows:
Mac:
a.
()
CD
HP CD-ROM
setup.exe
USB
a.
USB HP Photosmart
USB
a.
CD
: ,
HP CD-ROM setup.exe
: USB
a.
USB HP Photosmart
USB
a.
CD
“ ” HP “ CD-ROM ”
“ setup.exe ”
USB
a.
USB HP Photosmart
USB
a.
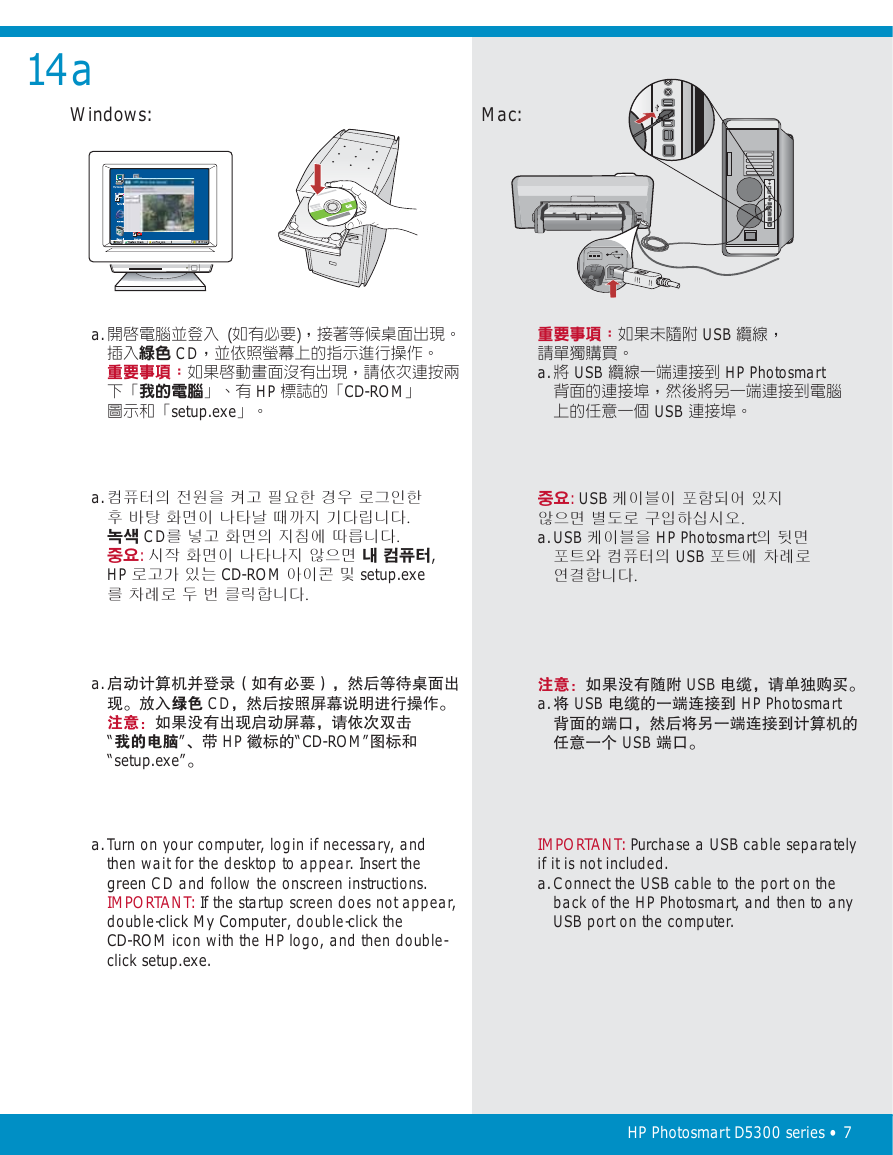
Turn on your computer, login if necessary, and
then wait for the desktop to appear. Insert the
green CD and follow the onscreen instructions.
IMPORTANT: If the startup screen does not appear,
double-click My Computer , double-click the
CD-ROM icon with the HP logo, and then double-
click setup.exe .
IMPORTANT: Purchase a USB cable separately
if it is not included.
a.
Connect the USB cable to the port on the
back of the HP Photosmart, and then to any
USB port on the computer.
HP Photosmart D5300 series • 7
�
14b
Windows:
Mac:
USB
b.
USB USB
HP Photosmart
USB
9 HP Photosmart
c.
d.
: USB
b.
USB USB
HP Photosmart USB
HP Photosmart 9
c.
d.
USB
b.
USB USB
HP Photosmart
USB
9 HP Photosmart
c.
d.
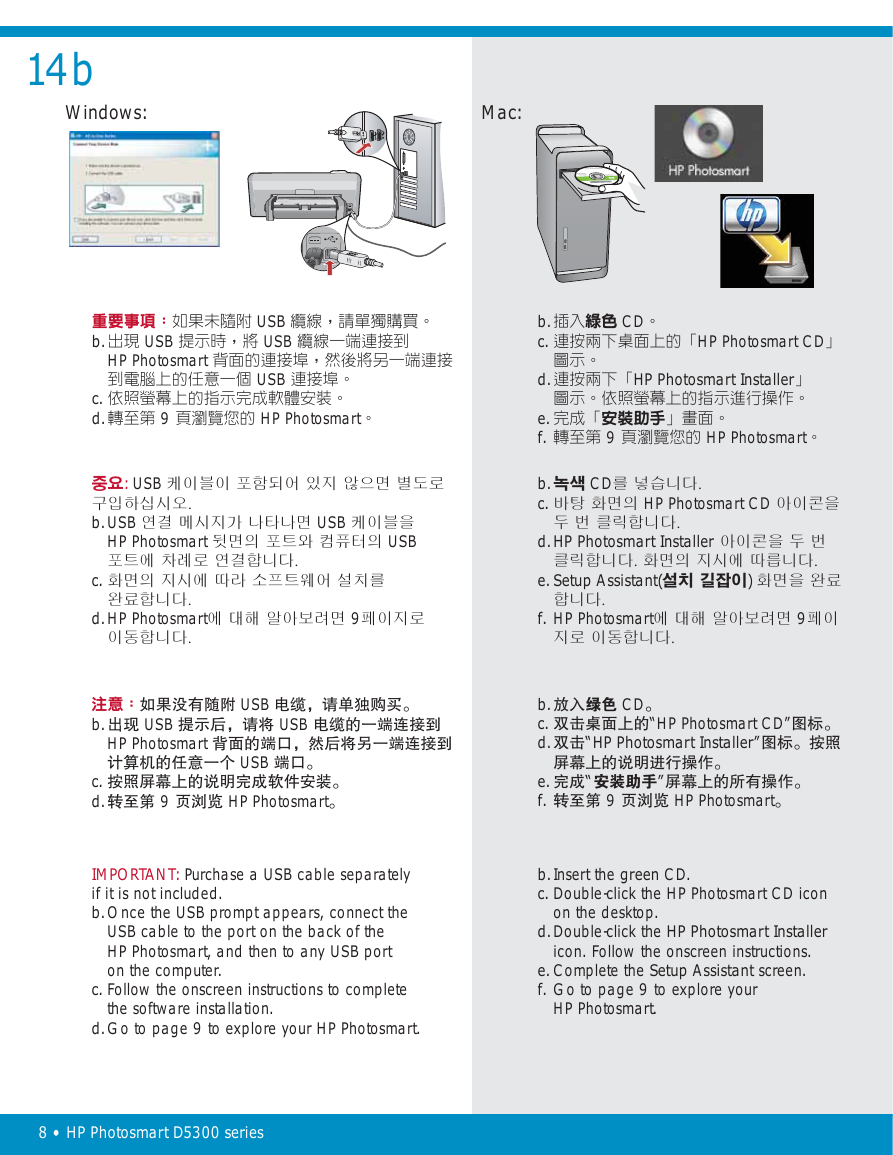
IMPORTANT: Purchase a USB cable separately
if it is not included.
b.
Once the USB prompt appears, connect the
USB cable to the port on the back of the
HP Photosmart, and then to any USB port
on the computer.
Follow the onscreen instructions to complete
the software installation.
Go to page 9 to explore your HP Photosmart.
c.
d.
8 • HP Photosmart D5300 series
b.
c.
d.
e.
f.
CD
HP Photosmart CD
HP Photosmart Installer
9 HP Photosmart
b.
c.
d.
e.
f.
CD
HP Photosmart CD
HP Photosmart Installer
Setup Assistant()
HP Photosmart 9
b.
c.
d.
e.
f.
CD
“HP Photosmart CD”
“ HP Photosmart Installer ”
“ ”
9 HP Photosmart
b.
c.
d.
e.
f.
Insert the green CD.
Double-click the HP Photosmart CD icon
on the desktop.
Double-click the HP Photosmart Installer
icon. Follow the onscreen instructions.
Complete the Setup Assistant screen.
Go to page 9 to explore your
HP Photosmart.
�




 2023年江西萍乡中考道德与法治真题及答案.doc
 2012年重庆南川中考生物真题及答案.doc
 2013年江西师范大学地理学综合及文艺理论基础考研真题.doc
 2020年四川甘孜小升初语文真题及答案I卷.doc
 2020年注册岩土工程师专业基础考试真题及答案.doc
 2023-2024学年福建省厦门市九年级上学期数学月考试题及答案.doc
 2021-2022学年辽宁省沈阳市大东区九年级上学期语文期末试题及答案.doc
 2022-2023学年北京东城区初三第一学期物理期末试卷及答案.doc
 2018上半年江西教师资格初中地理学科知识与教学能力真题及答案.doc
 2012年河北国家公务员申论考试真题及答案-省级.doc
 2020-2021学年江苏省扬州市江都区邵樊片九年级上学期数学第一次质量检测试题及答案.doc
 2022下半年黑龙江教师资格证中学综合素质真题及答案.doc