Raon Digital recommends WindowⓇ XP Home Edition
Ultra Portable PC
Product Manual
www.raondigital.com
Raon Digital Inc.
(462-806) Seacocks Tower Suite No. 1005, 513-14
Sandawon-dong, Joongwon-gu, Sungnam city, Gyunggi-do
�
Vega 제품사용설명서
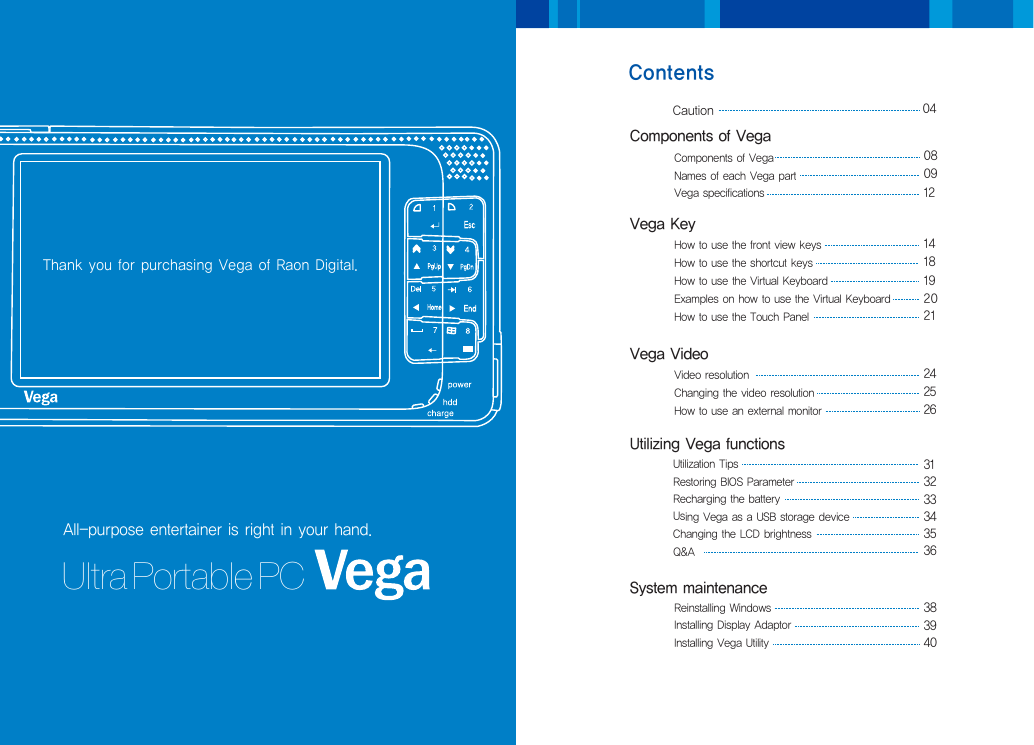
Thank you for purchasing Vega of Raon Digital.
All-purpose entertainer is right in your hand.
Ultra Portable PC
Contents
Caution
Components of Vega
Components of Vega
Names of each Vega part
Vega specifications
Vega Key
How to use the front view keys
How to use the shortcut keys
How to use the Virtual Keyboard
Examples on how to use the Virtual Keyboard
How to use the Touch Panel
Vega Video
Video resolution
Changing the video resolution
How to use an external monitor
Utilizing Vega functions
Utilization Tips
Restoring BIOS Parameter
Recharging the battery
Using Vega as a USB storage device
Changing the LCD brightness
Q&A
System maintenance
Reinstalling Windows
Installing Display Adaptor
Installing Vega Utility
04
08
09
12
14
18
19
20
21
24
25
26
31
32
33
34
35
36
38
39
40
�
Vega I Safety cautions
www.raondigital.com
Safety Cautions
It is very important that you follow the safety instruction of the manual
in order to prevent any possible malfunctions.
We recommend keeping the user’s manual at
a place where it can be easily found.
•Do not place anything on top of the product.
•Do not use the product while driving.
•Avoid contacting it with heating devices.
•Do not drop or inflict impact on the product.
•Do not disassemble, repair or modify the product.
•Use a soft cloth when cleaning the product.
•Be caution of the foreign substances.
•Do not use in the areas with damp, dust and black dirt.
•Do not place the product near a magnet or in the magnetic field.
•Be caution for malfunction when using the product in the excessive static generating areas.
•Do not disconnect the USB cable or power outage while reading or writing a file.
Doing so would cause a problem and is likely to damage the data.
•Always backup important files.
(The company does not have any responsibility for a problem that occurs due to the user’s malpractice.)
•Use only the AC adapter supplied with the product for electric safety.
•Disconnect all connected cables like AC adaptor when thunder and lightening occur.
There is high possibility of an electric shock or a fire.
•There could be a bad sector due to a physical impact on the HDD.
•Do not use the headphone/earphone in high volume while on foot,
especially when crossing a crosswalk.
•Stop using or reduce the level of sound when you feel ringing in your ears.
•Be caution not to let the headphone/earphone caught between the doors
of trains and cars.
•Many hours of music listening in high volume could damage hearing ability.
•Do not use the headphone/earphone when operating a bicycle, car or a motorcycle.
Things to be caution for data loss (HDD Maintenance)
Be caution not to damage the data in the HDD.
■ HDD is a sensitive product. An impact while in use or external environment
could cause malfunction of the product.
■ If the HDD is damaged due to external environment or by user’s carelessness,
the computer manufacturer holds no responsibility whatsoever.
What could cause the HDD and data damage
■ When an external impact is inflicted while disassembling the computer or in installation.
■ When reset (re-boot) the computer due to a power breakdown or
power goes off while operating HDD.
■ When the power goes off while running a program.
■ When transporting the main body or inflict an impact while HDD is running.
■ When copying or deleting a file using a USB device
while in standby or maximum power saving mode.
4
5
�
Components of Vega
Components of Vega
Names of each Vega part
Vega specifications
Vega I Customer Information Card
Customer Information Card
Product Name :
Model :
The serial number of the product :
Date purchased :
Customer’s name :
E-mail :
Other :
@
Please fill out the Customer Information Card immediately after purchasing the product.
You may use it when requesting service.
Copyright
The copyright of this manual is with Raon Digital. Using or copying the manual,
partly or entirely without permission of Raon Digital is prohibited.
The details of this manual may be changed without prior notice to upgrade
the functions of the product. Raon Digital does not warranty any data loss.
It is wholly within the user’s discretion to be caution about important data
and always back up for safety.
Things to be caution when changing OS
The default OS installed in the computer is Microsoft WindowsⓇ XP.
Deleting Microsoft WindowsⓇ XP and installing other OS means no change,
no refund and no free service when a problem occurs.
6
�
Vega I Components of Vega
www.raondigital.com
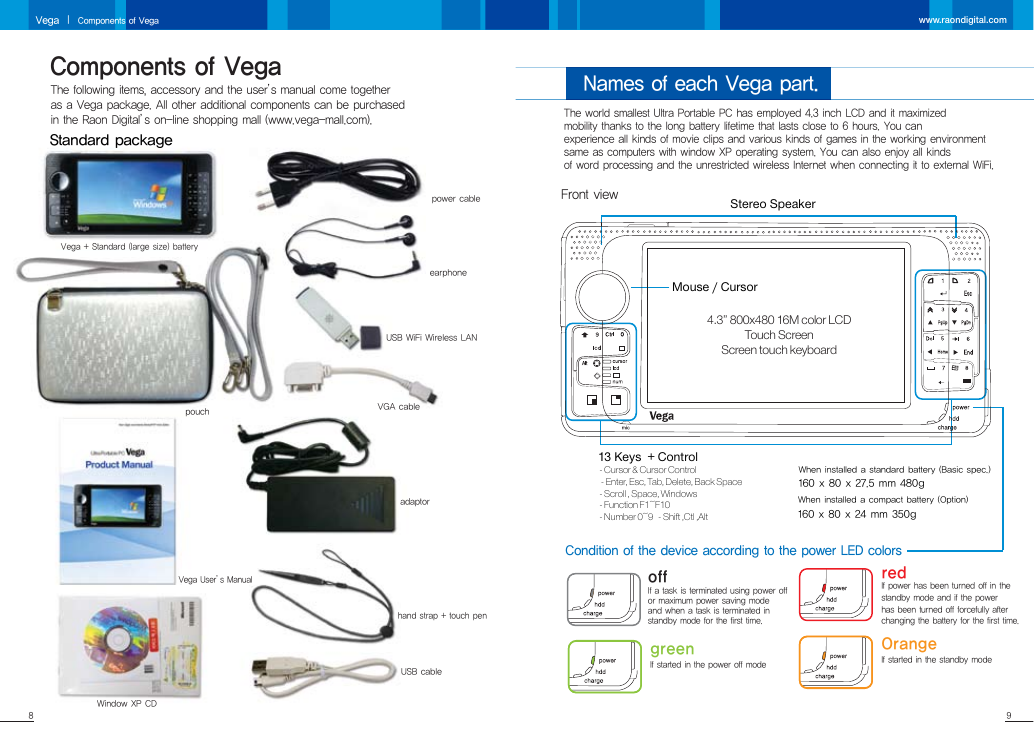
Components of Vega
The following items, accessory and the user’s manual come together
as a Vega package. All other additional components can be purchased
in the Raon Digital’s on-line shopping mall (www.vega-mall.com).
Standard package
Names of each Vega part.
The world smallest Ultra Portable PC has employed 4.3 inch LCD and it maximized
mobility thanks to the long battery lifetime that lasts close to 6 hours. You can
experience all kinds of movie clips and various kinds of games in the working environment
same as computers with window XP operating system. You can also enjoy all kinds
of word processing and the unrestricted wireless Internet when connecting it to external WiFi.
power cable
Front view
Stereo Speaker
Vega + Standard (large size) battery
earphone
USB WiFi Wireless LAN
pouch
VGA cable
Mouse / Cursor
4.3” 800x480 16M color LCD
Touch Screen
Screen touch keyboard
Vega User’s Manual
13 Keys + Control
- Cursor & Cursor Control
- Enter, Esc, Tab, Delete, Back Space
- Scroll , Space, Windows
- Function F1~F10
- Number 0~9 - Shift ,Ctl ,Alt
When installed a standard battery (Basic spec.)
160 x 80 x 27.5 mm 480g
When installed a compact battery (Option)
160 x 80 x 24 mm 350g
Condition of the device according to the power LED colors
red
If power has been turned off in the
standby mode and if the power
has been turned off forcefully after
changing the battery for the first time.
off
If a task is terminated using power off
or maximum power saving mode
and when a task is terminated in
standby mode for the first time.
green
If started in the power off mode
Orange
If started in the standby mode
adaptor
hand strap + touch pen
USB cable
Window XP CD
8
9
�
Vega I Names of each Vega part.
www.raondigital.com
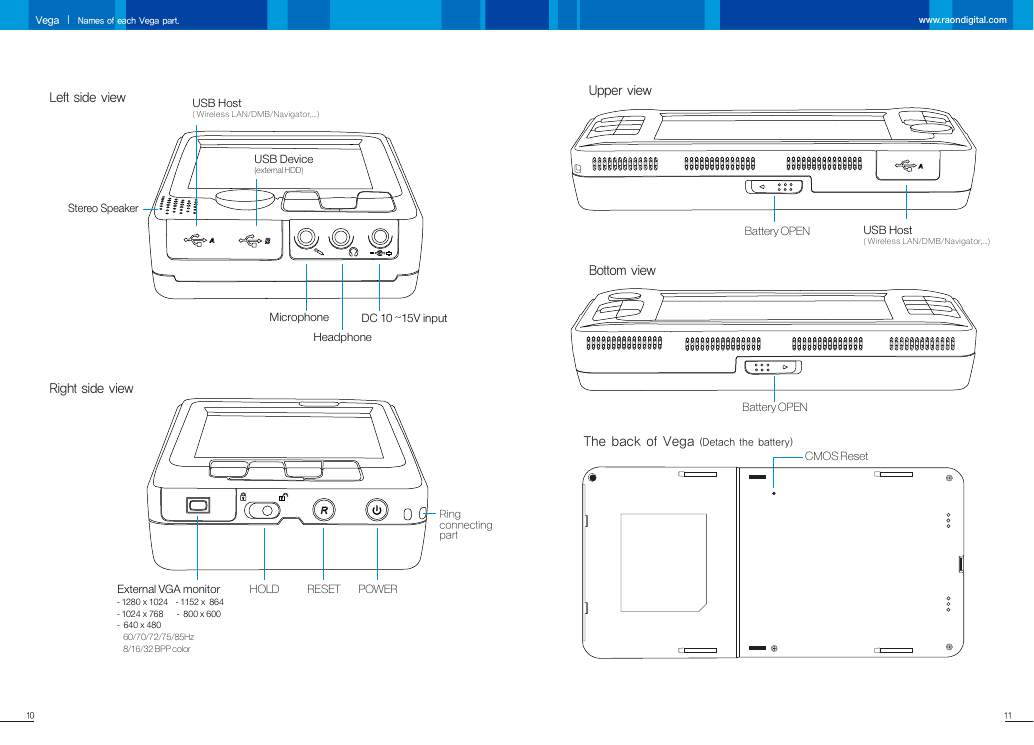
Left side view
USB Host
( Wireless LAN/DMB/Navigator,…)
USB Device
(external HDD)
Microphone
DC 10 ~15V input
Headphone
Stereo Speaker
Right side view
Upper view
Bottom view
Battery OPEN
USB Host
( Wireless LAN/DMB/Navigator,…)
Battery OPEN
The back of Vega (Detach the battery)
CMOS Reset
Ring
connecting
part
HOLD
RESET
POWER
External VGA monitor
- 1280 x 1024 - 1152 x 864
- 1024 x 768 - 800 x 600
- 640 x 480
60/70/72/75/85Hz
8/16/32 BPP color
10
11
�
Vega System Specifications
Items
Vega I System Specifications
OS
CPU
Cache Memory
Instruction set
Main Memory
Main Chipset
HDD
Graphics
Video processor
Display Controller
Sound
Speaker
Headphone
Microphone
LCD
Contrast Ratio/Luminance
Viewing angle
Battery
Battery Life
Charge Time
Temperature
Power
DC input
Physical
12
Specification
MicrosoftⓇ WindowsⓇ XP Home
AMD Geode LX800
L1 64KB-I/64KB-D L2 128KB
X86 + Integrate FPU + intel MMX + AMD 3Dnow
DDR400 / PC3200 256MB/512MB
AMD CS5536
Toshiba 1.8” 30GB 4200rpm
High performance 2D graphics controller
MicrosoftⓇ WindowsⓇ GDI GUI acceleration
Hardware screen rotation
Video Scaling / Mixing / VOP
Up to 1920x1440x32bpp 85Hz
RealTek ALC203
EAX/DirectSound3D/A3D/I3DL2 compatible
0.7W+0.7W Stereo Speaker
50mW / 20Ohm
1 Internal Mono / External Jack
4.3” (93.6 x56.16mm) WVGA
800x480 resolution 16M color 60Hz
400:1 / 200cd/m2
80° /80°
Li-ion 10.8V 3300mAH Standard Pack
Li-ion 10.8V 1100mAH Compact Pack
Up to 5.5Hrs (Standard Pack)
Up to 1.8Hrs (Compact Pack)
( VGA Size Movie playing, LCD Full Brightness,
50% Internal Speaker Volume Condition)
3Hrs(80% Charge)
Operating : 10 ~ 35 (20~80% Humidity)
Storage : -5 ~ 40 ( 5~90% Humidity)
AC100~240V 50/60Hz 35W
DC 10~15V 3A
Dimension 160 x 80 x 27.5 mm (Standard Pack)
Dimension 160 x 80 x 24 mm (Compact Pack)
480g/350g (Standard/Compact Pack)
Remark
External Monitor
H x V
Optional
Operating + Charge
W x H x D
Vega Key
How to use the front view keys
How to use the shortcut keys
How to use the Virtual Keyboard
Examples on how to use the Virtual Keyboard
How to use the Touch Panel
�
Vega I Vega Key
Vega Key
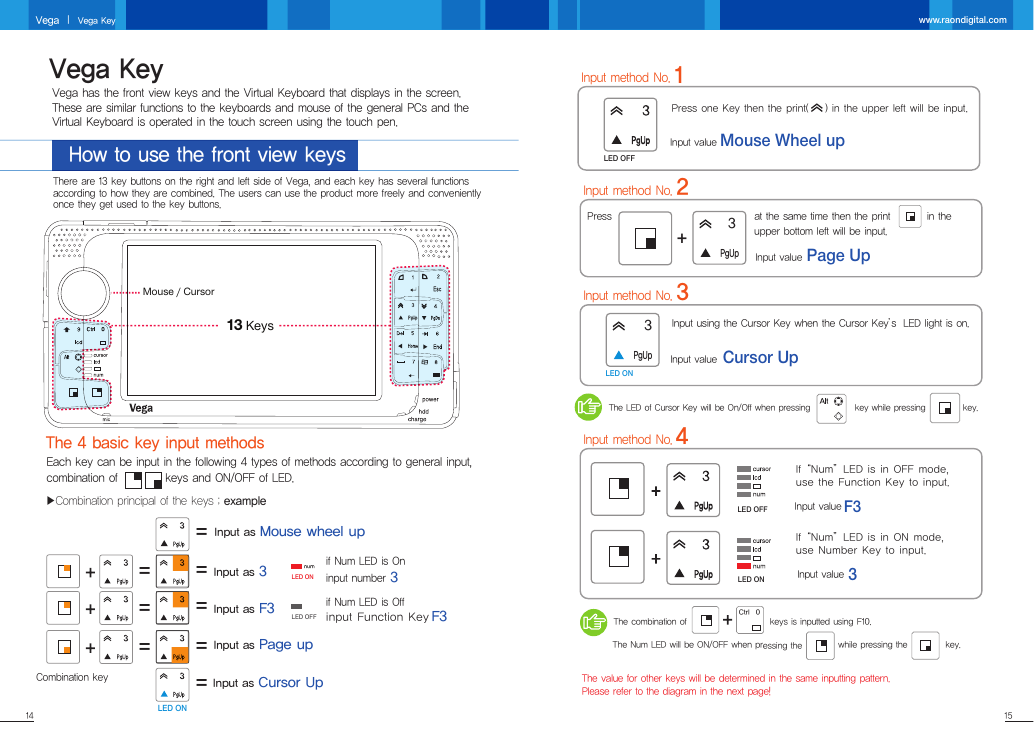
Vega has the front view keys and the Virtual Keyboard that displays in the screen.
These are similar functions to the keyboards and mouse of the general PCs and the
Virtual Keyboard is operated in the touch screen using the touch pen.
How to use the front view keys
www.raondigital.com
Input method No.1
Press one Key then the print( ) in the upper left will be input.
Input value
Mouse Wheel up
LED OFF
There are 13 key buttons on the right and left side of Vega, and each key has several functions
according to how they are combined. The users can use the product more freely and conveniently
once they get used to the key buttons.
Input method No.2
Mouse / Cursor
13 Keys
The 4 basic key input methods
Each key can be input in the following 4 types of methods according to general input,
combination of keys and ON/OFF of LED.
▶Combination principal of the keys ; example
=
=
Input as Mouse wheel up
Input as 3
LED ON
if Num LED is On
3
input number
= Input as F3
if Num LED is Off
input Function Key F3
LED OFF
=
=
Input as Page up
Input as Cursor Up
=
=
=
Combination key
14
LED ON
Press
+
3
PgUp
at the same time then the print
upper bottom left will be input.
in the
Input value Page Up
Input method No.3
3
PgUp
LED ON
Input using the Cursor Key when the Cursor Key’s LED light is on.
Input value
Cursor Up
The LED of Cursor Key will be On/Off when pressing
key while pressing
key.
Input method No.4
If“Num”LED is in OFF mode,
use the Function Key to input.
LED OFF
Input value
F3
If“Num”LED is in ON mode,
use Number Key to input.
Input value
3
LED ON
0Ctrl
The combination of
keys is inputted using F10.
The Num LED will be ON/OFF when pressing the
while pressing the
key.
The value for other keys will be determined in the same inputting pattern.
Please refer to the diagram in the next page!
15
�





 2023年江西萍乡中考道德与法治真题及答案.doc
 2012年重庆南川中考生物真题及答案.doc
 2013年江西师范大学地理学综合及文艺理论基础考研真题.doc
 2020年四川甘孜小升初语文真题及答案I卷.doc
 2020年注册岩土工程师专业基础考试真题及答案.doc
 2023-2024学年福建省厦门市九年级上学期数学月考试题及答案.doc
 2021-2022学年辽宁省沈阳市大东区九年级上学期语文期末试题及答案.doc
 2022-2023学年北京东城区初三第一学期物理期末试卷及答案.doc
 2018上半年江西教师资格初中地理学科知识与教学能力真题及答案.doc
 2012年河北国家公务员申论考试真题及答案-省级.doc
 2020-2021学年江苏省扬州市江都区邵樊片九年级上学期数学第一次质量检测试题及答案.doc
 2022下半年黑龙江教师资格证中学综合素质真题及答案.doc