logo资料库

codeblocks使用教程.pdf

第1页 / 共70页
第2页 / 共70页
第3页 / 共70页
第4页 / 共70页
第5页 / 共70页
第6页 / 共70页
第7页 / 共70页
第8页 / 共70页
资料共70页,剩余部分请下载后查看
1 CodeBlocks Project Management
1.1 Project View
1.2 Notes for Projects
1.3 Project Templates
1.4 Create Projects from Build Targets
1.5 Virtual Targets
1.6 Pre- and Postbuild steps
1.7 Adding Scripts in Build Targets
1.8 Workspace and Project Dependencies
1.9 Including Assembler files
1.10 Editor and Tools
1.10.1 Default Code
1.10.2 Abbreviation
1.10.3 Personalities
1.10.4 Configuration Files
1.10.5 Navigate and Search
1.10.6 Symbol view
1.10.7 Including external help files
1.10.8 Including external tools
1.11 Tips for working with CodeBlocks
1.11.1 Tracking of Modifications
1.11.2 Data Exchange with other applications
1.11.3 Configuring environmental variables
1.11.4 Switching between perspectives
1.11.5 Switching between projects
1.11.6 Extended settings for compilers
1.11.7 Zooming within the editor
1.11.8 Wrap Mode
1.11.9 Block select mode in editor
1.11.10 Code folding
1.11.11 Auto complete
1.11.12 Find broken files
1.11.13 Including libraries
1.11.14 Object linking order
1.11.15 Autosave
1.11.16 Settings for file extensions
1.12 CodeBlocks at the command line
1.13 Shortcuts
1.13.1 Editor
1.13.2 Files
1.13.3 View
1.13.4 Search
1.13.5 Build
2 Plugins
2.1 Astyle
2.2 CodeSnippets
2.3 Incremental Search
2.4 ToDo List
2.5 Source Code Exporter
2.6 Thread Search
2.6.1 Features
2.6.2 Usage
2.6.3 Configuration
2.6.4 Options
2.6.5 Thread search options
2.6.6 Layout
2.6.7 Panel Management
2.6.8 Logger Type
2.6.9 Splitter Window Mode
2.6.10 Sort Search Results
2.7 FileManager and PowerShell Plugin
2.8 Browse Tracker
2.9 SVN Support
2.10 LibFinder
2.10.1 Searching for libraries
2.10.2 Including libraries in projects
2.10.3 Using LibFinder and projects generated from wizards
2.11 AutoVersioning
2.11.1 Introduction
2.11.2 Features
2.11.3 Usage
2.11.4 Dialog notebook tabs
2.11.5 Including in your code
2.11.6 Change log generator
2.12 Code statistics
2.13 Searching Available Source Code
2.14 Code profiler
2.15 Symbol Table Plugin
3 Variable Expansion
3.1 Syntax
3.2 List of available built-ins
3.2.1 CodeBlocks workspace
3.2.2 Files and directories
3.2.3 Build targets
3.2.4 Language and encoding
3.2.5 Time and date
3.2.6 Random values
3.2.7 Operating System Commands
3.2.8 Conditional Evaluation
3.3 Script expansion
3.4 Command Macros
3.5 Compile single file
3.6 Link object files to executable
3.7 Global compiler variables
3.8 Synopsis
3.9 Names and Members
3.10 Constraints
3.11 Using Global Compiler Variables
3.12 Variable Sets
3.12.1 Custom Members Mini-Tutorial
4 Building CodeBlocks from sources
4.1 Introduction
4.1.1 WIN32
4.1.2 Initial Build System
4.1.3 Version Control System
4.1.4 wxWidgets
4.1.5 Zip
4.1.6 Building Codeblocks
4.1.7 WIN32
4.1.8 LINUX
4.1.9 Generate a plugins
4.1.10 Linux
4.1.11 Contributed Plugins
4.1.12 Building CodeBlocks
URL catalog
Code::Blocks Manual Version 1.0 Thanks to the CodeBlocks team: Anders F. Bj¨orklund (afb), Biplab Kumar Modak (biplab), Bartomiej wiecki (byo), Paul A. Jimenez (ceniza), Koa Chong Gee (cyberkoa), Daniel Orb (daniel2000), Lieven de Cock (killerbot), Yiannis Mandravellos (mandrav), Mispunt (mispunt), Martin Halle (morten- macfly), Jens Lody (jens), Jerome Antoine (dje), Damien Moore (dmoore), Pecan Heber (pecan), Ricardo Garcia (rickg22), Thomas Denk (thomasdenk), tiwag (tiwag) Permission is granted to copy, distribute and/or modify this document under the terms of the GNU Free Documentation License, Version 1.2 or any later version published by the Free Software Foundation.
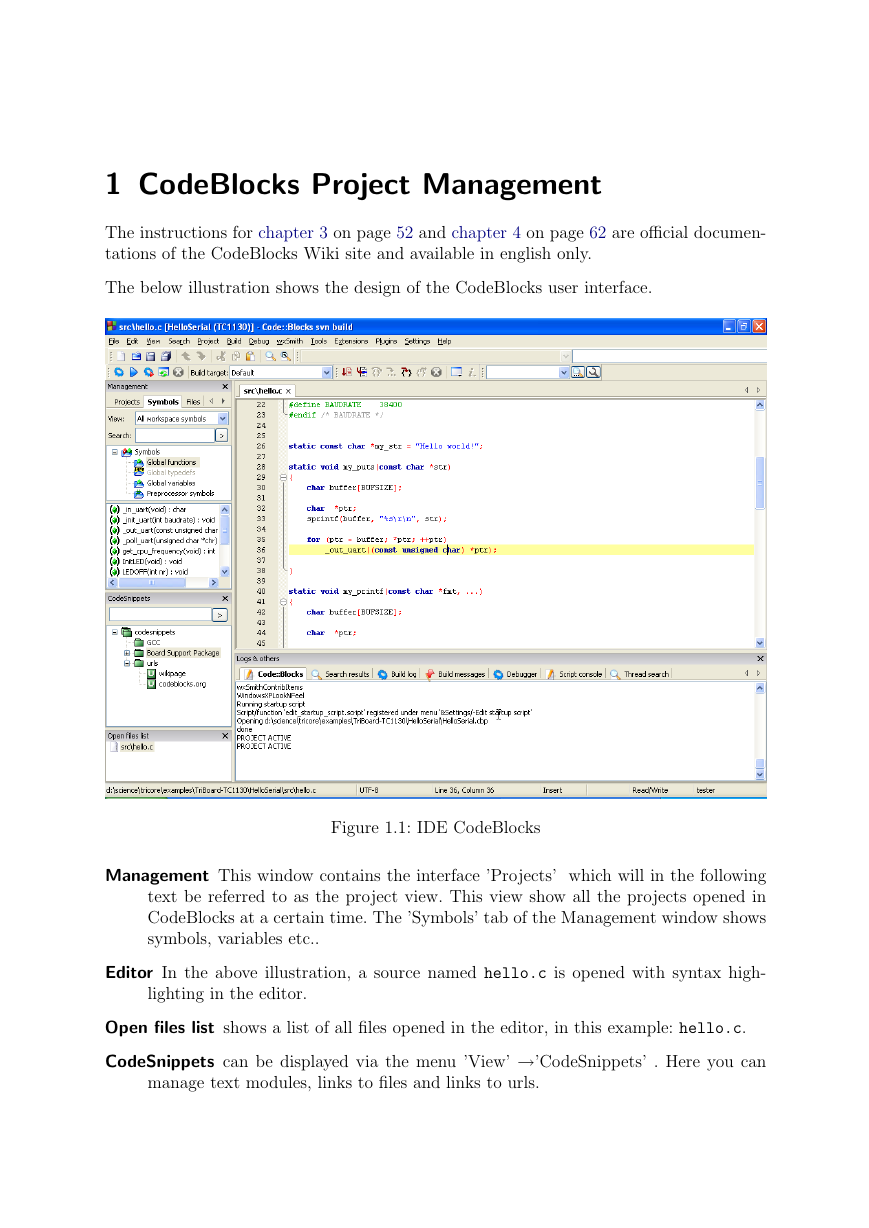
1 CodeBlocks Project Management The instructions for chapter 3 on page 52 and chapter 4 on page 62 are official documen- tations of the CodeBlocks Wiki site and available in english only. The below illustration shows the design of the CodeBlocks user interface. Figure 1.1: IDE CodeBlocks Management This window contains the interface ’Projects’ which will in the following text be referred to as the project view. This view show all the projects opened in CodeBlocks at a certain time. The ’Symbols’ tab of the Management window shows symbols, variables etc.. Editor In the above illustration, a source named hello.c is opened with syntax high- lighting in the editor. Open files list shows a list of all files opened in the editor, in this example: hello.c. CodeSnippets can be displayed via the menu ’View’ →’CodeSnippets’ . Here you can manage text modules, links to files and links to urls.
Code::Blocks V1.0 1.1 Project View Logs & others . This window is used for outputting search results, log messages of a compiler etc.. The status bar gives an overview of the following settings: • Absolute path of an opened file in the editor. • The editor uses the default character encoding of your host operating system. This setting will be displayed with default. • Row and column number of the current cursor position in the editor. • The configured keyboard mode for inserting text (Insert or Overwrite). • Current state of a file. A modified file will be marked with Modified otherwise this entry is empty. • The permission of a file. A file with read only settings will display Read only in the status bar. In the window ’Open files list’ these files will be emphasised with a lock as icon overlay. • If you start CodeBlocks with the command line option --personality= then the status bar will show the currently used profile, otherwise default will be shown. The settings of CodeBlocks are stored in the corresponding configuration file .conf. CodeBlocks offers a very flexible and comprehensive project management. The following text will address only some of the features of the project management. 1.1 Project View In CodeBlocks, the sources and the settings for the build process are stored in a project file .cbp. C/C++ sources and the corresponding header files are the typical components of a project. The easiest way to create a new project is executing the command ’File’ →’Project’ and selecting a wizard. Then you can add files to the project via the context menu ’Add files’ in the Management window. CodeBlocks governs the project files in categories according to their file extensions. These are the preset categories: Sources includes source files with the extensions *.c;*.cpp;. ASM Sources includes source files with the extensions *.s;*.S;*.ss;*.asm. Headers includes, among others, files with the extension *.h;. Resources includes files for layout descriptions for wxWidgets windows with the ex- tensions *.res;*.xrc;. These file types are shown in the ’Resources’ tab of the Manangement window. The settings for types and categories of files can be adjusted via the context menu ’Project tree’ →’Edit file types & categories’ . Here you can also define custom categories for file extensions of your own. For example, if you wish to list linker scripts with the *.ld extension in a category called Linkerscript, you only have to create the new category. Codeblocks 2
Code::Blocks V1.0 1.2 Notes for Projects Note: If you deactivate ’Project tree’ →’Categorize by file types’ in the context menu, the category display will be switched off, and the files will be listed as they are stored in the file system. 1.2 Notes for Projects In CodeBlocks, so-called notes can be stored for a project. These notes should contain short descriptions or hints for the corresponding project. By displaying this information during the opening of a project, other users are provided with a quick survey of the project. The display of notes can be switched on or off in the Notes tab of the Properties of a project. 1.3 Project Templates CodeBlocks is supplied with a variety of project templates which are displayed when creating a new project. However, it is also possible to store custom templates for collect- ing your own specifications for compiler switches, the optimisation to be used, machine- specific switches etc. in templates. These templates will be stored in the Documents and Settings\\Application Data\codeblocks\UserTemplates directory. If the tem- plates are to be open to all users, they have to be copied to a corresponding directory of the CodeBlocks installation. These templates will then be displayed at the next startup of CodeBlocks under ’New’ →’ Project’ →’User templates’ . Note: The available templates in the Project Wizard can be edited by se- lection via right-click. 1.4 Create Projects from Build Targets In projects it is necessary to have different variants of the project available. Variants are called Build Targets. They differ with respect to their compiler options, debug information and/or choice of files. A Build Target can also be outsourced to a separate project. To do so, click ’Project’ →’Properties’ , select the variant from the tab ’Build Targets’ and click the ’Create project from target’ button (see Figure 1.2 on page 4). 1.5 Virtual Targets Projects can be further structured in CodeBlocks by so-called Virtual Targets. A fre- quently used project structure consists of two Build Targets, one ’Debug’ Target which contains debug information and one ’Release’ Target without this information. By adding Virtual Targets via ’Project’ →’Properties’ →’Build Targets’ individual Build Targets can be combined. For example, a Virtual Target ’All’ can create the Targets Debug and Release simultaneously. Virtual Targets are shown in the symbol bar of the compiler under Build Targets. Codeblocks 3
Code::Blocks V1.0 1.6 Pre- and Postbuild steps Figure 1.2: Build Targets 1.6 Pre- and Postbuild steps CodeBlocks makes it possible to perform additional operations before or after compiling a project. These operations are called Prebuilt or Postbuilt Steps. Typical Postbuilt Steps are: • Creating an Intel Hexformat from a finished object • Manipulating objects by objcopy • Generating dump files by objdump Example Creating a Disassembly from an object under Windows. Piping to a file requires calling cmd with the /c option. cmd /c objdump -D name.elf > name.dis Archiving a project can be another example for a Postbuilt Step. For this purpose, create a Build Target ’Archive’ and include the following instruction in the Postbuilt Step: zip -j9 $(PROJECT_NAME)_$(TODAY).zip src h obj $(PROJECT_NAME).cbp With this command, the active project and its sources, header and objects will be packed as a zip file. In doing so, the Built-in variables $(PROJECT_NAME) and $(TODAY), the project name and the current date will be extracted (see section 3.2 on page 53). After the execution of the Target ’Archive’, the packed file will be stored in the project directory. Codeblocks 4
Code::Blocks V1.0 1.7 Adding Scripts in Build Targets In the share/codeblocks/scripts directory you will find some examples for scripts. You can add a script via menu ’Settings’ →’Scripting’ and register in a menu. If you execute e.g. the script make dist from the menu then all files belonging to a project will be compressed in an archive .tar.gz. 1.7 Adding Scripts in Build Targets CodeBlocks offers the possibility of using menu actions in scripts. The script represents another degree of freedom for controlling the generation of your project. Note: A script can also be included at a Build Target. 1.8 Workspace and Project Dependencies In CodeBlocks, multiple projects can be open. By saving open projects via ’File’ →’Save workspace’ you can collect them in a single workspace under .workspace. If you open .workspace during the next startup of von CodeBlocks, all projects will show up again. Complex software systems consist of components which are managed in different Code- Blocks projects. Furthermore, with the generation of such software systems, there are often dependencies between these projects. Example A project A contains fundamental functions which are made available to other projects in the form of a library. Now, if the sources of this project are modified, then the library has to be rebuilt. To maintain consistency between a project B which uses the functions and project A which implements the functions, project B has to depend on project A. The necessary information on the dependencies of projects is stored in the relevant workspace, so that each project can be created separately. The usage of dependencies makes it also possible to control the order in which the projects will be generated. The dependencies for projects can be set via the selecting the menu ’Project’ →’Properties’ and then clicking the ’Project’s dependencies’ button. 1.9 Including Assembler files In the Management window of the Project View, Assembler files are shown in the ASM Sources category. The user can change the listing of files in categories (see section 1.1 on page 2). Right-clicking one of the listed Assembler files will open a context menu. Select ’Properties’ to open a new window. Now select the ’Build’ tab and activate the two fields ’Compile file’ and ’Link file’. Then select the ’Advanced’ tab and execute the following steps: 1. Set ’Compiler variable’ to CC 2. Select the compiler under ’For this compiler’ Codeblocks 5
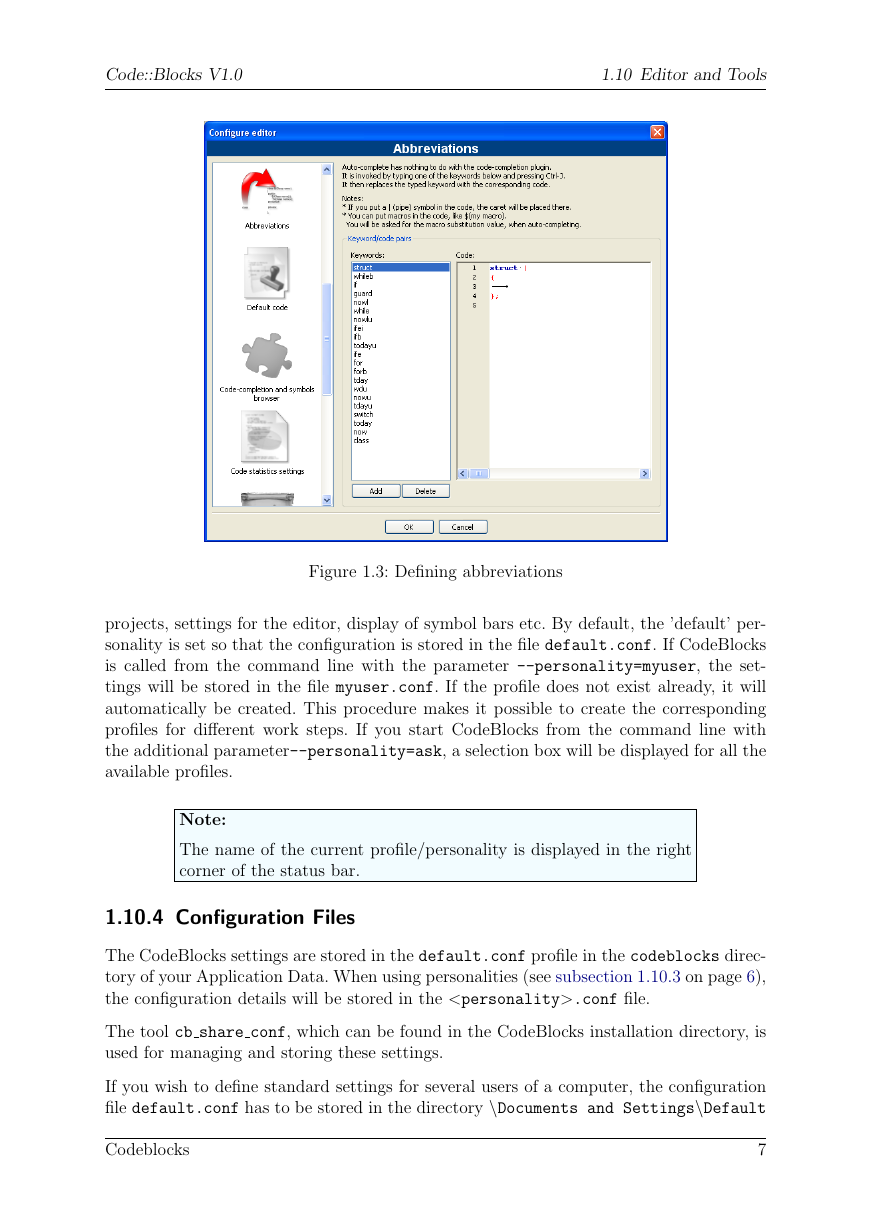
Code::Blocks V1.0 1.10 Editor and Tools 3. Select ’Use custom command to build this file’ 4. In the window, enter: $compiler $options $includes -c $file -o $object The CodeBlocks variables are marked by $ (see section 3.4 on page 57). They are set automatically so that you only have to replace the Assembler option by your own settings. 1.10 Editor and Tools 1.10.1 Default Code The company’s Coding Rules require source files to have a standard design. CodeBlocks makes it possible to include a predefined content at the beginning of a file automatically when creating new C/C++ sources and headers. This predefined content is called default code. This setting can be selected under ’Stettings’ →’Editor’ Default Code. A new file can be created via the menu ’File’ →’New’ →’File’ . Example /************************************************************************* * Project: * Function: ************************************************************************* * $Author: mario $ * $Name: $ ************************************************************************* * * Copyright 2007 by company name * ************************************************************************/ 1.10.2 Abbreviation A lot of typing can be saved in CodeBlocks by defining abbreviation. This is done by selecting ’Settings’ →’Editor’ and defining the abbreviations under the name , which can then be called by the keyboard shortcut Ctrl-J (see Figure 1.3 on page 7). Parametrisation is also possible by including variables $(NAME) in the abbreviations. #ifndef $(Guard token) #define $(Guard token) #endif // $(Guard token) When performing the abbreviation in the source text and performing Ctrl-J, the content of the variable is requested and included. 1.10.3 Personalities CodeBlocks settings are saved as application data in a file called .conf in the codeblocks directory. This configuration file contains information such as the last opened Codeblocks 6
Code::Blocks V1.0 1.10 Editor and Tools Figure 1.3: Defining abbreviations projects, settings for the editor, display of symbol bars etc. By default, the ’default’ per- sonality is set so that the configuration is stored in the file default.conf. If CodeBlocks is called from the command line with the parameter --personality=myuser, the set- tings will be stored in the file myuser.conf. If the profile does not exist already, it will automatically be created. This procedure makes it possible to create the corresponding profiles for different work steps. If you start CodeBlocks from the command line with the additional parameter--personality=ask, a selection box will be displayed for all the available profiles. Note: The name of the current profile/personality is displayed in the right corner of the status bar. 1.10.4 Configuration Files The CodeBlocks settings are stored in the default.conf profile in the codeblocks direc- tory of your Application Data. When using personalities (see subsection 1.10.3 on page 6), the configuration details will be stored in the .conf file. The tool cb share conf, which can be found in the CodeBlocks installation directory, is used for managing and storing these settings. If you wish to define standard settings for several users of a computer, the configuration file default.conf has to be stored in the directory \Documents and Settings\Default Codeblocks 7
分享到:
收藏