LCD PROJECTOR LENS
MODEL LNS-S30/S31
LENS REPLACEMENT PROCEDURE
NOTES ON LENS REPLACEMENT
Lens replacement should be performed by the qualified service personnel.
It should be followed by this procedure precisely.
Before attempt to replace the lens, confirm the model number (both the LCD
projector and the lens) and use the proper lens.
The lens cover is on the lens for protection. Be sure to remove the lens cover
before installation.
When installing or removing the lens, be careful not to stain, scratch or
damage the lens.
If you have any questions, contact the dealers.
PARTS LIST
Following parts are contained in the packing.
G LENS
G DRIVER (3 mm, Green)
G DRIVER (4 mm, Yellow)
G LIGHT-BLOCK SHEET For LNS-S30
For LNS-S31
1 piece
1 piece (Part No. 610 287 7328)
1 piece (Part No. 610 275 6029)
1 piece Type PA1 (Part No. 610 285 3735)
1 piece Type PE1 (Part No. 610 293 9804)
Following checks and confirmations should be taken for safety.
Check the following things by the time of the cabinet assembly after the lens
replacement.
1. Check the lens is securely fixed.
2. Check the proper wiring and the wires are fixed properly.
3. Check each connector is connected properly.
4. Check no wiring is tangled on the gear of lens motor or the other mechanical parts.
5. Check no parts is missing, or no mounting part is loose.
1AA6P1P3245-- (IDEJ)
�
LENS REPLACEMENT PROCEDURE
Perform the steps
1
to
6
for lens replacement.
First set the lens at the fully lower position with
lens shift adjustment.
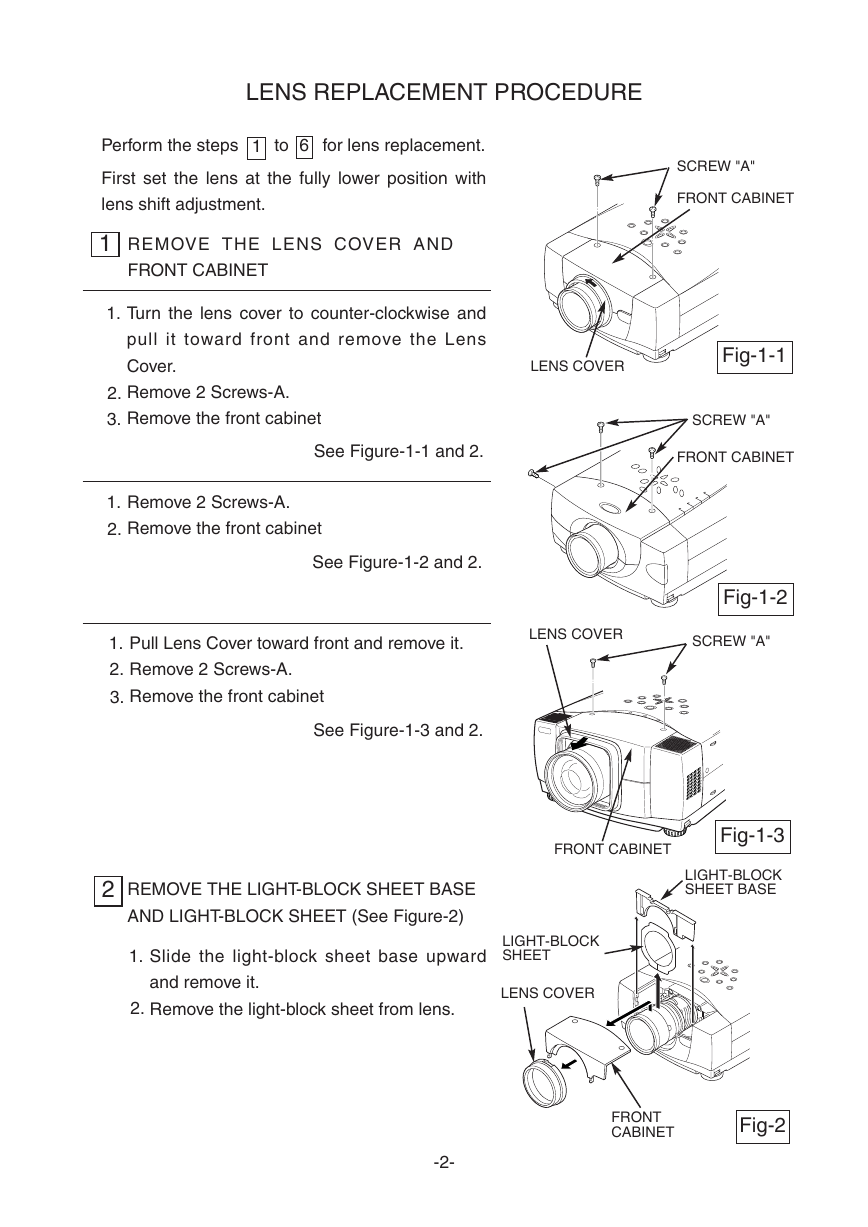
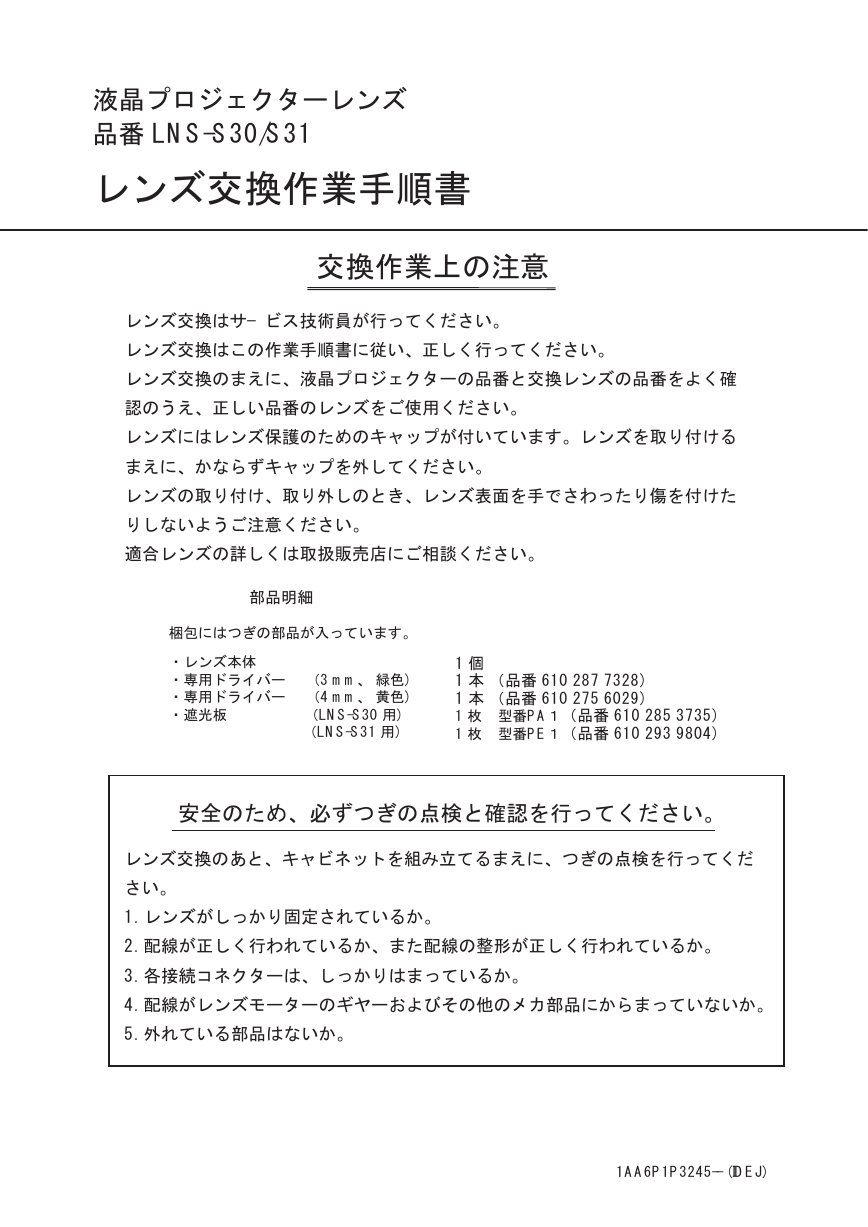
1
REMOVE THE LENS COVER AND
FRONT CABINET
1.
2.
3.
Turn the lens cover to counter-clockwise and
pull it toward front and remove the Lens
Cover.
Remove 2 Screws-A.
Remove the front cabinet
See Figure-1-1 and 2.
1.
2.
Remove 2 Screws-A.
Remove the front cabinet
See Figure-1-2 and 2.
1.
2.
3.
Pull Lens Cover toward front and remove it.
Remove 2 Screws-A.
Remove the front cabinet
See Figure-1-3 and 2.
SCREW "A"
FRONT CABINET
LENS COVER
Fig-1-1
SCREW "A"
FRONT CABINET
Fig-1-2
LENS COVER
SCREW "A"
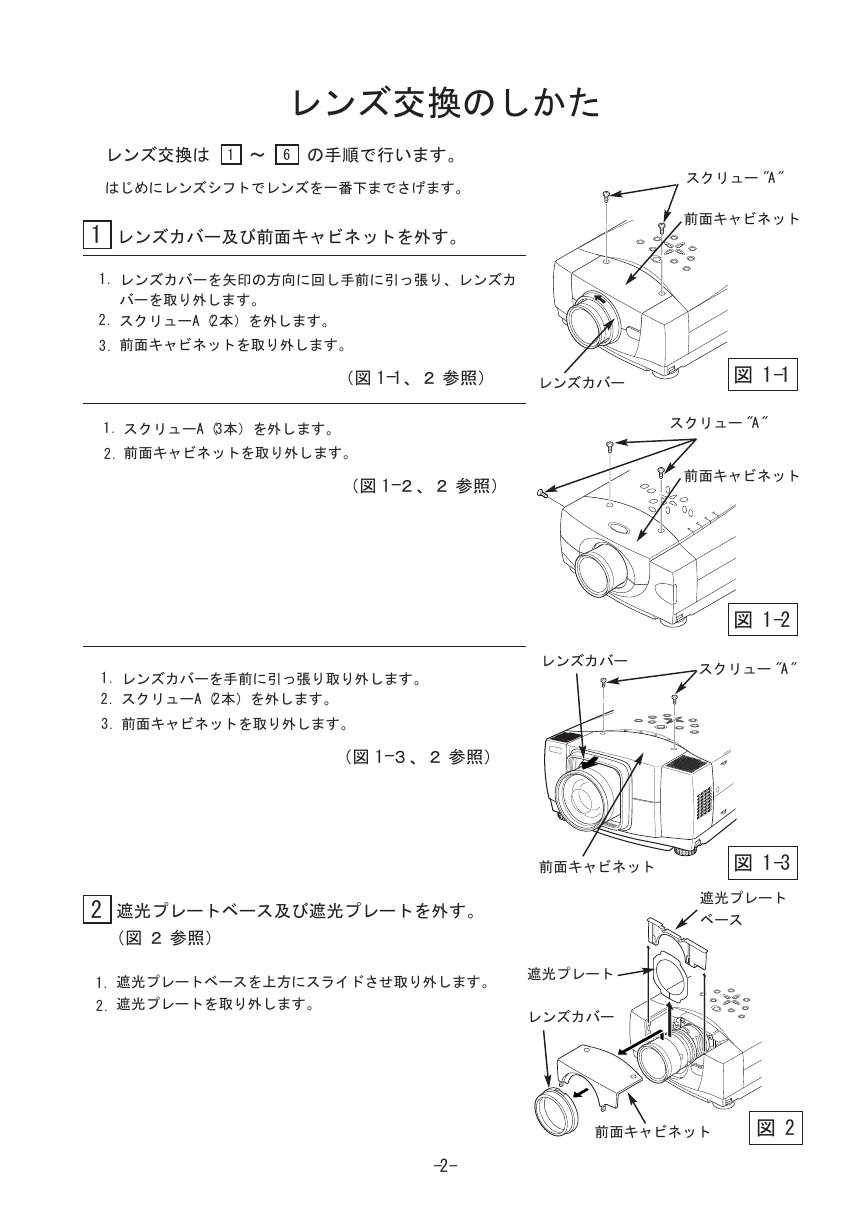
2 REMOVE THE LIGHT-BLOCK SHEET BASE
AND LIGHT-BLOCK SHEET (See Figure-2)
FRONT CABINET
Fig-1-3
LIGHT-BLOCK
SHEET BASE
1.
2.
Slide the light-block sheet base upward
and remove it.
Remove the light-block sheet from lens.
LIGHT-BLOCK
SHEET
LENS COVER
FRONT
CABINET
Fig-2
-2-
�
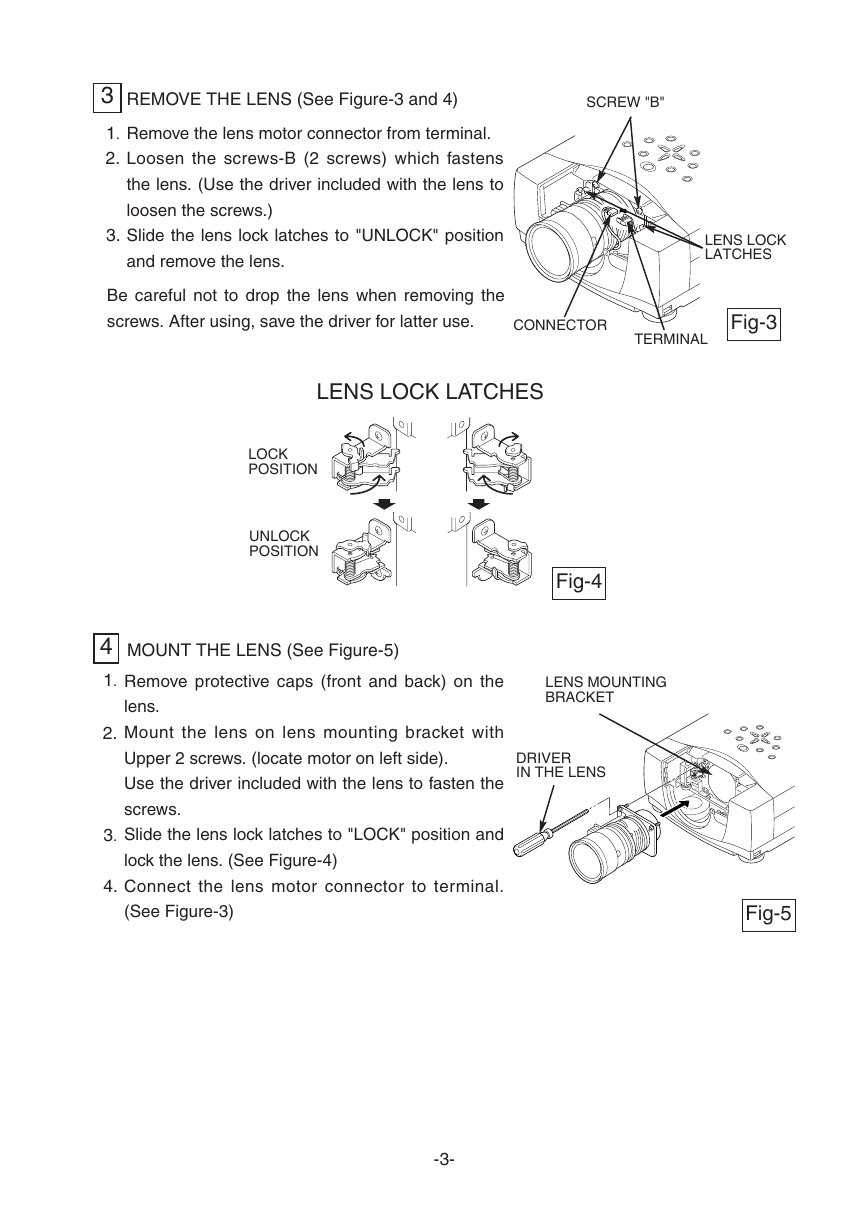
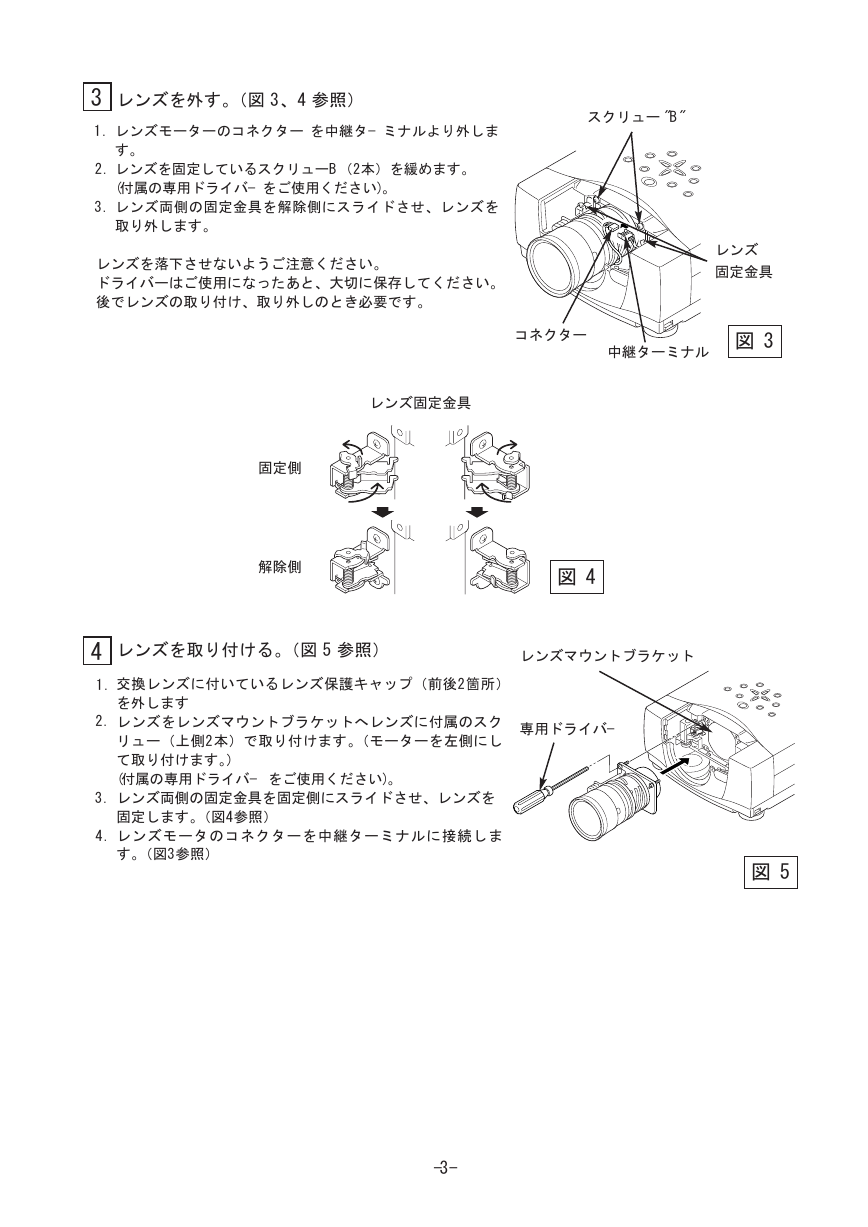
3 REMOVE THE LENS (See Figure-3 and 4)
1.
2.
Remove the lens motor connector from terminal.
Loosen the screws-B (2 screws) which fastens
the lens. (Use the driver included with the lens to
loosen the screws.)
Slide the lens lock latches to "UNLOCK" position
and remove the lens.
3.
SCREW "B"
LENS LOCK
LATCHES
Be careful not to drop the lens when removing the
screws. After using, save the driver for latter use.
CONNECTOR
Fig-3
TERMINAL
LENS LOCK LATCHES
LOCK
POSITION
UNLOCK
POSITION
4 MOUNT THE LENS (See Figure-5)
1.
Remove protective caps (front and back) on the
lens.
Mount the lens on lens mounting bracket with
Upper 2 screws. (locate motor on left side).
Use the driver included with the lens to fasten the
screws.
Slide the lens lock latches to "LOCK" position and
lock the lens. (See Figure-4)
Connect the lens motor connector to terminal.
(See Figure-3)
2.
3.
4.
Fig-4
LENS MOUNTING
BRACKET
DRIVER
IN THE LENS
Fig-5
-3-
�
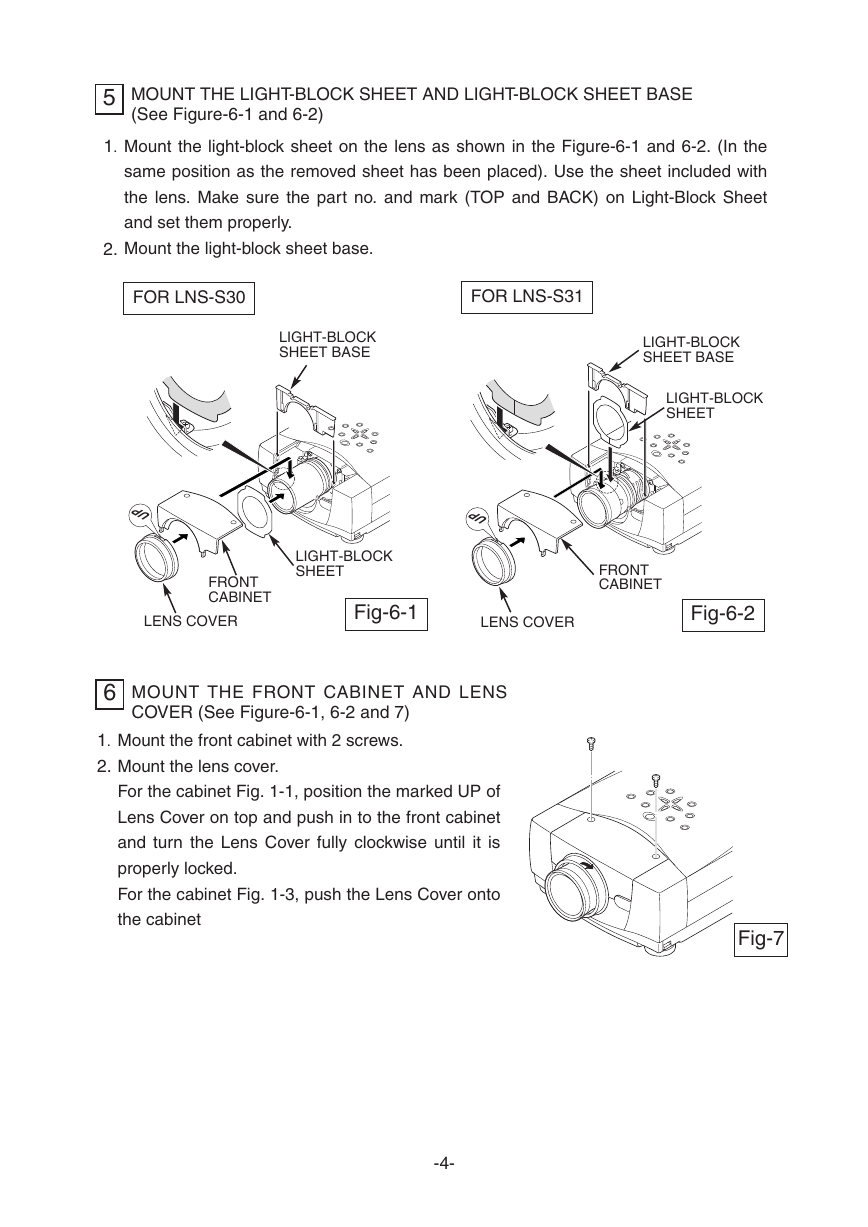
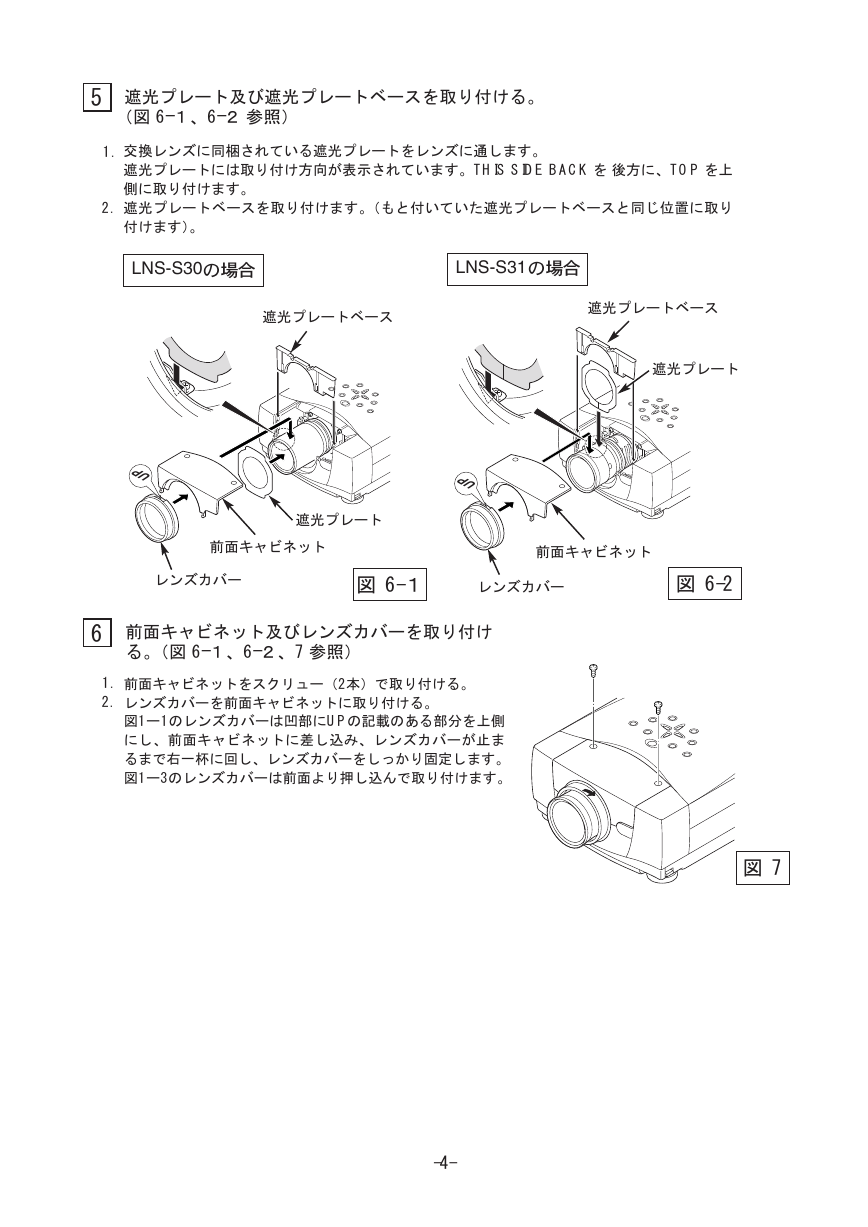
5 MOUNT THE LIGHT-BLOCK SHEET AND LIGHT-BLOCK SHEET BASE
(See Figure-6-1 and 6-2)
1.
2.
Mount the light-block sheet on the lens as shown in the Figure-6-1 and 6-2. (In the
same position as the removed sheet has been placed). Use the sheet included with
the lens. Make sure the part no. and mark (TOP and BACK) on Light-Block Sheet
and set them properly.
Mount the light-block sheet base.
FOR LNS-S30
FOR LNS-S31
LIGHT-BLOCK
SHEET BASE
LIGHT-BLOCK
SHEET BASE
LIGHT-BLOCK
SHEET
P
U
P
U
FRONT
CABINET
LENS COVER
LIGHT-BLOCK
SHEET
FRONT
CABINET
Fig-6-1
LENS COVER
Fig-6-2
1.
2.
6 MOUNT THE FRONT CABINET AND LENS
COVER (See Figure-6-1, 6-2 and 7)
Mount the front cabinet with 2 screws.
Mount the lens cover.
For the cabinet Fig. 1-1, position the marked UP of
Lens Cover on top and push in to the front cabinet
and turn the Lens Cover fully clockwise until it is
properly locked.
For the cabinet Fig. 1-3, push the Lens Cover onto
the cabinet
Fig-7
-4-
�
液晶プロジェクターレンズ
品番 LNS-S30/S31
レンズ交換作業手順書
交換作業上の注意
レンズ交換はサ−ビス技術員が行ってください。
レンズ交換はこの作業手順書に従い、正しく行ってください。
レンズ交換のまえに、液晶プロジェクターの品番と交換レンズの品番をよく確
認のうえ、正しい品番のレンズをご使用ください。
レンズにはレンズ保護のためのキャップが付いています。レンズを取り付ける
まえに、かならずキャップを外してください。
レンズの取り付け、取り外しのとき、レンズ表面を手でさわったり傷を付けた
りしないようご注意ください。
適合レンズの詳しくは取扱販売店にご相談ください。
部品明細
梱包にはつぎの部品が入っています。
・レンズ本体
・専用ドライバー (3 mm、 緑色)
・専用ドライバー (4 mm、 黄色)
(LNS-S30 用)
・遮光板
(LNS-S31 用)
1 個
1 本 (品番 610 287 7328)
1 本 (品番 610 275 6029)
1 枚 型番PA1(品番 610 285 3735)
1 枚 型番PE1(品番 610 293 9804)
安全のため、必ずつぎの点検と確認を行ってください。
レンズ交換のあと、キャビネットを組み立てるまえに、つぎの点検を行ってくだ
さい。
1. レンズがしっかり固定されているか。
2. 配線が正しく行われているか、また配線の整形が正しく行われているか。
3. 各接続コネクターは、しっかりはまっているか。
4. 配線がレンズモーターのギヤーおよびその他のメカ部品にからまっていないか。
5. 外れている部品はないか。
1AA6P1P3245-- (IDEJ)
�
レンズ交換のしかた
レンズ交換は
1
6〜
の手順で行います。
はじめにレンズシフトでレンズを一番下までさげます。
1
1.
2.
3.
レンズカバー及び前面キャビネットを外す。
レンズカバーを矢印の方向に回し手前に引っ張り、レンズカ
バーを取り外します。
スクリューA (2本)を外します。
前面キャビネットを取り外します。
スクリュー "A"
前面キャビネット
(図 1-1、2 参照)
レンズカバー
図 1-1
1.
2.
スクリューA (3本)を外します。
前面キャビネットを取り外します。
(図 1-2、2 参照)
スクリュー "A"
前面キャビネット
図 1-2
レンズカバー
スクリュー "A"
1.
2.
3.
レンズカバーを手前に引っ張り取り外します。
スクリューA (2本)を外します。
前面キャビネットを取り外します。
(図 1-3、2 参照)
2
遮光プレートベース及び遮光プレートを外す。
(図 2 参照)
前面キャビネット
図 1-3
遮光プレート
ベース
1.
2.
遮光プレートベースを上方にスライドさせ取り外します。
遮光プレートを取り外します。
遮光プレート
レンズカバー
前面キャビネット
図 2
-2-
�
3 レンズを外す。(図 3、4 参照)
1.
レンズモーターのコネクター を中継タ−ミナルより外しま
す。
レンズを固定しているスクリューB(2本)を緩めます。
(付属の専用ドライバ−をご使用ください)。
レンズ両側の固定金具を解除側にスライドさせ、レンズを
取り外します。
2.
3.
スクリュー "B"
レンズを落下させないようご注意ください。
ドライバーはご使用になったあと、大切に保存してください。
後でレンズの取り付け、取り外しのとき必要です。
レンズ
固定金具
コネクター
中継ターミナル
図 3
レンズ固定金具
固定側
解除側
4 レンズを取り付ける。(図 5 参照)
1.
交換レンズに付いているレンズ保護キャップ(前後2箇所)
を外します
レンズをレンズマウントブラケットへレンズに付属のスク
リュー(上側2本)で取り付けます。(モーターを左側にし
て取り付けます。)
(付属の専用ドライバ− をご使用ください)。
レンズ両側の固定金具を固定側にスライドさせ、レンズを
固定します。(図4参照)
レンズモータのコネクターを中継ターミナルに接続しま
す。(図3参照)
2.
3.
4.
図 4
レンズマウントブラケット
専用ドライバ−
図 5
-3-
�
5
遮光プレート及び遮光プレートベースを取り付ける。
(図 6-1、6-2 参照)
1.
2.
交換レンズに同梱されている遮光プレートをレンズに通します。
遮光プレートには取り付け方向が表示されています。THIS SIDE BACK を 後方に、TOP を上
側に取り付けます。
遮光プレートベースを取り付けます。(もと付いていた遮光プレートベースと同じ位置に取り
付けます)。
LNS-S30
LNS-S31
遮光プレートベース
遮光プレートベース
遮光プレート
P
U
P
U
遮光プレート
前面キャビネット
前面キャビネット
レンズカバー
図 6-1
レンズカバー
図 6-2
6
1.
2.
前面キャビネット及びレンズカバーを取り付け
る。(図 6-1、6-2、7 参照)
前面キャビネットをスクリュー(2本)で取り付ける。
レンズカバーを前面キャビネットに取り付ける。
図1ー1のレンズカバーは凹部にUPの記載のある部分を上側
にし、前面キャビネットに差し込み、レンズカバーが止ま
るまで右一杯に回し、レンズカバーをしっかり固定します。
図1ー3のレンズカバーは前面より押し込んで取り付けます。
図 7
-4-
�


 2023年江西萍乡中考道德与法治真题及答案.doc
 2012年重庆南川中考生物真题及答案.doc
 2013年江西师范大学地理学综合及文艺理论基础考研真题.doc
 2020年四川甘孜小升初语文真题及答案I卷.doc
 2020年注册岩土工程师专业基础考试真题及答案.doc
 2023-2024学年福建省厦门市九年级上学期数学月考试题及答案.doc
 2021-2022学年辽宁省沈阳市大东区九年级上学期语文期末试题及答案.doc
 2022-2023学年北京东城区初三第一学期物理期末试卷及答案.doc
 2018上半年江西教师资格初中地理学科知识与教学能力真题及答案.doc
 2012年河北国家公务员申论考试真题及答案-省级.doc
 2020-2021学年江苏省扬州市江都区邵樊片九年级上学期数学第一次质量检测试题及答案.doc
 2022下半年黑龙江教师资格证中学综合素质真题及答案.doc