Contents Contents
Print Status Window Functions 27
How to Use the Online Manual Understanding Error Messages 28
How to Control the Online Manual 1 Understanding the Status and Program Icon
How to Print Out the Online Manual 1 "Maintenance" Tab 29
"Options" Tab 30
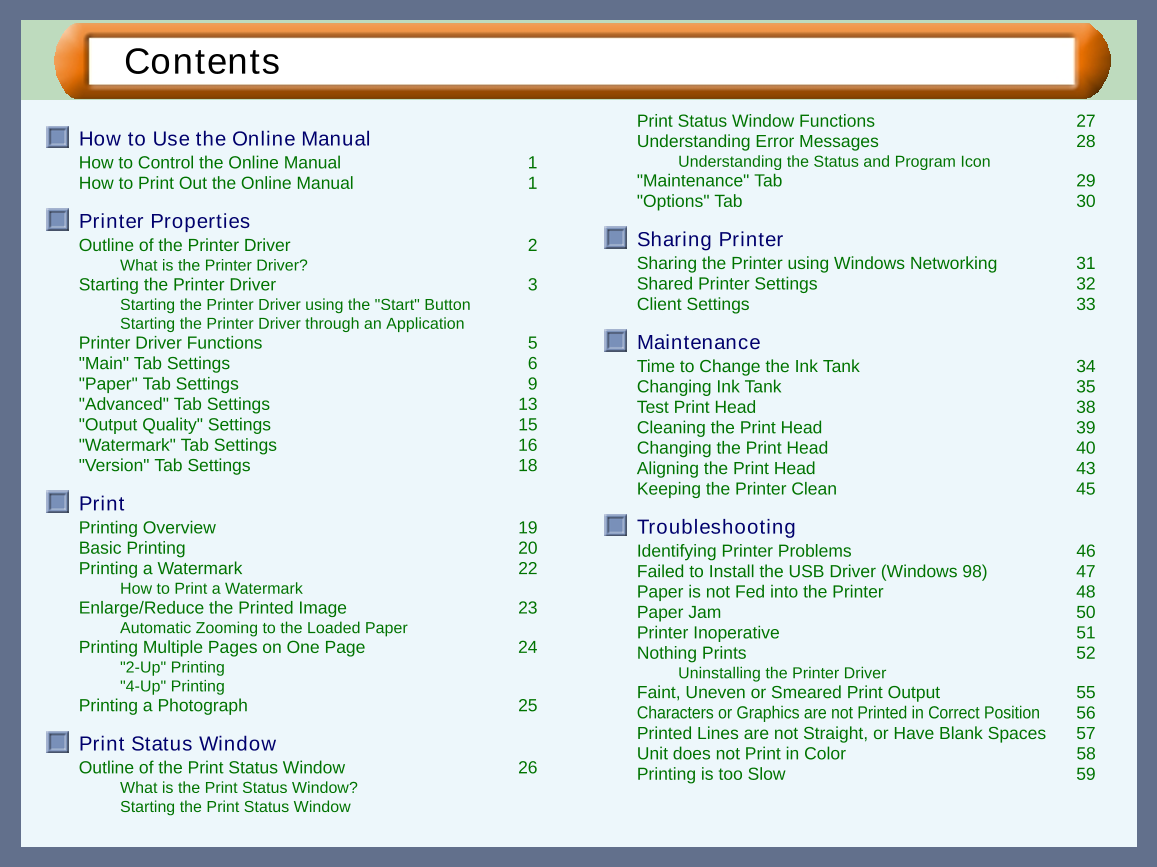
Printer Properties
Outline of the Printer Driver 2 Sharing Printer
What is the Printer Driver? Sharing the Printer using Windows Networking 31
Starting the Printer Driver 3 Shared Printer Settings 32
Starting the Printer Driver using the "Start" Button Client Settings 33
Starting the Printer Driver through an Application
Printer Driver Functions 5 Maintenance
"Main" Tab Settings 6 Time to Change the Ink Tank 34
"Paper" Tab Settings 9 Changing Ink Tank 35
"Advanced" Tab Settings 13 Test Print Head 38
"Output Quality" Settings 15 Cleaning the Print Head 39
"Watermark" Tab Settings 16 Changing the Print Head 40
"Version" Tab Settings 18 Aligning the Print Head 43
Keeping the Printer Clean 45
Print
Printing Overview 19 Troubleshooting
Basic Printing 20 Identifying Printer Problems 46
Printing a Watermark 22 Failed to Install the USB Driver (Windows 98) 47
How to Print a Watermark Paper is not Fed into the Printer 48
Enlarge/Reduce the Printed Image 23 Paper Jam 50
Automatic Zooming to the Loaded Paper Printer Inoperative 51
Printing Multiple Pages on One Page 24 Nothing Prints 52
"2-Up" Printing Uninstalling the Printer Driver
"4-Up" Printing Faint, Uneven or Smeared Print Output 55
Printing a Photograph 25 Characters or Graphics are not Printed in Correct Position 56
Printed Lines are not Straight, or Have Blank Spaces 57
Print Status Window Unit does not Print in Color 58
Outline of the Print Status Window 26 Printing is too Slow 59
What is the Print Status Window?
Starting the Print Status Window
How to Use the Online Manual How to Use the Online Manual
This Online Manual provides instruction for the operation of your new printer. It is designed to assist you in the
operation of the Online Manual and provide you with all relevant information.
For more information about computers, operating systems and Acrobat Reader, please refer to the relevant
manual or help file.
How to Control the Online Manual
Takes you back page by page. To return to the previously viewed page from the page displayed
by clicking a reference topic, click the ( ) button on the menu bar of the Acrobat Reader. Takes you forward page by page.
Click this button to display the Index of the Online Manual. From the Index you
can jump to various pages. Click the listed
Click this button to display the Table of Contents of the Online Manual. 1 items to display
From the Table of Contents you can jump to various pages. the header of
that section.
How to use the Print Status
Printer Properties Print
Online Manual Window Sharing Printer Maintenance Troubleshooting
Following links
Links can connect parts of a document to other parts for further information. In this document, green colored letters are linked area.
To follow a link, select the hand tool ( ), a zoom tool, or a selection tool. Position the pointer over the linked area on the page until the pointer
changes to a hand with a pointing finger ( ). Then click the link.
How to Print Out the Online Manual
In order to print out a hard copy of the Online Manual for your reference, go to Acrobat Reader, click the "File" menu,
and select "Print". After specifying the printer setting, click the "OK" button to print.
In this online manual, screen images and operating procedures are mainly for Windows 98. With other versions of Windows,
some screen images may be different from those in this manual.
In this manual, the contents of each screen image are those of AJ-1800. Please refer to the corresponding contents when using
AJ-2000.
1
How to Use the Printer Properties Print Print Status Sharing Printer Maintenance Troubleshooting
Online Manual Window
Outline of the Printer Driver Printer Properties
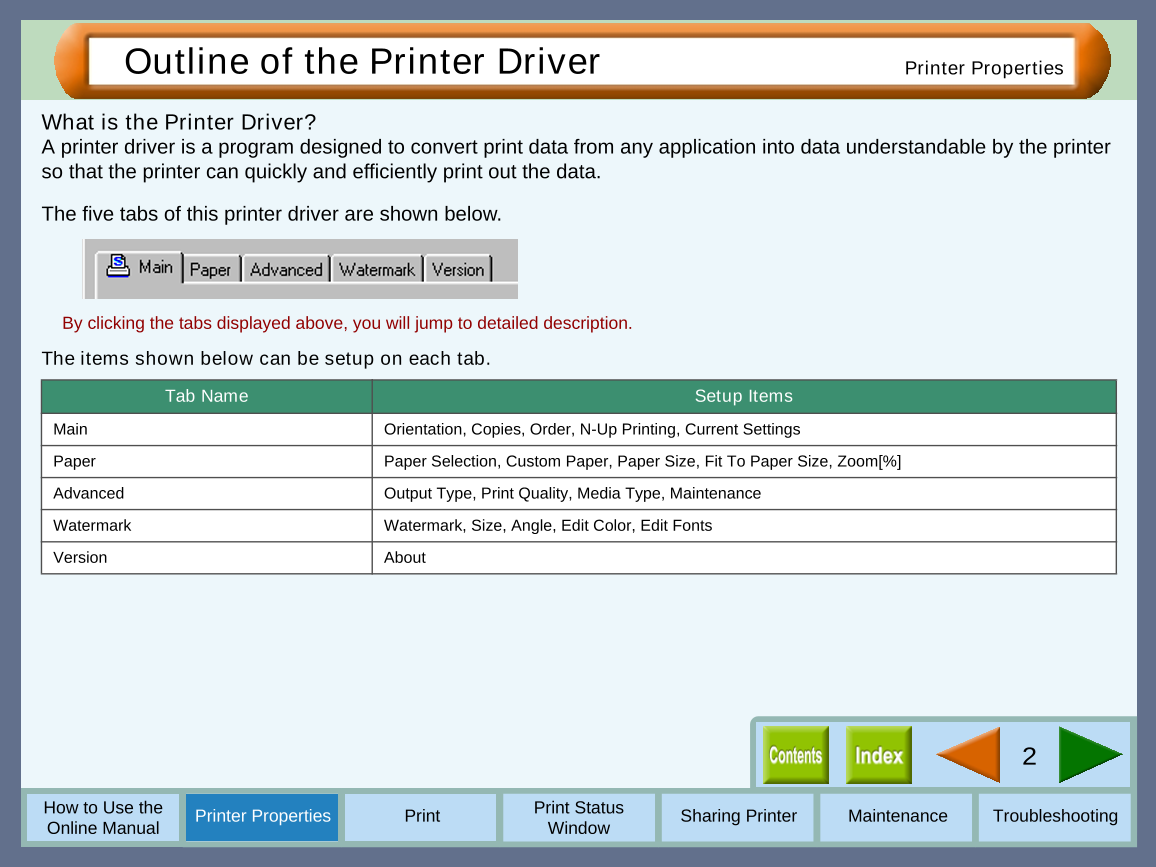
What is the Printer Driver?
A printer driver is a program designed to convert print data from any application into data understandable by the printer
so that the printer can quickly and efficiently print out the data.
The five tabs of this printer driver are shown below.
By clicking the tabs displayed above, you will jump to detailed description.
The items shown below can be setup on each tab.
Tab Name Setup Items
Main Orientation, Copies, Order, N-Up Printing, Current Settings
Paper Paper Selection, Custom Paper, Paper Size, Fit To Paper Size, Zoom[%]
Advanced Output Type, Print Quality, Media Type, Maintenance
Watermark Watermark, Size, Angle, Edit Color, Edit Fonts
Version About
2
How to Use the Printer Properties Print Print Status Sharing Printer Maintenance Troubleshooting
Online Manual Window
Starting the Printer Driver (part 1) Printer Properties
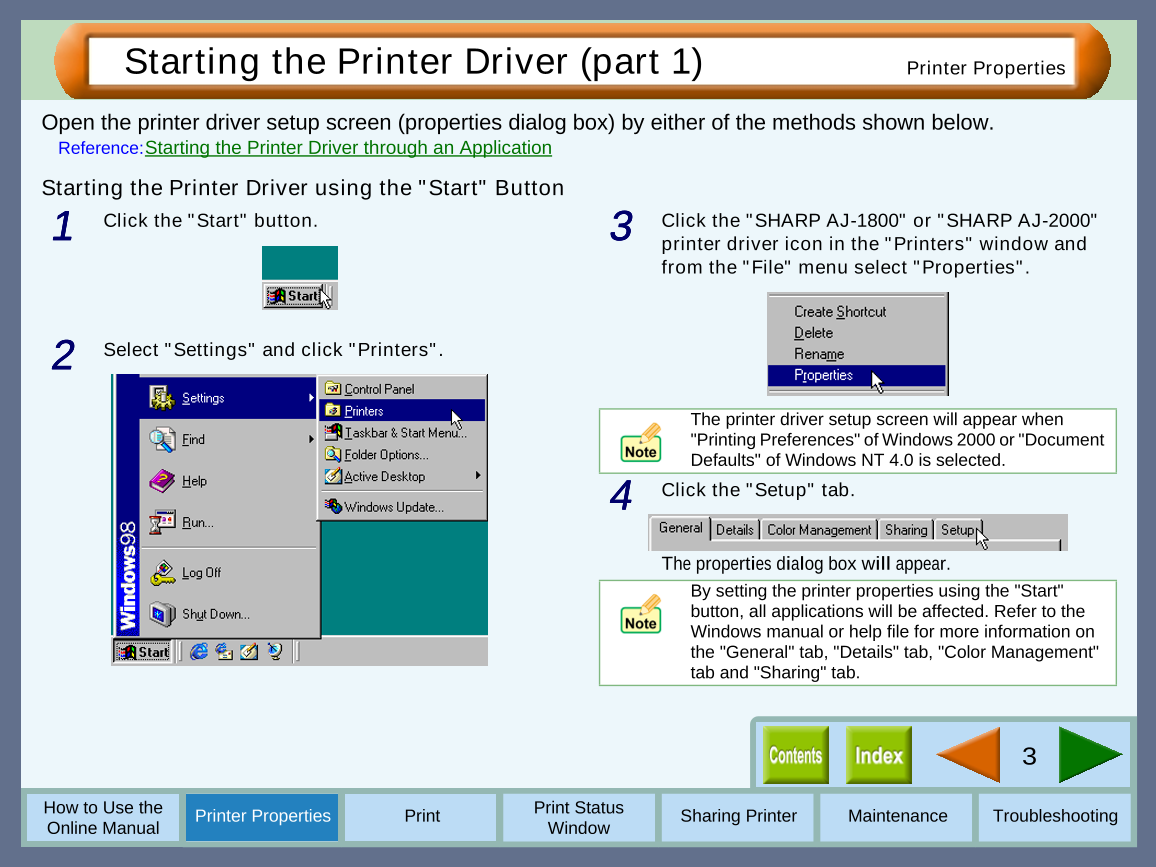
Open the printer driver setup screen (properties dialog box) by either of the methods shown below.
Reference:Starting the Printer Driver through an Application
Starting the Printer Driver using the "Start" Button
1 Click the "Start" button. 3 Click the "SHARP AJ-1800" or "SHARP AJ-2000"
printer driver icon in the "Printers" window and
from the "File" menu select "Properties".
2 Select "Settings" and click "Printers".
The printer driver setup screen will appear when
"Printing Preferences" of Windows 2000 or "Document
Defaults" of Windows NT 4.0 is selected.
4 Click the "Setup" tab.
The properties dialog box will appear.
By setting the printer properties using the "Start"
button, all applications will be affected. Refer to the
Windows manual or help file for more information on
the "General" tab, "Details" tab, "Color Management"
tab and "Sharing" tab.
3
How to Use the Printer Properties Print Print Status Sharing Printer Maintenance Troubleshooting
Online Manual Window
Starting the Printer Driver (part 2) Printer Properties
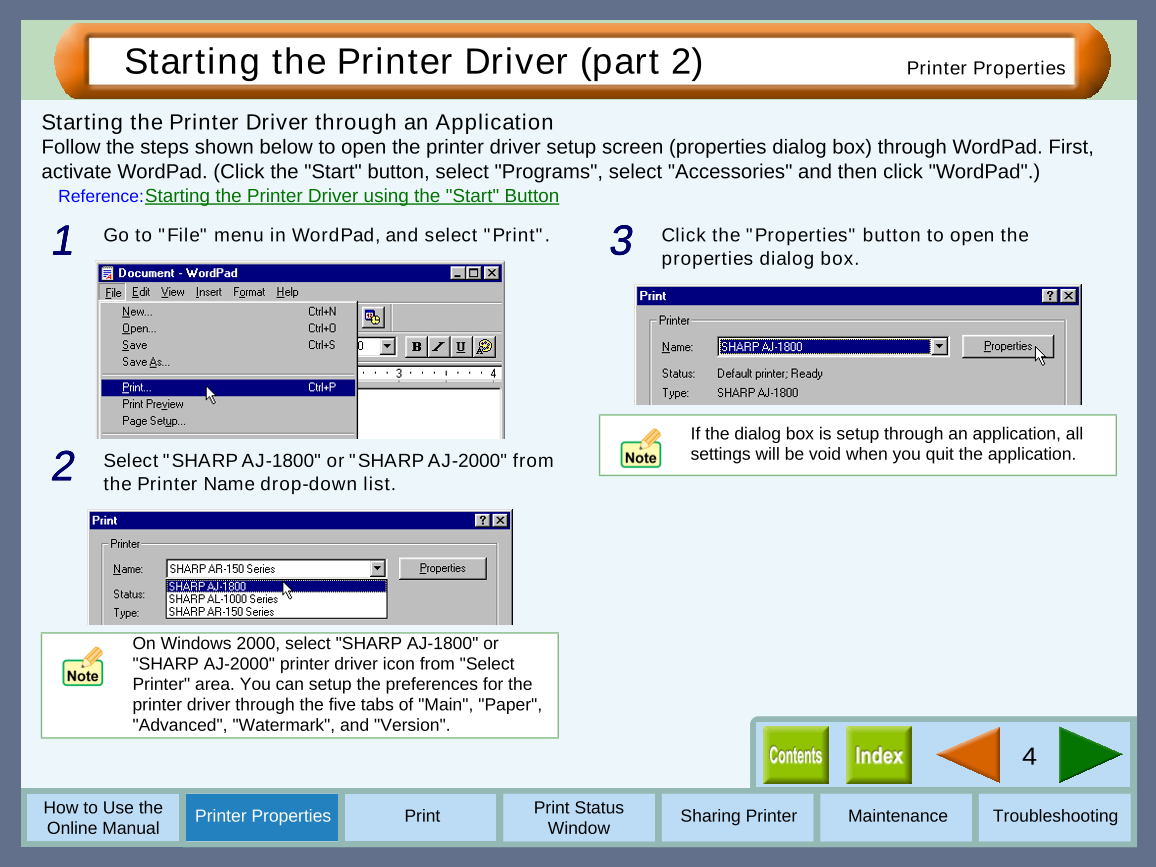
Starting the Printer Driver through an Application
Follow the steps shown below to open the printer driver setup screen (properties dialog box) through WordPad. First,
activate WordPad. (Click the "Start" button, select "Programs", select "Accessories" and then click "WordPad".)
Reference:Starting the Printer Driver using the "Start" Button
1 Go to "File" menu in WordPad, and select "Print". 3 Click the "Properties" button to open the
properties dialog box.
If the dialog box is setup through an application, all
2 Select "SHARP AJ-1800" or "SHARP AJ-2000" from settings will be void when you quit the application.
the Printer Name drop-down list.
On Windows 2000, select "SHARP AJ-1800" or
"SHARP AJ-2000" printer driver icon from "Select
Printer" area. You can setup the preferences for the
printer driver through the five tabs of "Main", "Paper",
"Advanced", "Watermark", and "Version".
4
How to Use the Printer Properties Print Print Status Sharing Printer Maintenance Troubleshooting
Online Manual Window
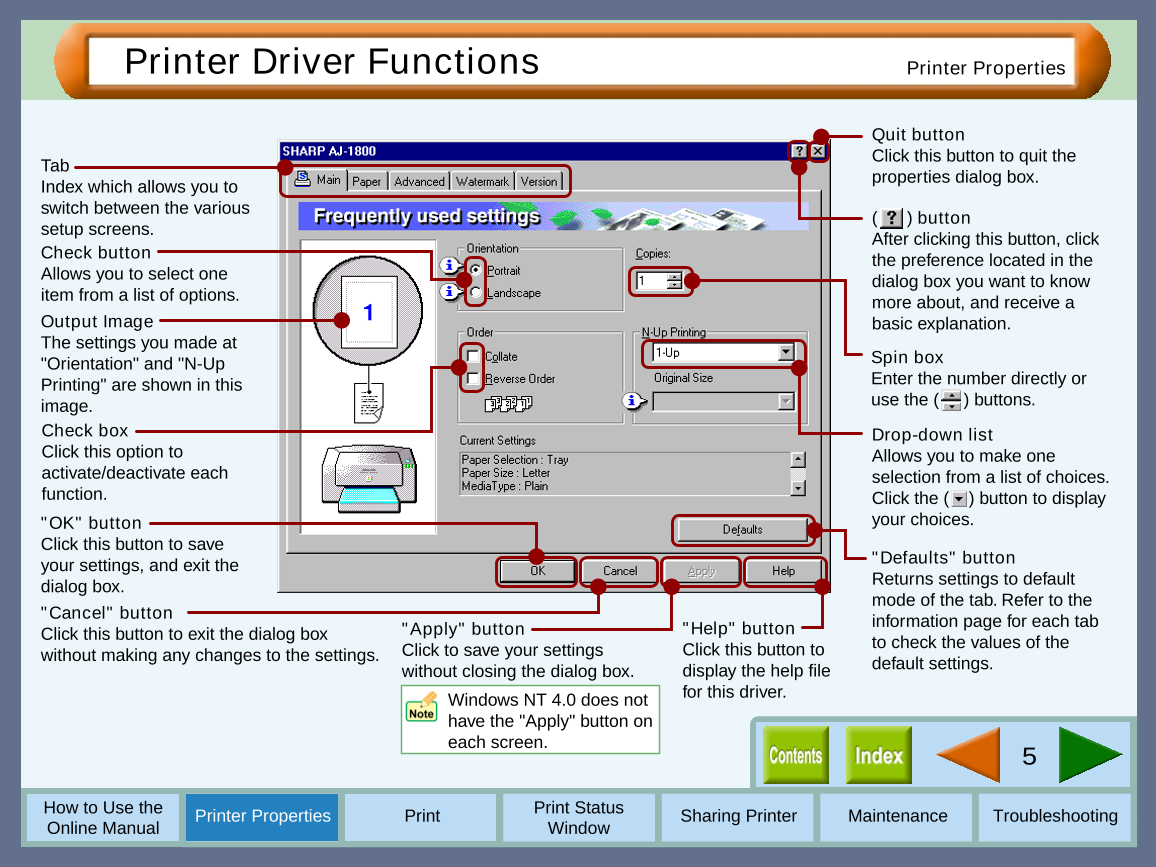
Printer Driver Functions Printer Properties
Quit button
Tab Click this button to quit the
Index which allows you to properties dialog box.
switch between the various ( ) button
setup screens. After clicking this button, click
Check button the preference located in the
Allows you to select one dialog box you want to know
item from a list of options. more about, and receive a
Output Image basic explanation.
The settings you made at
"Orientation" and "N-Up Spin box
Printing" are shown in this Enter the number directly or
image. use the ( ) buttons.
Check box Drop-down list
Click this option to Allows you to make one
activate/deactivate each selection from a list of choices.
function. Click the ( ) button to display
"OK" button your choices.
Click this button to save
your settings, and exit the "Defaults" button
dialog box. Returns settings to default
mode of the tab. Refer to the
"Cancel" button information page for each tab
Click this button to exit the dialog box "Apply" button "Help" button
to check the values of the
without making any changes to the settings. Click to save your settings Click this button to
without closing the dialog box. display the help file default settings.
Windows NT 4.0 does not for this driver.
have the "Apply" button on
each screen. 5
How to Use the Printer Properties Print Print Status Sharing Printer Maintenance Troubleshooting
Online Manual Window
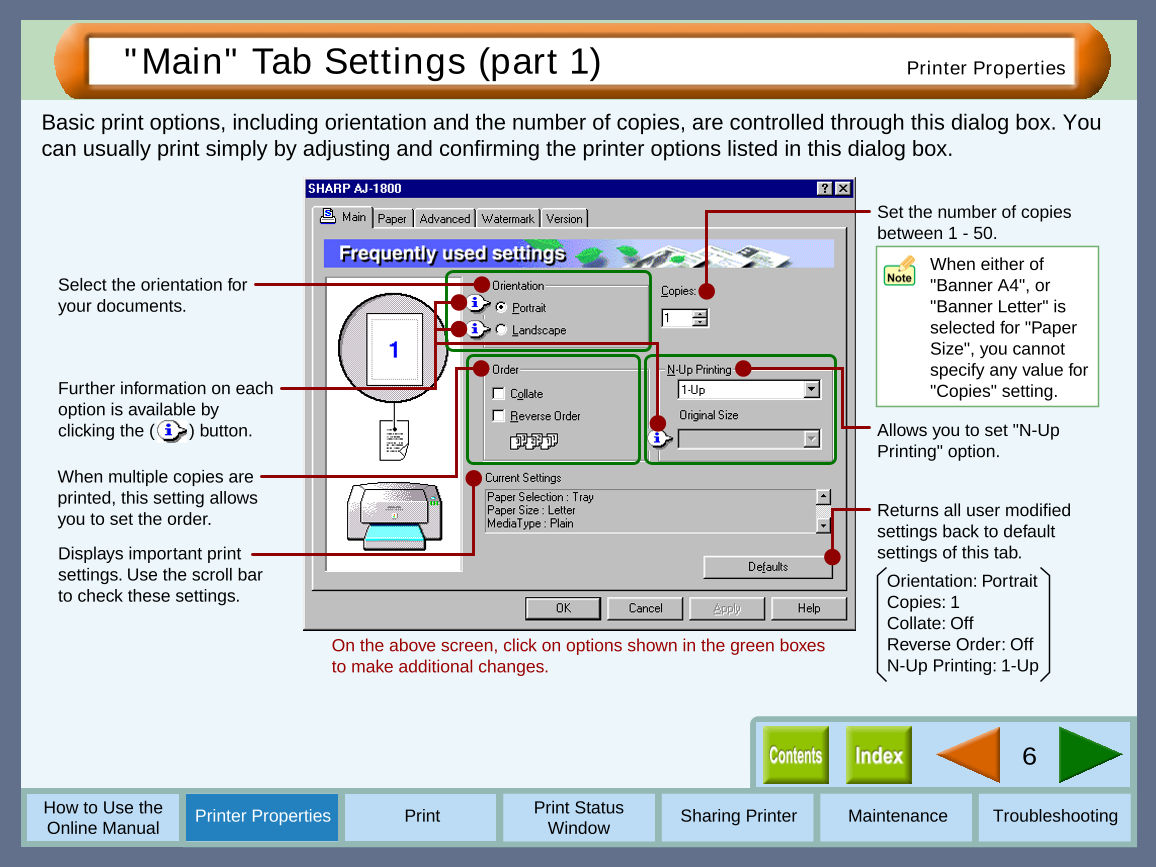
"Main" Tab Settings (part 1) Printer Properties
Basic print options, including orientation and the number of copies, are controlled through this dialog box. You
can usually print simply by adjusting and confirming the printer options listed in this dialog box.
Set the number of copies
between 1 - 50.
When either of
Select the orientation for "Banner A4", or
your documents. "Banner Letter" is
selected for "Paper
Size", you cannot
specify any value for
Further information on each "Copies" setting.
option is available by
clicking the ( ) button. Allows you to set "N-Up
Printing" option.
When multiple copies are
printed, this setting allows
you to set the order. Returns all user modified
settings back to default
Displays important print settings of this tab.
settings. Use the scroll bar Orientation: Portrait
to check these settings. Copies: 1
Collate: Off
On the above screen, click on options shown in the green boxes Reverse Order: Off
to make additional changes. N-Up Printing: 1-Up
6
How to Use the Printer Properties Print Print Status Sharing Printer Maintenance Troubleshooting
Online Manual Window




 2023年江西萍乡中考道德与法治真题及答案.doc
 2012年重庆南川中考生物真题及答案.doc
 2013年江西师范大学地理学综合及文艺理论基础考研真题.doc
 2020年四川甘孜小升初语文真题及答案I卷.doc
 2020年注册岩土工程师专业基础考试真题及答案.doc
 2023-2024学年福建省厦门市九年级上学期数学月考试题及答案.doc
 2021-2022学年辽宁省沈阳市大东区九年级上学期语文期末试题及答案.doc
 2022-2023学年北京东城区初三第一学期物理期末试卷及答案.doc
 2018上半年江西教师资格初中地理学科知识与教学能力真题及答案.doc
 2012年河北国家公务员申论考试真题及答案-省级.doc
 2020-2021学年江苏省扬州市江都区邵樊片九年级上学期数学第一次质量检测试题及答案.doc
 2022下半年黑龙江教师资格证中学综合素质真题及答案.doc