实验报告
一. 实验名称
图形用户界面
二. 实验目的及要求
1) 掌握 JFrame 的基本用法
2) 掌握基本图形的绘制,可以使用不同颜色,字体,线条进行绘制
3) 掌握简单的事件处理机制
4) 掌握几种事件处理机制:鼠标事件、窗口事件
5) 掌握边缘布局管理器,流式布局管理器
6) 掌握几种基本的 Swing 组件
三. 实验环境
IntelliJ IDEA Community Edition 2019.2.2
四. 实验内容
1) 创建一个简单的 JFrame,使用不同的颜色、线条绘制各种形状,使用不同
的字体、颜色绘制字符串,使用最简单的监听器 ActionListener 对 JButton 的点
击事件编程;
2)使用鼠标事件进行绘图;
3)使用边缘布局管理器和流式布局管理器和几种基本的 Swing 组件包括:JLabel,
JTextField,JPassword,JButton,JCheckBox 等,来设计一个登陆界面;
五. 实验过程及实验结果
1、创建一个新工程 GUITest;
①新建 SimpleFrame 类,继承 JFrame 类;
代码如下:
import javax.swing.*;
public class SimpleFrame extends JFrame {
�
public SimpleFrame() {
add(new DrawComponent());
pack();
}
}
②新建 Main 类,显示 JFrame;
代码如下:
import javax.swing.JButton;
import javax.swing.JFrame;
public class Main {
public static void main(String[] args) {
SimpleFrame frame = new SimpleFrame();
frame.setDefaultCloseOperation(JFrame.EXIT_ON_CLOSE);
frame.setVisible(true);
frame.setLocation(400,400);
frame.setTitle("Simple Frame");
}
}
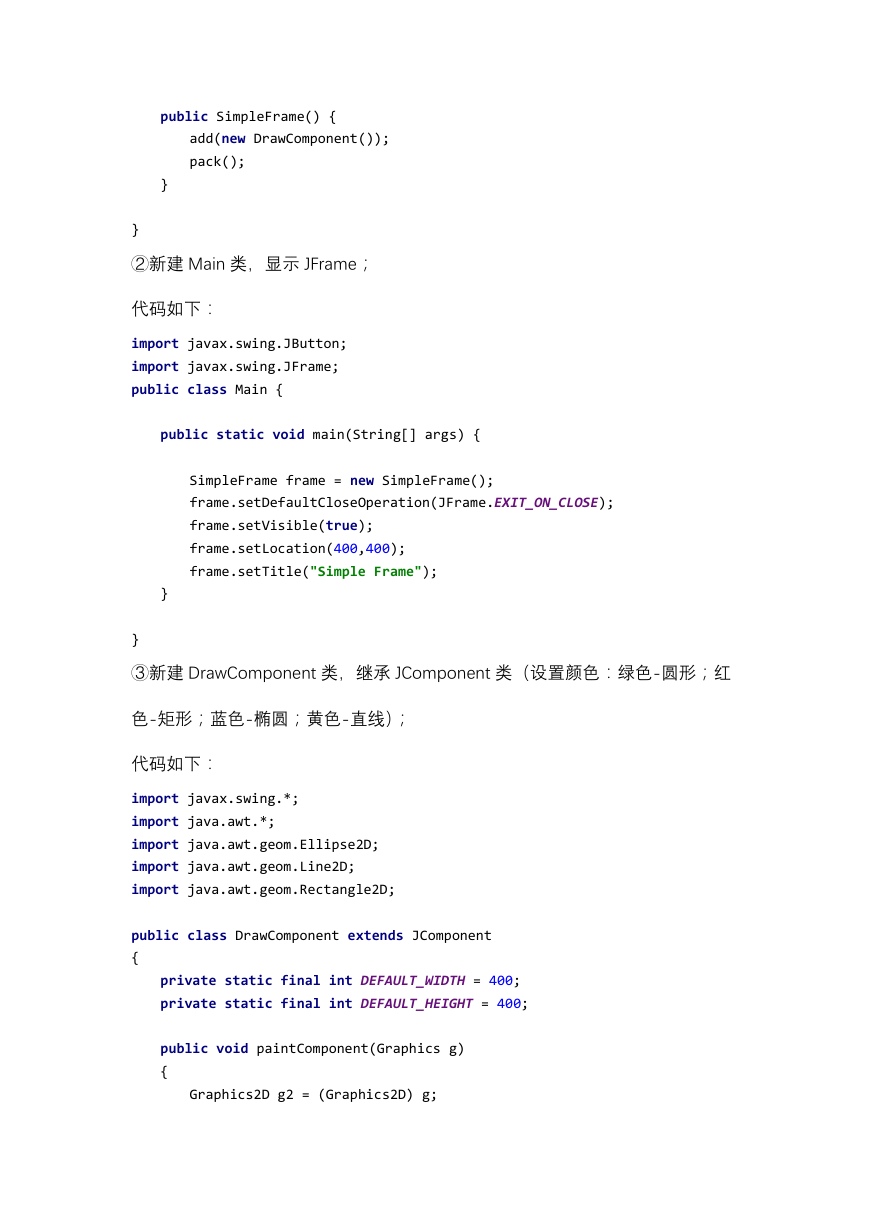
③新建 DrawComponent 类,继承 JComponent 类(设置颜色:绿色-圆形;红
色-矩形;蓝色-椭圆;黄色-直线);
代码如下:
import javax.swing.*;
import java.awt.*;
import java.awt.geom.Ellipse2D;
import java.awt.geom.Line2D;
import java.awt.geom.Rectangle2D;
public class DrawComponent extends JComponent
{
private static final int DEFAULT_WIDTH = 400;
private static final int DEFAULT_HEIGHT = 400;
public void paintComponent(Graphics g)
{
Graphics2D g2 = (Graphics2D) g;
�
double leftX = 100;
double topY = 100;
double width = 200;
double height = 150;
Rectangle2D rect = new Rectangle2D.Double(leftX, topY, width, height);
g2.draw(rect);
g2.setPaint (Color.BLUE);
g2.draw (rect);
g2.setStroke(new BasicStroke(3.0f));
g2.draw(rect);
//将画笔设置为蓝色
//设置线条宽度为3
//使用线条绘制
//使用蓝色绘制
// draw the enclosed ellipse
Ellipse2D ellipse = new Ellipse2D.Double();
ellipse.setFrame(rect);
g2.draw(ellipse);
g2.setPaint (Color.YELLOW);
g2.draw (rect);
g2.setStroke(new BasicStroke(3.0f));
g2.draw(rect);
//使用线条绘制
//使用黄色绘制
//将画笔设置为黄色
//设置线条宽度为3
// draw a diagonal line
g2.draw(new Line2D.Double(leftX, topY, leftX + width, topY + height));
g2.setPaint (Color.GREEN);
g2.draw (rect);
g2.setStroke(new BasicStroke(3.0f));
g2.draw(rect);
//将画笔设置为绿色
//设置线条宽度为3
//使用线条绘制
//使用绿色绘制
// draw a circle with the same center
double centerX = rect.getCenterX();
double centerY = rect.getCenterY();
double radius = 150;
Ellipse2D circle = new Ellipse2D.Double();
circle.setFrameFromCenter(centerX, centerY, centerX + radius, centerY
+ radius);
g2.draw(circle);
g2.setPaint (Color.RED);
g2.draw (rect);
g2.setStroke(new BasicStroke(3.0f));
g2.draw(rect);
//使用线条绘制
//使用红色绘制
//将画笔设置为红色
//设置线条宽度为3
}
public Dimension getPreferredSize() {
�
return new Dimension(DEFAULT_WIDTH, DEFAULT_HEIGHT); }
}
运行 Main 类,结果如图:
④将下面蓝色小球图片保存为文件 blue-ball.gif,然后复制到工程的根目录;
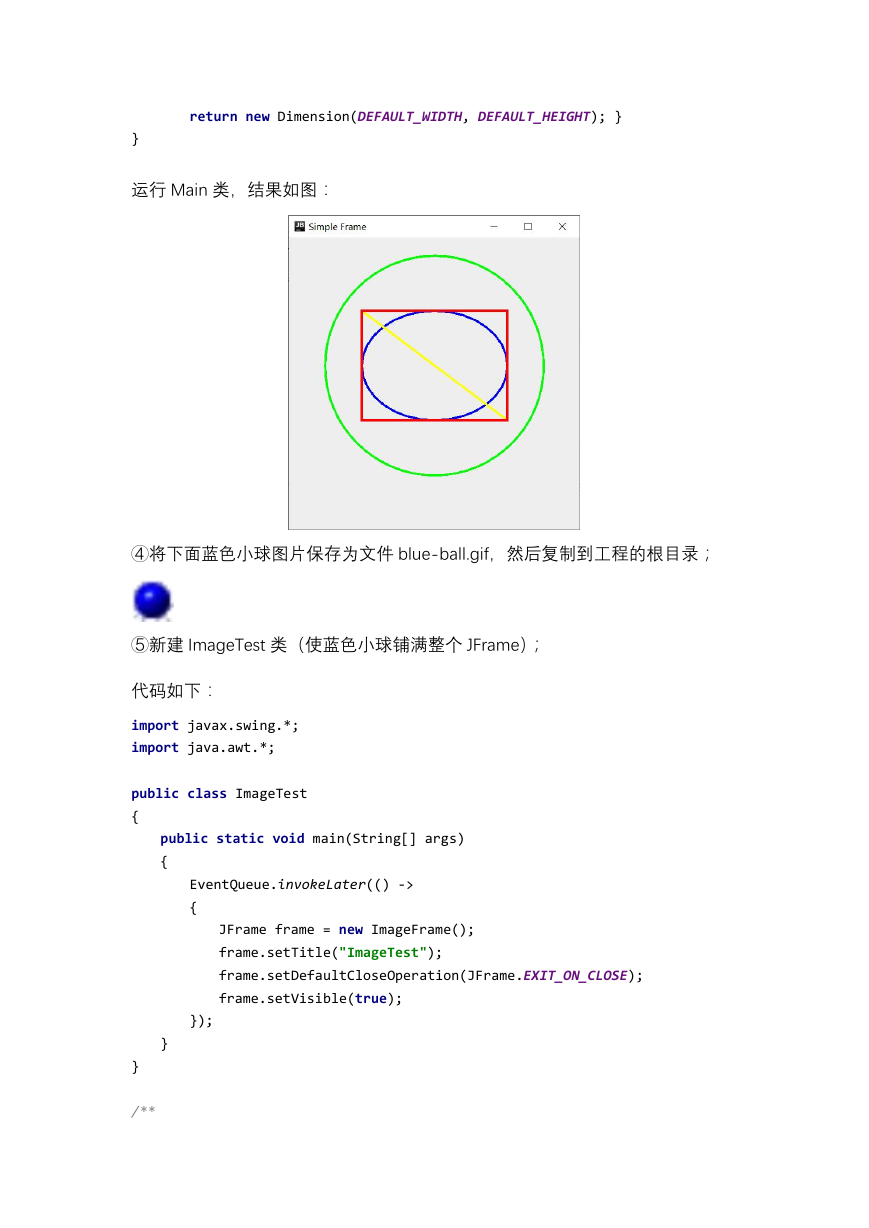
⑤新建 ImageTest 类(使蓝色小球铺满整个 JFrame);
代码如下:
import javax.swing.*;
import java.awt.*;
public class ImageTest
{
public static void main(String[] args)
{
EventQueue.invokeLater(() ->
{
JFrame frame = new ImageFrame();
frame.setTitle("ImageTest");
frame.setDefaultCloseOperation(JFrame.EXIT_ON_CLOSE);
frame.setVisible(true);
});
}
}
/**
�
* A frame with an image component
*/
class ImageFrame extends JFrame
{
public ImageFrame()
{
add(new ImageComponent());
pack();
}
}
/*
* A component that displays a tiled image
*/
class ImageComponent extends JComponent
{
private static final int DEFAULT_WIDTH = 300;
private static final int DEFAULT_HEIGHT = 300;
private Image image;
public ImageComponent()
{
image = new ImageIcon("blue-ball.gif").getImage();
}
public void paintComponent(Graphics g)
{
Graphics2D g2 = (Graphics2D) g;
Stroke s = new BasicStroke(5,
BasicStroke.CAP_ROUND, BasicStroke.JOIN_MITER);
g2.setStroke(s);
if (image == null) return;
int imageWidth = image.getWidth(null);
int imageHeight = image.getHeight(null);
// draw the image in the upper-left corner
g.drawImage(image, 0, 0, null);
�
// tile the image across the component
for (int i = 0; i * imageWidth <= getWidth(); i++)
for (int j = 0; j * imageHeight <= getHeight(); j++)
if (i + j >0)
g.copyArea(0, 0, imageWidth, imageHeight, i * imageWidth, j
* imageHeight);
}
public Dimension getPreferredSize() { return new Dimension(DEFAULT_WIDTH,
DEFAULT_HEIGHT); }
}
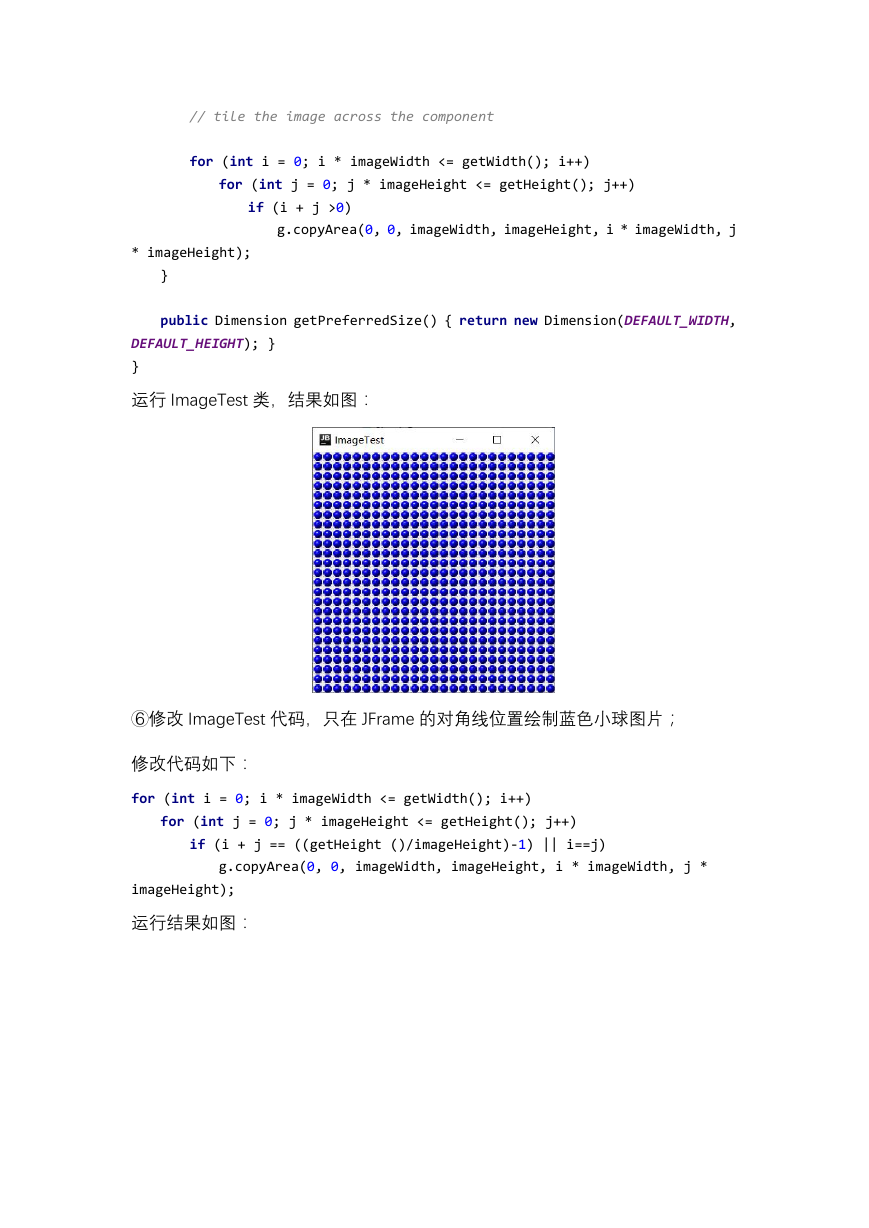
运行 ImageTest 类,结果如图:
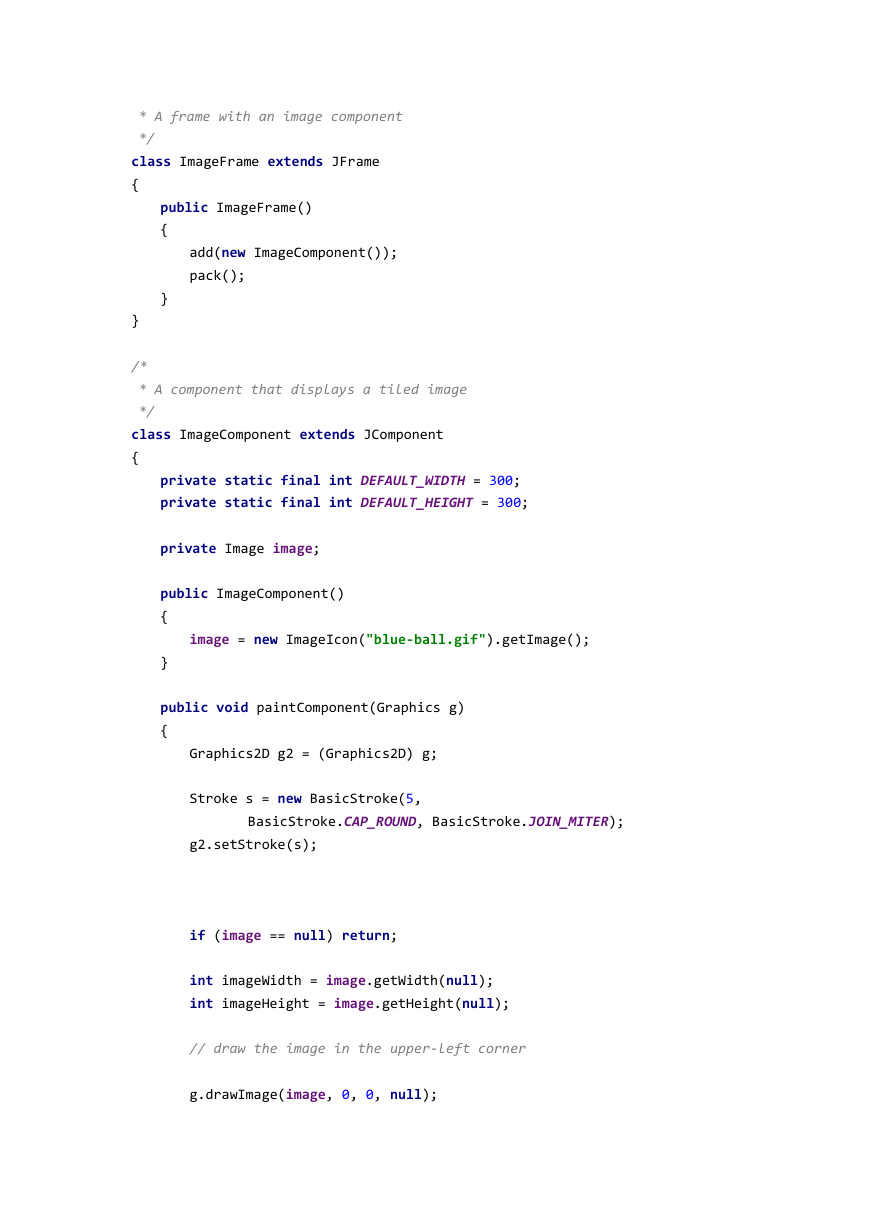
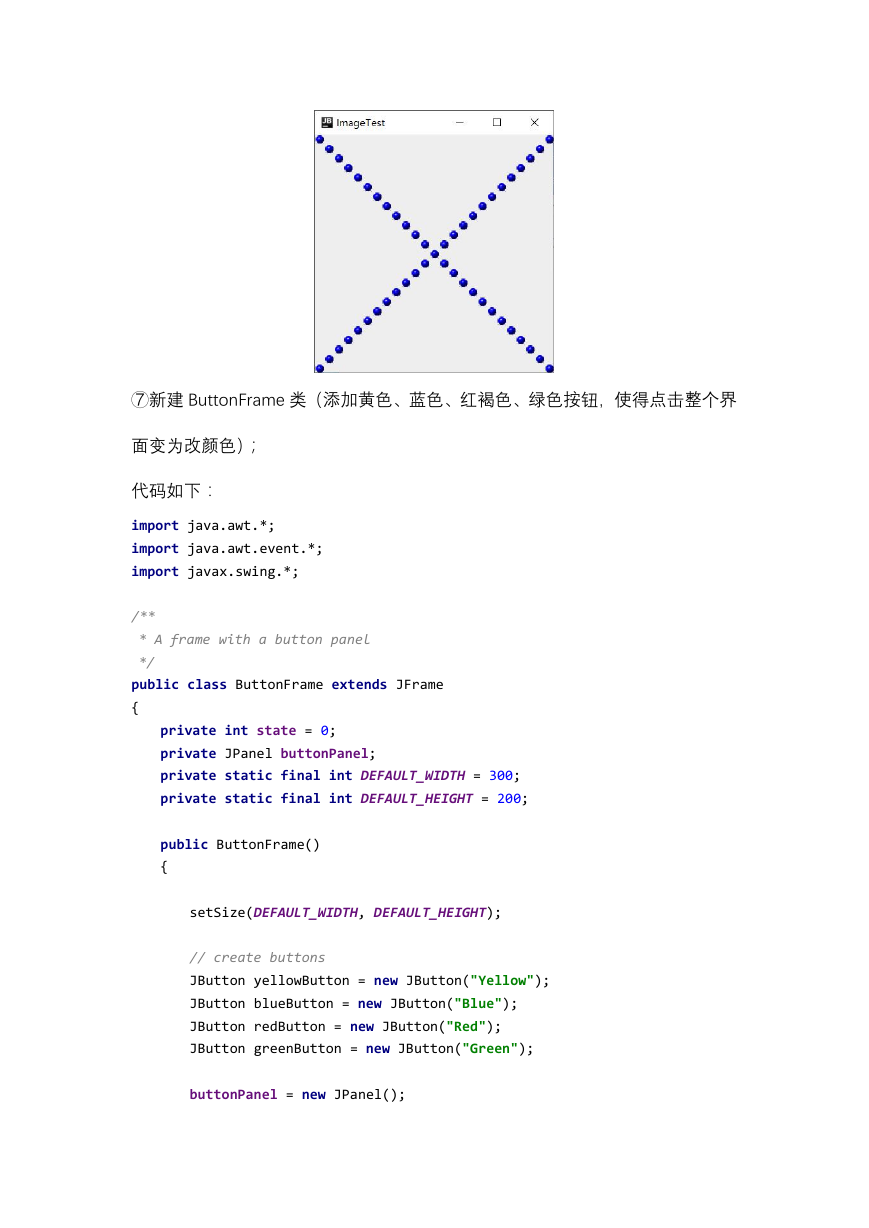
⑥修改 ImageTest 代码,只在 JFrame 的对角线位置绘制蓝色小球图片;
修改代码如下:
for (int i = 0; i * imageWidth <= getWidth(); i++)
for (int j = 0; j * imageHeight <= getHeight(); j++)
if (i + j == ((getHeight ()/imageHeight)-1) || i==j)
g.copyArea(0, 0, imageWidth, imageHeight, i * imageWidth, j *
imageHeight);
运行结果如图:
�
⑦新建 ButtonFrame 类(添加黄色、蓝色、红褐色、绿色按钮,使得点击整个界
面变为改颜色);
代码如下:
import java.awt.*;
import java.awt.event.*;
import javax.swing.*;
/**
* A frame with a button panel
*/
public class ButtonFrame extends JFrame
{
private int state = 0;
private JPanel buttonPanel;
private static final int DEFAULT_WIDTH = 300;
private static final int DEFAULT_HEIGHT = 200;
public ButtonFrame()
{
setSize(DEFAULT_WIDTH, DEFAULT_HEIGHT);
// create buttons
JButton yellowButton = new JButton("Yellow");
JButton blueButton = new JButton("Blue");
JButton redButton = new JButton("Red");
JButton greenButton = new JButton("Green");
buttonPanel = new JPanel();
�
// add buttons to panel
buttonPanel.add(yellowButton);
buttonPanel.add(blueButton);
buttonPanel.add(redButton);
buttonPanel.add(greenButton);
// add panel to frame
add(buttonPanel);
// create button actions
ColorAction yellowAction = new ColorAction(Color.YELLOW);
ColorAction blueAction = new ColorAction(Color.BLUE);
ColorAction redAction = new ColorAction(Color.RED);
ColorAction greenAction = new ColorAction(Color.GREEN);
// associate actions with buttons
yellowButton.addActionListener(yellowAction);
blueButton.addActionListener(blueAction);
redButton.addActionListener(redAction);
greenButton.addActionListener(greenAction);
yellowButton.addActionListener(e->{
buttonPanel.setBackground(Color.yellow);
if(state == 7) {
String message = "恭喜你!密码验证通过!";
ButtonFrame.this.setTitle(message);
state = 0;
}
else
state = 0;
});
blueButton.addActionListener(e -> {
buttonPanel.setBackground(Color.blue);
if(state == 1) {
state += 2;
}
else
state = 0;
});
redButton.addActionListener(e -> {
buttonPanel.setBackground(Color.RED);
if(state == 0) {
state += 1;
�



 2023年江西萍乡中考道德与法治真题及答案.doc
 2012年重庆南川中考生物真题及答案.doc
 2013年江西师范大学地理学综合及文艺理论基础考研真题.doc
 2020年四川甘孜小升初语文真题及答案I卷.doc
 2020年注册岩土工程师专业基础考试真题及答案.doc
 2023-2024学年福建省厦门市九年级上学期数学月考试题及答案.doc
 2021-2022学年辽宁省沈阳市大东区九年级上学期语文期末试题及答案.doc
 2022-2023学年北京东城区初三第一学期物理期末试卷及答案.doc
 2018上半年江西教师资格初中地理学科知识与教学能力真题及答案.doc
 2012年河北国家公务员申论考试真题及答案-省级.doc
 2020-2021学年江苏省扬州市江都区邵樊片九年级上学期数学第一次质量检测试题及答案.doc
 2022下半年黑龙江教师资格证中学综合素质真题及答案.doc