Language TOC.fm Page i Wednesday, November 16, 2005 11:30 AM
English . . . . . . . . . . . . . . . . . . . . . . . . . . . . . . . . . . . . . . . . . . 1
. . . . . . . . . . . . . . . . . . . . . . . . . . . . . . . . . . . . . . 13
. . . . . . . . . . . . . . . . . . . . . . . . . . . . . . . . . . . . . . . 25
i
�
Language TOC.fm Page ii Wednesday, November 16, 2005 11:30 AM
ii
�
Osaka.fm Page 1 Wednesday, November 16, 2005 2:15 PM
Congratulations ____________________
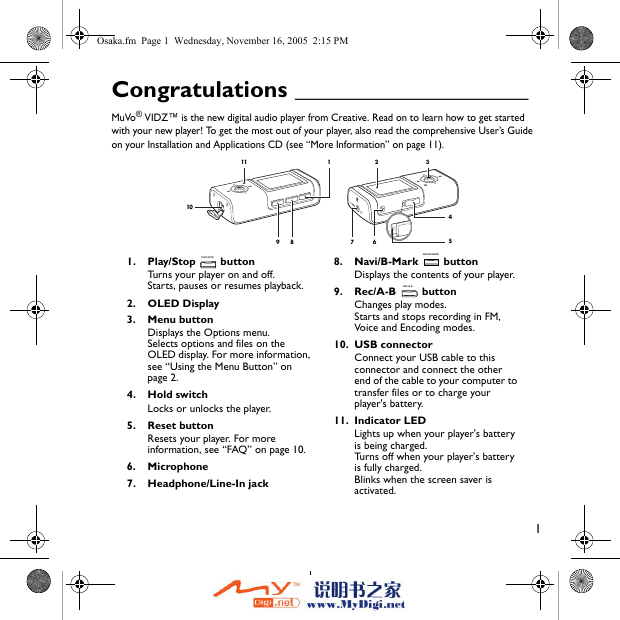
MuVo® VIDZ™ is the new digital audio player from Creative. Read on to learn how to get started
with your new player! To get the most out of your player, also read the comprehensive User’s Guide
on your Installation and Applications CD (see “More Information” on page 11).
11
1
2
3
10
9
8
7
6
4
5
1. Play/Stop
PLAY/STOP
button
Turns your player on and off.
Starts, pauses or resumes playback.
2. OLED Display
3. Menu button
Displays the Options menu.
Selects options and files on the
OLED display. For more information,
see “Using the Menu Button” on
page 2.
4. Hold switch
Locks or unlocks the player.
5. Reset button
Resets your player. For more
information, see “FAQ” on page 10.
6. Microphone
7. Headphone/Line-In jack
8. Navi/B-Mark
NAVI/B-MARK
button
Displays the contents of your player.
9. Rec/A-B
REC/A-B
button
Changes play modes.
Starts and stops recording in FM,
Voice and Encoding modes.
10. USB connector
Connect your USB cable to this
connector and connect the other
end of the cable to your computer to
transfer files or to charge your
player's battery.
11. Indicator LED
Lights up when your player's battery
is being charged.
Turns off when your player's battery
is fully charged.
Blinks when the screen saver is
activated.
1
�
Osaka.fm Page 2 Wednesday, November 16, 2005 2:15 PM
Using the Menu Button ______________
Select
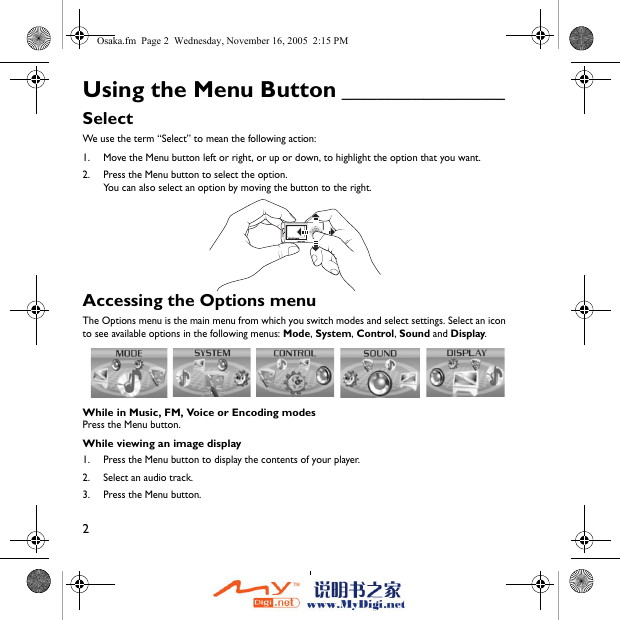
We use the term “Select” to mean the following action:
1. Move the Menu button left or right, or up or down, to highlight the option that you want.
2.
Press the Menu button to select the option.
You can also select an option by moving the button to the right.
Accessing the Options menu
The Options menu is the main menu from which you switch modes and select settings. Select an icon
to see available options in the following menus: Mode, System, Control, Sound and Display.
While in Music, FM, Voice or Encoding modes
Press the Menu button.
While viewing an image display
1.
2.
3.
Press the Menu button to display the contents of your player.
Select an audio track.
Press the Menu button.
2
�
Osaka.fm Page 3 Wednesday, November 16, 2005 2:15 PM
While viewing a video
1.
2.
3.
Press and hold the Navi/B-Mark
Select an audio track.
Press the Menu button.
NAVI/B-MARK
button to display the contents of your player.
To prevent the loss of recordings, you cannot access the Options menu while making a
recording. If you are making a recording, stop the recording, and then press the Menu button to
access the Options menu.
Getting Started ____________________
Step 1: Set up software
DO NOT connect your player to your computer before setting up the software.
1.
2.
Turn on your computer.
If you have Windows XP or Windows 2000, you must log in as an administrator in Windows
before you can set up the software. For more information, refer to your operating system's
online Help.
Insert the Installation and Applications CD into your CD-ROM/DVD-ROM drive. Your CD
should start automatically. If it does not, follow the steps below:
i.
Double-click the My Computer icon on your desktop.
Alternatively, click Start → My Computer.
Right-click the CD-ROM/DVD-ROM drive icon, and then click AutoPlay.
ii.
Follow the instructions on the screen.
3.
4. When prompted, restart your computer.
5. When your computer restarts, follow the product registration instructions on the screen.
Note that you require an Internet connection to register your product.
3
�
Osaka.fm Page 4 Wednesday, November 16, 2005 2:15 PM
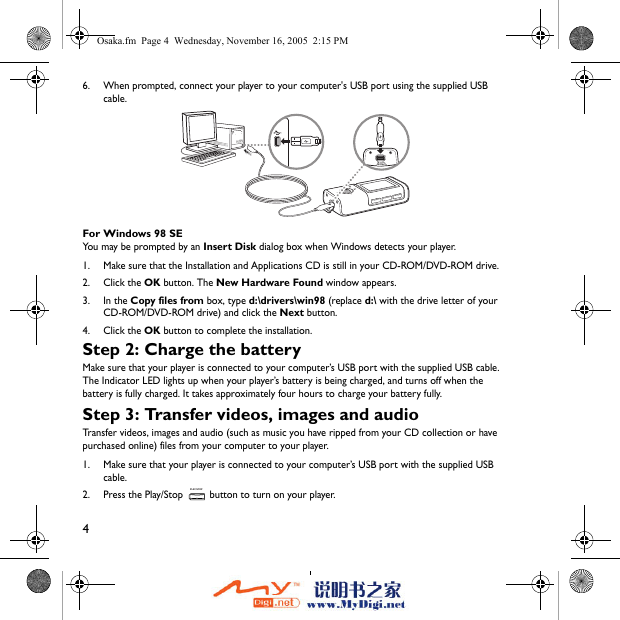
6. When prompted, connect your player to your computer's USB port using the supplied USB
cable.
POWER
RESET
For Windows 98 SE
You may be prompted by an Insert Disk dialog box when Windows detects your player.
1. Make sure that the Installation and Applications CD is still in your CD-ROM/DVD-ROM drive.
2. Click the OK button. The New Hardware Found window appears.
3.
In the Copy files from box, type d:\drivers\win98 (replace d:\ with the drive letter of your
CD-ROM/DVD-ROM drive) and click the Next button.
4. Click the OK button to complete the installation.
Step 2: Charge the battery
Make sure that your player is connected to your computer’s USB port with the supplied USB cable.
The Indicator LED lights up when your player’s battery is being charged, and turns off when the
battery is fully charged. It takes approximately four hours to charge your battery fully.
Step 3: Transfer videos, images and audio
Transfer videos, images and audio (such as music you have ripped from your CD collection or have
purchased online) files from your computer to your player.
1. Make sure that your player is connected to your computer’s USB port with the supplied USB
cable.
Press the Play/Stop
PLAY/STOP
button to turn on your player.
2.
4
�
Osaka.fm Page 5 Thursday, November 17, 2005 5:20 PM
3. Double-click the My Computer icon on your desktop.
Alternatively, click Start → My Computer.
You will notice that your player is recognized as a Removable Disk.
Locate your audio (MP3 or WMA files), image (JPG files) and video (MV4 files) files on your
computer and copy them to your player using the drag-and-drop method.
Note that you can also transfer data files using this drag-and-drop method.
4.
5. Organize audio tracks in the ROOT folder, images in the JPEG folder and videos in the MV4
folder.
You can also organize your videos, images and audio tracks using your own folder structure. For
more information, refer to your player’s User’s Guide found on the Installation and Applications
CD (See “User’s Guide” on page 11).
Step 4: Disconnect the player
DO NOT disconnect your player from your computer if you see the Comm Mode
screen on the OLED display.
Before disconnecting your player, use the Windows Eject or Safely Remove Hardware icon
on the Taskbar to safely disconnect your player. If your player is not disconnected safely, the content
may become corrupted and the player will not function correctly. Follow these steps below to safely
disconnect your player:
In Windows XP, Windows 2000 or Windows ME
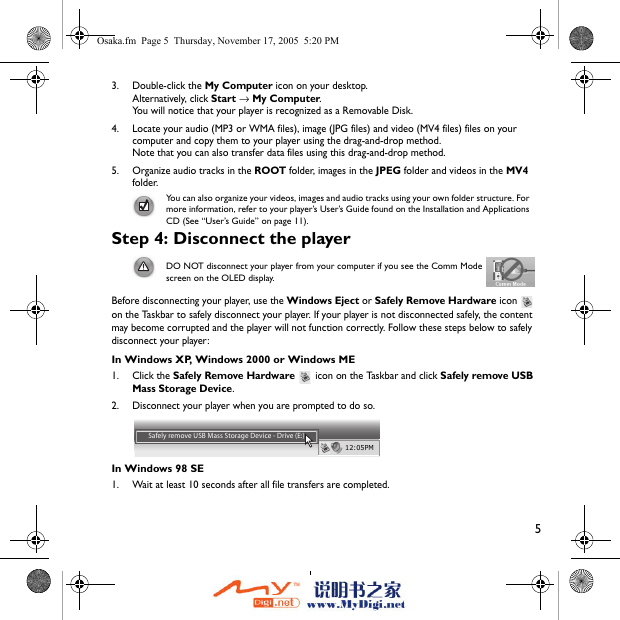
1. Click the Safely Remove Hardware
icon on the Taskbar and click Safely remove USB
Mass Storage Device.
2. Disconnect your player when you are prompted to do so.
Safely remove USB Mass Storage Device - Drive (E:)
12:05PM
In Windows 98 SE
1. Wait at least 10 seconds after all file transfers are completed.
5
�
Osaka.fm Page 6 Wednesday, November 16, 2005 2:15 PM
2.
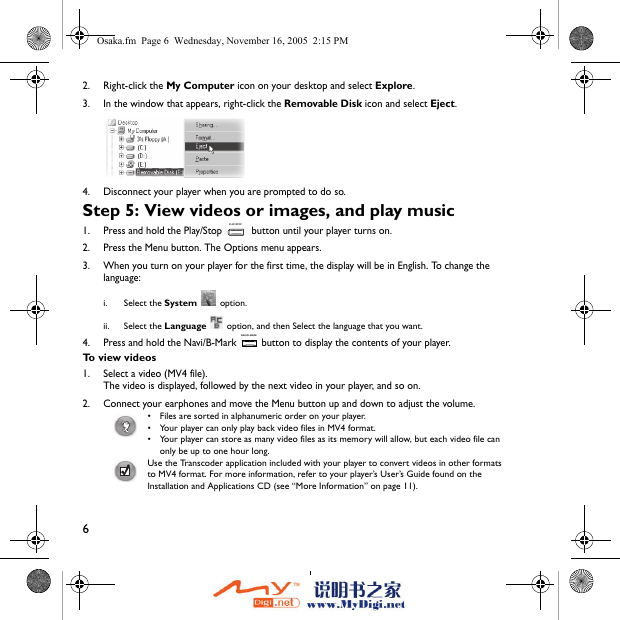
3.
Right-click the My Computer icon on your desktop and select Explore.
In the window that appears, right-click the Removable Disk icon and select Eject.
4. Disconnect your player when you are prompted to do so.
Step 5: View videos or images, and play music
1.
2.
3. When you turn on your player for the first time, the display will be in English. To change the
Press and hold the Play/Stop
Press the Menu button. The Options menu appears.
button until your player turns on.
PLAY/STOP
language:
i.
Select the System
option.
Select the Language
ii.
Press and hold the Navi/B-Mark
option, and then Select the language that you want.
NAVI/B-MARK
button to display the contents of your player.
4.
To view videos
1.
Select a video (MV4 file).
The video is displayed, followed by the next video in your player, and so on.
2. Connect your earphones and move the Menu button up and down to adjust the volume.
Files are sorted in alphanumeric order on your player.
Your player can only play back video files in MV4 format.
Your player can store as many video files as its memory will allow, but each video file can
only be up to one hour long.
Use the Transcoder application included with your player to convert videos in other formats
to MV4 format. For more information, refer to your player’s User’s Guide found on the
Installation and Applications CD (see “More Information” on page 11).
6
�



 2023年江西萍乡中考道德与法治真题及答案.doc
 2012年重庆南川中考生物真题及答案.doc
 2013年江西师范大学地理学综合及文艺理论基础考研真题.doc
 2020年四川甘孜小升初语文真题及答案I卷.doc
 2020年注册岩土工程师专业基础考试真题及答案.doc
 2023-2024学年福建省厦门市九年级上学期数学月考试题及答案.doc
 2021-2022学年辽宁省沈阳市大东区九年级上学期语文期末试题及答案.doc
 2022-2023学年北京东城区初三第一学期物理期末试卷及答案.doc
 2018上半年江西教师资格初中地理学科知识与教学能力真题及答案.doc
 2012年河北国家公务员申论考试真题及答案-省级.doc
 2020-2021学年江苏省扬州市江都区邵樊片九年级上学期数学第一次质量检测试题及答案.doc
 2022下半年黑龙江教师资格证中学综合素质真题及答案.doc