Digital
Video Camera Manager
E-manual
�
Chapter 1: Installation
Software Installation
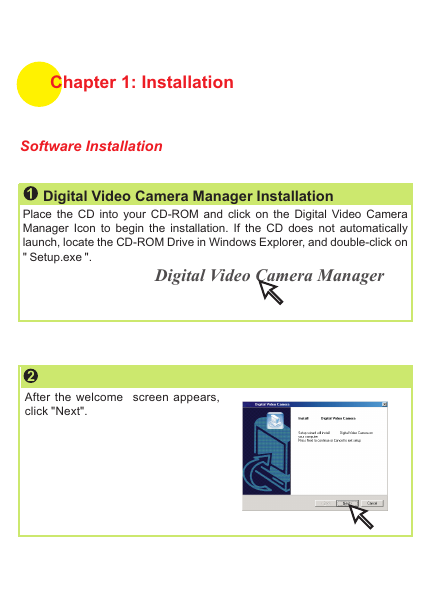
Digital Video Camera Manager Installation
Place the CD into your CD-ROM and click on the Digital Video Camera
Manager Icon to begin the installation. If the CD does not automatically
launch, locate the CD-ROM Drive in Windows Explorer, and double-click on
" Setup.exe ".
Digital Video Camera Manager
After the welcome screen appears,
click "Next".
�
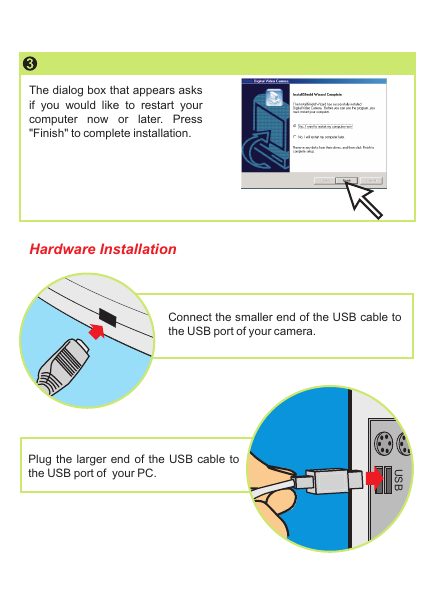
The dialog box that appears asks
if you would like to restart your
computer now or
later. Press
"Finish" to complete installation.
Hardware Installation
Connect the smaller end of the USB cable to
the USB port of your camera.
Plug the larger end of the USB cable to
the USB port of your PC.
U
S
B
�
Chapter2: How to Use Your Digital Video
Camera
Introduction
The Pocket DV is equipped with 16 MB (128Mbits). It offers digital cam-
corder, digital still camera, voice annotation , and Video Conferencing
functions. It is able to take up to 450 VGA pictures and up to 2000 QVGA
pictures. In addition, your camera
and
provides audio & video synchronized function. It allows up to 200 seconds
audio & video recording and is able to achieve around 30 minutes voice
annotation.
supports AVI Movie (QVGA)
Installing batteries
Your camera is powered by 2 AA batteries or by a PC via a USB cable.
Please be aware that when batteries are out of power or are
removed, all stored pictures will be erased. Therefore, please upload
images, audio or video files to PC as soon as possible.
(Battery Capacity: continuous AV recording for 2 hours, standby for 7
days. )
�
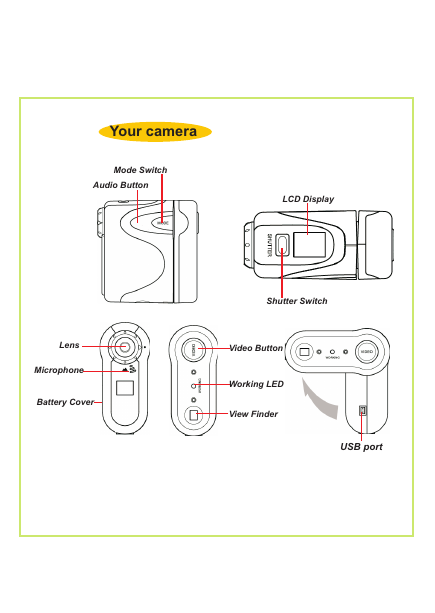
Your camera
Mode Switch
Audio Button
LCD Display
Shutter Switch
Lens
Microphone
Battery Cover
Video Button
Working LED
View Finder
USB port
�
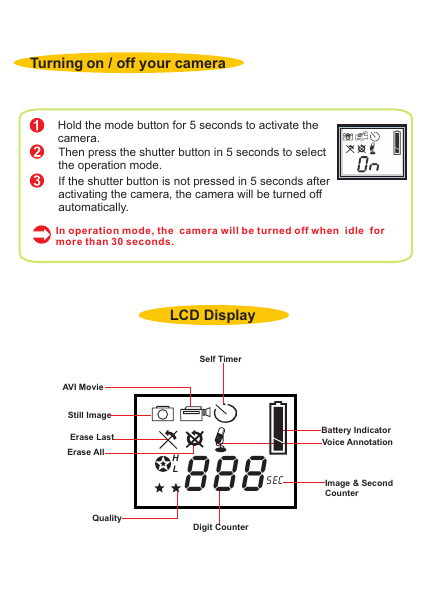
Turning on / off your camera
Hold the mode button for 5 seconds to activate the
camera.
Then press the shutter button in 5 seconds to select
the operation mode.
If the shutter button is not pressed in 5 seconds after
activating the camera, the camera will be turned off
automatically.
In operation mode, the camera will be turned off when idle for
more than 30 seconds.
LCD Display
Self Timer
AVI Movie
Still Image
Erase Last
Erase All
H
L888 Sec
Battery Indicator
Voice Annotation
Image & Second
Counter
Quality
Digit Counter
�
Still Image
Quality
Size
VGA
VGA
QVGA
QVGA
(640x480)
(640x480)
(320x240)
(320x240)
Quality
Maximum
Photos
Up to250 pic.
Up to 450 pic.
Up to1000 pic.
Up to2000 pic.
Choosing the Quality
Press the mode button until star icons with H or L are shown.
To change "H" or "L" quality, press the shutter.
Select a function icon to take a picture, such as Still Image mode.
Press the shutter and a picture is taken.
AVI Movie
The AV recording video size is QVGA (320x240). As you click the
Video button, your camera will automatically select QVGA format.
�
Chapter 3: Taking Pictures
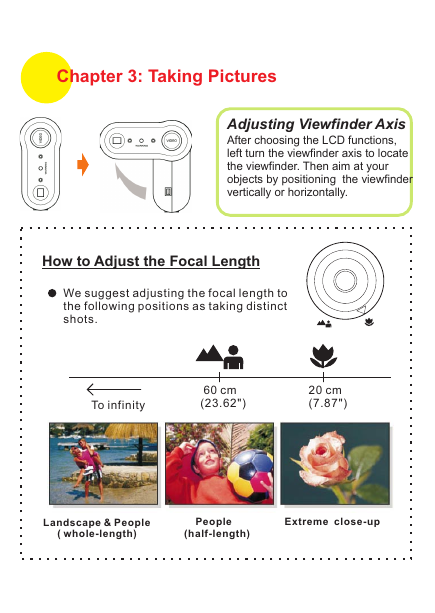
Adjusting Viewfinder Axis
After choosing the LCD functions,
left turn the viewfinder axis to locate
the viewfinder. Then aim at your
objects by positioning the viewfinder
vertically or horizontally.
How to Adjust the Focal Length
We suggest adjusting the focal length to
the following positions as taking distinct
shots.
To infinity
60 cm
(23.62")
20 cm
(7.87")
Landscape & People
( whole-length)
People
(half-length)
Extreme close-up
�




 2023年江西萍乡中考道德与法治真题及答案.doc
 2012年重庆南川中考生物真题及答案.doc
 2013年江西师范大学地理学综合及文艺理论基础考研真题.doc
 2020年四川甘孜小升初语文真题及答案I卷.doc
 2020年注册岩土工程师专业基础考试真题及答案.doc
 2023-2024学年福建省厦门市九年级上学期数学月考试题及答案.doc
 2021-2022学年辽宁省沈阳市大东区九年级上学期语文期末试题及答案.doc
 2022-2023学年北京东城区初三第一学期物理期末试卷及答案.doc
 2018上半年江西教师资格初中地理学科知识与教学能力真题及答案.doc
 2012年河北国家公务员申论考试真题及答案-省级.doc
 2020-2021学年江苏省扬州市江都区邵樊片九年级上学期数学第一次质量检测试题及答案.doc
 2022下半年黑龙江教师资格证中学综合素质真题及答案.doc