快速入门
Quick Start
HP Photosmart 8000 series
�
1
打开 HP Photosmart 打印机的包装
Unpack the HP Photosmart printer
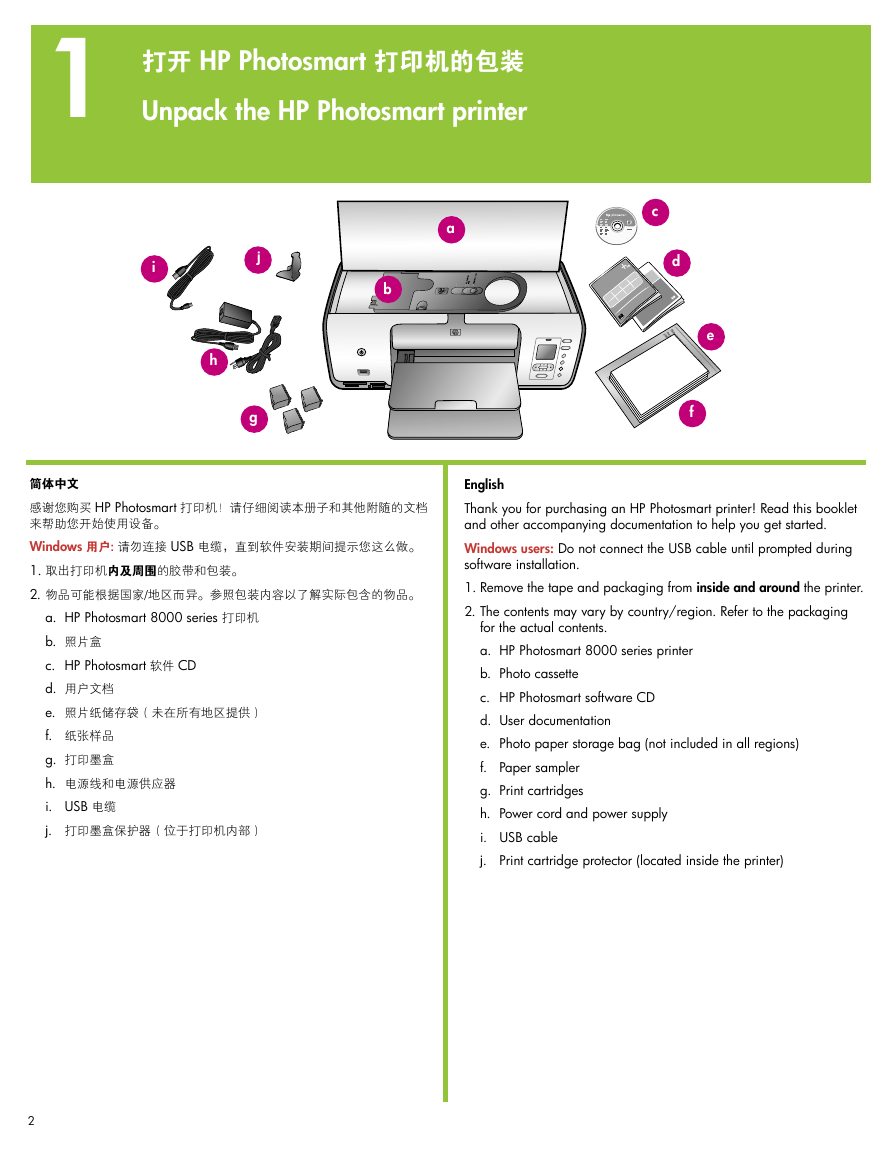
a
b
i
j
g
h
c
d
e
f
简体中文
感谢您购买 HP Photosmart 打印机!请仔细阅读本册子和其他附随的文档
来帮助您开始使用设备。
Windows 用户: 请勿连接 USB 电缆,直到软件安装期间提示您这么做。
1. 取出打印机内及周围的胶带和包装。
2. 物品可能根据国家/地区而异。参照包装内容以了解实际包含的物品。
a. HP Photosmart 8000 series 打印机
b. 照片盒
c. HP Photosmart 软件 CD
d. 用户文档
e. 照片纸储存袋(未在所有地区提供)
f. 纸张样品
g. 打印墨盒
h. 电源线和电源供应器
i. USB 电缆
j. 打印墨盒保护器(位于打印机内部)
English
Thank you for purchasing an HP Photosmart printer! Read this booklet
and other accompanying documentation to help you get started.
Windows users: Do not connect the USB cable until prompted during
software installation.
1. Remove the tape and packaging from inside and around the printer.
2. The contents may vary by country/region. Refer to the packaging
for the actual contents.
a. HP Photosmart 8000 series printer
b. Photo cassette
c. HP Photosmart software CD
d. User documentation
e. Photo paper storage bag (not included in all regions)
f. Paper sampler
g. Print cartridges
h. Power cord and power supply
i. USB cable
j. Print cartridge protector (located inside the printer)
2
�
2 连接电源并设置语言
Connect the power and set the language
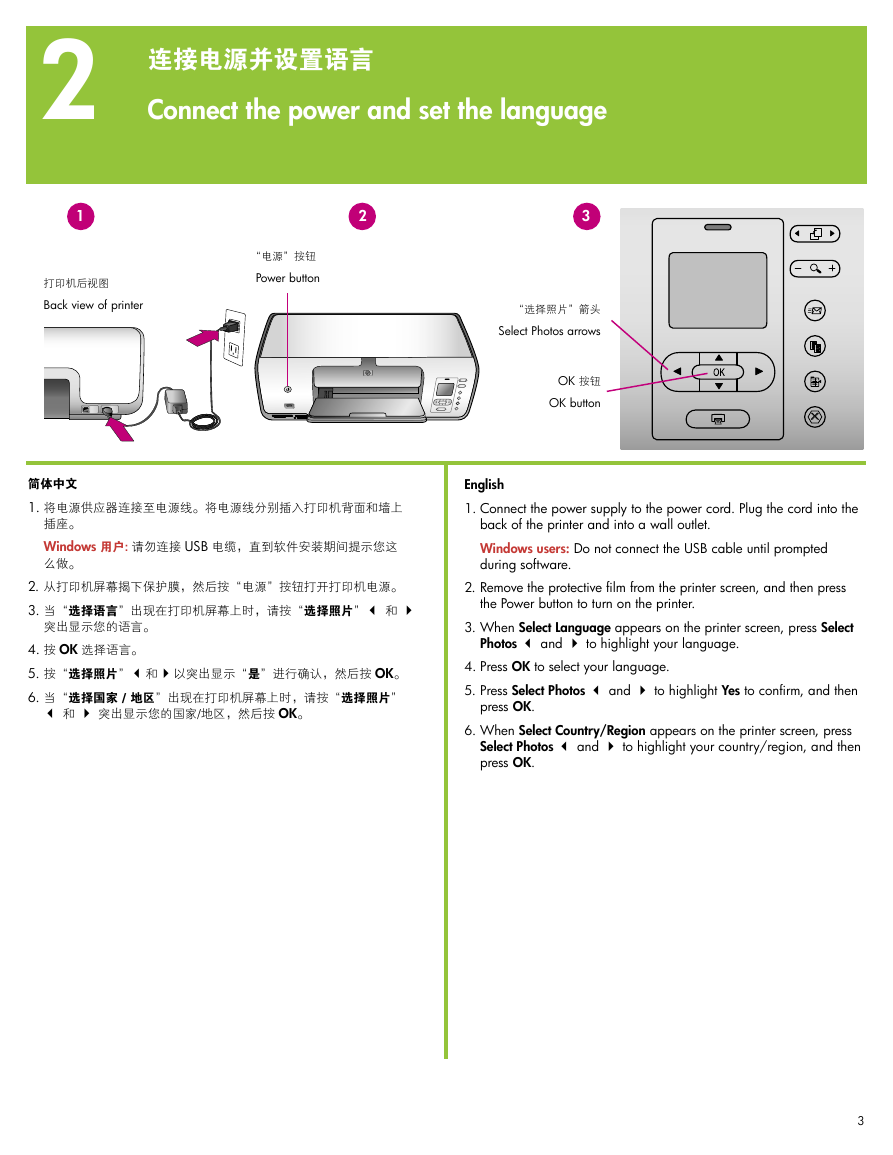
1
2
3
打印机后视图
Back view of printer
“电源”按钮
Power button
简体中文
1. 将电源供应器连接至电源线。将电源线分别插入打印机背面和墙上
插座。
Windows 用户: 请勿连接 USB 电缆,直到软件安装期间提示您这
么做。
2. 从打印机屏幕揭下保护膜,然后按“电源”按钮打开打印机电源。
3. 当“选择语言”出现在打印机屏幕上时,请按“选择照片” 和
突出显示您的语言。
4. 按 OK 选择语言。
5. 按“选择照片”和以突出显示“是”进行确认,然后按 OK。
6. 当“选择国家 / 地区”出现在打印机屏幕上时,请按“选择照片”
和 突出显示您的国家/地区,然后按 OK。
“选择照片”箭头
Select Photos arrows
OK 按钮
OK button
X
English
1. Connect the power supply to the power cord. Plug the cord into the
back of the printer and into a wall outlet.
Windows users: Do not connect the USB cable until prompted
during software.
2. Remove the protective film from the printer screen, and then press
the Power button to turn on the printer.
3. When Select Language appears on the printer screen, press Select
Photos and to highlight your language.
4. Press OK to select your language.
5. Press Select Photos and to highlight Yes to confirm, and then
press OK.
6. When Select Country/Region appears on the printer screen, press
Select Photos and to highlight your country/region, and then
press OK.
3
�
3 安装打印墨盒
Install the print cartridges
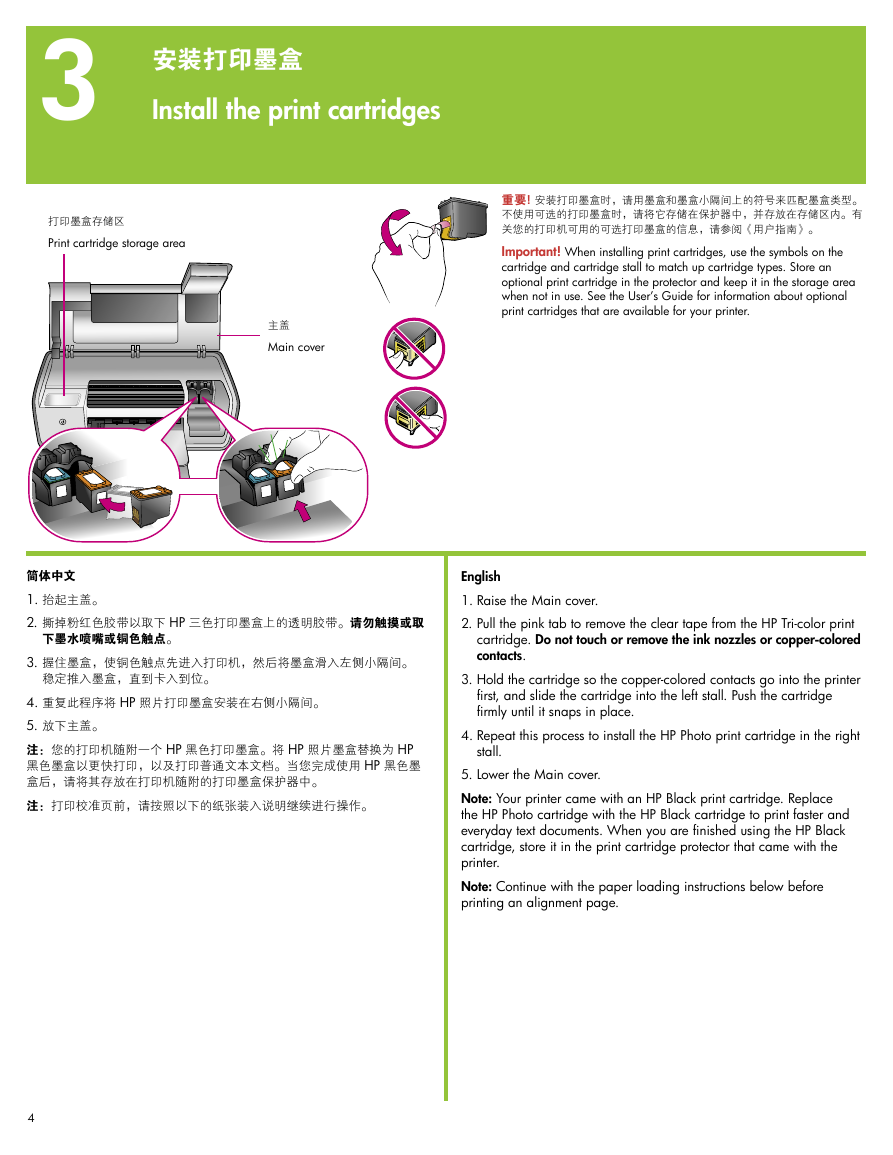
打印墨盒存储区
Print cartridge storage area
主盖
Main cover
重要! 安装打印墨盒时,请用墨盒和墨盒小隔间上的符号来匹配墨盒类型。
不使用可选的打印墨盒时,请将它存储在保护器中,并存放在存储区内。有
关您的打印机可用的可选打印墨盒的信息,请参阅《用户指南》。
Important! When installing print cartridges, use the symbols on the
cartridge and cartridge stall to match up cartridge types. Store an
optional print cartridge in the protector and keep it in the storage area
when not in use. See the User’s Guide for information about optional
print cartridges that are available for your printer.
简体中文
1. 抬起主盖。
2. 撕掉粉红色胶带以取下 HP 三色打印墨盒上的透明胶带。请勿触摸或取
下墨水喷嘴或铜色触点。
3. 握住墨盒,使铜色触点先进入打印机,然后将墨盒滑入左侧小隔间。
稳定推入墨盒,直到卡入到位。
4. 重复此程序将 HP 照片打印墨盒安装在右侧小隔间。
5. 放下主盖。
注:您的打印机随附一个 HP 黑色打印墨盒。将 HP 照片墨盒替换为 HP
黑色墨盒以更快打印,以及打印普通文本文档。当您完成使用 HP 黑色墨
盒后,请将其存放在打印机随附的打印墨盒保护器中。
注:打印校准页前,请按照以下的纸张装入说明继续进行操作。
English
1. Raise the Main cover.
2. Pull the pink tab to remove the clear tape from the HP Tri-color print
cartridge. Do not touch or remove the ink nozzles or copper-colored
contacts.
3. Hold the cartridge so the copper-colored contacts go into the printer
first, and slide the cartridge into the left stall. Push the cartridge
firmly until it snaps in place.
4. Repeat this process to install the HP Photo print cartridge in the right
stall.
5. Lower the Main cover.
Note: Your printer came with an HP Black print cartridge. Replace
the HP Photo cartridge with the HP Black cartridge to print faster and
everyday text documents. When you are finished using the HP Black
cartridge, store it in the print cartridge protector that came with the
printer.
Note: Continue with the paper loading instructions below before
printing an alignment page.
4
�
4
装入普通纸
Load plain paper
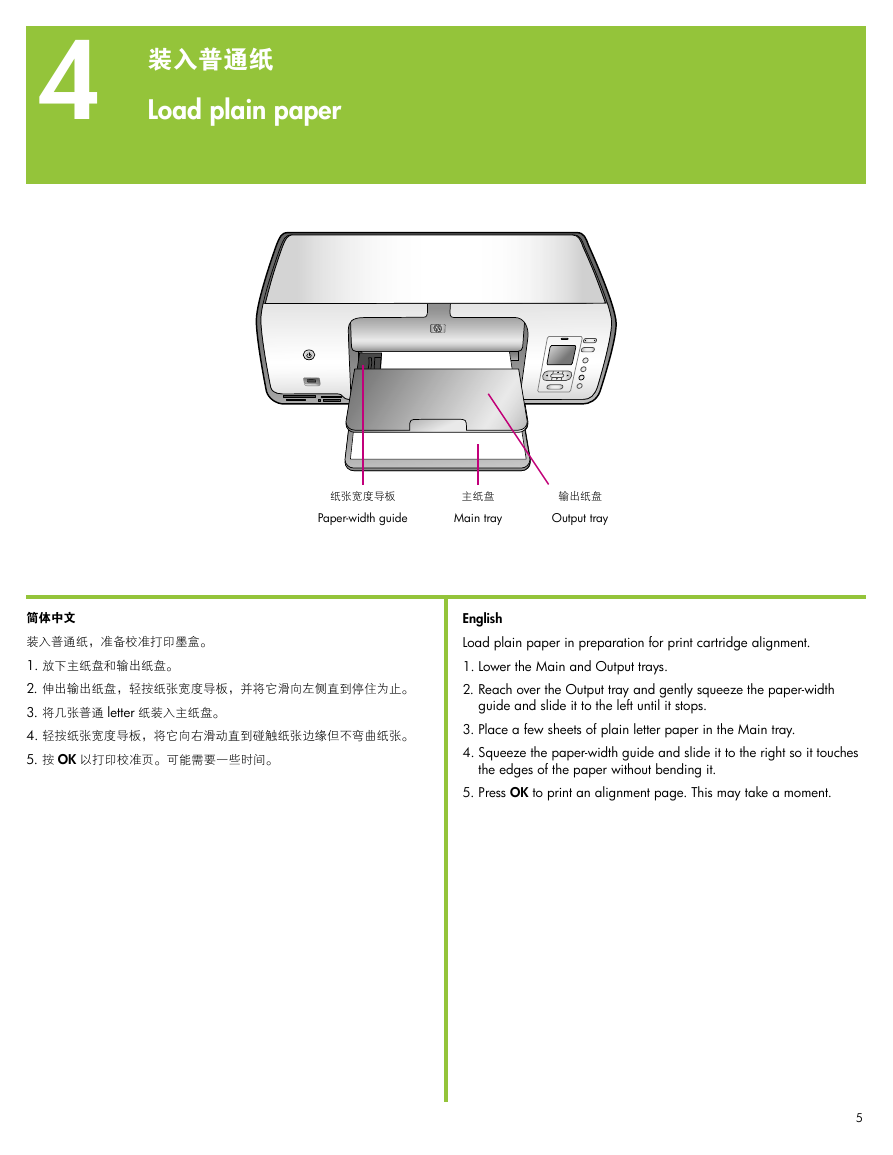
纸张宽度导板
Paper-width guide
主纸盘
Main tray
输出纸盘
Output tray
简体中文
装入普通纸,准备校准打印墨盒。
1. 放下主纸盘和输出纸盘。
2. 伸出输出纸盘,轻按纸张宽度导板,并将它滑向左侧直到停住为止。
3. 将几张普通 letter 纸装入主纸盘。
4. 轻按纸张宽度导板,将它向右滑动直到碰触纸张边缘但不弯曲纸张。
5. 按 OK 以打印校准页。可能需要一些时间。
English
Load plain paper in preparation for print cartridge alignment.
1. Lower the Main and Output trays.
2. Reach over the Output tray and gently squeeze the paper-width
guide and slide it to the left until it stops.
3. Place a few sheets of plain letter paper in the Main tray.
4. Squeeze the paper-width guide and slide it to the right so it touches
the edges of the paper without bending it.
5. Press OK to print an alignment page. This may take a moment.
5
�
5
安装 HP Photosmart 软件 (Windows)
Install the HP Photosmart software (Windows)
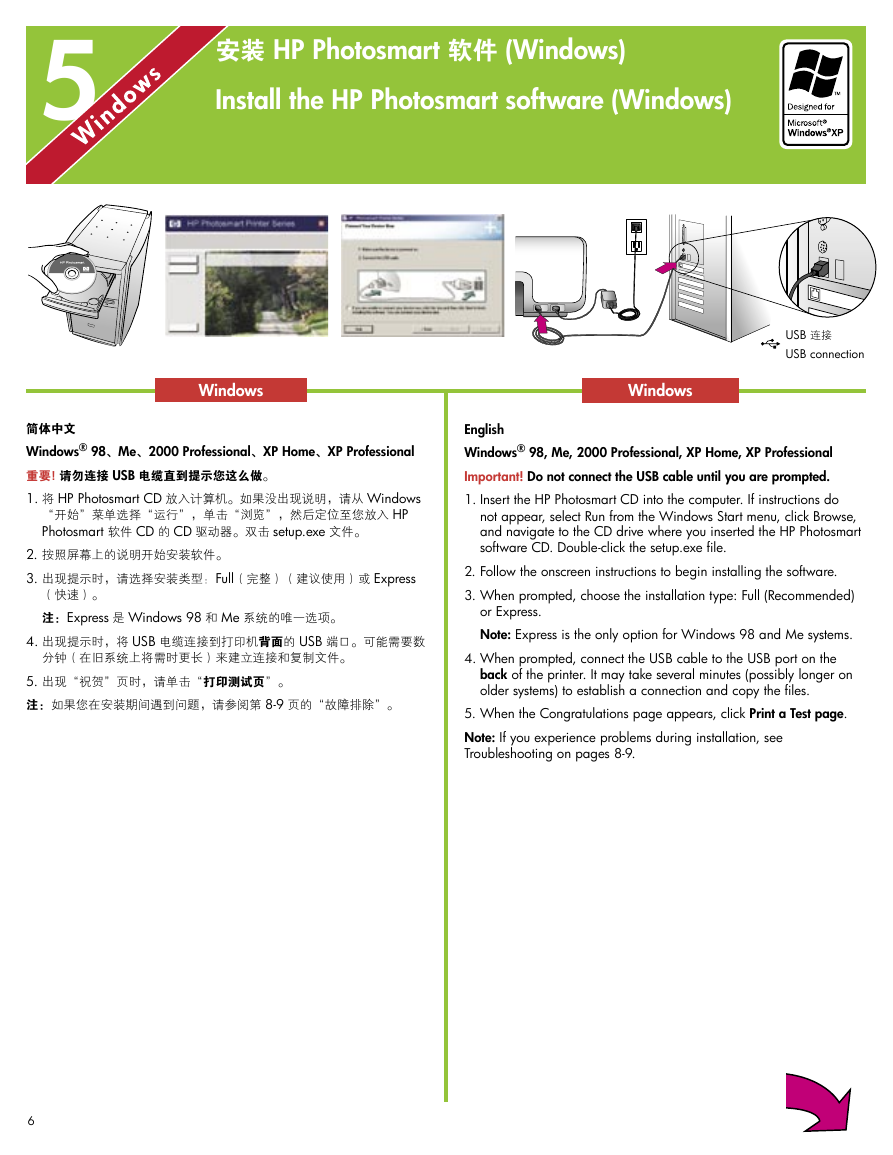
USB 连接
USB connection
Windows
Windows
简体中文
Windows® 98、Me、2000 Professional、XP Home、XP Professional
重要! 请勿连接 USB 电缆直到提示您这么做。
1. 将 HP Photosmart CD 放入计算机。如果没出现说明,请从 Windows
“开始”菜单选择“运行”,单击“浏览”,然后定位至您放入 HP
Photosmart 软件 CD 的 CD 驱动器。双击 setup.exe 文件。
2. 按照屏幕上的说明开始安装软件。
3. 出现提示时,请选择安装类型:Full(完整)(建议使用)或 Express
(快速)。
注:Express 是 Windows 98 和 Me 系统的唯一选项。
4. 出现提示时,将 USB 电缆连接到打印机背面的 USB 端口。可能需要数
分钟(在旧系统上将需时更长)来建立连接和复制文件。
5. 出现“祝贺”页时,请单击“打印测试页”。
注:如果您在安装期间遇到问题,请参阅第 8-9 页的“故障排除”。
English
Windows® 98, Me, 2000 Professional, XP Home, XP Professional
Important! Do not connect the USB cable until you are prompted.
1. Insert the HP Photosmart CD into the computer. If instructions do
not appear, select Run from the Windows Start menu, click Browse,
and navigate to the CD drive where you inserted the HP Photosmart
software CD. Double-click the setup.exe file.
2. Follow the onscreen instructions to begin installing the software.
3. When prompted, choose the installation type: Full (Recommended)
or Express.
Note: Express is the only option for Windows 98 and Me systems.
4. When prompted, connect the USB cable to the USB port on the
back of the printer. It may take several minutes (possibly longer on
older systems) to establish a connection and copy the files.
5. When the Congratulations page appears, click Print a Test page.
Note: If you experience problems during installation, see
Troubleshooting on pages 8-9.
6
�
5
安装 HP Photosmart 软件 (Macintosh)
Install the HP Photosmart software (Macintosh)
USB 连接
USB connection
Macintosh
Macintosh
简体中文
Macintosh OS X 10.2*、10.3* 及以上
1. 将 USB 电缆连接到计算机和打印机背面的 USB 端口。
2. 将 HP Photosmart CD 放入计算机。
3. 连按桌面上的 HP Photosmart CD 图象。
4. 连按“HP Photosmart Installer”(HP Photosmart 安装器)图象。
按照屏幕说明进行操作。
5. 当“HP Setup Assistant”(HP 设置助理)出现时,请选择默认的纸张
大小,然后点按“下一步”。
6. 若打印机未自动检测,请点按“Rescan USB”(重新扫描 USB)。
7. 当您的设备名称出现在设备列表中时,请点按“下一步”。
8. 点按“完成”。
9. 出现“祝贺”画面时,点按“完成”。“HP 注册页”会在您的浏览器
中打开。
注:如果您在安装期间遇到问题,请参阅第 8-9 页的“故障排除”。
English
Macintosh OS X 10.2*, 10.3*, and later
1. Connect the USB cable to the computer and to the USB port on the
back of the printer.
2. Insert the HP Photosmart CD into the computer.
3. Double-click the HP Photosmart CD icon on the desktop.
4. Double-click the HP Photosmart Installer icon. Follow the onscreen
instructions.
5. When the HP Setup Assistant appears, choose a default paper size
and click Next.
6. If the printer is not automatically detected, click Rescan USB.
7. When your device name appears in the device list, click Next.
8. Click Finish.
9. When the Congratulations screen appears, click Done. The
HP Registration page opens in your browser.
Note: If you experience problems during installation, see
Troubleshooting on pages 8-9.
7
�
安装故障排除
Installation troubleshooting
简体中文
如果打印机软件安装失败,或安装软件后打印机与计算机无法正常通信,请在此页
寻找可能的解决方案。
请检查打印机与计算机之间的所有电缆连接,并确保所用的打印机软件为最新版
本。您可以拜访 HP 支持网站 www.hp.com/support 以取得最新的软件更新。如果
仍需帮助,请查阅打印机文档或联系 HP 客户服务中心。
仅限于 Windows
仅限于 Macintosh
问题:安装打印机软件后,“Print Center”(打印中心)内的所有打印机消失。
解决方案:卸载然后重新安装打印机软件。要卸载,请打开 HP Image Zone。点
按“Devices”(设备)选项卡,然后选择“Settings”(设置)> “Uninstall HP
Photosmart Software”(卸载 HP Photosmart 软件)。将打印机添加到“Print
Center”(打印中心)前先重新启动计算机。
问题:放入 CD 时安装软件没有自动启动。
Windows 和 Macintosh
解决方案:从 Windows“开始”菜单,选择“运行”。选择“浏览”,然后定位到
您放入 HP Photosmart 软件 CD 的 CD 驱动器。双击 setup.exe 文件。
问题:计算机不能读取 HP Photosmart CD。
解决方案:确保 CD 没有污迹或划痕。如果其他 CD 均能正常工作,只有 HP
Photosmart CD 例外,您的 CD 可能已损坏。您可以从 HP 支持网站下载软件或向
HP 客户服务中心请求新的 CD。如果其他 CD 也不能工作,则可能需要维修 CD 驱
动器。
问题:“找到新硬件向导”成功打开但未能识别打印机。
解决方案:您可能在完成软件安装前连接 USB 电缆。拔下 USB 电缆。将软件 CD
放入您的 CD 驱动器,然后按照屏幕上的说明进行操作。若未出现说明,请查找并
双击 CD 上的 setup.exe 文件以重新启动安装。如果出现一则信息说明软件已成功
安装,请选择“卸载”,然后按照说明重新安装软件。只有在软件安装过程中出现
相应提示时才重新连接 USB 电缆。
问题:系统要求检查指出,计算机运行的 Internet Explorer 版本已过时。
解决方案:取消该安装,更新 Internet Explorer 版本然后重新安装 HP Photosmart
软件。
问题:计算机在软件安装过程中停止响应。
解决方案:可能是由于后台正在运行防毒软件或其他软件程序,因此减慢了安装进
度。等待软件完成文件复制,此过程可能会占用几分钟。如果几分钟过后,计算机
仍没有响应,请重新启动计算机,然后暂停或禁用所有运行中的防毒软件(请参考
防毒软件手册以获得有关如何禁用它的信息),并退出其他所有软件程序,再重新
安装打印机软件。注:计算机重启后,防毒软件会自动重新打开。
问题:系统要求对话框在安装过程中出现。
解决方案:计算机系统的其中一个组件不符合最低系统要求。升级该组件以使之达
到最低系统要求,然后重新安装打印机软件。
8
�



 2023年江西萍乡中考道德与法治真题及答案.doc
 2012年重庆南川中考生物真题及答案.doc
 2013年江西师范大学地理学综合及文艺理论基础考研真题.doc
 2020年四川甘孜小升初语文真题及答案I卷.doc
 2020年注册岩土工程师专业基础考试真题及答案.doc
 2023-2024学年福建省厦门市九年级上学期数学月考试题及答案.doc
 2021-2022学年辽宁省沈阳市大东区九年级上学期语文期末试题及答案.doc
 2022-2023学年北京东城区初三第一学期物理期末试卷及答案.doc
 2018上半年江西教师资格初中地理学科知识与教学能力真题及答案.doc
 2012年河北国家公务员申论考试真题及答案-省级.doc
 2020-2021学年江苏省扬州市江都区邵樊片九年级上学期数学第一次质量检测试题及答案.doc
 2022下半年黑龙江教师资格证中学综合素质真题及答案.doc