INSTRUCTION MANUAL
VPC-E1
Digital Movie Camera
Important note
This manual explains how to safely operate the VPC-E1.
Please read these instructions carefully before using the camera.
Make sure to read and understand the separate booklet “SAFETY MANUAL”.
Keep this manual in a safe place for later reference.
�
Warning
TO PREVENT THE RISK OF FIRE OR ELECTRIC SHOCK, DO NOT
EXPOSE THIS APPLIANCE TO RAIN OR MOISTURE.
FOR AMERICAN USERS
The following advisory is included in accordance with the laws of the State of
California (USA):
WARNING:
This product contains chemicals, including lead, known to the State of
California to cause cancer, birth defects or other reproductive harm. Wash
hands after handling.
i This equipment has been tested and found to comply with the limits for a
Class B digital device, pursuant to Part 15 of the FCC Rules. These limits
are designed to provide reasonable protection against harmful interference
in a residential installation. This equipment generates, uses and can
radiate radio frequency energy and, if not installed and used in accordance
with the instructions, may cause harmful interference to radio
communications. However, there is no guarantee that interference will not
occur in a particular installation. If this equipment does cause harmful
interference to radio or television reception, which can be determined by
turning the equipment off and on, the user is encouraged to try to correct
the interference by one or more of the following measures:
h Reorient or relocate the receiving antenna.
h Increase the separation between the equipment and receiver.
h Connect the equipment into an outlet on a circuit different from that to
which the receiver is connected.
h Consult the dealer or an experienced radio/TV technician for help.
i Changes or modifications not expressly approved by the party responsible
for compliance could void the user’s authority to operate the equipment.
Declaration of Conformity
Model number: VPC-E1
Trade Name: SANYO
Responsible party: SANYO FISHER COMPANY
Address: 21605 Plummer Street, Chatsworth, California 91311
Telephone No.: (818) 998-7322
This device complies with Part 15 of the FCC Rules. Operation is subject
to the following two conditions:
(1) this device may not cause harmful interference, and
(2) this device must accept any interference received, including
interference that may cause undesired operation.
i
English
�
FOR CANADIAN USERS
i This Class B digital apparatus complies with Canadian ICES-003.
Symbols used in this manual
HINT
Points giving some extended instructions or special points to pay
attention to.
CAUTION Points that require special attention.
(page xx) Refer to the page indicated for detailed information.
You may find the answers to questions or problems concerning camera
operation in the sections “COMMONLY ASKED QUESTIONS” (page 159)
and “TROUBLESHOOTING” (page 166).
English
ii
�
SHOOT, PLAY BACK AND SAVE
Install the battery pack and card
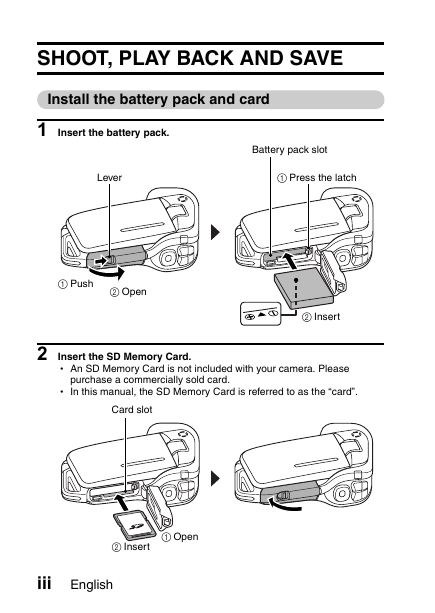
1 Insert the battery pack.
Battery pack slot
Lever
1 Press the latch
1 Push
2 Open
2 Insert
h An SD Memory Card is not included with your camera. Please
purchase a commercially sold card.
h In this manual, the SD Memory Card is referred to as the “card”.
2 Insert the SD Memory Card.
Card slot
1 Open
2 Insert
iii
English
�
Before capturing those important shots, be sure to first take a
test shot to confirm that your camera is set up and ready to go
i Sanyo declines any claim for compensation for recorded contents etc. in
case of photographing or recording failure due to a chance camera or card
flaw.
Shooting
kVideo clip recording
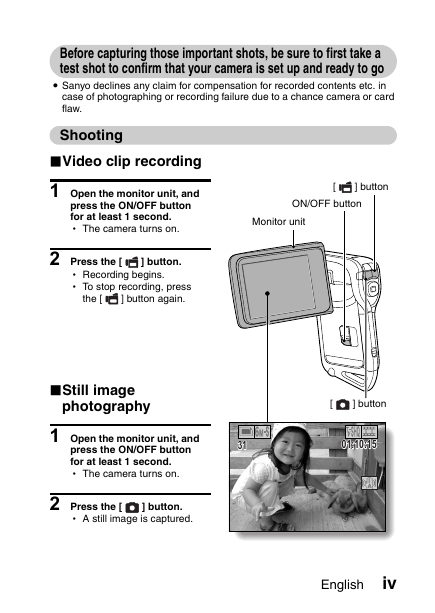
1 Open the monitor unit, and
press the ON/OFF button
for at least 1 second.
h The camera turns on.
[
] button
ON/OFF button
Monitor unit
2 Press the [
] button.
h Recording begins.
h To stop recording, press
the [
] button again.
kStill image
photography
1 Open the monitor unit, and
press the ON/OFF button
for at least 1 second.
h The camera turns on.
2 Press the [
h A still image is captured.
] button.
[
] button
3131
01:10:15
01:10:15
English
iv
�
SHOOT, PLAY BACK AND SAVE
Playback
kVideo clip playback
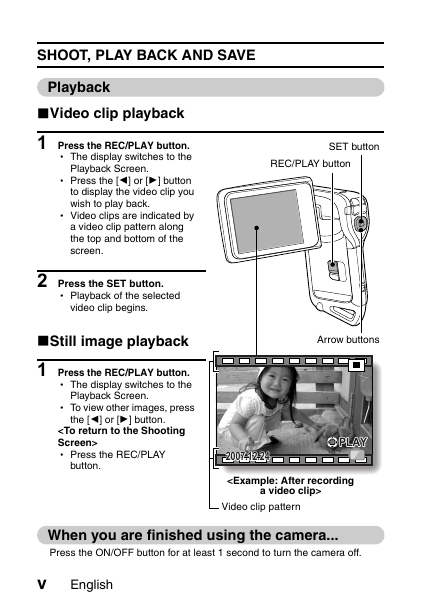
1 Press the REC/PLAY button.
h Press the [G] or [H] button
h The display switches to the
Playback Screen.
to display the video clip you
wish to play back.
h Video clips are indicated by
a video clip pattern along
the top and bottom of the
screen.
2 Press the SET button.
h Playback of the selected
video clip begins.
kStill image playback
1 Press the REC/PLAY button.
h The display switches to the
Playback Screen.
h To view other images, press
the [G] or [H] button.
h Press the REC/PLAY
button.
SET button
REC/PLAY button
Arrow buttons
2007.12.24
2007.12.24
PLAYPLAY
Video clip pattern
When you are finished using the camera...
Press the ON/OFF button for at least 1 second to turn the camera off.
v
English
�
Burn your recorded video clips onto a DVD
(Windows XP)
Introduced here is the procedure to use the supplied DVD-ROM (Xacti
Software DVD) to burn movies captured with your camera to a DVD,
creating your original DVD.
Install the application programs
Install two programs from the Xacti Software DVD to your computer:
Adobe Photoshop Album Starter Edition (in this manual, referred to as
Photoshop Album SE) and, for creating DVDs, Adobe Premiere Elements 3.0
(in this manual, referred to as Premiere Elements).
1 Set the supplied DVD-ROM (Xacti Software DVD) in your computer’s
DVD drive.
h The installation window opens.
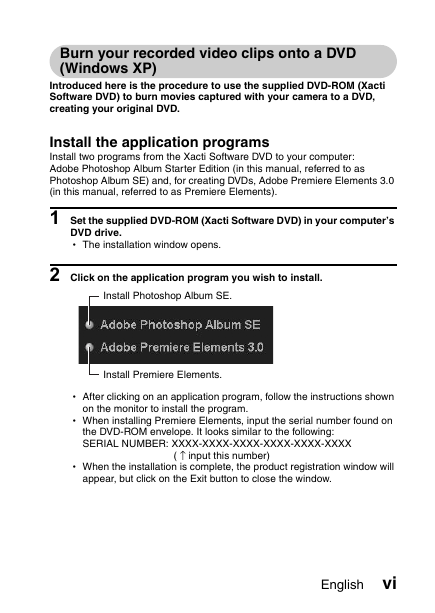
2 Click on the application program you wish to install.
Install Photoshop Album SE.
Install Premiere Elements.
h After clicking on an application program, follow the instructions shown
on the monitor to install the program.
h When installing Premiere Elements, input the serial number found on
the DVD-ROM envelope. It looks similar to the following:
SERIAL NUMBER: XXXX-XXXX-XXXX-XXXX-XXXX-XXXX
( ↑ input this number)
h When the installation is complete, the product registration window will
appear, but click on the Exit button to close the window.
English vi
�
SHOOT, PLAY BACK AND SAVE
3 In the installation window, click on [Finish].
h The installation window closes.
h Remove the DVD-ROM from your computer’s DVD drive.
h When the installation window closes, a dialog box to connect to the
website introducing Kodak’s online service appears. Check the [No
thanks !] option button, and then click on the [OK] button.
Copy data from your camera to the computer
Connect your camera to a computer, and copy the desired data to the
computer.
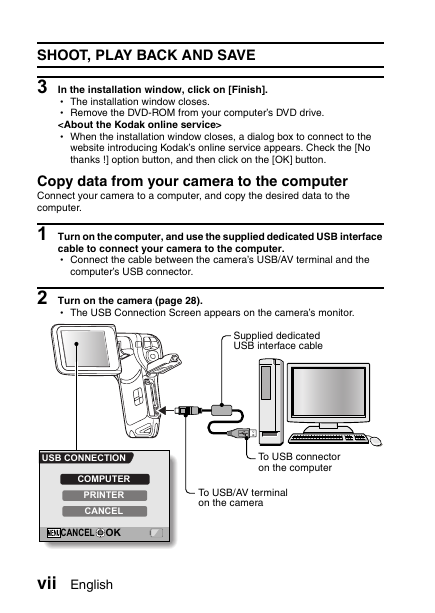
1 Turn on the computer, and use the supplied dedicated USB interface
cable to connect your camera to the computer.
h Connect the cable between the camera’s USB/AV terminal and the
computer’s USB connector.
2 Turn on the camera (page 28).
h The USB Connection Screen appears on the camera’s monitor.
Supplied dedicated
USB interface cable
To USB connector
on the computer
To USB/AV terminal
on the camera
USB CONNECTION
COMPUTER
PRINTER
CANCEL
CANCEL
OK
vii English
�




 2023年江西萍乡中考道德与法治真题及答案.doc
 2012年重庆南川中考生物真题及答案.doc
 2013年江西师范大学地理学综合及文艺理论基础考研真题.doc
 2020年四川甘孜小升初语文真题及答案I卷.doc
 2020年注册岩土工程师专业基础考试真题及答案.doc
 2023-2024学年福建省厦门市九年级上学期数学月考试题及答案.doc
 2021-2022学年辽宁省沈阳市大东区九年级上学期语文期末试题及答案.doc
 2022-2023学年北京东城区初三第一学期物理期末试卷及答案.doc
 2018上半年江西教师资格初中地理学科知识与教学能力真题及答案.doc
 2012年河北国家公务员申论考试真题及答案-省级.doc
 2020-2021学年江苏省扬州市江都区邵樊片九年级上学期数学第一次质量检测试题及答案.doc
 2022下半年黑龙江教师资格证中学综合素质真题及答案.doc