USER MANUAL
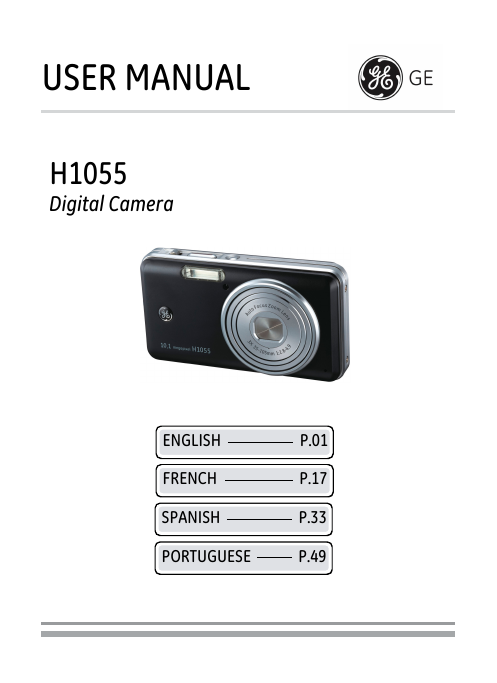
H1055
Digital Camera
ENGLISH P.01
FRENCH P.17
SPANISH P.33
PORTUGUESE P.49
�
�
Preface
Thank you for purchasing GE digital cameras. Please read this manual
carefully and keep it in a safe place for future reference.
Copyright
© Copyright 2007 General Imaging Company All rights reserved.
No part of this publication may be reproduced, transmitted, transcribed,
stored in a retrieval system, or translated into any language or
computer language, in any form, by any means, without the prior written
permission of General Imaging Company.
Trademarks
All trademarks mentioned in this manual are used for identification
purposes only and may be properties of their respective owners.
Unpacking
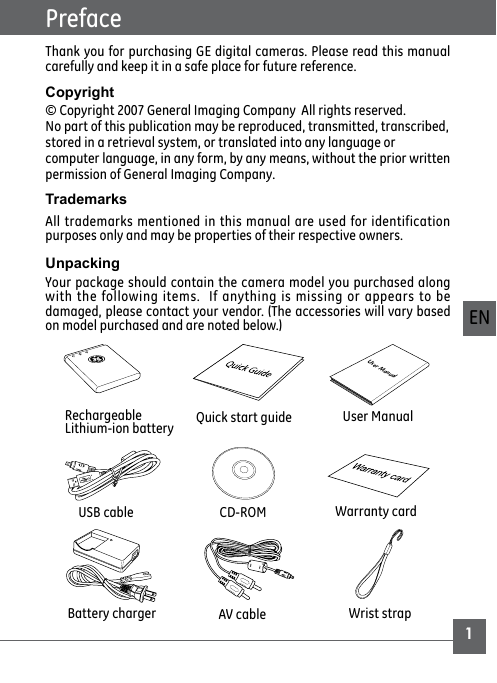
Your package should contain the camera model you purchased along
with the following items. If anything is missing or appears to be
damaged, please contact your vendor. (The accessories will vary based
on model purchased and are noted below.)
User Manual
Rechargeable
Lithium-ion battery
Quick start guide
User Manual
USB cable
CD-ROM
Warranty card
Battery charger
AV cable
Wrist strap
EN
�
�
Camera Views : H1055
W T
18
16
17
3
1
2
23
10.1
megapix el
H 1055
5
6
7
14
15
11
12
13
19
20
21
22
4
8
9
10
EN
�
�
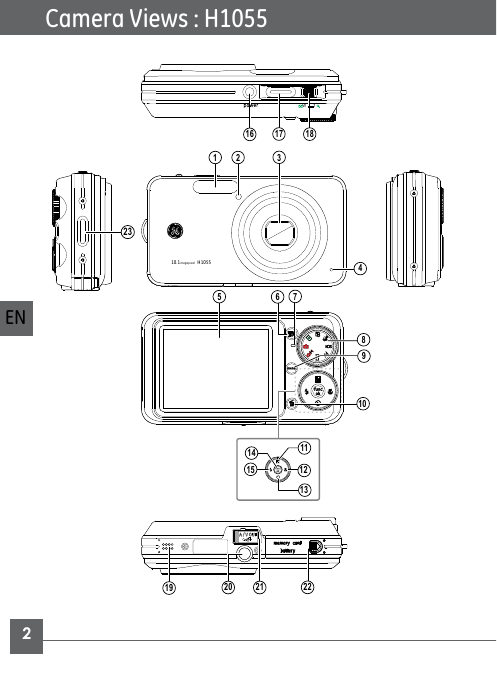
1
2
Flash
AF assist beam/
Timer indicator
Lens
3
4 Mic
LCD screen
5
Face detection AF button
6
7
Status LED
8 Mode dial
9 Menu button
10 Erase button
Camera Views
13
14
Self-timer/ Down button
Func/ok button
Flash mode/ Left button
Power button
Shutter button
Zoom scroll wheel
Speaker
Tripod mount point
15
16
17
18
19
20
21 USB/ AV port
22 Memory card/
Battery compartment
11 Exposure compensation/
Up button
12 Macro mode/ Right button
23 Wrist strap mount
EN
�
�
Getting Started
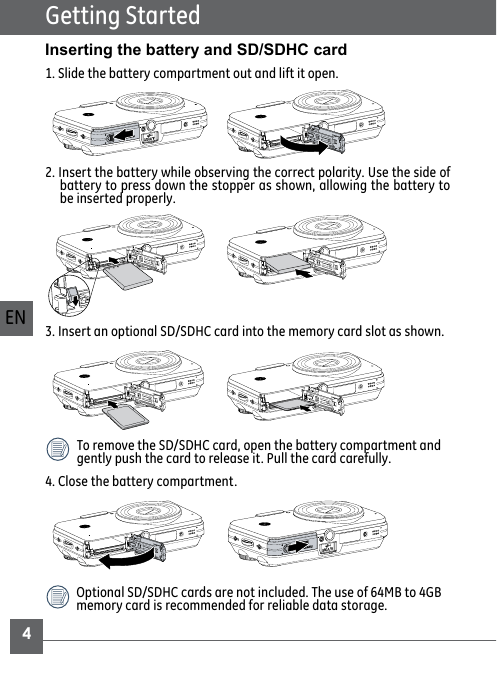
Inserting the battery and SD/SDHC card
1. Slide the battery compartment out and lift it open.
2. Insert the battery while observing the correct polarity. Use the side of
battery to press down the stopper as shown, allowing the battery to
be inserted properly.
EN
3. Insert an optional SD/SDHC card into the memory card slot as shown.
To remove the SD/SDHC card, open the battery compartment and
gently push the card to release it. Pull the card carefully.
4. Close the battery compartment.
Optional SD/SDHC cards are not included. The use of 64MB to 4GB
memory card is recommended for reliable data storage.
�
�
Getting Started
Turning on and off
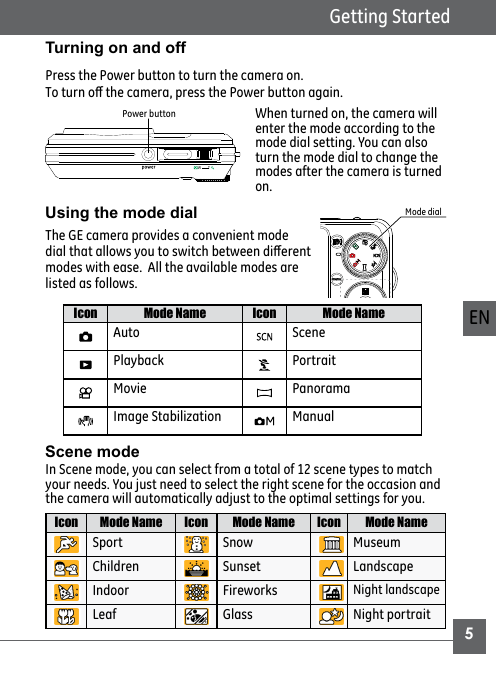
Press the Power button to turn the camera on.
To turn off the camera, press the Power button again.
Power button
W T
When turned on, the camera will
enter the mode according to the
mode dial setting. You can also
turn the mode dial to change the
modes after the camera is turned
on.
Using the mode dial
The GE camera provides a convenient mode
dial that allows you to switch between different
modes with ease. All the available modes are
listed as follows.
Icon
Mode Name
Icon
Mode Name
Auto
Playback
Movie
Image Stabilization
Scene
Portrait
Panorama
Manual
Mode dial
EN
Scene mode
In Scene mode, you can select from a total of 12 scene types to match
your needs. You just need to select the right scene for the occasion and
the camera will automatically adjust to the optimal settings for you.
Mode Name
Icon
Icon
Museum
Landscape
Night landscape
Night portrait
�
Mode Name
Sport
Children
Indoor
Leaf
Icon
Mode Name
Snow
Sunset
Fireworks
Glass
�
camera on.
Getting Started
Setting display language, date, and time
When using the camera for the first time, you need to set the language,
date, and time for your camera in the Setup menu.
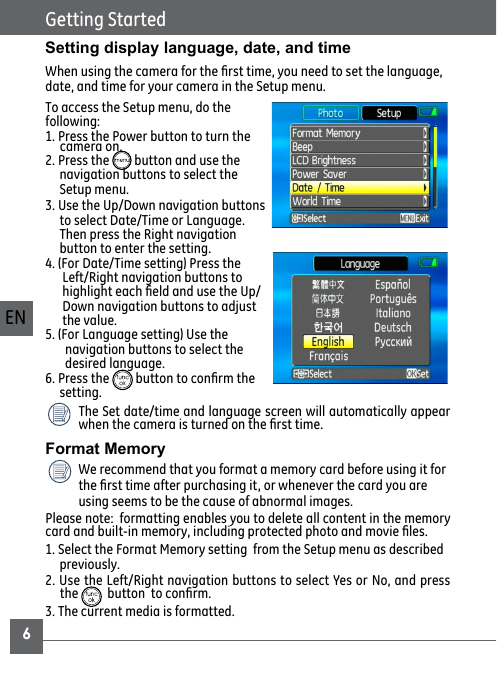
To access the Setup menu, do the
following:
1. Press the Power button to turn the
2. Press the
button and use the
navigation buttons to select the
Setup menu.
3. Use the Up/Down navigation buttons
to select Date/Time or Language.
Then press the Right navigation
button to enter the setting.
4. (For Date/Time setting) Press the
Left/Right navigation buttons to
highlight each field and use the Up/
Down navigation buttons to adjust
the value.
5. (For Language setting) Use the
navigation buttons to select the
desired language.
6. Press the
setting.
button to confirm the
The Set date/time and language screen will automatically appear
when the camera is turned on the first time.
Format Memory
We recommend that you format a memory card before using it for
the first time after purchasing it, or whenever the card you are
using seems to be the cause of abnormal images.
EN
Please note: formatting enables you to delete all content in the memory
card and built-in memory, including protected photo and movie files.
1. Select the Format Memory setting from the Setup menu as described
previously.
2. Use the Left/Right navigation buttons to select Yes or No, and press
the
button to confirm.
3. The current media is formatted.
�
�




 2023年江西萍乡中考道德与法治真题及答案.doc
 2012年重庆南川中考生物真题及答案.doc
 2013年江西师范大学地理学综合及文艺理论基础考研真题.doc
 2020年四川甘孜小升初语文真题及答案I卷.doc
 2020年注册岩土工程师专业基础考试真题及答案.doc
 2023-2024学年福建省厦门市九年级上学期数学月考试题及答案.doc
 2021-2022学年辽宁省沈阳市大东区九年级上学期语文期末试题及答案.doc
 2022-2023学年北京东城区初三第一学期物理期末试卷及答案.doc
 2018上半年江西教师资格初中地理学科知识与教学能力真题及答案.doc
 2012年河北国家公务员申论考试真题及答案-省级.doc
 2020-2021学年江苏省扬州市江都区邵樊片九年级上学期数学第一次质量检测试题及答案.doc
 2022下半年黑龙江教师资格证中学综合素质真题及答案.doc