python,sklearn,svm,遥感数据分类
遥感数据分类,代码实例
代码实例
@python,sklearn,svm,遥感数据分类
python_sklearn_svm遥感数据分类代码实例
遥感数据分类代码实例
((1))svm原理简述
原理简述
遥感数据分类,代码实例
代码实例
支持向量机(Support Vector Machine,即SVM)是包括分类(Classification)、回归(Regression)和异常检测(Outlier
Detection)等一系列监督学习算法的总称。对于分类,SVM最初用于解决二分类问题,多分类问题可通过构建多个SVM分类器
解决。SVM具有两大特点:1.寻求最优分类边界,即求解出能够正确划分训练数据集并且几何间隔最大的分离超平面,这是
SVM的基本思想;2.基于核函数的扩维变换,即通过核函数的特征变换对线性不可分的原始数据集进行升维变换,使其线性可
分。因此SVM最核心的过程是核函数和参数选择。
((2))svm实现环境解析
实现环境解析
设置中文输出代码兼容格式及引用的库函数,用于精度评估的库函数,以及svm参数寻优等。
下面展示一些 内联代码片。
-*- coding: utf-8 -*-
#用于精度评价
from sklearn.metrics import cohen_kappa_score
from sklearn.metrics import accuracy_score
from sklearn.metrics import confusion_matrix
#numpy引用
import numpy as np
#记录运行时间
import datetime
#文件路径操作
import os
#svm and best parameter select using grid search method
from sklearn import svm
from sklearn.model_selection import GridSearchCV
#scale the data to 0-1 用于数据归一化
from sklearn import preprocessing
((3))svm函数参数寻优
函数参数寻优
SVM参数寻优的实现,有两种常用方法,一种是网格搜索法(本文中的),另一种是使用libsvm工具通过交叉验证实现(后面
再写,有兴趣的可以留言)。
def grid_find(train_data_x,train_data_y):
# 10 is often helpful. Using a basis of 2, a finer.tuning can be achieved but at a much higher cost.
# logspace(a,b,N),base默认=10,把10的a次方到10的b次方区间分成N份。
C_range = np.logspace(-5, 9, 8, base=2)
# 如:C_range = 1/64,1/8,1/2,2,8,32,128,512
gamma_range = np.logspace(-15, 3, 10, base=2)
# 选择linear线性核函数和rbf核函数
parameters = {'kernel': ('linear', 'rbf'), 'C': C_range, 'gamma': gamma_range}
svr = svm.SVC()
# n_jobs表示并行运算量,可加快程序运行结果。
# 此处选择5折交叉验证,10折交叉验证也是常用的。
clf = GridSearchCV(svr, parameters, cv=5, n_jobs=4)
# 进行模型训练
clf.fit(train_data_x, train_data_y)
print('最优c,g参数为:{0}'.format(clf.best_params_))
# 返回最优模型结果
svm_model = clf.best_estimator_
return svm_model
更多关于网格搜索法:
((4)数据读取函数编写(读取
)数据读取函数编写(读取txt格式的训练与测试文件)
格式的训练与测试文件)
首先是读取txt格式的训练数据和测试数据的函数。
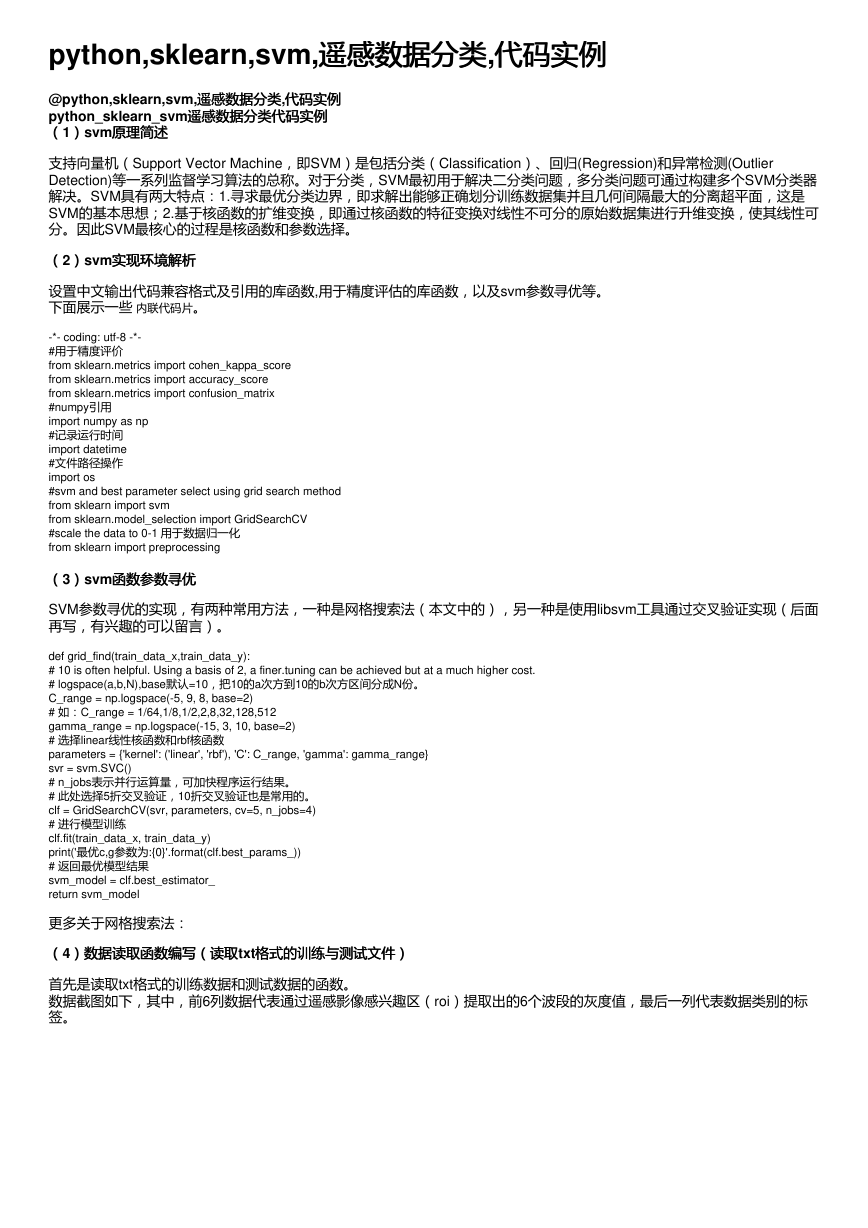
数据截图如下,其中,前6列数据代表通过遥感影像感兴趣区(roi)提取出的6个波段的灰度值,最后一列代表数据类别的标
签。
�
代码如下,仅需输入文件路径即可:
def open_txt_film(filepath):
# open the film
if os.path.exists(filepath):
with open(filepath, mode='r') as f:
train_data_str = np.loadtxt(f, delimiter=' ')
print('训练(以及测试)数据的行列数为{}'.format(train_data_str.shape))
return train_data_str
else:
print('输入txt文件路径错误,请重新输入文件路径')
((5))svm模型预测函数编写
模型预测函数编写
输入模型与测试数据,输出精度评估(包括混淆矩阵,制图精度等等)。
def model_process(svm_model, test_data_x, test_data_y):
p_lable = svm_model.predict(test_data_x)
# 精确度为 生产者精度 召回率为 用户精度
print('总体精度为 : {}'.format(accuracy_score(test_data_y, p_lable)))
print('混淆矩阵为 :\n {}'.format(confusion_matrix(test_data_y, p_lable)))
print('kappa系数为 :\n {}'.format(cohen_kappa_score(test_data_y, p_lable)))
matric = confusion_matrix(test_data_y, p_lable)
# output the accuracy of each category。由于类别标签是从1开始的,因此明确数据中最大值,即可知道有多少类
for category in range(np.max(test_data_y)):
# add 0.0 to keep the float type of output
precise = (matric[category, category] + 0.0) / np.sum(matric[category, :])
recall = (matric[category, category] + 0.0) / np.sum(matric[:, category])
f1_score = 2 * (precise * recall) / (recall + precise)
print(
'类别{}的生产者、制图(recall)精度为{:.4} 用户(precision)精度为{:.4} F1 score 为{:.4} '.format(category + 1, precise, recall, f1_score))
((6)主函数编写
)主函数编写
主函数主要负责:读取数据,预处理数据,以及参数寻优、模型训练和模型预测。
针对不同的数据集,每次使用,仅仅需要修改训练与测试数据的路径即可。
def main():
# read the train data from txt film
train_file_path = r'E:\CSDN\data1\train.txt'
train_data = open_txt_film(train_file_path)
# read the predict data from txt film
test_file_path = r'E:\CSDN\data1\test.txt'
test_data = open_txt_film(test_file_path)
# data normalization for svm training and testing dataset
scaler = preprocessing.MinMaxScaler().fit(train_data[:, :-1])
train_data[:, :-1] = scaler.transform(train_data[:, :-1])
# keep the same scale of the train data
test_data[:, :-1] = scaler.transform(test_data[:, :-1])
# conversion the type of data,and the label's dimension to 1-d
train_data_y = train_data[:, -1:].astype('int')
train_data_y = train_data_y.reshape(len(train_data_y))
train_data_x = train_data[:, :-1] # 取出测试数据灰度值和标签值,并将2维标签转为1维
test_data_x = test_data[:, :-1] test_data_y = test_data[:, -1:].astype('int')
test_data_y = test_data_y.reshape(len(test_data_y))
model = grid_find(train_data_x,train_data_y)
# 模型预测
model_process(model, test_data_x, test_data_y)
((7)调用主函数
)调用主函数
这里新增了几行代码用于记录程序运行时间。
�
if __name__ == "__main__":
# remember the beginning time of the program
start_time = datetime.datetime.now()
print("start...%s" % start_time)
main()
# record the running time of program with the unit of minutes
end_time = datetime.datetime.now()
last_time = (end_time - start_time).seconds / 60
print("The program is last %s" % last_time + " minutes")
# print("The program is last {} seconds".format(last_time))
((8)训练数据与测试数据实例下载地址
)训练数据与测试数据实例下载地址
数据在作者的github仓库下,共两个文件(train.txt 和 test.txt) 。
[下载链接]: (https://github.com/sunzhihu123/sunzhihu123.github.io)
仓库下点击下载即可,如图:
==本文优点:仅有两个输入,一个是训练数据的路径,一个是测试数据的路径,轻松上手;并且以遥感图像数据为例。另外
github将会整体上传源码哦~
作者:作者:huhu_xq
�


 2023年江西萍乡中考道德与法治真题及答案.doc
 2012年重庆南川中考生物真题及答案.doc
 2013年江西师范大学地理学综合及文艺理论基础考研真题.doc
 2020年四川甘孜小升初语文真题及答案I卷.doc
 2020年注册岩土工程师专业基础考试真题及答案.doc
 2023-2024学年福建省厦门市九年级上学期数学月考试题及答案.doc
 2021-2022学年辽宁省沈阳市大东区九年级上学期语文期末试题及答案.doc
 2022-2023学年北京东城区初三第一学期物理期末试卷及答案.doc
 2018上半年江西教师资格初中地理学科知识与教学能力真题及答案.doc
 2012年河北国家公务员申论考试真题及答案-省级.doc
 2020-2021学年江苏省扬州市江都区邵樊片九年级上学期数学第一次质量检测试题及答案.doc
 2022下半年黑龙江教师资格证中学综合素质真题及答案.doc