User ManUal + Warranty Info
�
Join the GoPro party at facebook.com/goprocamera
to see what other GoPro owners are capturing with
their GoPros. Share some of your own footage and
contribute to the GoPro movement!
2
Accessories
Mounts
HD HERO2 Features
Firmware Update
Basics
Camera Modes
Advanced Menu Settings
Additional Menu Settings
Storage/SD Cards
System Requirements
Transferring Files
Battery Life
Important Warning Messages
Camera Assembly
FCC Statement
Warranty
Customer Support
table of contents
4
5
6
8
8
11
17
24
30
31
32
34
36
37
43
44
45
3
�
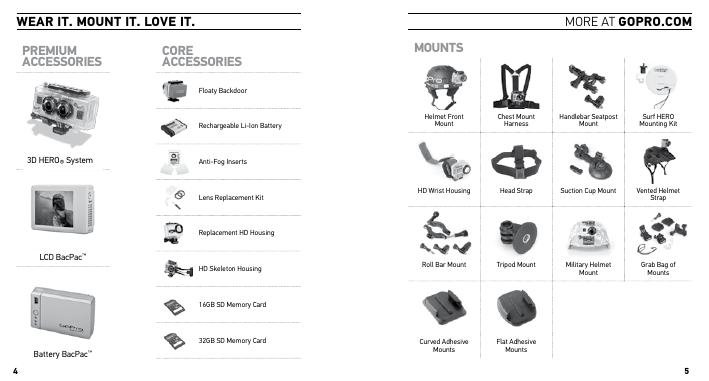
WEAR it. mount it. lovE it.
pREmium
AccEssoRiEs
coRE
AccEssoRiEs
More at gopRo.com
mounts
Floaty Backdoor
Rechargeable Li-Ion Battery
Helmet Front
Mount
Chest Mount
Harness
Handlebar Seatpost
Mount
Surf HERO
Mounting Kit
3D HERO® System
Anti-Fog Inserts
Lens Replacement Kit
Replacement HD Housing
HD Skeleton Housing
16GB SD Memory Card
32GB SD Memory Card
LCD BacPac™
Battery BacPac™
4
HD Wrist Housing
Head Strap
Suction Cup Mount
Vented Helmet
Strap
Roll Bar Mount
Tripod Mount
Military Helmet
Mount
Grab Bag of
Mounts
Curved Adhesive
Mounts
Flat Adhesive
Mounts
5
�
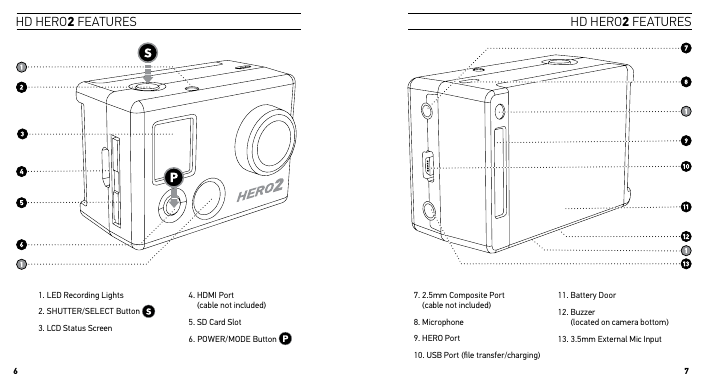
HD Hero2 featUres
HD Hero2 featUres
1. LED Recording Lights
2. SHUTTER/SELECT Button
3. LCD Status Screen
4. HDMI Port
(cable not included)
5. SD Card Slot
6. POWER/MODE Button
6
7. 2.5mm Composite Port
(cable not included)
8. Microphone
9. HERO Port
10. USB Port (file transfer/charging)
11. Battery Door
12. Buzzer
(located on camera bottom)
13. 3.5mm External Mic Input
7
�
fIrMWare UpDate
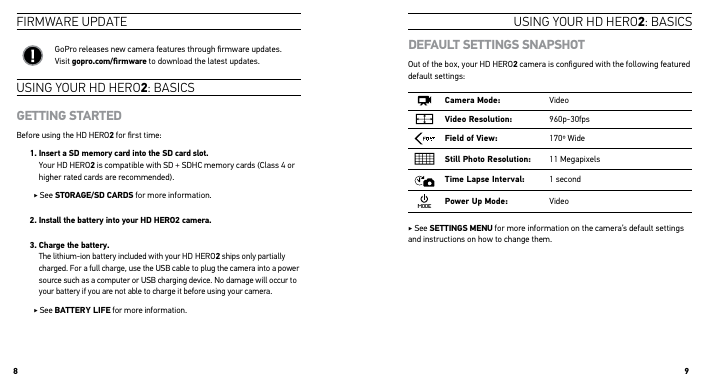
GoPro releases new camera features through firmware updates.
Visit gopro.com/firmware to download the latest updates.
UsInG yoUr HD Hero2: basIcs
gEtting stARtED
Before using the HD HERO2 for first time:
1. insert a sD memory card into the sD card slot.
Your HD HERO2 is compatible with SD + SDHC memory cards (Class 4 or
higher rated cards are recommended).
‣ See stoRAgE/sD cARDs for more information.
2. install the battery into your HD HERo2 camera.
3. charge the battery.
The lithium-ion battery included with your HD HERO2 ships only partially
charged. For a full charge, use the USB cable to plug the camera into a power
source such as a computer or USB charging device. No damage will occur to
your battery if you are not able to charge it before using your camera.
‣ See BAttERY liFE for more information.
UsInG yoUr HD Hero2: basIcs
DEFAult sEttings snApsHot
Out of the box, your HD HERO2 camera is configured with the following featured
default settings:
camera mode:
video Resolution:
Field of view:
Video
960p-30fps
170º Wide
still photo Resolution:
11 Megapixels
time lapse interval:
1 second
power up mode:
Video
‣ See sEttings mEnu for more information on the camera’s default settings
and instructions on how to change them.
8
9
�
UsInG yoUr HD Hero2: basIcs
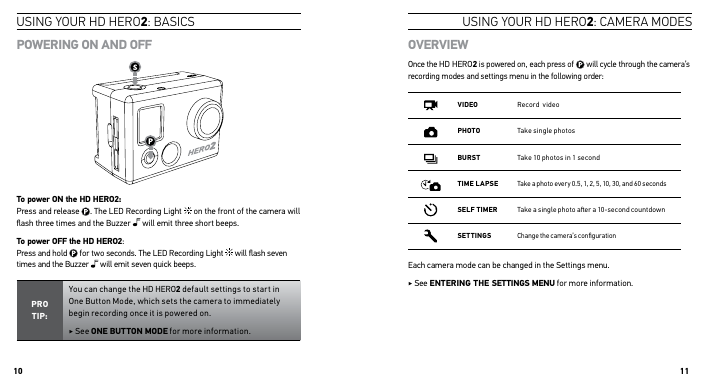
poWERing on AnD oFF
UsInG yoUr HD Hero2: caMera MoDes
ovERviEW
Once the HD HERO2 is powered on, each press of
recording modes and settings menu in the following order:
will cycle through the camera’s
viDEo
Record video
pHoto
Take single photos
BuRst
Take 10 photos in 1 second
timE lApsE
Take a photo every 0.5, 1, 2, 5, 10, 30, and 60 seconds
. The LED Recording Light
on the front of the camera will
sElF timER
Take a single photo after a 10-second countdown
will emit three short beeps.
sEttings
Change the camera’s configuration
Each camera mode can be changed in the Settings menu.
‣ See EntERing tHE sEttings mEnu for more information.
to power on the HD HERo2:
Press and release
flash three times and the Buzzer
to power oFF the HD HERo2:
Press and hold
times and the Buzzer
for two seconds. The LED Recording Light
will flash seven
will emit seven quick beeps.
You can change the HD HERO2 default settings to start in
One Button Mode, which sets the camera to immediately
begin recording once it is powered on.
pRo
tip:
‣ See onE Button moDE for more information.
10
11
�
UsInG yoUr HD Hero2: caMera MoDes
REcoRDing viDEo
Verify that the camera is in Video Mode, indicated by
repeatedly until the camera displays the Video Mode icon.
on the LCD. If not, press
• To begin recording video:
Press and release
Recording Light will flash while recording continues.
. The camera will emit one beep and the LED
• To stop recording:
Press and release
the camera will emit three beeps to indicate recording has stopped.
. The LED Recording Light will flash three times and
HD HERO2 will automatically stop recording when either the SD card is full or the
battery runs out of power. Your video will be saved before the camera powers off.
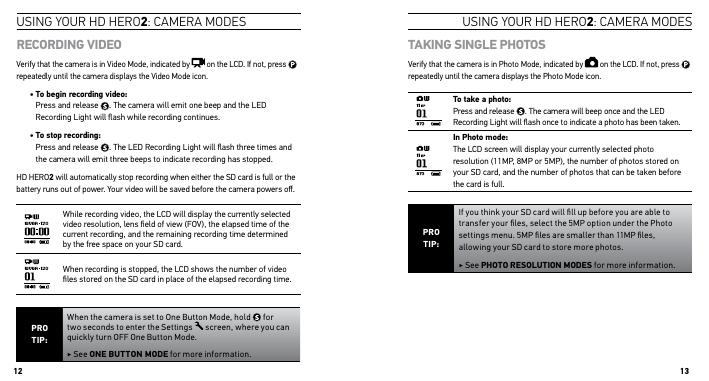
While recording video, the LCD will display the currently selected
video resolution, lens field of view (FOV), the elapsed time of the
current recording, and the remaining recording time determined
by the free space on your SD card.
When recording is stopped, the LCD shows the number of video
files stored on the SD card in place of the elapsed recording time.
UsInG yoUr HD Hero2: caMera MoDes
tAking singlE pHotos
Verify that the camera is in Photo Mode, indicated by
repeatedly until the camera displays the Photo Mode icon.
on the LCD. If not, press
. The camera will beep once and the LED
to take a photo:
Press and release
Recording Light will flash once to indicate a photo has been taken.
in photo mode:
The LCD screen will display your currently selected photo
resolution (11MP, 8MP or 5MP), the number of photos stored on
your SD card, and the number of photos that can be taken before
the card is full.
If you think your SD card will fill up before you are able to
transfer your files, select the 5MP option under the Photo
settings menu. 5MP files are smaller than 11MP files,
allowing your SD card to store more photos.
pRo
tip:
‣ See pHoto REsolution moDEs for more information.
pRo
tip:
12
When the camera is set to One Button Mode, hold
two seconds to enter the Settings
quickly turn OFF One Button Mode.
screen, where you can
for
‣ See onE Button moDE for more information.
13
�
UsInG yoUr HD Hero2: caMera MoDes
pHoto BuRst moDE
In Photo Burst Mode, the camera will take 10 photos in 1 second.
• Verify the camera is in Burst Mode, indicated by
on the LCD screen.
repeatedly until the camera displays the Burst Mode icon.
If not, press
• Press and release
once to take a photo burst of ten photos over one
second. The LED Recording Light will flash and the camera will beep 10
times to indicate the photos have been taken.
As in Photo Mode, the LCD screen will display your currently
selected photo resolution (11MP, 8MP or 5MP), the number of
photos stored on your SD card, and the number of photos that
can be taken before the card is full.
pRo
tip:
Compared to single Photo Mode, Burst Mode gives you 10
times as many chances to capture that “can’t miss” moment.
UsInG yoUr HD Hero2: caMera MoDes
timE lApsE pHoto moDE
Time Lapse Photo Mode is used to take a series of photos at 0.5, 1, 2, 5, 10,
30 or 60 second intervals (when using 0.5 seconds, it is recommended to use a
class 10 or higher SD card).
‣ See timE lApsE pHoto moDE in advanced settings for instructions on how
to change the interval setting.
• Verify the camera is in Time Lapse Mode, indicated by
on the LCD
screen. If not, press
Lapse Mode icon.
repeatedly until the camera displays the Time
• Press the
button once to begin taking Time Lapse photos. The LED
Recording Light will flash each time a photo is taken.
• Press
once to stop taking Time Lapse photos. The LED Recording Light
will flash three times and the camera will emit three beeps to indicate Time
Lapse has stopped.
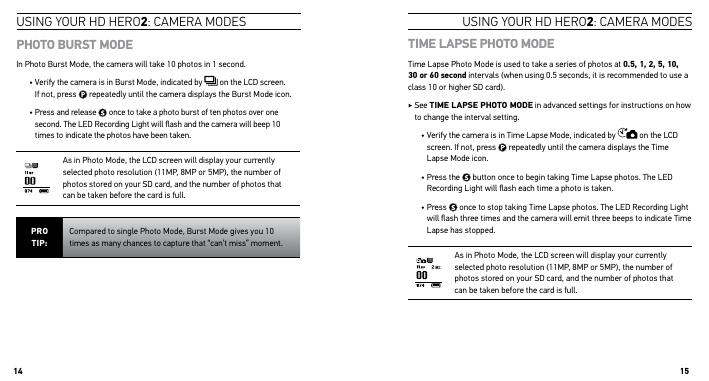
As in Photo Mode, the LCD screen will display your currently
selected photo resolution (11MP, 8MP or 5MP), the number of
photos stored on your SD card, and the number of photos that
can be taken before the card is full.
14
15
�


 2023年江西萍乡中考道德与法治真题及答案.doc
 2012年重庆南川中考生物真题及答案.doc
 2013年江西师范大学地理学综合及文艺理论基础考研真题.doc
 2020年四川甘孜小升初语文真题及答案I卷.doc
 2020年注册岩土工程师专业基础考试真题及答案.doc
 2023-2024学年福建省厦门市九年级上学期数学月考试题及答案.doc
 2021-2022学年辽宁省沈阳市大东区九年级上学期语文期末试题及答案.doc
 2022-2023学年北京东城区初三第一学期物理期末试卷及答案.doc
 2018上半年江西教师资格初中地理学科知识与教学能力真题及答案.doc
 2012年河北国家公务员申论考试真题及答案-省级.doc
 2020-2021学年江苏省扬州市江都区邵樊片九年级上学期数学第一次质量检测试题及答案.doc
 2022下半年黑龙江教师资格证中学综合素质真题及答案.doc