USBPcap 的使用_夕阳中的西游哥_新浪博客
http://blog.sina.com.cn/s/blog_4fc2fb600102ydoq.html
一、采用命令的方式收集数据
1、运行 cmd 命令窗口,进入如下图界面的目录中:(主要是进入 USBPcap 的安装目录)
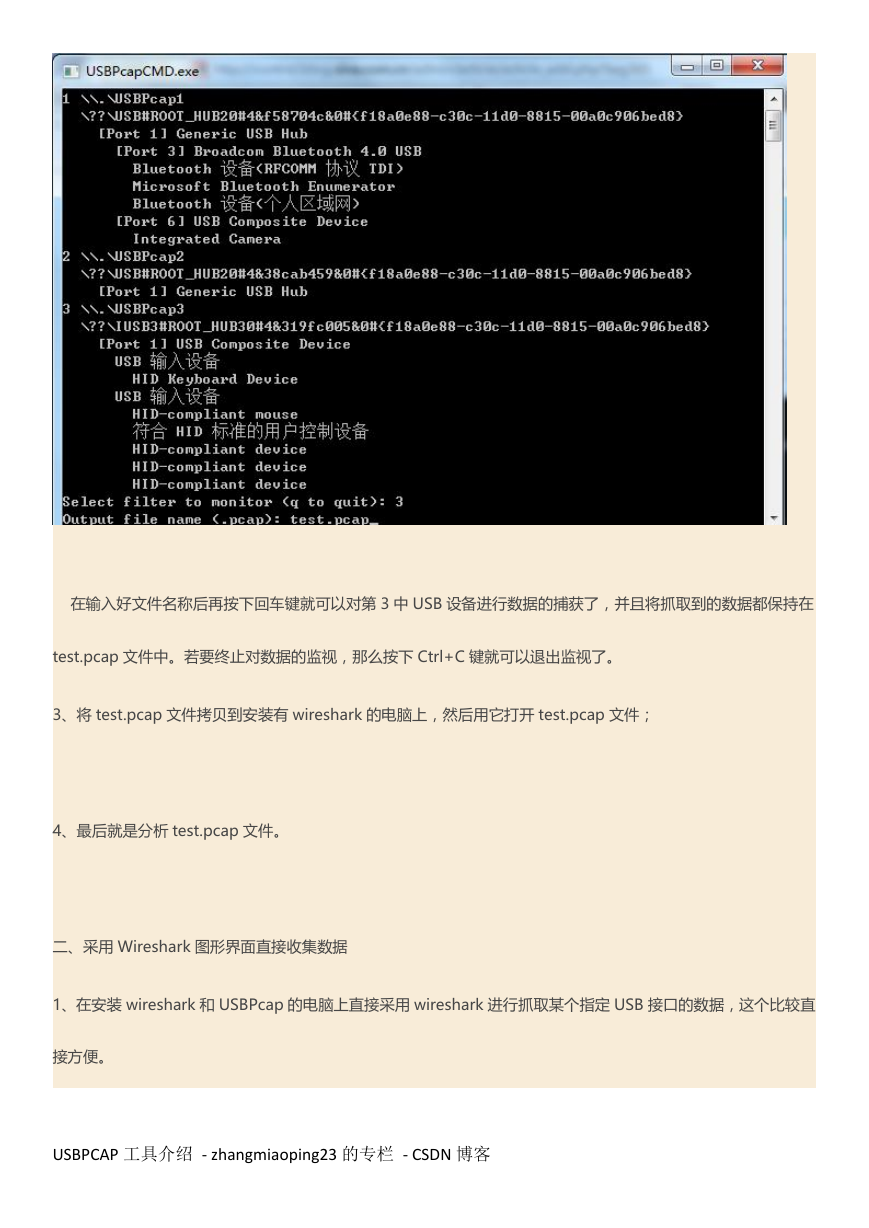
2、在上图界面运行 USBPcapCMD.exe 命令,即可弹出如下截图界面:
�
此时有三种 USB Hub,这里选择监视第 3 种,即在命令行中输入 3,然后按回车键就可以出现如下界面:
此时,在命令行输入文件名称,比如:
test.pcap
�
在输入好文件名称后再按下回车键就可以对第 3 中 USB 设备进行数据的捕获了,并且将抓取到的数据都保持在
test.pcap 文件中。若要终止对数据的监视,那么按下 Ctrl+C 键就可以退出监视了。
3、将 test.pcap 文件拷贝到安装有 wireshark 的电脑上,然后用它打开 test.pcap 文件;
4、最后就是分析 test.pcap 文件。
二、采用 Wireshark 图形界面直接收集数据
1、在安装 wireshark 和 USBPcap 的电脑上直接采用 wireshark 进行抓取某个指定 USB 接口的数据,这个比较直
接方便。
USBPCAP 工具介绍 - zhangmiaoping23 的专栏 - CSDN 博客
�
https://blog.csdn.net/zhangmiaoping23/article/details/51554304?t=1492869755423&t=1492869755864
在开始前,我们先介绍一些 USB 的基础知识。USB 有不同的规格,以下是使用 USB 的三种方式:
l USB UART
l USB HID
l USB Memory
UART 或者 Universal Asynchronous Receiver/Transmitter。这种方式下,设备只是简单的将 USB 用
于接受和发射数据,除此之外就再没有其他通讯功能了。
HID 是人性化的接口。这一类通讯适用于交互式,有这种功能的设备有:键盘,鼠标,游戏手柄和数字
显示设备。
最后是 USB Memory,或者说是数据存储。External HDD, thumb drive / flash drive,等都是这一类的。
其中使用的最广的不是 USB HID 就是 USB Memory 了。
每一个 USB 设备(尤其是 HID 或者 Memory)都有一个供应商 ID(Vendor Id)和产品识别码
(Product Id)。Vendor Id 是用来标记哪个厂商生产了这个 USB 设备。Product Id 用来标记不同的产
品,他并不是一个特殊的数字,当然最好不同。如下图:
上图是连接在我电脑上的 USB 设备列表,通过 lsusb 查看命令。
例如说,我有一个无线鼠标 Logitech。它是属于 HID 设备。这个设备正常的运行,并且通过 lsusb 这个
命令查看所有usb设备,现在大家能找出哪一条是这个鼠标吗??没有错,就是第四个,就是下面这条:
Bus 003 Device 010: ID 046d:c52f Logitech, Inc. Unifying Receiver
�
其中,ID 046d:c52f 就是 Vendor-Product Id 对,Vendor Id 的值是 046d,并且 Product Id 的值是 c52f。
Bus 003 Device 010 代表 usb 设备正常连接,这点需要记下来。
转:http://www.51testing.com/html/85/132585-849172.html
经过上网上及 wireshark 的帮助文档发现一个新的工具 USBPCAP.EXE,可以获取 USB 设备的数据
具体的经过如下
1、下载工具 usbpcap.exe
地址:http://desowin.org/usbpcap/thankyou.html?file=USBPcapSetup-1.0.0.5.exe
2、如何使用请参考
地址:http://desowin.org/usbpcap/tour.html
USB Packet capture for Windows Tour
This short tour assumes you have installed the latest version of USBPcap and the patched version of
Wireshark and rebooted your system. Each of the steps contains short description of what should
happen and in some cases gives tips for troubleshooting.
If you feel the information provided there is not complete (it doesn't cover your case), please
describe your problem on the USBPcap mailing list.
Step 1 - identify the Root Hub you want to monitor
The first step is to connect the device you want to sniff the traffic and identify the Root Hub this
device is connected to. In order to do so, launch the USBPcapCMD.exe that is stored in the
installation directory. You should be presented with something similiar to the picture below.
�
Troubleshooting step 1
If for any reason you can't see the list of connected devices make sure you have the USBPcap driver
installed and you have restarted your computer after the installation. Please note that if running on
64-bit Windws it is required to run in Test Mode.
Step 2 - start the capture
So now you know which of the Root Hubs available in your system you want to monitor. Please
disconnect the device from your computer - this will allow USBPcap to capture the USB descriptors
needed for analysis in Wireshark. Now you can run the USBPcapCMD.exe again and enter your
desired output file name. (A careful reader will notice that they can skip the restart part: all that
required to get the descriptors in the capture file is to reconnect your device after capture has
started.).
We will be capturing the Root Hub that showed the two Hubs connected to it and an composite USB
device (it is actually DigiTech RP250).
Now it is time to use the device in order to get packets captured. In this example I have simply
started the X-Edit software that controls the DigiTech RP250.
Step 3 - analyse the data
After you're done collecting data, press Ctrl+C and start Wireshark. Once started, open the pcap file
you have created in Step 2. You should see the packets allongside with their description. The sample
capture is available at the Google code:sample_2013_04_10.pcap
�
Step 4 - live capture
If you didn't like that in steps 2 and 3 you had to finish capturing before having a chance to look at
the data, you can also do a live capture. In order to do so, you must have running the cmd.exe with
elevated privileges (as Administrator). Then enter the following command:
USBPcapCMD.exe -d \\.\USBPcap2 -o - | "C:\Program Files\Wireshark\Wireshark.exe" -k -i -
This should result in live capture from standard input in Wireshark as shown below.
�
Step 5 - Contribute to the project :-)
Once you know how to use USBPcap you might want it to work better. There are numerous ways to
help, for example:
Improving project website
Improving the documentation
Improving the filter driver
Improving the sample application
Improving installation process
Creating project artwork (icon, website banner, etc.)
Integrating the project more closely with Wireshark (dumpcap)
Donating money
If you can help please check the menu on the right for links for github page, donation fund and contact information.
�


 2023年江西萍乡中考道德与法治真题及答案.doc
 2012年重庆南川中考生物真题及答案.doc
 2013年江西师范大学地理学综合及文艺理论基础考研真题.doc
 2020年四川甘孜小升初语文真题及答案I卷.doc
 2020年注册岩土工程师专业基础考试真题及答案.doc
 2023-2024学年福建省厦门市九年级上学期数学月考试题及答案.doc
 2021-2022学年辽宁省沈阳市大东区九年级上学期语文期末试题及答案.doc
 2022-2023学年北京东城区初三第一学期物理期末试卷及答案.doc
 2018上半年江西教师资格初中地理学科知识与教学能力真题及答案.doc
 2012年河北国家公务员申论考试真题及答案-省级.doc
 2020-2021学年江苏省扬州市江都区邵樊片九年级上学期数学第一次质量检测试题及答案.doc
 2022下半年黑龙江教师资格证中学综合素质真题及答案.doc