Asp.net 动态生成 Word 文档并填充数据 转
转自 http://hi.baidu.com/huyuan2008
好东西.
"
操作步骤如下:
首先要添加引用:
1、添加引用->COM->Microsoft Word 11.0 Object Library (注意不要
错选了 Microsoft Office 11.0 Object Library,我就是因为这个低级
错误,浪费了好长时间。)
2、在.cs 文件中添加 using Word;
代码如下:
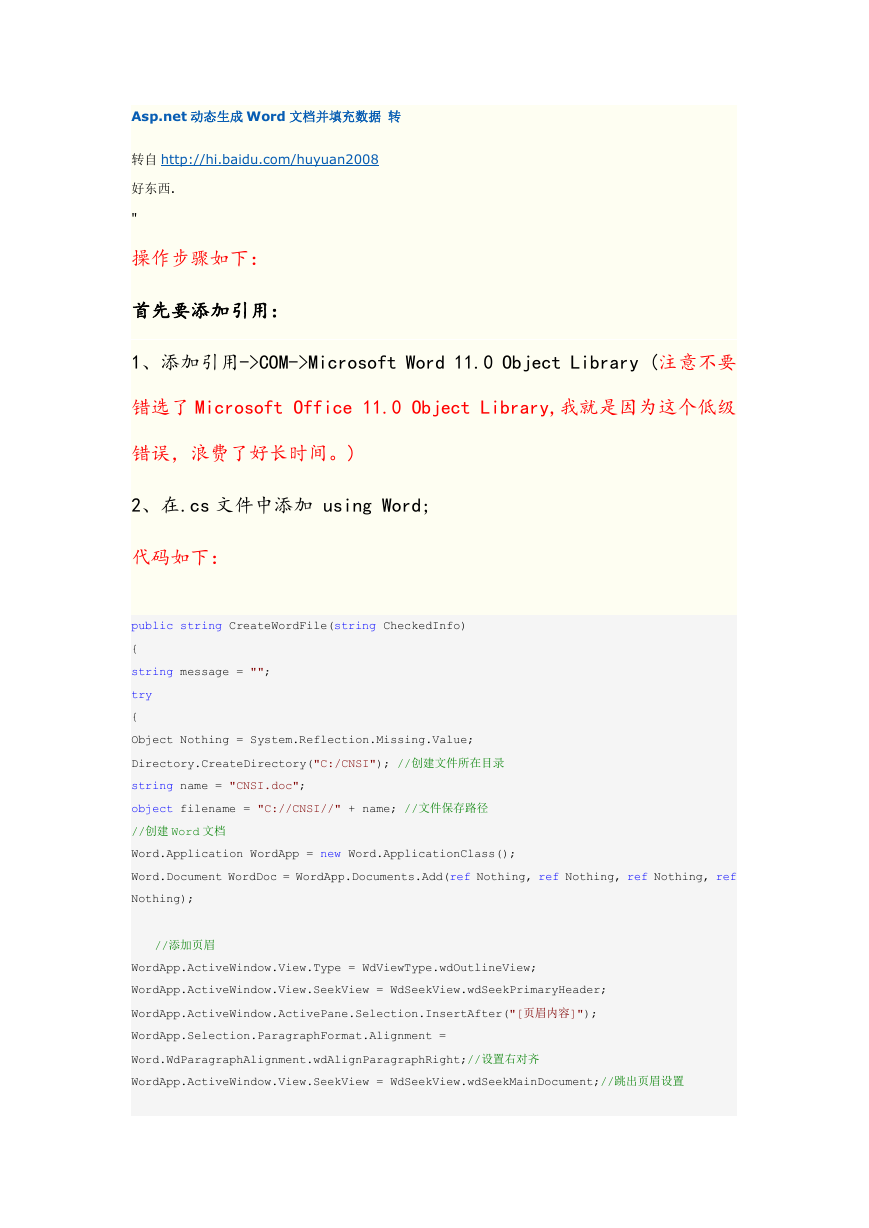
public string CreateWordFile(string CheckedInfo)
{
string message = "";
try
{
Object Nothing = System.Reflection.Missing.Value;
Directory.CreateDirectory("C:/CNSI"); //创建文件所在目录
string name = "CNSI.doc";
object filename = "C://CNSI//" + name; //文件保存路径
//创建 Word 文档
Word.Application WordApp = new Word.ApplicationClass();
Word.Document WordDoc = WordApp.Documents.Add(ref Nothing, ref Nothing, ref Nothing, ref
Nothing);
//添加页眉
WordApp.ActiveWindow.View.Type = WdViewType.wdOutlineView;
WordApp.ActiveWindow.View.SeekView = WdSeekView.wdSeekPrimaryHeader;
WordApp.ActiveWindow.ActivePane.Selection.InsertAfter("[页眉内容]");
WordApp.Selection.ParagraphFormat.Alignment =
Word.WdParagraphAlignment.wdAlignParagraphRight;//设置右对齐
WordApp.ActiveWindow.View.SeekView = WdSeekView.wdSeekMainDocument;//跳出页眉设置
�
WordApp.Selection.ParagraphFormat.LineSpacing = 15f;//设置文档的行间距
/*WordDoc.PageSetup.Orientation = Word.WdOrientation.wdOrientLandscape; //设置页面为纵向
WordDoc.PageSetup.PageHeight = WordApp.CentimetersToPoints(21F);
WordDoc.PageSetup.PageWidth = WordApp.CentimetersToPoints(29.7F);
WordDoc.PageSetup.TopMargin = 57; //设置上边距
WordDoc.PageSetup.BottomMargin = 57;//设置下边距
WordDoc.PageSetup.LeftMargin = 57;//设置左边距
WordDoc.PageSetup.RightMargin = 57;//设置右边距*/
//移动焦点并换行
object count = 14;
object WdLine = Word.WdUnits.wdLine;//换一行;
WordApp.Selection.MoveDown(ref WdLine, ref count, ref Nothing);//移动焦点
WordApp.Selection.TypeParagraph();//插入段落
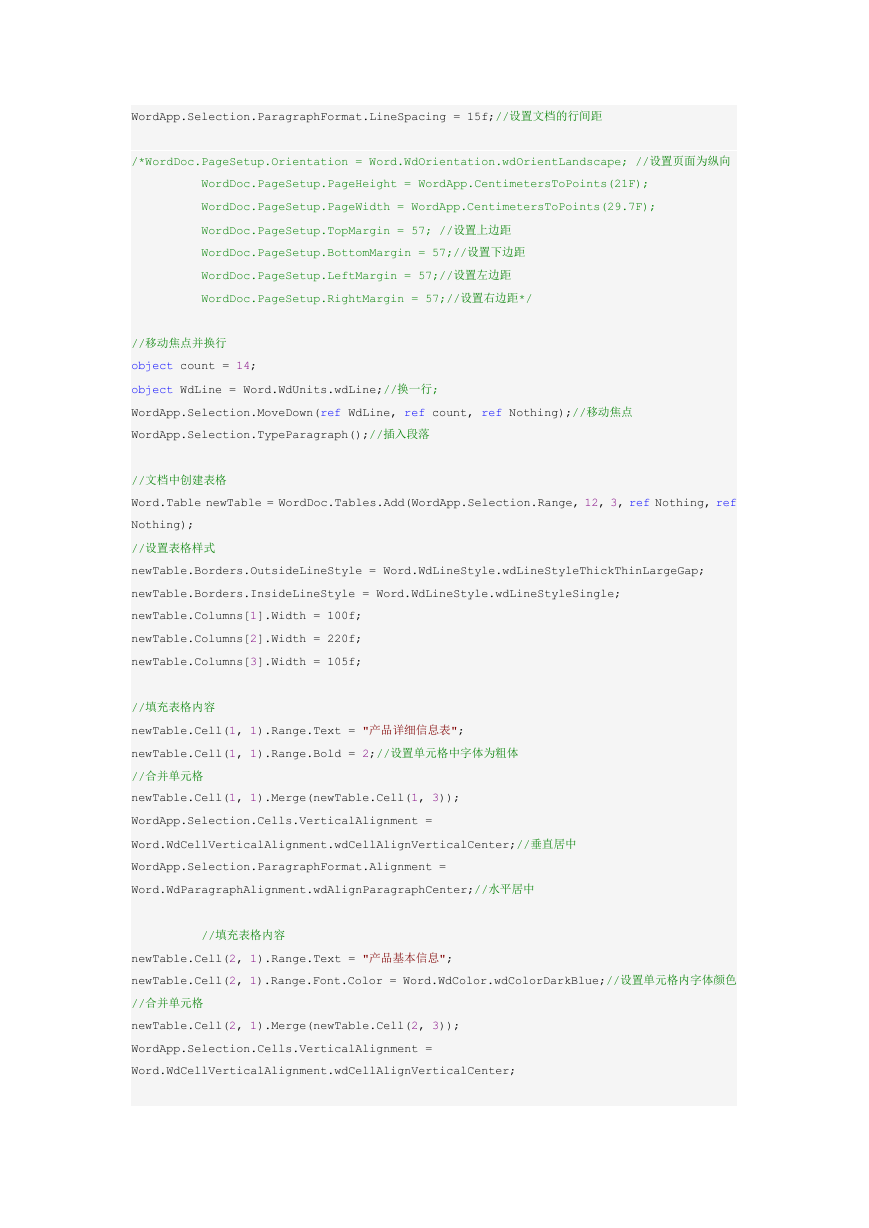
//文档中创建表格
Word.Table newTable = WordDoc.Tables.Add(WordApp.Selection.Range, 12, 3, ref Nothing, ref
Nothing);
//设置表格样式
newTable.Borders.OutsideLineStyle = Word.WdLineStyle.wdLineStyleThickThinLargeGap;
newTable.Borders.InsideLineStyle = Word.WdLineStyle.wdLineStyleSingle;
newTable.Columns[1].Width = 100f;
newTable.Columns[2].Width = 220f;
newTable.Columns[3].Width = 105f;
//填充表格内容
newTable.Cell(1, 1).Range.Text = "产品详细信息表";
newTable.Cell(1, 1).Range.Bold = 2;//设置单元格中字体为粗体
//合并单元格
newTable.Cell(1, 1).Merge(newTable.Cell(1, 3));
WordApp.Selection.Cells.VerticalAlignment =
Word.WdCellVerticalAlignment.wdCellAlignVerticalCenter;//垂直居中
WordApp.Selection.ParagraphFormat.Alignment =
Word.WdParagraphAlignment.wdAlignParagraphCenter;//水平居中
//填充表格内容
newTable.Cell(2, 1).Range.Text = "产品基本信息";
newTable.Cell(2, 1).Range.Font.Color = Word.WdColor.wdColorDarkBlue;//设置单元格内字体颜色
//合并单元格
newTable.Cell(2, 1).Merge(newTable.Cell(2, 3));
WordApp.Selection.Cells.VerticalAlignment =
Word.WdCellVerticalAlignment.wdCellAlignVerticalCenter;
�
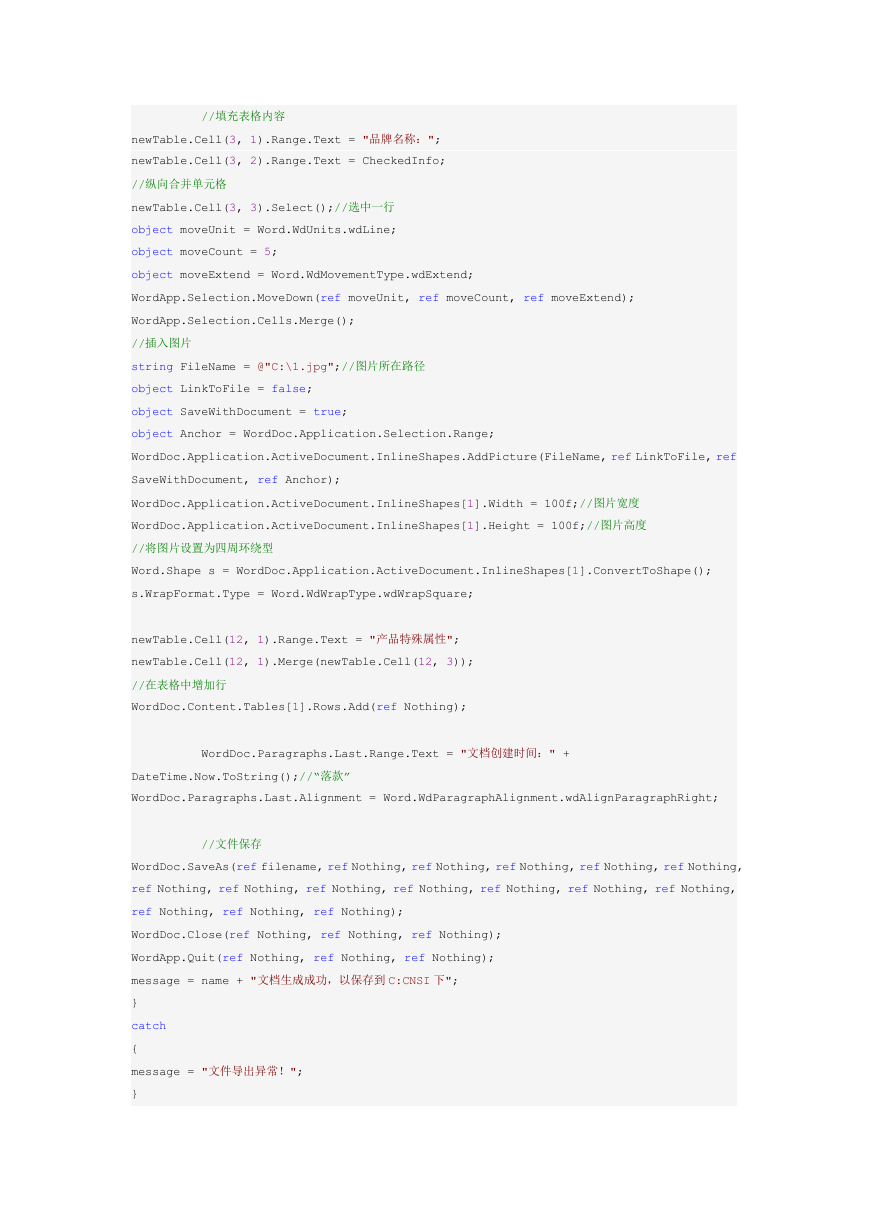
//填充表格内容
newTable.Cell(3, 1).Range.Text = "品牌名称:";
newTable.Cell(3, 2).Range.Text = CheckedInfo;
//纵向合并单元格
newTable.Cell(3, 3).Select();//选中一行
object moveUnit = Word.WdUnits.wdLine;
object moveCount = 5;
object moveExtend = Word.WdMovementType.wdExtend;
WordApp.Selection.MoveDown(ref moveUnit, ref moveCount, ref moveExtend);
WordApp.Selection.Cells.Merge();
//插入图片
string FileName = @"C:\1.jpg";//图片所在路径
object LinkToFile = false;
object SaveWithDocument = true;
object Anchor = WordDoc.Application.Selection.Range;
WordDoc.Application.ActiveDocument.InlineShapes.AddPicture(FileName, ref LinkToFile, ref
SaveWithDocument, ref Anchor);
WordDoc.Application.ActiveDocument.InlineShapes[1].Width = 100f;//图片宽度
WordDoc.Application.ActiveDocument.InlineShapes[1].Height = 100f;//图片高度
//将图片设置为四周环绕型
Word.Shape s = WordDoc.Application.ActiveDocument.InlineShapes[1].ConvertToShape();
s.WrapFormat.Type = Word.WdWrapType.wdWrapSquare;
newTable.Cell(12, 1).Range.Text = "产品特殊属性";
newTable.Cell(12, 1).Merge(newTable.Cell(12, 3));
//在表格中增加行
WordDoc.Content.Tables[1].Rows.Add(ref Nothing);
WordDoc.Paragraphs.Last.Range.Text = "文档创建时间:" +
DateTime.Now.ToString();//“落款”
WordDoc.Paragraphs.Last.Alignment = Word.WdParagraphAlignment.wdAlignParagraphRight;
//文件保存
WordDoc.SaveAs(ref filename, ref Nothing, ref Nothing, ref Nothing, ref Nothing, ref Nothing,
ref Nothing, ref Nothing, ref Nothing, ref Nothing, ref Nothing, ref Nothing, ref Nothing,
ref Nothing, ref Nothing, ref Nothing);
WordDoc.Close(ref Nothing, ref Nothing, ref Nothing);
WordApp.Quit(ref Nothing, ref Nothing, ref Nothing);
message = name + "文档生成成功,以保存到 C:CNSI 下";
}
catch
{
message = "文件导出异常!";
}
�
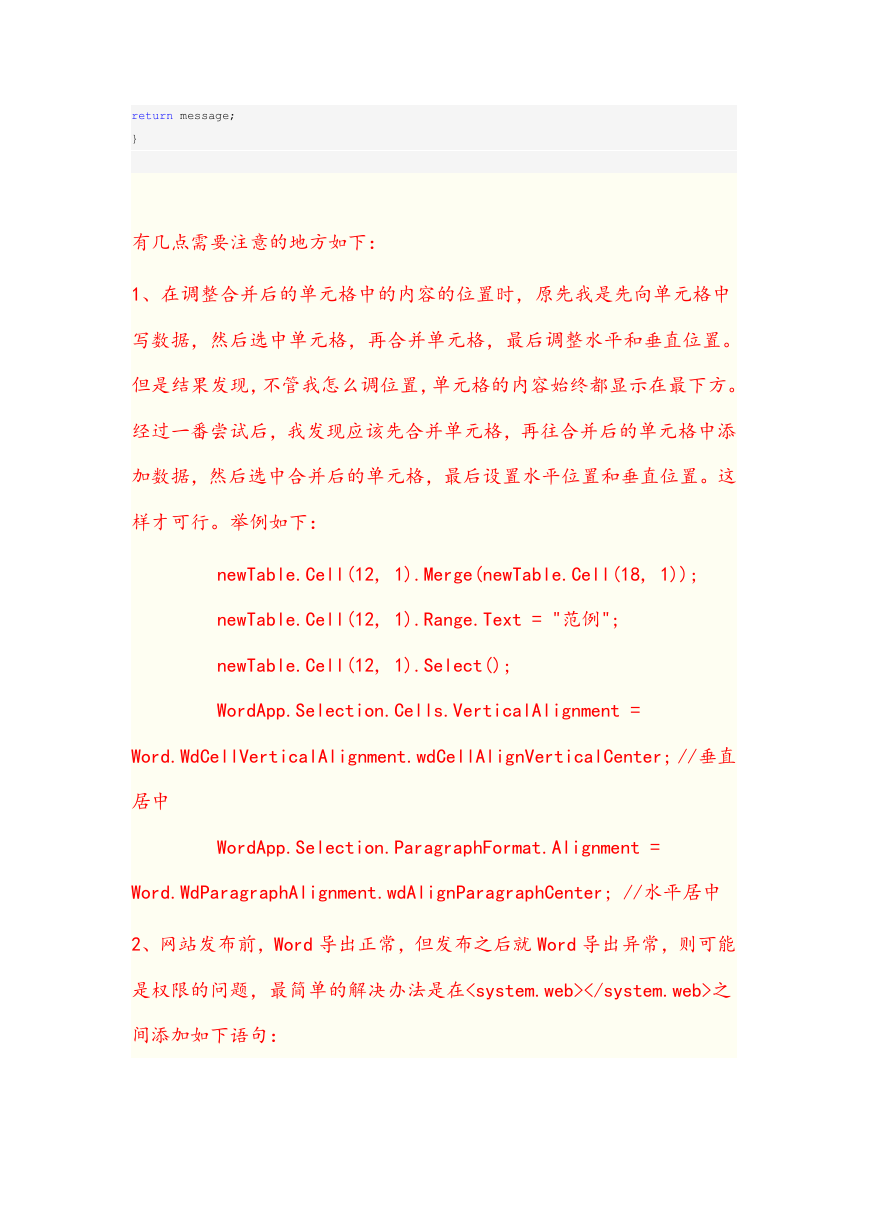
return message;
}
有几点需要注意的地方如下:
1、在调整合并后的单元格中的内容的位置时,原先我是先向单元格中
写数据,然后选中单元格,再合并单元格,最后调整水平和垂直位置。
但是结果发现,不管我怎么调位置,单元格的内容始终都显示在最下方。
经过一番尝试后,我发现应该先合并单元格,再往合并后的单元格中添
加数据,然后选中合并后的单元格,最后设置水平位置和垂直位置。这
样才可行。举例如下:
newTable.Cell(12, 1).Merge(newTable.Cell(18, 1));
newTable.Cell(12, 1).Range.Text = "范例";
newTable.Cell(12, 1).Select();
WordApp.Selection.Cells.VerticalAlignment =
Word.WdCellVerticalAlignment.wdCellAlignVerticalCenter; //垂直
居中
WordApp.Selection.ParagraphFormat.Alignment =
Word.WdParagraphAlignment.wdAlignParagraphCenter; //水平居中
2、网站发布前,Word 导出正常,但发布之后就 Word 导出异常,则可能
是权限的问题,最简单的解决办法是在之
间添加如下语句:
�
,注意密码不能为空或者是弱密码。
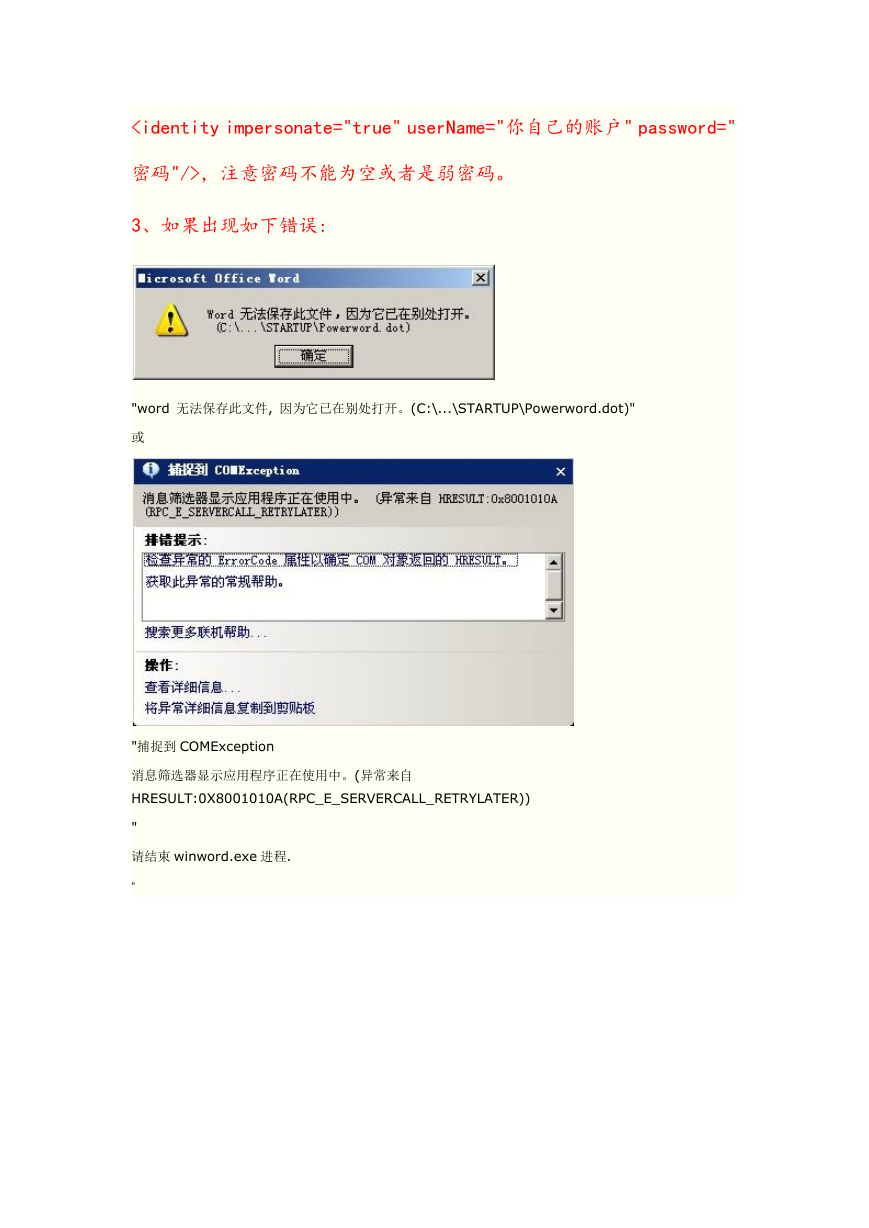
3、如果出现如下错误:
"word 无法保存此文件, 因为它已在别处打开。(C:\...\STARTUP\Powerword.dot)"
或
"捕捉到 COMException
消息筛选器显示应用程序正在使用中。(异常来自
HRESULT:0X8001010A(RPC_E_SERVERCALL_RETRYLATER))
"
请结束 winword.exe 进程.
"
�


 2023年江西萍乡中考道德与法治真题及答案.doc
 2012年重庆南川中考生物真题及答案.doc
 2013年江西师范大学地理学综合及文艺理论基础考研真题.doc
 2020年四川甘孜小升初语文真题及答案I卷.doc
 2020年注册岩土工程师专业基础考试真题及答案.doc
 2023-2024学年福建省厦门市九年级上学期数学月考试题及答案.doc
 2021-2022学年辽宁省沈阳市大东区九年级上学期语文期末试题及答案.doc
 2022-2023学年北京东城区初三第一学期物理期末试卷及答案.doc
 2018上半年江西教师资格初中地理学科知识与教学能力真题及答案.doc
 2012年河北国家公务员申论考试真题及答案-省级.doc
 2020-2021学年江苏省扬州市江都区邵樊片九年级上学期数学第一次质量检测试题及答案.doc
 2022下半年黑龙江教师资格证中学综合素质真题及答案.doc