Color LaserJet Pro MFP M277
Getting Started Guide
IMPORTANT:
Follow Steps 1 - 3 on the printer
hardware setup poster, then
continue with step 4 on the
following page.
EN
ZHCN
4. 在控制面板上进行初始设置 ............................2
5. �选择一种连接方式并准备安装软件 ..............2
6. 找到或下载软件安装文件 .................................2
7. 安装软件 ...................................................................3
8. 移动和无线打印(仅限�dw�和�
c6�型号�-�可选) ....................................................3
9. 设置通过电子邮件的 HP ePrint(可选) ........4
10. 为网络上的打印机设置扫描功能
(可选) .................................................................4
11. 设置传真(可选) .............................................5
故障排除 ......................................................................6
4. Initial setup on the control panel ................................... 7
5. Select a connection method and prepare for
software installation ...................................................... 7
6. Locate or download the software installation files ....... 7
7. Install the software ......................................................... 8
8. Mobile and wireless printing
(dw and c6 models only - optional) ................................ 8
9. Set up HP ePrint via email (optional) .............................. 9
10. Set up scan features for printers on
a network (optional) ..................................................... 9
11. Set up fax (optional) ................................................... 10
Troubleshooting ................................................................ 11
B3Q10-90980_Nebula_GSG_EN_CN.indd 1
11-12-2014 19:00:40
�
4. 在控制面板上进行初始设置
开启打印机之后,等待其初始化。要在触摸屏控制面板上导航,请使用轻触、轻扫和滚动手势。按控制面板上的提示配置以下
这些设置:
• 语言
• 位置
• 默认设置
在“默认设置”下,选择以下某个选项:
• 自我管理:�为向导式设置、配置和更新体验优化的默认设置。
•
IT�管理:�为批量管理和增强安全性优化的默认设置。
初始设置之后,全部设置均可自定义。
注: 选择“打印信息页”以打印一页内容,其中说明如何更改默认设置。
注: 轻触打印机控制面板上的“帮助” �按钮以访问帮助主题。
5. 选择一种连接方式并准备安装软件
USB 直接连接打印机和计算机
请使用�A�接�B�型的�USB�电缆。
Windows
1. 在�Windows(Windows 8、8.1�或�RT 除外)中,安装
软件之前请勿连接�USB 电缆。如果已连接了电缆,则
将其拔下,然后再继续。安装过程将适时提示连接电
缆。
2. 继续执行“找到或下载软件安装文件”。
注:在安装软件期间,选择“使用�USB 电缆直接连接
此计算机”选项。
Mac
1. 对于�Mac,在安装软件之前使用�USB�电缆连接计算机
和打印机。
2. 继续执行“找到或下载软件安装文件”。
有线(以太网)网络连接
使用标准网络电缆。
1. 使用网络电缆连接产品和网络。等待几分钟,让产品
获取网络地址。
2. 在打印机控制面板上,轻触“网络” �按钮。如果已
列出�IP�地址,则网络连接已建立。如果未列出,请等
待几分钟,然后重试。请记下�IP�地址以备安装软件时
使用。IP 地址示例:192.168.0.1
要手动配置�IP�地址,请参阅“手动配置�IP�地址”。
3. 继续执行“找到或下载软件安装文件”。
注:在安装软件期间,选择“通过网络进行连接”选
项。
内置无线网络连接(仅限 dw 和 c6 型号)
1. 要将打印机连接到无线�(Wi-Fi)�网络,请在打印机控制
面板上轻触“无线” �按钮。
2. 轻触“无线”菜单,然后轻触“无线设置向导”。
从�SSID�列表中选择该网络名称,如果未列出该网络名
称,则输入它。
3. 使用键盘输入通行短语,然后轻触“确定”按钮。
4. 等待打印机建立网络连接。
5. 在打印机控制面板上,轻触“网络” �按钮。如果已
列出�IP�地址,则网络连接已建立。如果未列出,请等
待几分钟,然后重试。请记下�IP�地址以备安装软件时
使用。IP 地址示例: 192.168.0.1
6. 要从计算机进行打印,请继续执行“找到或下载软件
安装文件”。要仅从手机或平板电脑进行打印,请继
续执行“移动和无线打印”。
注:在安装软件期间,选择“通过网络进行连接”选
项。
手动配置 IP 地址
有关如何手动配置�IP�地址的信息,请参阅打印机《用户指
南》,网址为�www.hp.com/support/colorljMFPM277。
6. 找到或下载软件安装文件
从打印机 CD 安装
对于�Windows,在打印机附带的�CD�上提供软件安装文件。
对于�OS X,CD�上的安装程序文件中含有从�Web
下载文件的链接。
安装说明
有关打印机软件的更多详细信息,请参阅打印机�CD�上的�
Install Notes(安装说明)文件。
从 Web 下载
1. 访问�www.hp.com/support/colorljMFPM277。
2. 在�Download Options(下载选项)下,依次单击�Drivers
(驱动程序)、Software & Firmware(软件和固件)。
3. 从列表中选择该打印机型号。
4. 选择操作系统。
5.
�决定使用哪个软件选项,然后单击它旁边的 Download (下
载)按钮。
2
B3Q10-90980_Nebula_GSG_EN_CN.indd 2
11-12-2014 19:00:54
�
7. 安装软件
Windows 完整解决方案
1. 将打印机�CD�插入计算机,或启动从�Web�下载的软件
安装文件。
2. 软件安装程序检测操作系统语言,然后以相同语言显
示安装程序的主菜单。从�CD�进行安装时,如果打印
程序在�30�秒后未启动,则浏览计算机上的�CD�驱动器
并启动名为�SETUP.EXE�的文件。
“软件选择”屏幕详细介绍要安装的软件。
• 建议安装的软件包括打印驱动程序和有关产品所有
3.
功能的软件。
• 要自定义所安装的软件,请单击可自定义的软件选
择链接。完成后,单击“下一步”按钮。
4. 按照屏幕上的说明安装软件。
5. 提示选择连接类型时,选择连接类型对应的选项:�
• 使用 USB 电缆直接连接此计算机
• 通过网络进行连接
注: 通过网络进行连接时,检测打印机的最简便方式
为选择“在网络上自动查找我的打印机”。
6. (可选)对于网络上的打印机,在安装软件过程结束
时,使用“传真设置向导”、“扫描到电子邮件向
导”和“扫描到网络文件夹向导”设置传真和扫描功
能。这是配置这些功能的一种简便方式。有关详细信
息,请参阅“为网络上的打印机设置扫描功能”。
3.
OS X 完整解决方案
1. 启动从�Web�下载的软件安装�.dmg�文件。
2. 软件安装程序检测操作系统语言,然后以相同语言显
示安装程序的主菜单。
“安装选项”屏幕详细介绍要安装的软件。
•�
•
�要进行标准安装,现在请单击“安装”按钮。
�要进行自定义安装,请单击“自定义”按钮。在
打开的屏幕上,选择要安装的组件,然后单击“
安装”按钮。
4. 按照屏幕上的说明安装软件。
5. 在安装软件过程结束时,使用�HP Utility 设置助手配置
打印机选项。
OS X 基本安装
要安装基本的打印和传真驱动程序,但不运行�CD�上或从
hp.com�下载的�HP�完整解决方案软件,请执行以下步骤:
1. 将打印机连接到计算机或网络。
2. 从“系统偏好设置”中,单击“打印机与扫描仪”,
然后单击左下角的加号按钮,再选择�M277,其中使
用驱动程序命名的“AirPrint”或“HP�打印机”。
Readiris Pro for HP
下载此免费软件以启用其他扫描功能,包括光学字符识
别�(OCR)。在安装软件期间,单击左侧窗格中的“更多选
项”一项,然后选择“Web 支持”以下载此软件。
要从 Web�下载软件,请访问�
www.hp.com/support/colorljMFPM277,然后依次选择�
Drivers(驱动程序)、Software & Firmware(软件和固
件)。
8. 移动和无线打印(仅限 dw 和 c6 型号 - 可选)
要从手机或平板电脑进行打印,请将该设备与打印机连接到同
一无线网络。
Apple iOS 设备 (AirPrint):�打开要打印的项,然后选择“操作”
图标。依次选择“打印”、本打印机、“打印”。
较新的 Android 设备(4.4 或更高版本):�打开要打印的项,
然后选择“菜单”按钮。依次选择“打印”、本打印机、“打
印”。
某些设备需要从�Google Play�商店下载“HP Print Service�插件”
应用程序。
较旧的 Android 设备(4.3 或更低版本):�从�Google Play�商店
下载“HP ePrint”应用程序。
Windows Phone:�从�Windows�应用商店下载
“HP AiO Remote”应用程序。
Wi-Fi Direct
通过�Wi-Fi Direct,可近距离从无线移动设备直接打印到支持�
Wi-Fi Direct�的打印机,而无需连接到网络或�Internet。
启用 Wi-Fi Direct
1. 在打印机控制面板上,轻触“无线” �按钮。依次轻
触“Wi-Fi Direct”、“设置”。
2. 依次轻触“开/关”、“开”。
3. 要进行安全打印,请依次轻触“安全性”、“开”。记下所
显示的通行短语。使用此通行短语允许访问移动设备。要允
许进行非安全打印,请依次轻触“安全性”、“关”。
有关无线打印和无线设置的详细信息,请访问�
www.hp.com/go/wirelessprinting。
详细了解移动打印
要详细了解其他移动打印选项(包括其
他�ePrint�解决方案),请扫描二维码或
参阅《用户指南》的“移动打印”一
节。
3
B3Q10-90980_Nebula_GSG_EN_CN.indd 3
11-12-2014 19:00:56
�
9. 设置通过电子邮件的 HP ePrint(可选)
使用通过电子邮件的�HP ePrint�打印文档只需从任何支持电子邮件的设备(甚至可从不在同一网络上的设备)�这些�将文档作为电
子邮件附件发送到产品的电子邮件地址即可。
要使用通过电子邮件的�HP ePrint,打印机必须满足以
下这些要求:�
•
•
启用 HP Web 服务
1. 从打印机控制面板上的主屏幕中,轻触“Web�服务” �按钮。
2. 轻触“启用 Web 服务”按钮。随后打印机将启用�Web�服
打印机必须连接到有线或无线网络并可访问�Internet。
打印机上必须启用�HP Web�服务,并且打印机必须注册到�
HP Connected。
务,然后打印一张信息页。该信息页包含在�HP Connected
注册�HP�产品所需的打印机代码。
3. 访问�www.hpconnected.com 以创建�HP ePrint�帐户并完成设
置过程。
10. 为网络上的打印机设置扫描功能(可选)
打印机具有“扫描到电子邮件”和“扫描到网络文件夹”功能,扫描文件后可将其作为电子邮件附件发送或将其保存在网络上
的文件夹中。打印机必须连接到有线或无线网络。要配置这些选项,首先请获取以下信息:
•
对于“扫描到电子邮件”功能,获取 SMTP�服务器名称、SMTP�端口号和身份验证信息。有关此信息,请与电子邮件/Internet
服务提供商或系统管理员联系。通常很容易找到�SMTP�服务器名称和端口号,只需在�Internet�上搜索一下即可。例如,搜
索“gmail smtp�服务器名称”或“yahoo smtp�服务器名称”等词语。
对于“扫描到网络文件夹”功能,确认设置了具有适当权限的共享网络文件夹,并且知道该文件夹在网络上的路径。
注: 有关设置“扫描到电子邮件”和“扫描到网络文件夹”的更多帮助,请参阅《用户指南》,或访问�
www.hp.com/support/colorljMFPM277�并使用“扫描到电子邮件”或“扫描到网络文件夹”词语进行搜索。
•
OS X
通过单击�Dock�上的�HP Utility�图标,打开�HP Utility,或单
击“前往”菜单,然后双击 HP Utility。
扫描到电子邮件
1. 依次单击“系统”选项卡、“管理”链接,然后将
“扫描到电子邮件”选项设置为“开”。
2. 依次单击“扫描”选项卡、“外发电子邮件配置文
件”链接、“新建”按钮。
3. 在“电子邮件地址”区域中,填写必填字段。
4. 在“SMTP 服务器设置”区域中,填写必填字段。
注: 大多数情况下不需要更改默认端口号。
5. 如果�SMTP�服务器要求进行身份验证才能发送电子邮
件,则填写“SMTP 身份验证”区域中的必填字段。
创建安全�PIN�为可选操作。
6. 在“电子邮件首选项”区域中配置电子邮件首选项。
7.� 检查所有信息,然后单击“保存并测试”。
扫描到网络文件夹
1. 依次单击“系统”选项卡、“管理”链接,然后将
“扫描到网络文件夹”选项设置为“开”。
2. 单击“扫描”选项卡,确保突出显示“网络文件夹设
置”链接。
3. 在“网络文件夹配置”页面上,单击“新建”按钮。
4. 在“网络文件夹配置”区域中,填写必填字段。创建
安全�PIN�为可选操作。
5. 在“扫描设置”区域中,填写必填字段。
6. 检查所有信息,然后单击“保存并测试”。
Windows
某些�HP�产品从软件�CD�中安装驱动程序。此安装过程结
束时有一个设置‘扫描到文件夹和电子邮件’选项。这
些设置向导中含有基本配置的选项。
扫描到电子邮件设置向导
1. 依次单击“开始”、“程序”。
2. 依次单击“HP”、产品名称、“扫描到电子邮件向
导”。
3. 在“外发电子邮件配置文件”对话框中,单击“新
建”按钮。随后将打开“扫描到电子邮件设置”对话
框。
4. 在“1. 开始”页面上,输入“电子邮件地址”和“显
示名称”,然后单击“下一步”。创建安全�PIN�为可
选操作。
5. 在“2. 身份验证”页面上,输入“SMTP 服务器”
和“端口号”。
注: 大多数情况下不需要更改默认端口号。
6. 如果使用�Google™ Gmail�电子邮件服务,则选中始终
使用安全连接 (SSL/TLS)�复选框。
7.� 如果�SMTP�服务器要求进行身份验证才能发送电子邮
件,则选中“电子邮件登录身份验证”复选框,然后
输入用户�ID�和密码。单击“下一步”。
8. 在“4. 完成”页面上,确认所有设置均正确无误,然
后单击“完成”。
扫描到网络文件夹设置向导
1. 依次单击“开始”、“程序”。
2. 依次单击“HP”、产品名称、“扫描到网络文件夹”
向导。
3. 在“网络文件夹配置文件”对话框中,单击“新建”
按钮。随后将打开“扫描到网络文件夹”对话框。
4. 在“1. 开始”页面上,输入“显示名称”和“目标文
件夹”,然后单击“下一步”。
提示: 单击“浏览”按钮以查找该文件夹。
5. 要在计算机桌面上创建该网络文件夹的快捷方式,请
选中“创建网络文件夹的桌面快捷方式”复选框,然
后单击“下一步”。创建安全�PIN�为可选操作。
6. 在“2. 身份验证”页面上,输入�Windows®�用户名和
密码,然后单击“下一步”。
7.� 在“3. 配置”页面上,确保默认扫描设置正确无误,
然后在“文件名前缀”字段中输入文件名前缀,再单
击“下一步”。
8. 在“4. 完成”页面上,确认所有设置均正确无误,然
后单击“保存并测试”。
9. 单击“完成”以完成配置。
B3Q10-90980_Nebula_GSG_EN_CN.indd 4
11-12-2014 19:01:13
4
�
11. 设置传真(可选)
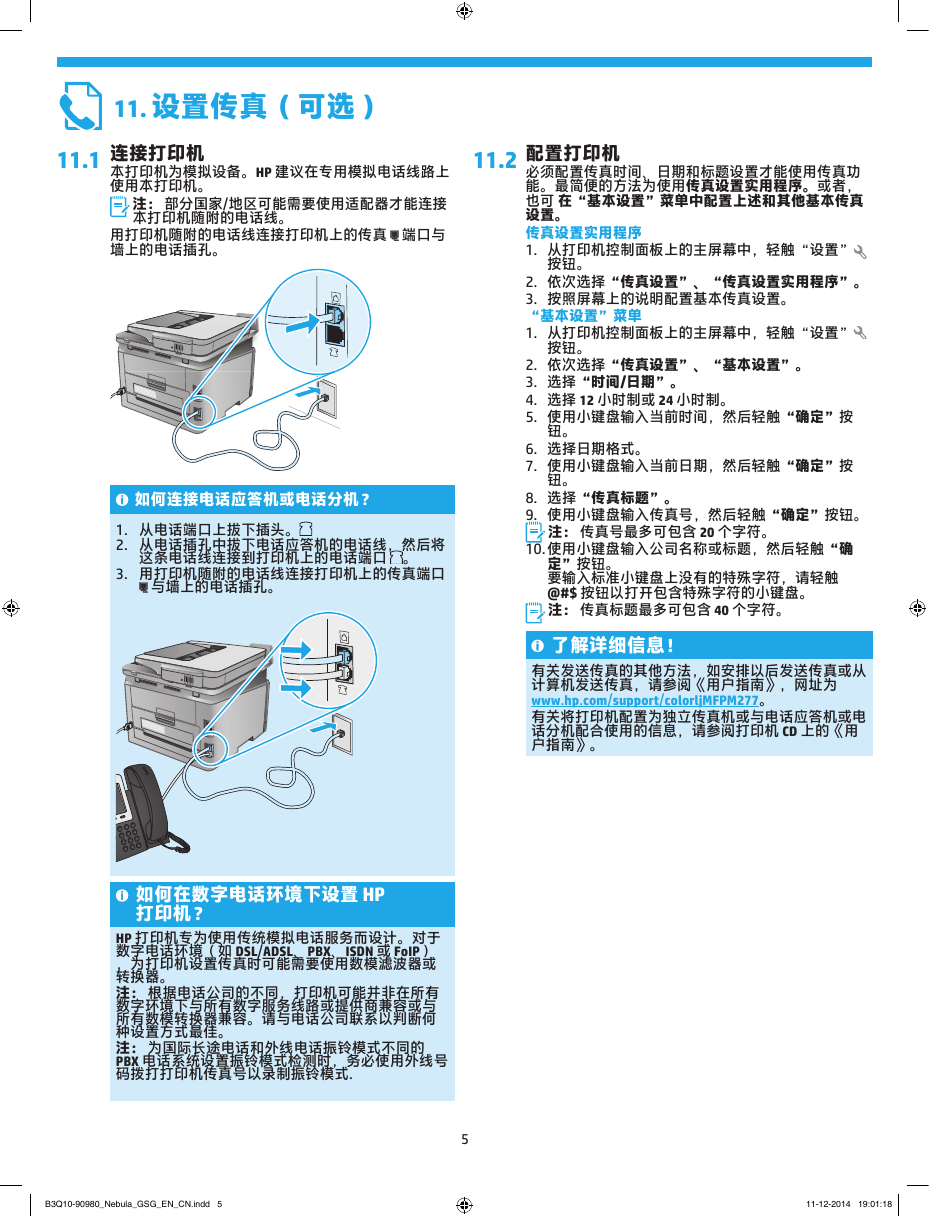
11.1
连接打印机
本打印机为模拟设备。HP�建议在专用模拟电话线路上
使用本打印机。
注: 部分国家/地区可能需要使用适配器才能连接
本打印机随附的电话线。
用打印机随附的电话线连接打印机上的传真�
墙上的电话插孔。
�端口与
11.2
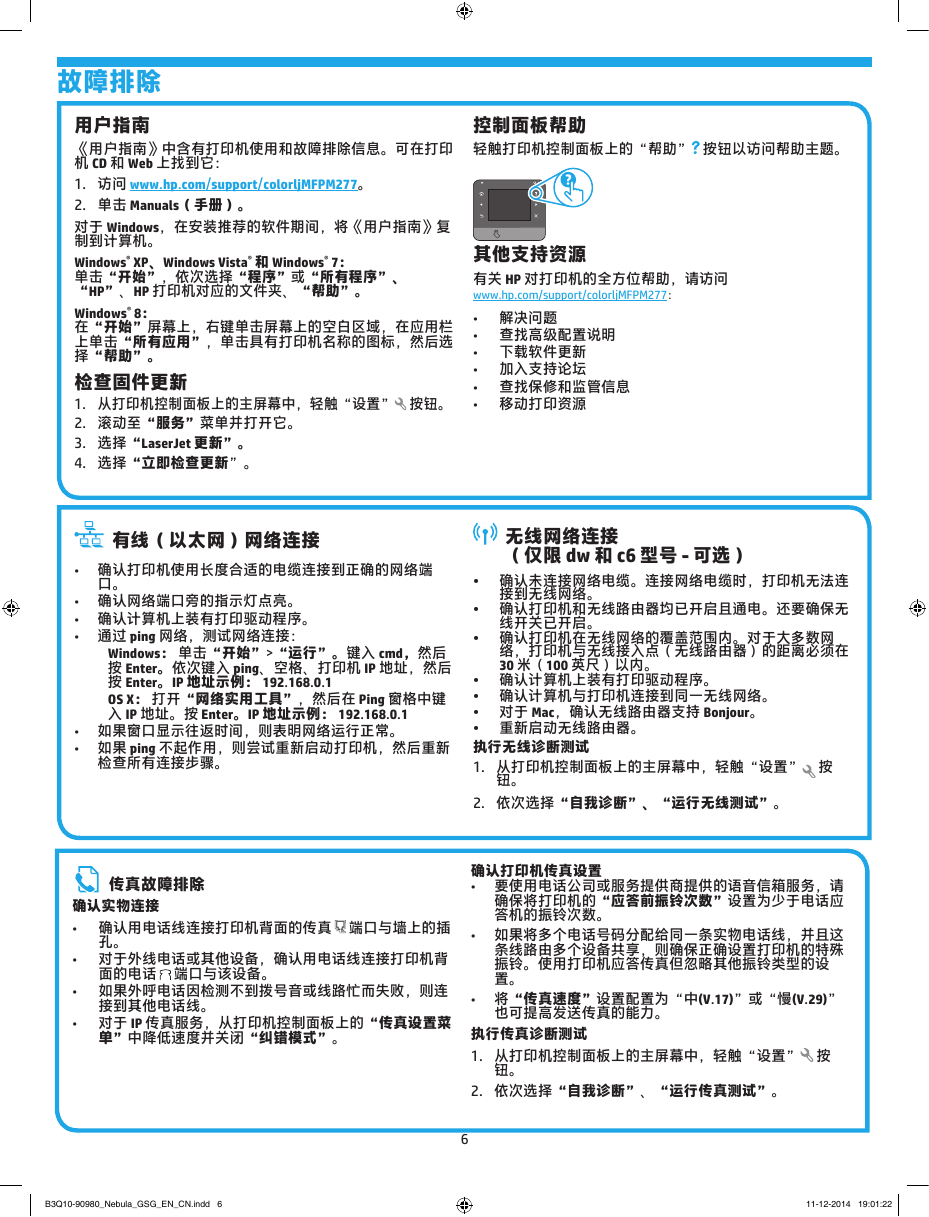
如何连接电话应答机或电话分机?
1. 从电话端口上拔下插头。
2. 从电话插孔中拔下电话应答机的电话线,然后将
这条电话线连接到打印机上的电话端口� 。
3. 用打印机随附的电话线连接打印机上的传真端口�
�与墙上的电话插孔。
配置打印机
必须配置传真时间、日期和标题设置才能使用传真功
能。最简便的方法为使用传真设置实用程序。或者,
也可�在“基本设置”菜单中配置上述和其他基本传真
设置。
传真设置实用程序
1. 从打印机控制面板上的主屏幕中,轻触“设置”
按钮。
2. 依次选择“传真设置”、“传真设置实用程序”。
3. 按照屏幕上的说明配置基本传真设置。
“基本设置”菜单
1. 从打印机控制面板上的主屏幕中,轻触“设置”
按钮。
2. 依次选择“传真设置”、“基本设置”。
3. 选择“时间/日期”。
4. 选择�12�小时制或�24�小时制。
5. 使用小键盘输入当前时间,然后轻触“确定”按
钮。
6. 选择日期格式。
7.� 使用小键盘输入当前日期,然后轻触“确定”按
钮。
8. 选择“传真标题”。
9. 使用小键盘输入传真号,然后轻触“确定”按钮。
注: 传真号最多可包含�20�个字符。
10. 使用小键盘输入公司名称或标题,然后轻触“确
定”按钮。
要输入标准小键盘上没有的特殊字符,请轻触�
@#$�按钮以打开包含特殊字符的小键盘。
注: 传真标题最多可包含�40�个字符。
了解详细信息!
有关发送传真的其他方法,如安排以后发送传真或从
计算机发送传真,请参阅《用户指南》,网址为�
www.hp.com/support/colorljMFPM277。
有关将打印机配置为独立传真机或与电话应答机或电
话分机配合使用的信息,请参阅打印机�CD�上的《用
户指南》。
如何在数字电话环境下设置 HP
打印机?
HP�打印机专为使用传统模拟电话服务而设计。对于
数字电话环境(如�DSL/ADSL、PBX、ISDN�或�FoIP)
,为打印机设置传真时可能需要使用数模滤波器或
转换器。
注: 根据电话公司的不同,打印机可能并非在所有
数字环境下与所有数字服务线路或提供商兼容或与
所有数模转换器兼容。请与电话公司联系以判断何
种设置方式最佳。
注: 为国际长途电话和外线电话振铃模式不同的�
PBX�电话系统设置振铃模式检测时,务必使用外线号
码拨打打印机传真号以录制振铃模式.
5
B3Q10-90980_Nebula_GSG_EN_CN.indd 5
11-12-2014 19:01:18
�
故障排除
用户指南
《用户指南》中含有打印机使用和故障排除信息。可在打印
机�CD�和�Web�上找到它:
1. 访问�www.hp.com/support/colorljMFPM277。
2. 单击�Manuals(手册)。
对于�Windows,在安装推荐的软件期间,将《用户指南》复
制到计算机。
Windows® XP、Windows Vista® 和 Windows® 7:
单击“开始”,依次选择“程序”或“所有程序”、
“HP”、HP�打印机对应的文件夹、“帮助”。
Windows® 8:
在“开始”屏幕上,右键单击屏幕上的空白区域,在应用栏
上单击“所有应用”,单击具有打印机名称的图标,然后选
择“帮助”。
检查固件更新
1. 从打印机控制面板上的主屏幕中,轻触“设置” �按钮。
2. 滚动至“服务”菜单并打开它。
3. 选择“LaserJet 更新”。
4. 选择“立即检查更新”。
有线(以太网)网络连接
确认打印机使用长度合适的电缆连接到正确的网络端
口。
•
• 确认网络端口旁的指示灯点亮。
• 确认计算机上装有打印驱动程序。
• 通过�ping�网络,测试网络连接:
Windows: 单击“开始”>“运行”。键入�cmd,然后
按�Enter。依次键入�ping、空格、打印机�IP�地址,然后
按�Enter。IP 地址示例: 192.168.0.1
OS X: 打开“网络实用工具”,然后在�Ping�窗格中键
入�IP�地址。按 Enter。IP 地址示例: 192.168.0.1
• 如果窗口显示往返时间,则表明网络运行正常。
•
如果�ping�不起作用,则尝试重新启动打印机,然后重新
检查所有连接步骤。
传真故障排除
确认实物连接
•
�端口与墙上的插
确认用电话线连接打印机背面的传真�
孔。
对于外线电话或其他设备,确认用电话线连接打印机背
面的电话�
如果外呼电话因检测不到拨号音或线路忙而失败,则连
接到其他电话线。
对于�IP�传真服务,从打印机控制面板上的“传真设置菜
单”中降低速度并关闭“纠错模式”。
�端口与该设备。
•
•
•
控制面板帮助
轻触打印机控制面板上的“帮助” �按钮以访问帮助主题。
其他支持资源
有关�HP�对打印机的全方位帮助,请访问�
www.hp.com/support/colorljMFPM277:
• 解决问题
• 查找高级配置说明
• 下载软件更新
• 加入支持论坛
• 查找保修和监管信息
• 移动打印资源
•
•
•
无线网络连接
(仅限 dw 和 c6 型号 - 可选)
确认未连接网络电缆。连接网络电缆时,打印机无法连
接到无线网络。
确认打印机和无线路由器均已开启且通电。还要确保无
线开关已开启。
�确认打印机在无线网络的覆盖范围内。对于大多数网
络,打印机与无线接入点(无线路由器)的距离必须在�
30�米(100�英尺)以内。
确认计算机上装有打印驱动程序。
确认计算机与打印机连接到同一无线网络。
对于�Mac,确认无线路由器支持�Bonjour。
重新启动无线路由器。
•
•
•
•
执行无线诊断测试
1. 从打印机控制面板上的主屏幕中,轻触“设置” �按
钮。
2. 依次选择“自我诊断”、“运行无线测试”。
确认打印机传真设置
•
要使用电话公司或服务提供商提供的语音信箱服务,请
确保将打印机的“应答前振铃次数”设置为少于电话应
答机的振铃次数。
如果将多个电话号码分配给同一条实物电话线,并且这
条线路由多个设备共享,则确保正确设置打印机的特殊
振铃。使用打印机应答传真但忽略其他振铃类型的设
置。
将“传真速度”设置配置为“中(V.17)”或“慢(V.29)”
也可提高发送传真的能力。
•
•
执行传真诊断测试
1. 从打印机控制面板上的主屏幕中,轻触“设置” �按
钮。
2. 依次选择“自我诊断”、“运行传真测试”。
6
B3Q10-90980_Nebula_GSG_EN_CN.indd 6
11-12-2014 19:01:22
�
4. Initial setup on the control panel
After turning on the printer, wait for it to initialize. To navigate the touchscreen control panel, use touch, swipe, and scroll gestures.
Follow the prompts on the control panel to configure these settings:
•
•
• Default Settings
Under Default Settings select one of these options:
•
•
Self-managed: Optimized default settings for a guided experience on setups, configurations, and updates.
IT-managed: Optimized default settings for fleet manageability with enhanced security.
Language
Location
Settings are fully customizable after initial setup.
NOTE: Select Print Information Page to print a page that instructs how to change the default settings.
NOTE: Touch the Help
button on the printer control panel to access help topics.
5. Select a connection method and prepare for software installation
USB connection directly between the
printer and the computer
Use an A-to-B type USB cable.
Windows
1. For Windows, except Windows 8, 8.1, or RT, do not connect the
USB cable before installing the software. If the cable is already
connected, disconnect it before continuing. The installation
process prompts to connect the cable at the appropriate time.
2. Continue with “Locate or download the software installation files.”
NOTE: During software installation, select the option to “Directly
connect this computer using a USB cable.”
Mac
1. For Mac, connect the USB cable between the computer and the
printer before installing the software.
2. Continue with “Locate or download the software installation files.”
Wired (Ethernet) network connection
Use a standard network cable.
1. Connect the network cable to the printer and to the network. Wait
a few minutes for the printer to acquire a network address.
2. On the printer control panel, touch the Network
button. If an IP
address is listed, the network connection has been established. If
not, wait a few more minutes and try again. Note the IP address for
use during software installation. Example IP address: 192.168.0.1
To manually configure the IP address, see “Manually configure the
IP address.”
3. Continue with “Locate or download the software installation files.”
NOTE: During software installation, select the option to “Connect
through a network.”
Built-in wireless network connection
(dw and c6 models only)
1. To connect the printer to a wireless (Wi-Fi) network, on the
printer control panel, touch the Wireless
button.
2. Touch Wireless Menu, and then touch Wireless Setup Wizard.
Select the network name from the SSID list, or enter the network
name if it is not listed.
3. Use the keyboard to enter the passphrase, and then touch the OK
button.
4. Wait while the printer establishes a network connection.
5. On the printer control panel, touch the Network
button.
If an IP address is listed, the network connection has been
established. If not, wait a few more minutes and try again. Note
the IP address for use during software installation. Example IP
address: 192.168.0.1
6. To print from a computer, continue with “Locate or download the
software installation files.” To print from a phone or tablet only,
continue with “Mobile and wireless printing.”
NOTE: During software installation, select the option to “Connect
through a network.”
Manually configure the IP address
See the printer User Guide for information on how to manually
configure the IP address www.hp.com/support/colorljMFPM277.
6. Locate or download the software installation files
Install from the printer CD
For Windows, the software installation files are provided on the CD that
came with the printer.
For OS X, the installer file on the CD includes a link to download the files from
the Web.
Install Notes
For more details about the software for the printer, see the Install Notes
file on the printer CD.
7
Download from the Web
1. Go to www.hp.com/support/colorljMFPM277.
2. Under Download options, click Drivers, and then click Software &
Firmware.
3. Select the printer model from the list.
4. Select the operating system.
5. Determine which software option to use, and then click the Download
button next to it.
B3Q10-90980_Nebula_GSG_EN_CN.indd 7
11-12-2014 19:01:26
�
7. Install the software
Windows full solution
1.
Insert the printer CD into the computer, or launch the software
installation file downloaded from the Web.
2. The software installer detects the language of the operating
system, and then it displays the main menu of the installation
program in the same language. When installing from the CD, if
the installer program does not start after 30 seconds, browse the
CD drive on the computer and launch the file named SETUP.EXE.
3. The Software Selection screen details the software to be
installed.
• The recommended software installation includes the print
driver and software for all available printer features.
• To customize the software installed, click the Customizable
software selections link. When finished, click the Next button.
4. Follow the on-screen instructions to install the software.
5. When prompted to select a connection type, select the
appropriate option for the type of connection:
• Directly connect this computer using a USB cable
• Connect through a network
NOTE: When connecting through a network, the easiest way to
detect the printer is to select Automatically find my printer on
the network.
(Optional) For printers on a network, at the end of the software
installation process, set up fax and scan features by using the
Fax Setup Wizard, Scan to E-mail Wizard, and the Scan to
Network Folder Wizard. This is a convenient way to configure
these features. See “Set up scan features for printers on a
network” for more information.
6.
OS X full solution
1. Launch the software installation .dmg file that you downloaded
from the Web.
2. The software installer detects the language of the operating
system, and then it displays the main menu of the installation
program in the same language.
3. The Installation Options screen details the software to be
installed.
• For a standard installation, click the Install button now.
• For a custom installation, click the Customize button. On the
screen that opens, select the components to install, and then
click the Install button.
4. Follow the on-screen instructions to install the software.
5. At the end of the software installation process, use the HP Utility
Setup Assistant to configure printer options.
OS X basic installation
To install basic print and fax drivers without running the HP full
solution software from CD or hp.com download, follow these steps:
1. Connect the printer to the computer or network.
2. From System Preferences, click Printers and Scanners, then the
plus button on the bottom left, and select M277 using the driver
named either AirPrint or HP Printer.
Readiris Pro for HP
Download this free software to enable extra scanning features,
including Optical Character Recognition (OCR). During software
installation, click the More Options item in the left pane, and then
select Web Support to download this software.
To download the software from the Web, go to
www.hp.com/support/colorljMFPM277, select Drivers, and then click
Software & Firmware.
8. Mobile and wireless printing (dw and c6 models only - optional)
To print from a phone or tablet, connect the device to the same wireless
network
as the printer.
Apple iOS devices (AirPrint): Open the item to print, and select the Action
icon.
Select Print, select the printer, and then select Print.
Newer Android devices (4.4 or newer): Open the item to print, and select the
Menu button. Select Print, select the printer, and select Print.
Some devices require downloading the HP Print Service plugin app from the
Google Play store.
Older Android Devices (4.3 or older): Download the HP ePrint app from the
Google Play store.
Windows Phone: Download the HP AiO Remote app from the Windows Store.
Learn More About Mobile Printing
To learn more about other mobile printing options,
including additional ePrint solutions, scan the QR
code, or see the “Mobile printing” section of the
user guide.
Wi-Fi Direct
Wi-Fi Direct enables close-proximity printing from a wireless mobile device
directly to an Wi-Fi Direct-enabled printer without requiring a connection to a
network or the Internet.
Enable Wi-Fi Direct
1. On the printer control panel, touch the Wireless
Wireless Menu, and then touch Wireless Direct.
button. Touch
2. Touch On/Off, and then touch On.
3. For secure printing, touch Security, and then touch On. Note the
passphrase that displays. Use this passphrase to allow access to the
mobile devices.
To allow unsecured printing, touch Security, and then touch Off.
For more information on wireless printing and wireless setup, go to
www.hp.com/go/wirelessprinting.
B3Q10-90980_Nebula_GSG_EN_CN.indd 8
11-12-2014 19:01:27
8
�


 2023年江西萍乡中考道德与法治真题及答案.doc
 2012年重庆南川中考生物真题及答案.doc
 2013年江西师范大学地理学综合及文艺理论基础考研真题.doc
 2020年四川甘孜小升初语文真题及答案I卷.doc
 2020年注册岩土工程师专业基础考试真题及答案.doc
 2023-2024学年福建省厦门市九年级上学期数学月考试题及答案.doc
 2021-2022学年辽宁省沈阳市大东区九年级上学期语文期末试题及答案.doc
 2022-2023学年北京东城区初三第一学期物理期末试卷及答案.doc
 2018上半年江西教师资格初中地理学科知识与教学能力真题及答案.doc
 2012年河北国家公务员申论考试真题及答案-省级.doc
 2020-2021学年江苏省扬州市江都区邵樊片九年级上学期数学第一次质量检测试题及答案.doc
 2022下半年黑龙江教师资格证中学综合素质真题及答案.doc