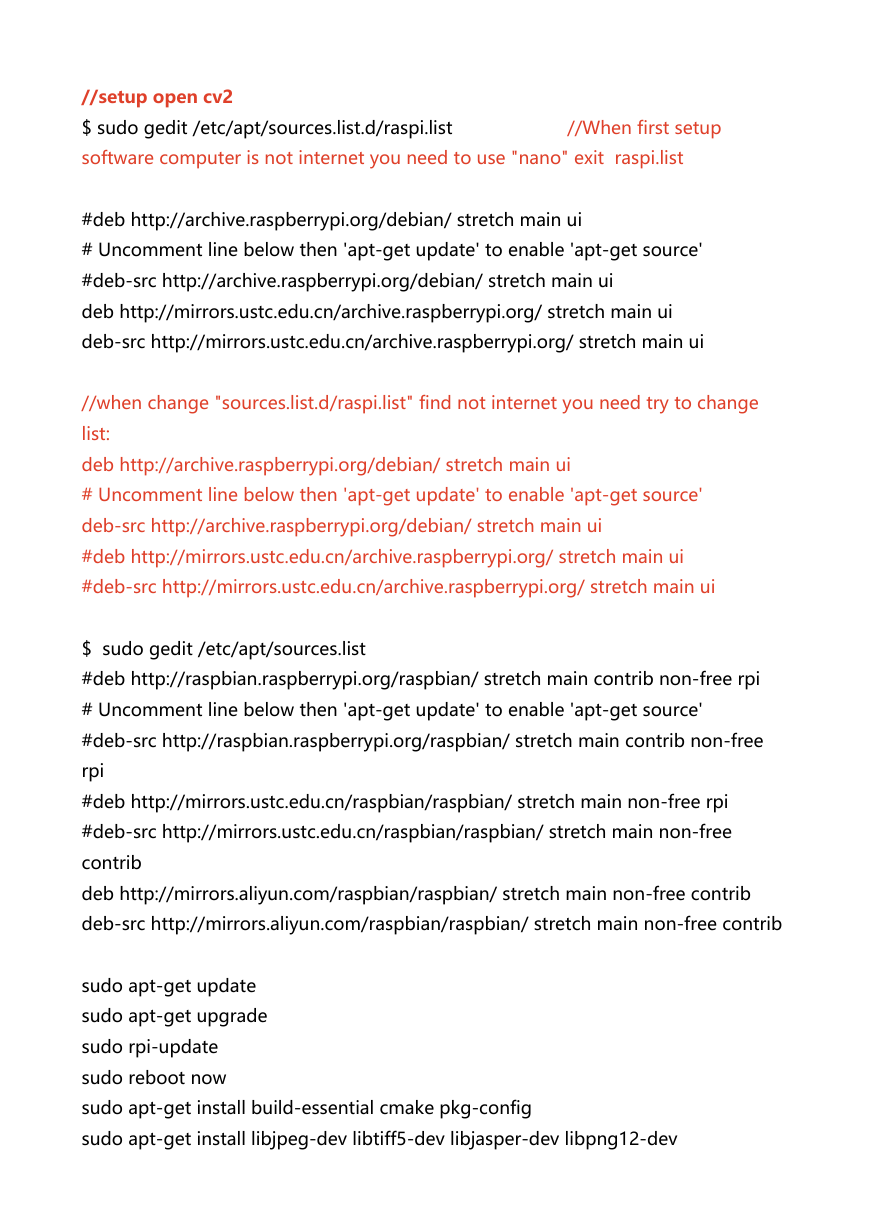
//setup open cv2
$ sudo gedit /etc/apt/sources.list.d/raspi.list //When first setup
software computer is not internet you need to use "nano" exit raspi.list
#deb http://archive.raspberrypi.org/debian/ stretch main ui
# Uncomment line below then 'apt-get update' to enable 'apt-get source'
#deb-src http://archive.raspberrypi.org/debian/ stretch main ui
deb http://mirrors.ustc.edu.cn/archive.raspberrypi.org/ stretch main ui
deb-src http://mirrors.ustc.edu.cn/archive.raspberrypi.org/ stretch main ui
//when change "sources.list.d/raspi.list" find not internet you need try to change
list:
deb http://archive.raspberrypi.org/debian/ stretch main ui
# Uncomment line below then 'apt-get update' to enable 'apt-get source'
deb-src http://archive.raspberrypi.org/debian/ stretch main ui
#deb http://mirrors.ustc.edu.cn/archive.raspberrypi.org/ stretch main ui
#deb-src http://mirrors.ustc.edu.cn/archive.raspberrypi.org/ stretch main ui
$ sudo gedit /etc/apt/sources.list
#deb http://raspbian.raspberrypi.org/raspbian/ stretch main contrib non-free rpi
# Uncomment line below then 'apt-get update' to enable 'apt-get source'
#deb-src http://raspbian.raspberrypi.org/raspbian/ stretch main contrib non-free
rpi
#deb http://mirrors.ustc.edu.cn/raspbian/raspbian/ stretch main non-free rpi
#deb-src http://mirrors.ustc.edu.cn/raspbian/raspbian/ stretch main non-free
contrib
deb http://mirrors.aliyun.com/raspbian/raspbian/ stretch main non-free contrib
deb-src http://mirrors.aliyun.com/raspbian/raspbian/ stretch main non-free contrib
sudo apt-get update
sudo apt-get upgrade
sudo rpi-update
sudo reboot now
sudo apt-get install build-essential cmake pkg-config
sudo apt-get install libjpeg-dev libtiff5-dev libjasper-dev libpng12-dev
�
sudo apt-get install libgtk2.0-dev libgstreamer0.10-0-dbg libgstreamer0.10-0
libgstreamer0.10-dev libv4l-0 libv4l-dev //若出现问题可以将错误复制到网页中搜索可
以解决,好像是移除一个文件,具体的解决办法没有被记录
sudo apt-get install libavcodec-dev libavformat-dev libswscale-dev libv4l-dev
sudo apt-get install libxvidcore-dev libx264-dev
sudo apt-get install libatlas-base-dev gfortran
sudo apt-get install python-numpy python-scipy python-matplotlib
sudo apt-get install default-jdk ant
sudo apt-get install libgtkglext1-dev
sudo apt-get install v4l-utils
wget https://bootstrap.pypa.io/get-pip.py
sudo python get-pip.py
sudo apt-get install python2.7-dev
sudo pip install numpy
cd ~
wget -O opencv.zip https://github.com/Itseez/opencv/archive/3.2.0.zip
unzip opencv.zip
wget -O opencv_contrib.zip
https://github.com/Itseez/opencv_contrib/archive/3.2.0.zip
unzip opencv_contrib.zip
cd ~/opencv-3.2.0/
mkdir build
cd build
cmake -D CMAKE_BUILD_TYPE=RELEASE \
sudo make -j3
//when execute "sudo make -j3" you should execute next two step continue
execute"sudo make -j3"
sudo make clean
sudo make
-D CMAKE_INSTALL_PREFIX=/usr/local \
-D INSTALL_C_EXAMPLES=OFF \
-D INSTALL_PYTHON_EXAMPLES=ON \
-D OPENCV_EXTRA_MODULES_PATH=~/opencv_contrib-3.2.0/modules \
-D BUILD_EXAMPLES=ON \
-D ENABLE_NEON=ON ..
�
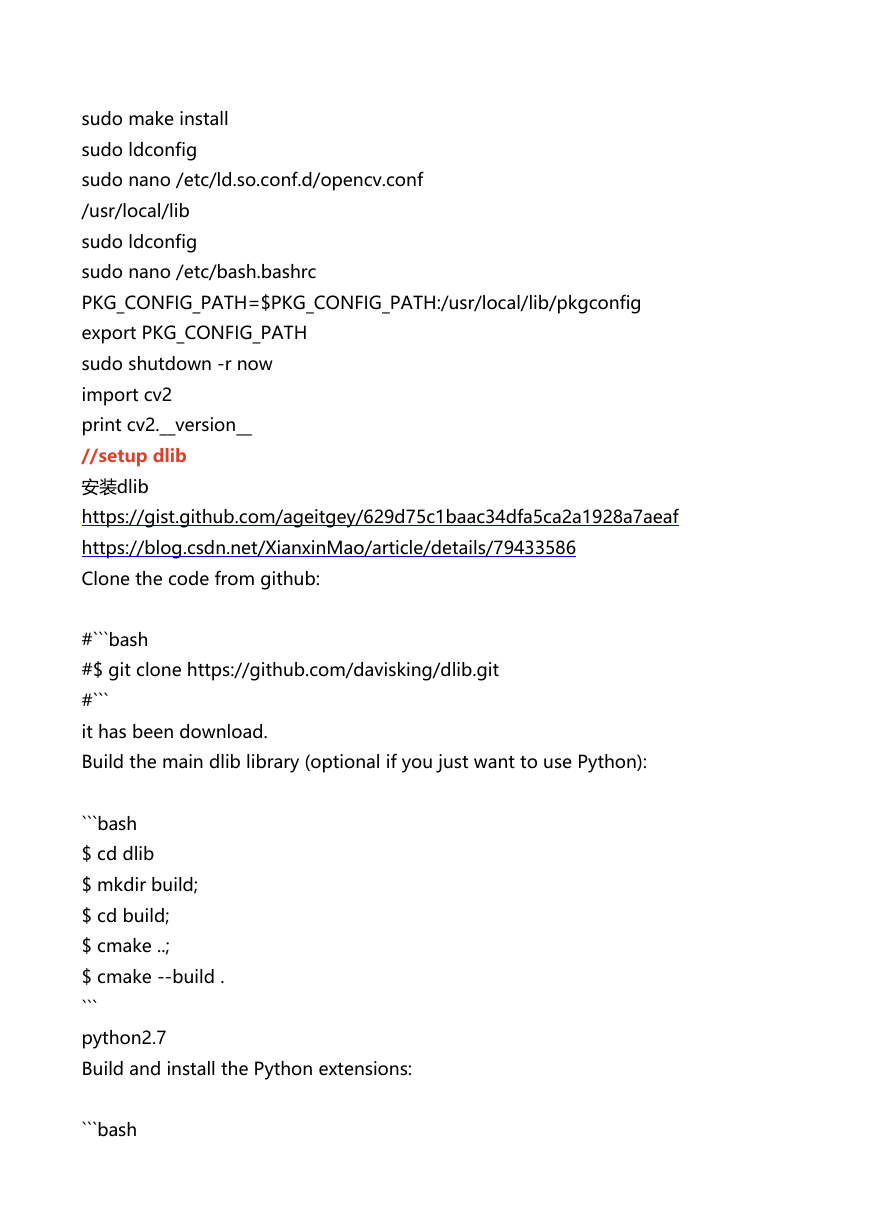
sudo make install
sudo ldconfig
sudo nano /etc/ld.so.conf.d/opencv.conf
/usr/local/lib
sudo ldconfig
sudo nano /etc/bash.bashrc
PKG_CONFIG_PATH=$PKG_CONFIG_PATH:/usr/local/lib/pkgconfig
export PKG_CONFIG_PATH
sudo shutdown -r now
import cv2
print cv2.__version__
//setup dlib
安装dlib
https://gist.github.com/ageitgey/629d75c1baac34dfa5ca2a1928a7aeaf
https://blog.csdn.net/XianxinMao/article/details/79433586
Clone the code from github:
#```bash
#$ git clone https://github.com/davisking/dlib.git
#```
it has been download.
Build the main dlib library (optional if you just want to use Python):
```bash
$ cd dlib
$ mkdir build;
$ cd build;
$ cmake ..;
$ cmake --build .
```
python2.7
Build and install the Python extensions:
```bash
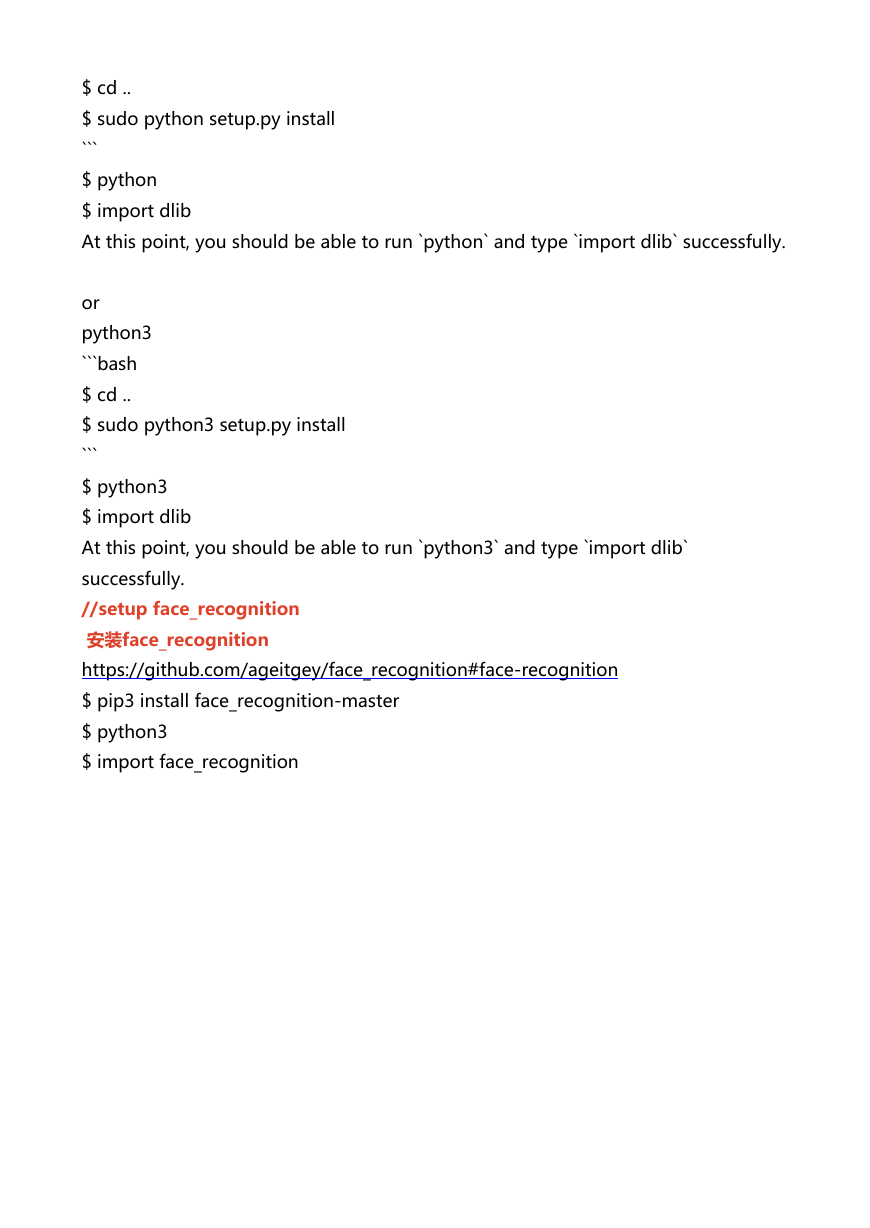
�
$ cd ..
$ sudo python setup.py install
```
$ python
$ import dlib
At this point, you should be able to run `python` and type `import dlib` successfully.
or
python3
```bash
$ cd ..
$ sudo python3 setup.py install
```
$ python3
$ import dlib
At this point, you should be able to run `python3` and type `import dlib`
successfully.
//setup face_recognition
安装face_recognition
https://github.com/ageitgey/face_recognition#face-recognition
$ pip3 install face_recognition-master
$ python3
$ import face_recognition
�


 2023年江西萍乡中考道德与法治真题及答案.doc
 2012年重庆南川中考生物真题及答案.doc
 2013年江西师范大学地理学综合及文艺理论基础考研真题.doc
 2020年四川甘孜小升初语文真题及答案I卷.doc
 2020年注册岩土工程师专业基础考试真题及答案.doc
 2023-2024学年福建省厦门市九年级上学期数学月考试题及答案.doc
 2021-2022学年辽宁省沈阳市大东区九年级上学期语文期末试题及答案.doc
 2022-2023学年北京东城区初三第一学期物理期末试卷及答案.doc
 2018上半年江西教师资格初中地理学科知识与教学能力真题及答案.doc
 2012年河北国家公务员申论考试真题及答案-省级.doc
 2020-2021学年江苏省扬州市江都区邵樊片九年级上学期数学第一次质量检测试题及答案.doc
 2022下半年黑龙江教师资格证中学综合素质真题及答案.doc