GETTING STARTED
C 3.0C
3 Megapixels Digital Camera
Users Guide
Users Guide
www.jenoptik-camera.com
1
�
CONGRATULATIONS
Congratulations on the purchase of your new camera. Your camera has
been carefully engineered and manufactured to give you dependable
operation. Read this manual before operating the camera to become
more familiar with it.
This manual has been written and formatted with depth and detail so
that you can easily follow the instructions to maximize the features of
your camera.
1
�
Table of Contents
GETTING STARTED
Package Contents ............................................................................................................................. 4
System Requirements ...................................................................................................................... 4
Camera Overview ............................................................................................................................ 5
Loading the Batteries ........................................................................................................................ 6
Inserting an SD Card ........................................................................................................................ 6
Turning the Camera On and Off ....................................................................................................... 7
Turning the LCD/Icons On and Off ................................................................................................... 7
Setting the Cameras Operational Mode ........................................................................................... 8
TAKING PICTURES AND VIDEO CLIPS
Taking Pictures .................................................................................................................................. 9
Using the Digital Zoom ...................................................................................................................... 9
Setting the Flash ............................................................................................................................... 9
Taking Pictures with Self-Timer ...................................................................................................... 10
Setting Image Resolution ................................................................................................................ 10
Setting Image Quality ...................................................................................................................... 11
Setting Image Color ........................................................................................................................ 11
Setting Exposure Compensation ............................................................................................. 11
Setting White Balance ............................................................................................................. 12
Setting Image Sharpness ........................................................................................................ 12
Taking Video Clips .......................................................................................................................... 13
CUSTOMIZING YOUR CAMERA SETTINGS
Setting Auto Power Off .................................................................................................................... 14
Setting Date and Time .................................................................................................................... 14
Setting Anti-Flicker Frequency ........................................................................................................ 15
Setting Language ............................................................................................................................ 15
REVIEWING YOUR FILES
Viewing Files .................................................................................................................................. 16
Magnifying Pictures ....................................................................................................................... 16
Rotating the Pictures ....................................................................................................................... 16
Deleting Stored Files ...................................................................................................................... 17
Deleting One ........................................................................................................................... 17
Deleting All ............................................................................................................................... 17
Protecting Files .............................................................................................................................. 17
Formatting the SD Card ................................................................................................................. 17
CONNECTING TO PC
Installing Software ........................................................................................................................... 18
Downloading Pictures and Video Clips onto Your Computer ........................................................ 19
Unplugging Your Camera from the Computer ................................................................................ 20
2
�
Using the Camera as A Web Camera ............................................................................................. 20
APPENDIX
Troubleshooting ............................................................................................................................. 21
Specifications .................................................................................................................................. 23
Getting Help .................................................................................................................................... 24
Safety Tips and Maintenance ......................................................................................................... 25
Regulatory Information .................................................................................................................... 27
3
�
GETTING STARTED
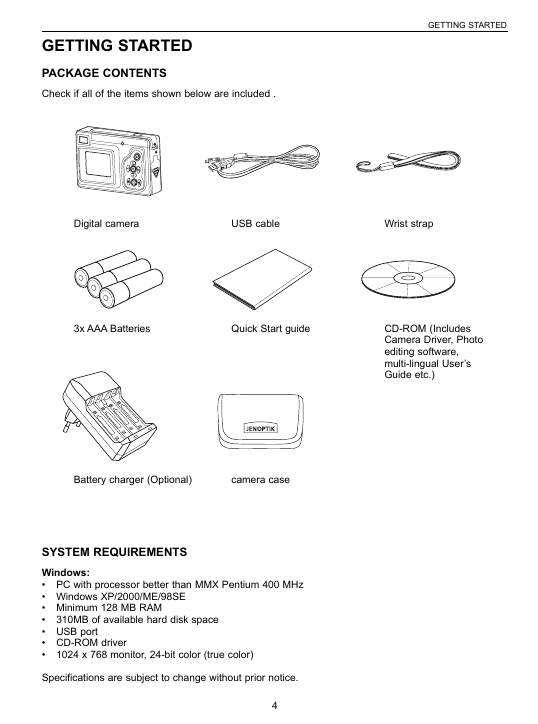
PACKAGE CONTENTS
Check if all of the items shown below are included .
GETTING STARTED
Digital camera
USB cable
Wrist strap
3x AAA Batteries
Quick Start guide
CD-ROM (Includes
Camera Driver, Photo
editing software,
multi-lingual Users
Guide etc.)
Battery charger (Optional)
camera case
SYSTEM REQUIREMENTS
Windows:
PC with processor better than MMX Pentium 400 MHz
Windows XP/2000/ME/98SE
Minimum 128 MB RAM
310MB of available hard disk space
USB port
CD-ROM driver
1024 x 768 monitor, 24-bit color (true color)
Specifications are subject to change without prior notice.
4
�
GETTING STARTED
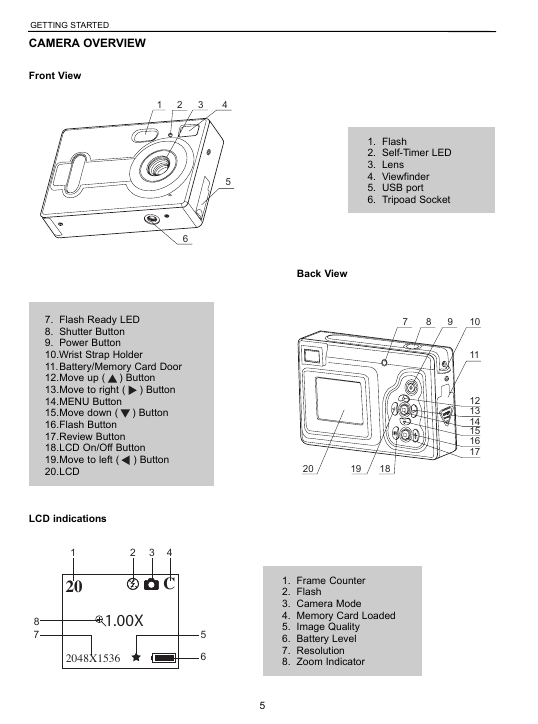
CAMERA OVERVIEW
Front View
1
2
3
4
5
6
Back View
) Button
7. Flash Ready LED
8. Shutter Button
9. Power Button
10.Wrist Strap Holder
11. Battery/Memory Card Door
12. Move up (
13. Move to right (
14. MENU Button
15. Move down (
16. Flash Button
17. Review Button
18. LCD On/Off Button
19. Move to left (
20. LCD
) Button
) Button
) Button
LCD indications
1
20
2
3
4
C
1.00X
2048X1536
5
6
8
7
1. Flash
2. Self-Timer LED
3. Lens
4. Viewfinder
5. USB port
6. Tripoad Socket
7
8
9
10
11
12
13
14
15
16
17
20
19
18
1. Frame Counter
2. Flash
3. Camera Mode
4. Memory Card Loaded
5. Image Quality
6. Battery Level
7. Resolution
8. Zoom Indicator
5
�
LOADING THE BATTERIES
The camera uses 3x AAA alkaline or rechargeable batteries.
1. Slide the Battery Door and lift it open.
2. Insert the batteries according to the polarity indication engraved on
the battery contact.
3. Close the battery compartment cover.
Checking the Battery Level
The battery level indicates the power of the batteries.
Full
Low
Empty
Note: When batteries are low, the camera will ask you to input
battery type information. This is because the camera needs
to adjust its working voltage to meet the battery supply as
rechargeable batteries are usually 1.2V while alkaline batteries are
1.5V. Choose the correct battery type by pressing the
button first, and then pressing the Menu button.
or
GETTING STARTED
1. Alkaline
2. Rechargeable
INSERTING AN SD CARD
The camera uses a Secure Digital (SD) memory card to store images and or video clips. Before
proceeding to shoot picture with the camera, you need to buy one SD card.
To insert an SD card:
Insert the memory card in the direction as shown in figure, then gently but firmly push the SD card into
the SD card slot as far as possible. When the card is fully engaged, a click can be heard.
Note: NEVER forcefully push the card into the camera
to avoid damaging both the card and/or the camera.
To remove the SD card:
Press the memory card into the slot then release. When the card is
partially ejected, pull it out.
Note : If the format of SD card is FAT32 or NTFS, the camera will format this SD card without
any warning and will change the format to FAT16 file format. Existing files or pictures on the card
will be deleted.
6
�
GETTING STARTED
TURNING THE CAMERA ON OR OFF
Press and hold the Power button for a few second to turn the camera
on. The blue Flash Ready LED will light up first, and then the LCD will
turn on automatically.
The camera will be turned on at the last set mode. Refer to page 8 to
switch the camera to desired mode.
The camera will automatically power off after being idled for around 30 seconds by default. To power
off the camera sooner, press and hold the Power button for a few seconds.
Power button
Note: Refer to page 14 to adjust auto power off timing.
TURNING THE LCD ON OR OFF
The camera has a 1.4 LCD which can frame subjects for image and
video clip capture, review stored images and video clips and to display
the current camera settings.
Press the LCD On/Off button to toggle the LCD mode. The LCD mode
changes each time the button is pressed.
LCD on with icons
Icons off
LCD off
LCD On/Off button
) Review Mode, the LCD changes as below when the LCD On/Off button is pressed
Note:
To save battery power, you may turn off the LCD display.
In (
repeatedly: LCD on with icons
Icons off
Thumbnail view
7
�


 2023年江西萍乡中考道德与法治真题及答案.doc
 2012年重庆南川中考生物真题及答案.doc
 2013年江西师范大学地理学综合及文艺理论基础考研真题.doc
 2020年四川甘孜小升初语文真题及答案I卷.doc
 2020年注册岩土工程师专业基础考试真题及答案.doc
 2023-2024学年福建省厦门市九年级上学期数学月考试题及答案.doc
 2021-2022学年辽宁省沈阳市大东区九年级上学期语文期末试题及答案.doc
 2022-2023学年北京东城区初三第一学期物理期末试卷及答案.doc
 2018上半年江西教师资格初中地理学科知识与教学能力真题及答案.doc
 2012年河北国家公务员申论考试真题及答案-省级.doc
 2020-2021学年江苏省扬州市江都区邵樊片九年级上学期数学第一次质量检测试题及答案.doc
 2022下半年黑龙江教师资格证中学综合素质真题及答案.doc