Using the GUI (Graphical User Interface) Menu Screen
Basic Operations
Projector
Remote Control
1, 7
2, 3, 5
4
6
6
1.2.3
4.5.6
This projector has two sets of menu screens that allow you to adjust the image and various projector settings.
These menu screens can be operated from the projector or the remote control with the following procedure.
INPUT 1, 2 (RGB) or 3 (DIGITAL) mode
INPUT 4, 5 (VIDEO) mode
1
ß 2 ©
1
ß 2 ©
(GUI) On-screen Display
∂
3
ƒ
ß 5 ©
4
ß 2 ©
ß 5 ©
∂
3
ƒ
ß 5 ©
(Slide the MOUSE/ADJUSTMENT switch
on the remote control to the ADJ. position.)
MOUSE
ADJ.
1 Press MENU to display the INPUT 1, 2, 3, 4 or 5
mode menu bar.
2 Press ß/© to select an adjustment menu on the
menu bar.
3 Press ∂/ƒ to select a specific adjustment item.
4 To display a single adjustment item, press ENTER
after selecting the item. Only the menu bar and
the selected adjustment item will appear.
5 Press ß/© to adjust the item.
6 Press UNDO to return to the previous screen.
7 To exit from the GUI, press MENU.
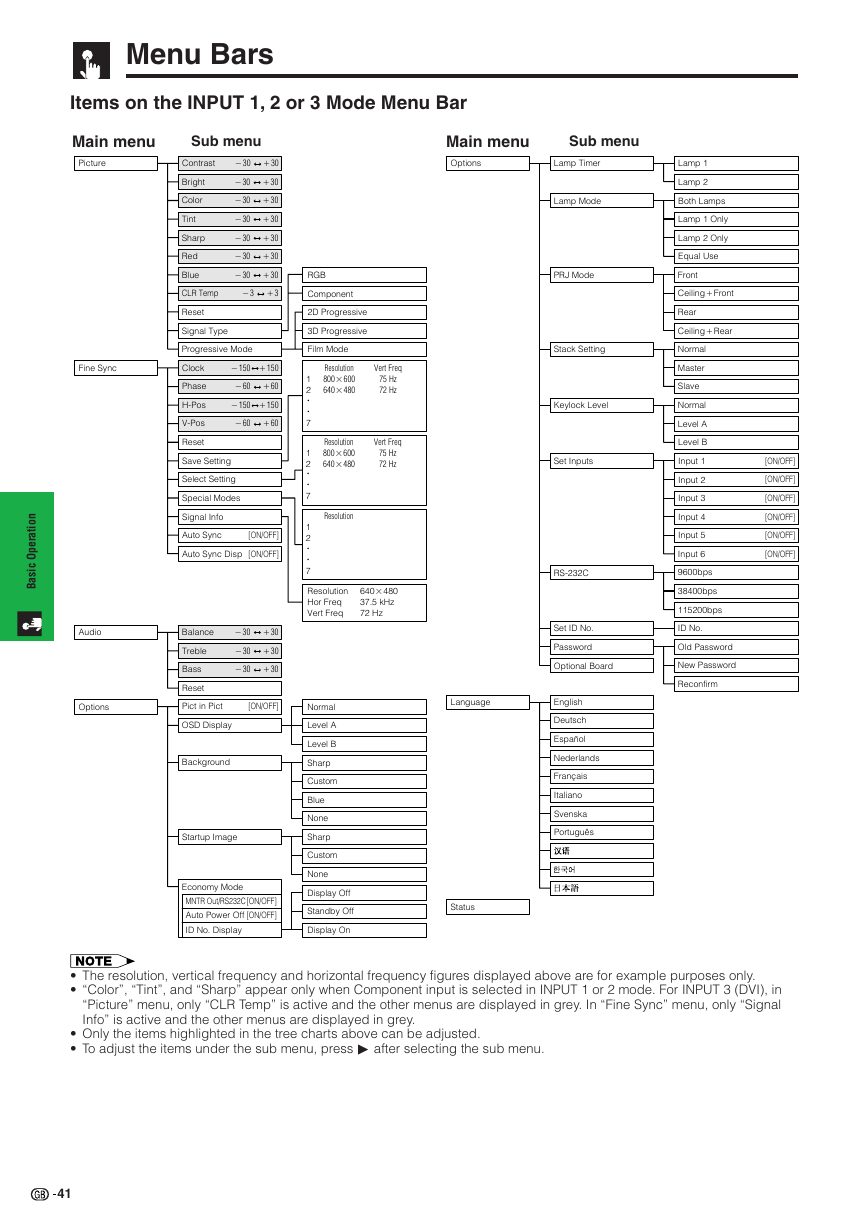
• For details on items on the menu screen, see the tree charts
on pages 41 and 42.
B
a
s
i
c
O
p
e
r
a
t
i
o
n
40
�
Menu Bars
Items on the INPUT 1, 2 or 3 Mode Menu Bar
Main menu
Picture
Sub menu
Contrast
ⳮ30
Ⳮ30
Bright
Color
Tint
Sharp
Red
Blue
ⳮ30
Ⳮ30
ⳮ30
Ⳮ30
ⳮ30
Ⳮ30
ⳮ30
Ⳮ30
ⳮ30
ⳮ30
Ⳮ30
Ⳮ30
Main menu
Options
Sub menu
Lamp Timer
Lamp Mode
RGB
PRJ Mode
CLR Temp
ⳮ3
Ⳮ3
Component
Reset
Signal Type
2D Progressive
3D Progressive
Progressive Mode
Film Mode
Stack Setting
Fine Sync
n
o
i
t
a
r
e
p
O
c
i
s
a
B
ⳮ150
Ⳮ150
ⳮ60
Ⳮ60
ⳮ150
Ⳮ150
ⳮ60
Ⳮ60
Clock
Phase
H-Pos
V-Pos
Reset
Save Setting
Select Setting
Special Modes
Signal Info
Auto Sync
[ON/OFF]
Auto Sync Disp [ON/OFF]
Resolution
800⳯600
640⳯480
Vert Freq
75 Hz
72 Hz
Resolution
800⳯600
640⳯480
Vert Freq
75 Hz
72 Hz
Resolution
1
2
•
•
7
1
2
•
•
7
1
2
•
•
7
Resolution
Hor Freq
Vert Freq
640⳯480
37.5 kHz
72 Hz
Audio
Balance
ⳮ30
Ⳮ30
ⳮ30
Ⳮ30
ⳮ30
Ⳮ30
Treble
Bass
Reset
Options
Pict in Pict
[ON/OFF]
OSD Display
Background
Startup Image
Normal
Level A
Level B
Sharp
Custom
Blue
None
Sharp
Custom
None
Keylock Level
Set Inputs
RS-232C
Set ID No.
Password
Optional Board
English
Deutsch
Español
Nederlands
Français
Italiano
Svenska
Português
Language
Economy Mode
MNTR Out/RS232C[ON/OFF]
Auto Power Off
[ON/OFF]
ID No. Display
Display Off
Standby Off
Display On
Status
Lamp 1
Lamp 2
Both Lamps
Lamp 1 Only
Lamp 2 Only
Equal Use
Front
CeilingⳭFront
Rear
CeilingⳭRear
Normal
Master
Slave
Normal
Level A
Level B
Input 1
Input 2
Input 3
Input 4
Input 5
Input 6
9600bps
38400bps
115200bps
ID No.
Old Password
New Password
Reconfirm
[ON/OFF]
[ON/OFF]
[ON/OFF]
[ON/OFF]
[ON/OFF]
[ON/OFF]
• The resolution, vertical frequency and horizontal frequency figures displayed above are for example purposes only.
• “Color”, “Tint”, and “Sharp” appear only when Component input is selected in INPUT 1 or 2 mode. For INPUT 3 (DVI), in
“Picture” menu, only “CLR Temp” is active and the other menus are displayed in grey. In “Fine Sync” menu, only “Signal
Info” is active and the other menus are displayed in grey.
• Only the items highlighted in the tree charts above can be adjusted.
• To adjust the items under the sub menu, press © after selecting the sub menu.
41
�
Menu Bars
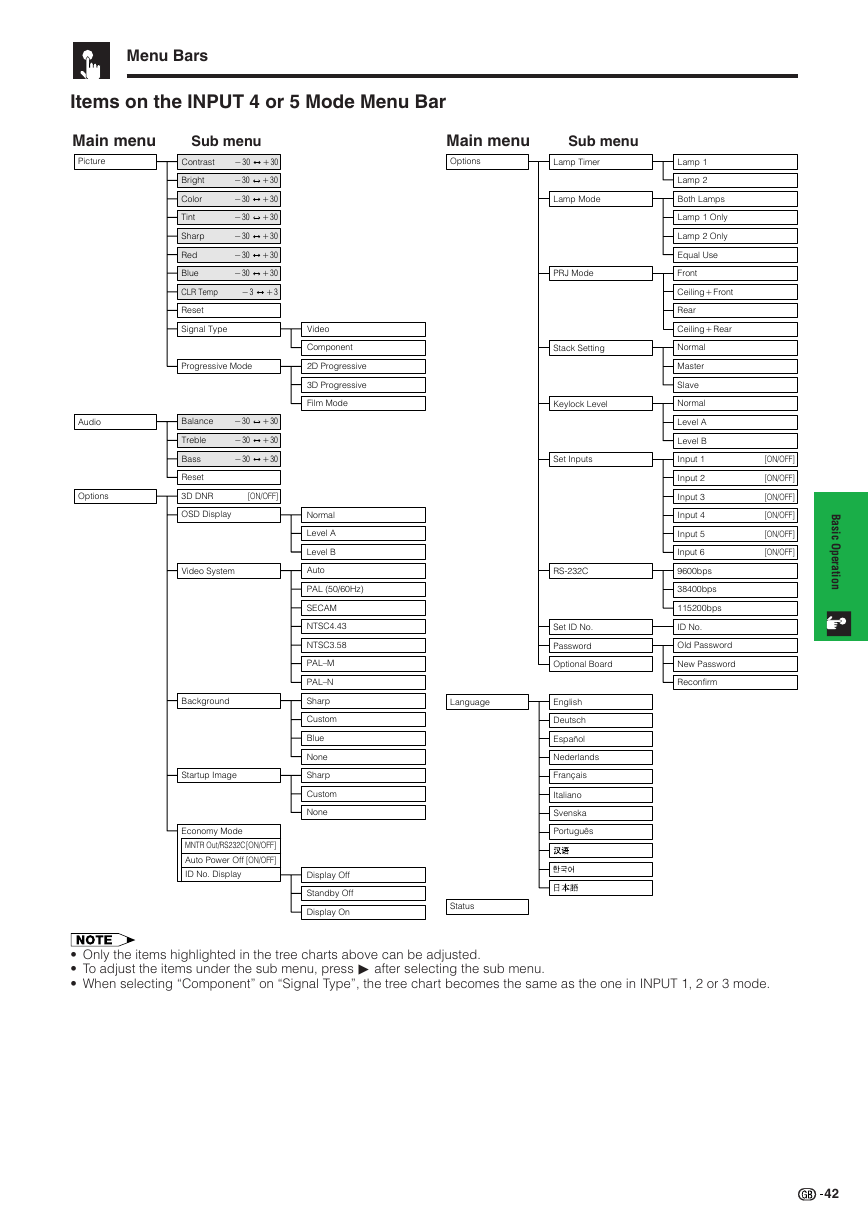
Items on the INPUT 4 or 5 Mode Menu Bar
Main menu
Picture
Sub menu
Contrast
ⳮ30
Ⳮ30
Bright
Color
Tint
Sharp
Red
Blue
ⳮ30
Ⳮ30
ⳮ30
Ⳮ30
ⳮ30
Ⳮ30
ⳮ30
Ⳮ30
ⳮ30
ⳮ30
Ⳮ30
Ⳮ30
CLR Temp
ⳮ3
Ⳮ3
Reset
Signal Type
Progressive Mode
Audio
Balance
ⳮ30
Ⳮ30
ⳮ30
Ⳮ30
ⳮ30
Ⳮ30
Treble
Bass
Reset
Options
3D DNR
[ON/OFF]
OSD Display
Video System
Background
Startup Image
Economy Mode
MNTR Out/RS232C[ON/OFF]
Auto Power Off
[ON/OFF]
ID No. Display
Video
Component
2D Progressive
3D Progressive
Film Mode
Normal
Level A
Level B
Auto
PAL (50/60Hz)
SECAM
NTSC4.43
NTSC3.58
PAL–M
PAL–N
Sharp
Custom
Blue
None
Sharp
Custom
None
Display Off
Standby Off
Display On
Main menu
Options
Sub menu
Lamp Timer
Lamp Mode
PRJ Mode
Stack Setting
Keylock Level
Set Inputs
RS-232C
Set ID No.
Password
Optional Board
English
Deutsch
Español
Nederlands
Français
Italiano
Svenska
Português
Language
Status
Lamp 1
Lamp 2
Both Lamps
Lamp 1 Only
Lamp 2 Only
Equal Use
Front
CeilingⳭFront
Rear
CeilingⳭRear
Normal
Master
Slave
Normal
Level A
Level B
Input 1
Input 2
Input 3
Input 4
Input 5
Input 6
9600bps
38400bps
115200bps
ID No.
Old Password
New Password
Reconfirm
[ON/OFF]
[ON/OFF]
[ON/OFF]
[ON/OFF]
[ON/OFF]
[ON/OFF]
B
a
s
i
c
O
p
e
r
a
t
i
o
n
• Only the items highlighted in the tree charts above can be adjusted.
• To adjust the items under the sub menu, press © after selecting the sub menu.
• When selecting “Component” on “Signal Type”, the tree chart becomes the same as the one in INPUT 1, 2 or 3 mode.
42
�
Adjusting the Picture
Projector
Remote Control
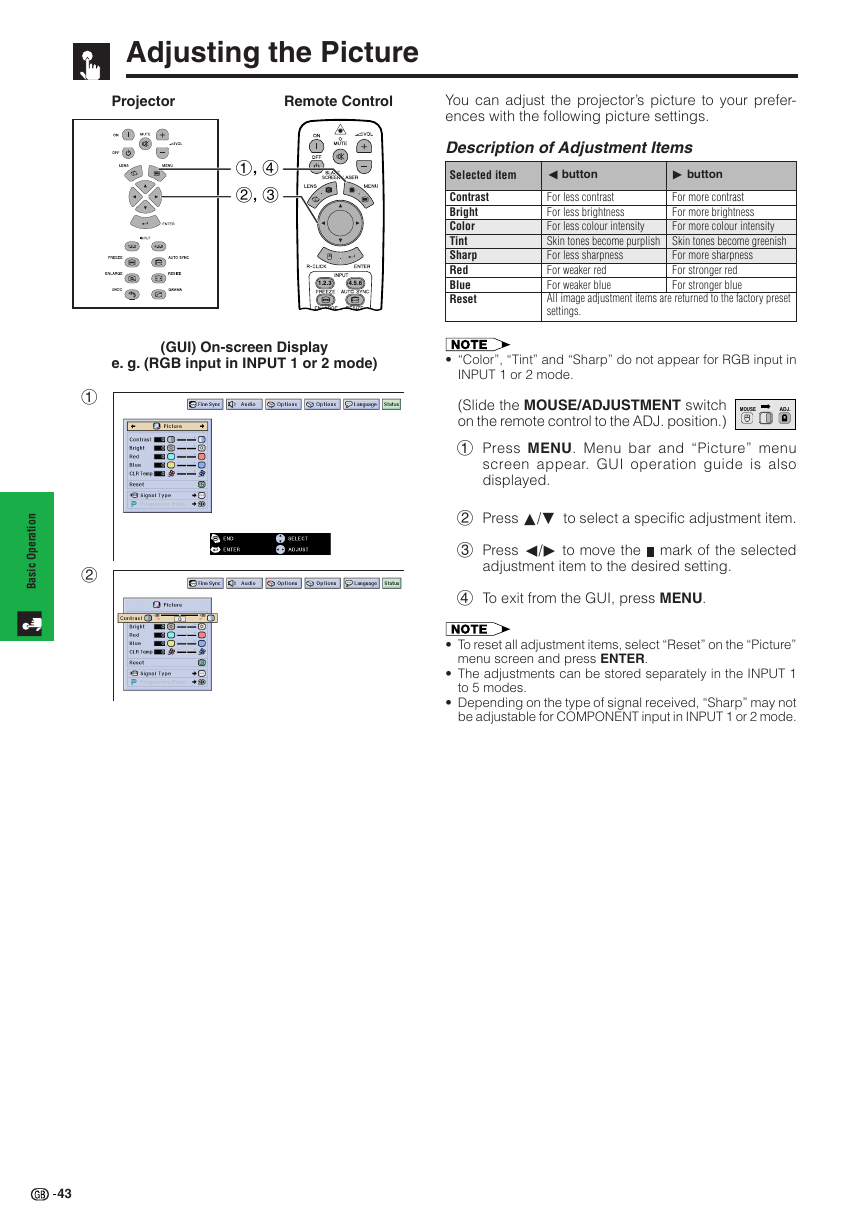
You can adjust the projector’s picture to your prefer-
ences with the following picture settings.
1, 4
2, 3
1.2.3
4.5.6
(GUI) On-screen Display
e. g. (RGB input in INPUT 1 or 2 mode)
Description of Adjustment Items
Selected item
ß button
© button
Contrast
Bright
Color
Tint
Sharp
Red
Blue
Reset
For less contrast
For less brightness
For less colour intensity
Skin tones become purplish
For less sharpness
For weaker red
For weaker blue
All image adjustment items are returned to the factory preset
settings.
For more contrast
For more brightness
For more colour intensity
Skin tones become greenish
For more sharpness
For stronger red
For stronger blue
• “Color”, “Tint” and “Sharp” do not appear for RGB input in
INPUT 1 or 2 mode.
(Slide the MOUSE/ADJUSTMENT switch
on the remote control to the ADJ. position.)
MOUSE
ADJ.
1 Press MENU. Menu bar and “Picture” menu
screen appear. GUI operation guide is also
displayed.
2 Press ∂/ƒ to select a specific adjustment item.
3 Press ß/© to move the
mark of the selected
adjustment item to the desired setting.
4 To exit from the GUI, press MENU.
• To reset all adjustment items, select “Reset” on the “Picture”
menu screen and press ENTER.
• The adjustments can be stored separately in the INPUT 1
to 5 modes.
• Depending on the type of signal received, “Sharp” may not
be adjustable for COMPONENT input in INPUT 1 or 2 mode.
1
2
n
o
i
t
a
r
e
p
O
c
i
s
a
B
43
�
Adjusting the Picture
Projector
Remote Control
1, 4
2, 3
1.2.3
4.5.6
(GUI) On-screen Display
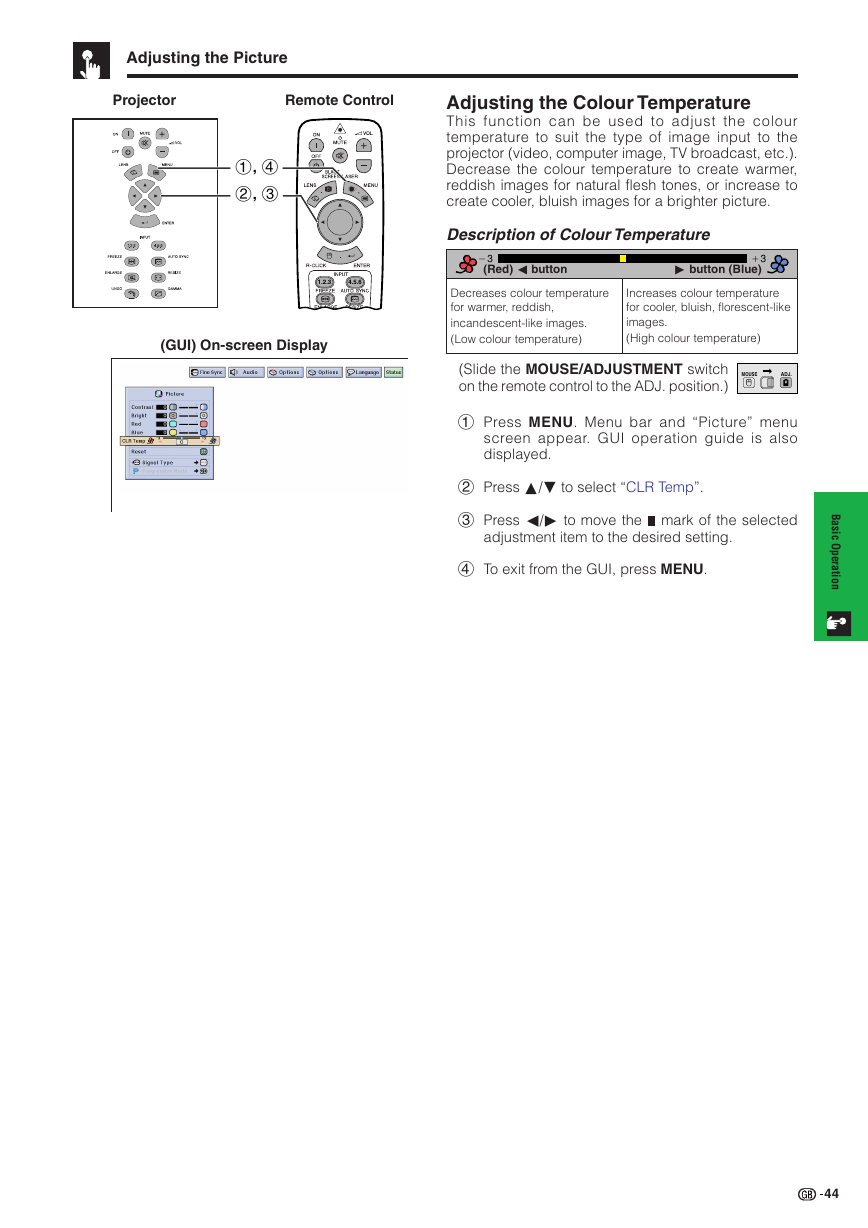
Adjusting the Colour Temperature
This function can be used to adjust the colour
temperature to suit the type of image input to the
projector (video, computer image, TV broadcast, etc.).
Decrease the colour temperature to create warmer,
reddish images for natural flesh tones, or increase to
create cooler, bluish images for a brighter picture.
Description of Colour Temperature
ⳮ3
(Red) ß button
Ⳮ3
© button (Blue)
Decreases colour temperature
for warmer, reddish,
incandescent-like images.
(Low colour temperature)
Increases colour temperature
for cooler, bluish, florescent-like
images.
(High colour temperature)
(Slide the MOUSE/ADJUSTMENT switch
on the remote control to the ADJ. position.)
MOUSE
ADJ.
1 Press MENU. Menu bar and “Picture” menu
screen appear. GUI operation guide is also
displayed.
2 Press ∂/ƒ to select “CLR Temp”.
3 Press ß/© to move the
mark of the selected
adjustment item to the desired setting.
4 To exit from the GUI, press MENU.
B
a
s
i
c
O
p
e
r
a
t
i
o
n
44
�
Adjusting the Picture
Projector
Remote Control
1, 5
2, 3
4
1.2.3
4.5.6
(GUI) On-screen Display
n
o
i
t
a
r
e
p
O
c
i
s
a
B
Projector
Remote Control
1, 5
2, 3
4
1.2.3
4.5.6
(GUI) On-screen Display
45
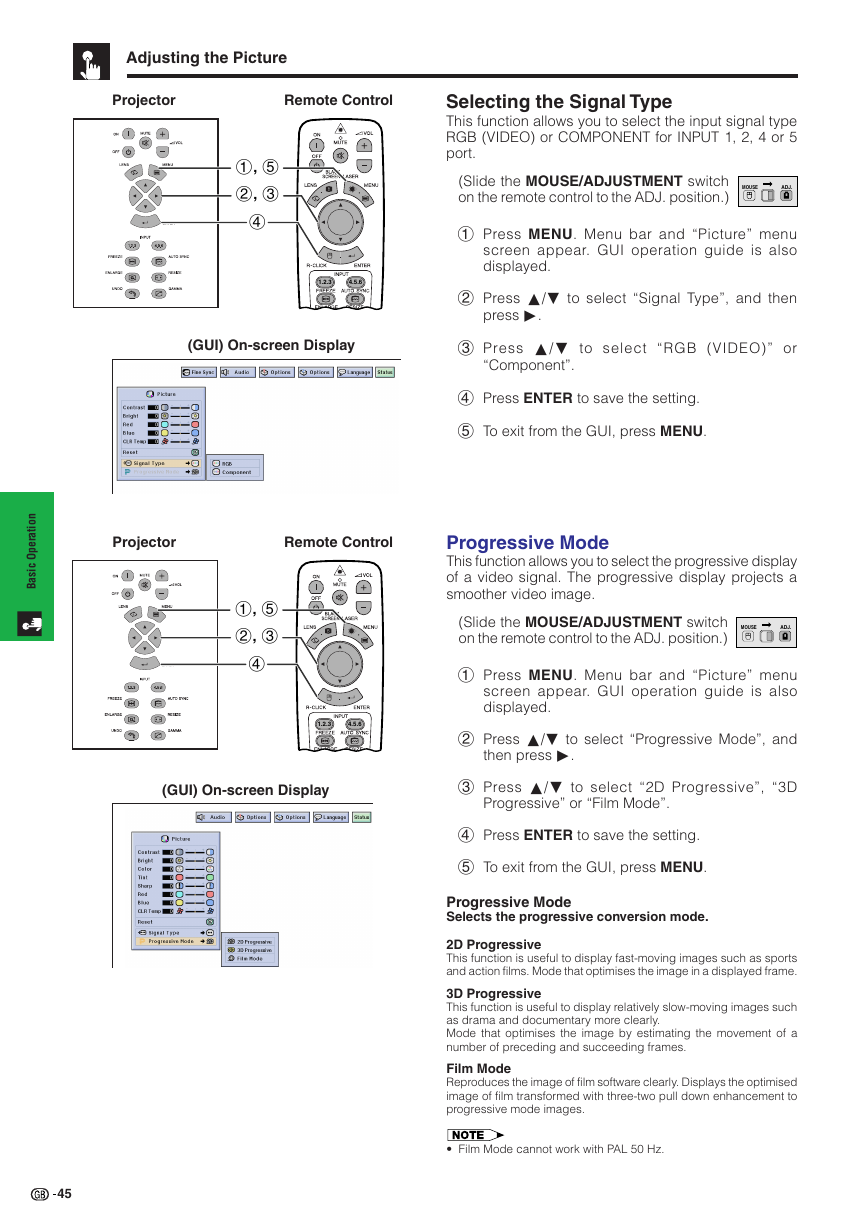
Selecting the Signal Type
This function allows you to select the input signal type
RGB (VIDEO) or COMPONENT for INPUT 1, 2, 4 or 5
port.
(Slide the MOUSE/ADJUSTMENT switch
on the remote control to the ADJ. position.)
MOUSE
ADJ.
1 Press MENU. Menu bar and “Picture” menu
screen appear. GUI operation guide is also
displayed.
2 Press ∂/ƒ to select “Signal Type”, and then
press ©.
3 Press ∂/ƒ to select “RGB (VIDEO)” or
“Component”.
4 Press ENTER to save the setting.
5 To exit from the GUI, press MENU.
Progressive Mode
This function allows you to select the progressive display
of a video signal. The progressive display projects a
smoother video image.
(Slide the MOUSE/ADJUSTMENT switch
on the remote control to the ADJ. position.)
MOUSE
ADJ.
1 Press MENU. Menu bar and “Picture” menu
screen appear. GUI operation guide is also
displayed.
2 Press ∂/ƒ to select “Progressive Mode”, and
then press ©.
3 Press ∂/ƒ to select “2D Progressive”, “3D
Progressive” or “Film Mode”.
4 Press ENTER to save the setting.
5 To exit from the GUI, press MENU.
Progressive Mode
Selects the progressive conversion mode.
2D Progressive
This function is useful to display fast-moving images such as sports
and action films. Mode that optimises the image in a displayed frame.
3D Progressive
This function is useful to display relatively slow-moving images such
as drama and documentary more clearly.
Mode that optimises the image by estimating the movement of a
number of preceding and succeeding frames.
Film Mode
Reproduces the image of film software clearly. Displays the optimised
image of film transformed with three-two pull down enhancement to
progressive mode images.
• Film Mode cannot work with PAL 50 Hz.
�
Adjusting the Computer Images (RGB menu only)
Projector
Remote Control
1, 5
2, 3, 4
1.2.3
4.5.6
(GUI) On-screen Display
2
3
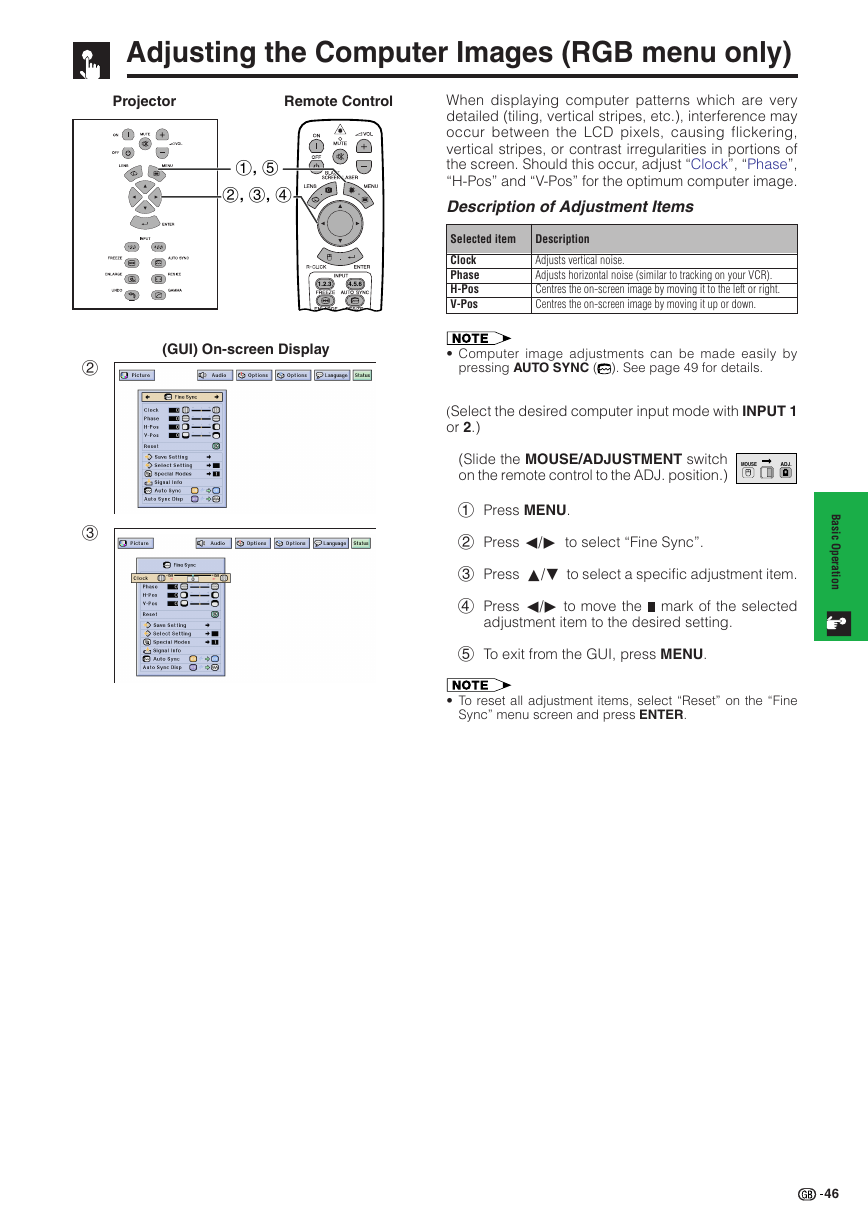
When displaying computer patterns which are very
detailed (tiling, vertical stripes, etc.), interference may
occur between the LCD pixels, causing flickering,
vertical stripes, or contrast irregularities in portions of
the screen. Should this occur, adjust “Clock”, “Phase”,
“H-Pos” and “V-Pos” for the optimum computer image.
Description of Adjustment Items
Selected item
Clock
Phase
H-Pos
V-Pos
Description
Adjusts vertical noise.
Adjusts horizontal noise (similar to tracking on your VCR).
Centres the on-screen image by moving it to the left or right.
Centres the on-screen image by moving it up or down.
• Computer image adjustments can be made easily by
pressing AUTO SYNC (
). See page 49 for details.
(Select the desired computer input mode with INPUT 1
or 2.)
(Slide the MOUSE/ADJUSTMENT switch
on the remote control to the ADJ. position.)
MOUSE
ADJ.
1 Press MENU.
2 Press ß/© to select “Fine Sync”.
3 Press ∂/ƒ to select a specific adjustment item.
B
a
s
i
c
O
p
e
r
a
t
i
o
n
4 Press ß/© to move the
mark of the selected
adjustment item to the desired setting.
5 To exit from the GUI, press MENU.
• To reset all adjustment items, select “Reset” on the “Fine
Sync” menu screen and press ENTER.
46
�
Adjusting the Computer Images (RGB menu only)
Projector
Remote Control
1, 6
2, 3, 4
5
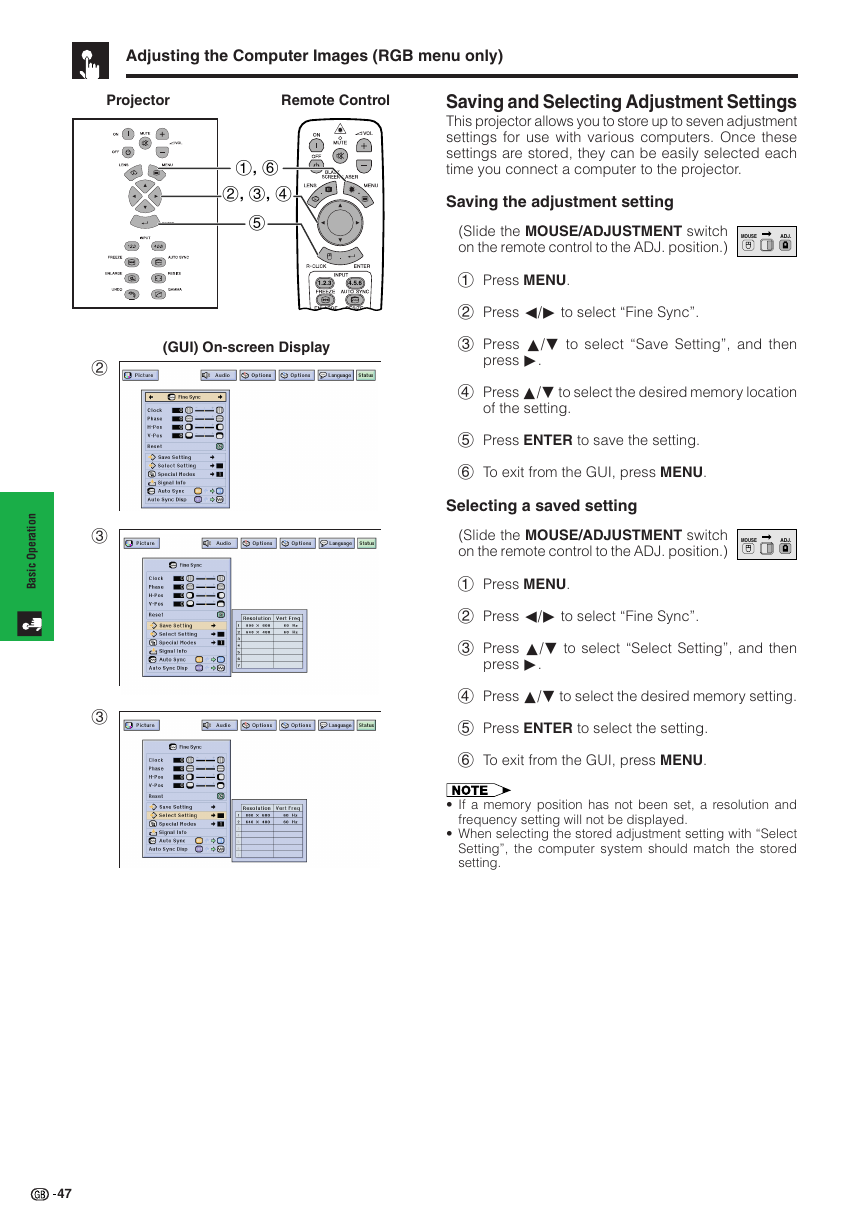
Saving and Selecting Adjustment Settings
This projector allows you to store up to seven adjustment
settings for use with various computers. Once these
settings are stored, they can be easily selected each
time you connect a computer to the projector.
Saving the adjustment setting
(Slide the MOUSE/ADJUSTMENT switch
on the remote control to the ADJ. position.)
MOUSE
ADJ.
1.2.3
4.5.6
1 Press MENU.
(GUI) On-screen Display
2 Press ß/© to select “Fine Sync”.
3 Press ∂/ƒ to select “Save Setting”, and then
press ©.
4 Press ∂/ƒ to select the desired memory location
of the setting.
5 Press ENTER to save the setting.
6 To exit from the GUI, press MENU.
Selecting a saved setting
(Slide the MOUSE/ADJUSTMENT switch
on the remote control to the ADJ. position.)
MOUSE
ADJ.
1 Press MENU.
2 Press ß/© to select “Fine Sync”.
3 Press ∂/ƒ to select “Select Setting”, and then
press ©.
4 Press ∂/ƒ to select the desired memory setting.
5 Press ENTER to select the setting.
6 To exit from the GUI, press MENU.
• If a memory position has not been set, a resolution and
frequency setting will not be displayed.
• When selecting the stored adjustment setting with “Select
Setting”, the computer system should match the stored
setting.
n
o
i
t
a
r
e
p
O
c
i
s
a
B
2
3
3
47
�



 2023年江西萍乡中考道德与法治真题及答案.doc
 2012年重庆南川中考生物真题及答案.doc
 2013年江西师范大学地理学综合及文艺理论基础考研真题.doc
 2020年四川甘孜小升初语文真题及答案I卷.doc
 2020年注册岩土工程师专业基础考试真题及答案.doc
 2023-2024学年福建省厦门市九年级上学期数学月考试题及答案.doc
 2021-2022学年辽宁省沈阳市大东区九年级上学期语文期末试题及答案.doc
 2022-2023学年北京东城区初三第一学期物理期末试卷及答案.doc
 2018上半年江西教师资格初中地理学科知识与教学能力真题及答案.doc
 2012年河北国家公务员申论考试真题及答案-省级.doc
 2020-2021学年江苏省扬州市江都区邵樊片九年级上学期数学第一次质量检测试题及答案.doc
 2022下半年黑龙江教师资格证中学综合素质真题及答案.doc