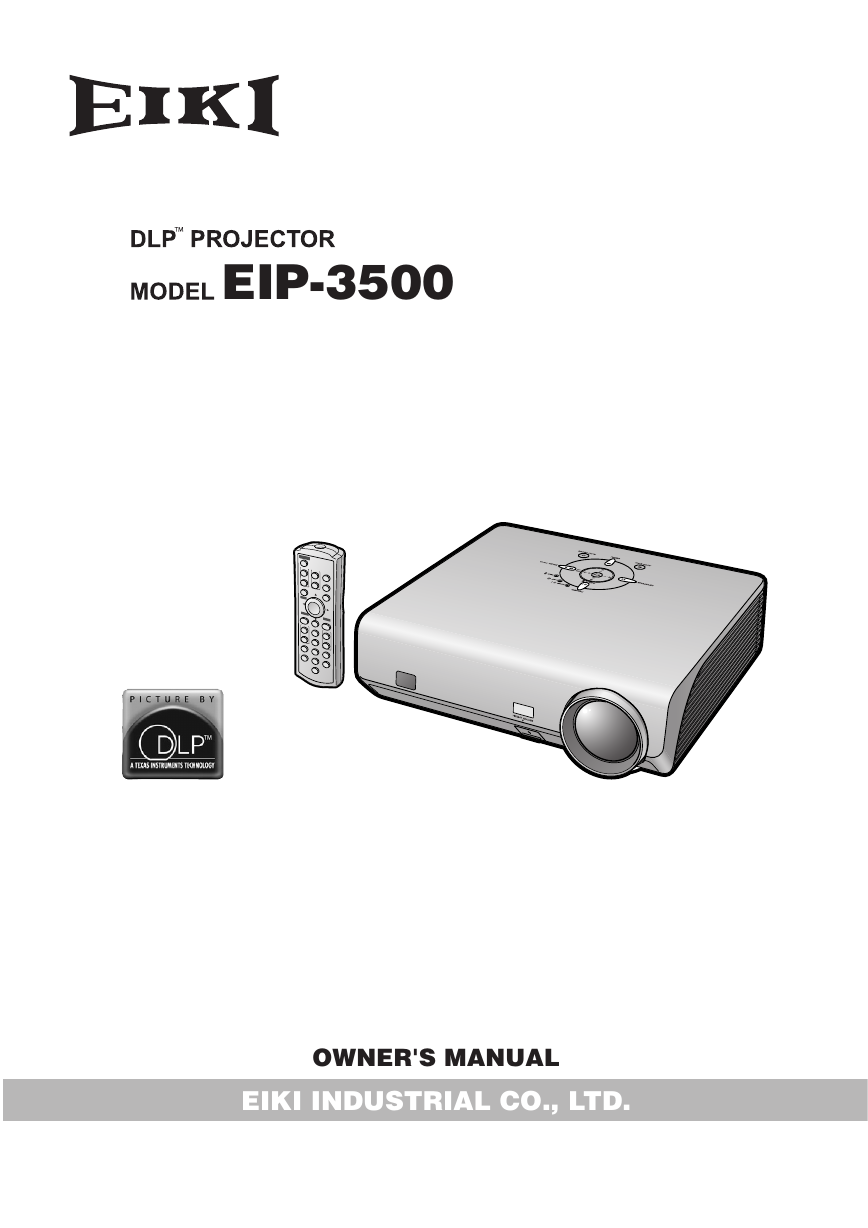
EIP-3500
OWNER'S MANUAL
EIKI INDUSTRIAL CO., LTD.
�
IMPORTANT
For your assistance in reporting the loss or theft of your
Projector, please record the Serial Number located on
the bottom of the projector and retain this information.
Before recycling the packaging, please ensure that you
have checked the contents of the carton thoroughly
against the list of “Supplied accessories” on page 10.
Model No.: EIP-3500
Serial No.:
�
SPECIAL NOTE FOR USERS IN THE U.K.
The mains lead of this product is fitted with a non-rewireable (moulded) plug incorporating a 10A fuse. Should
the fuse need to be replaced, a BSI or ASTA approved BS 1362 fuse marked
above, which is also indicated on the pin face of the plug, must be used.
Always refit the fuse cover after replacing the fuse. Never use the plug without the fuse cover fitted.
In the unlikely event of the socket outlet in your home not being compatible with the plug supplied, cut off the
mains plug and fit an appropriate type.
and of the same rating as
or
DANGER:
The fuse from the cut-off plug should be removed and the cut-off plug destroyed immediately and disposed of
in a safe manner.
Under no circumstances should the cut-off plug be inserted elsewhere into a 10A socket outlet, as a serious
electric shock may occur.
To fit an appropriate plug to the mains lead, follow the instructions below:
WARNING:
THIS APPARATUS MUST BE EARTHED.
IMPORTANT:
The wires in this mains lead are coloured in accordance with the following code:
Green-and-yellow : Earth
Blue
Brown
: Neutral
: Live
the letter E or by the safety earth symbol
or coloured green or green-and-yellow.
As the colours of the wires in the mains lead of this apparatus may not correspond with the coloured markings
identifying the terminals in your plug proceed as follows:
• The wire which is coloured green-and-yellow must be connected to the terminal in the plug which is marked by
• The wire which is coloured blue must be connected to the terminal which is marked with the letter N or coloured
black.
• The wire which is coloured brown must be connected to the terminal which is marked with the letter L or coloured
red.
IF YOU HAVE ANY DOUBT, CONSULT A QUALIFIED ELECTRICIAN.
�
The supplied CD-ROM contains SETUP GUIDE in English, German, French, Spanish, Italian, Portuguese and
Japanese.
Die mitgelieferte CD-ROM enthält Einrichtungs-Anleitung in Englisch, Deutsch, Französisch, Spanisch, Italienisch,
Portugiesisch und Japanisch.
Le CD-ROM fourni contient le guide d’installation en anglais, allemand, français, espagnol, italien, portugais et
japonais.
Den medföljande CD-ROM-skivan innehåller uppställningsguide på engelska, tyska, franska, spanska,
italienska, portugisiska och japanska.
El CD-ROM suministrado contiene guía de configuración en inglés, alemán, francés, español, italiano,
portugués y japonés.
Il CD-ROM in dotazione contiene guia di impostazione in inglese, tedesco, francese, spagnolo, italiano,
portoghese e giapponese.
De meegeleverde CD-ROM bevat instelgids in het Engels, Duits, Frans, Spaans, Italiaans, Portugees en
Japans.
O CD-ROM fornecido contém guia de configuração em Inglês, Alemão, Francês, Espanhol, Italiano, Português
e Japonês.
�
Before using the projector, please read this operation manual carefully.
Introduction
ENGLISH
1. WARRANTY
This is to assure that you immediately receive the full benefit of the parts, service and labor
warranty applicable to your purchase.
2. CONSUMER PRODUCT SAFETY ACT
To ensure that you will promptly receive any safety notification of inspection, modification, or
recall that EIKI may be required to give under the 1972 Consumer Product Safety Act, PLEASE
READ CAREFULLY THE IMPORTANT “LIMITED WARRANTY” CLAUSE.
U.S.A. ONLY
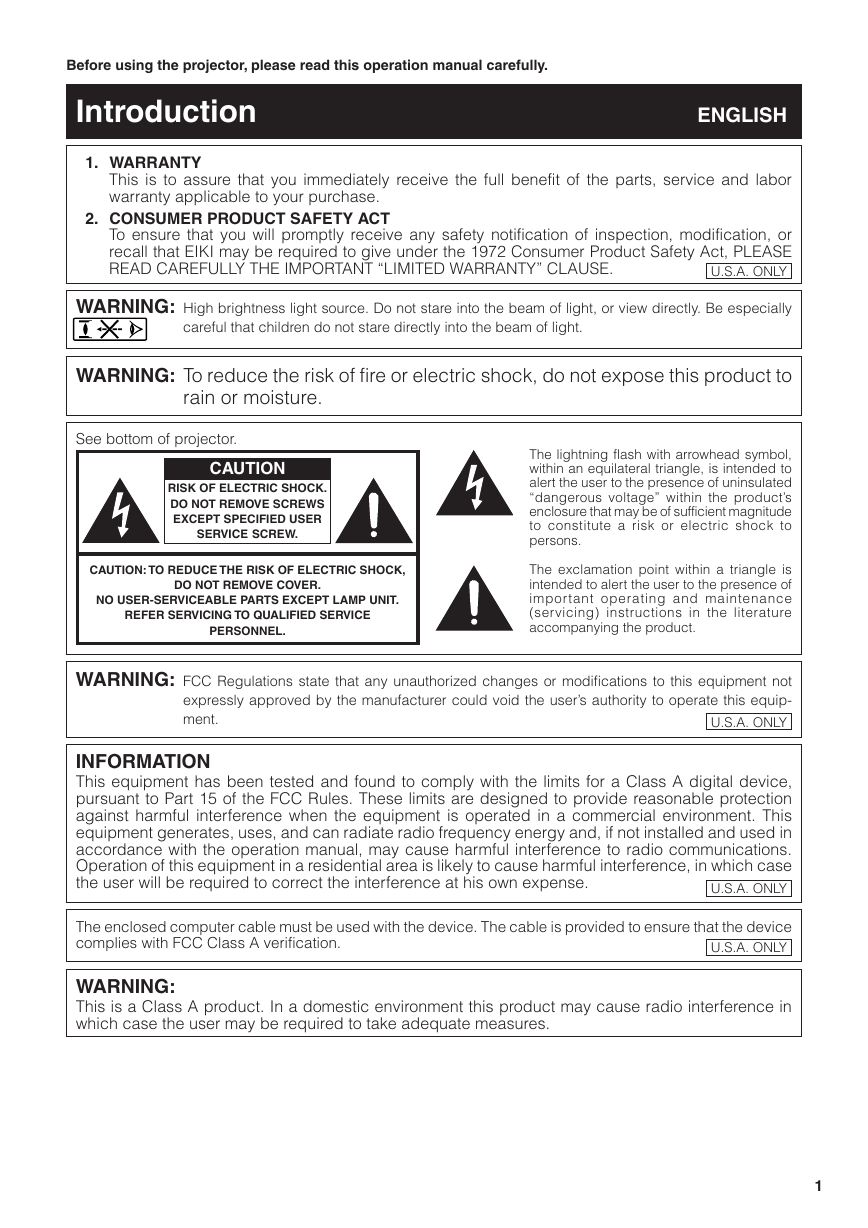
WARNING: High brightness light source. Do not stare into the beam of light, or view directly. Be especially
careful that children do not stare directly into the beam of light.
WARNING: To reduce the risk of fire or electric shock, do not expose this product to
rain or moisture.
See bottom of projector.
CAUTION
RISK OF ELECTRIC SHOCK.
DO NOT REMOVE SCREWS
EXCEPT SPECIFIED USER
SERVICE SCREW.
CAUTION: TO REDUCE THE RISK OF ELECTRIC SHOCK,
DO NOT REMOVE COVER.
NO USER-SERVICEABLE PARTS EXCEPT LAMP UNIT.
REFER SERVICING TO QUALIFIED SERVICE
PERSONNEL.
The lightning flash with arrowhead symbol,
within an equilateral triangle, is intended to
alert the user to the presence of uninsulated
“dangerous voltage” within the product’s
enclosure that may be of sufficient magnitude
to constitute a risk or electric shock to
persons.
The exclamation point within a triangle is
intended to alert the user to the presence of
important operating and maintenance
(servicing) instructions in the literature
accompanying the product.
WARNING: FCC Regulations state that any unauthorized changes or modifications to this equipment not
expressly approved by the manufacturer could void the user’s authority to operate this equip-
ment.
U.S.A. ONLY
INFORMATION
This equipment has been tested and found to comply with the limits for a Class A digital device,
pursuant to Part 15 of the FCC Rules. These limits are designed to provide reasonable protection
against harmful interference when the equipment is operated in a commercial environment. This
equipment generates, uses, and can radiate radio frequency energy and, if not installed and used in
accordance with the operation manual, may cause harmful interference to radio communications.
Operation of this equipment in a residential area is likely to cause harmful interference, in which case
the user will be required to correct the interference at his own expense.
U.S.A. ONLY
The enclosed computer cable must be used with the device. The cable is provided to ensure that the device
complies with FCC Class A verification.
U.S.A. ONLY
WARNING:
This is a Class A product. In a domestic environment this product may cause radio interference in
which case the user may be required to take adequate measures.
1
�
WARNING:
The cooling fan in this projector continues to run for about 90 seconds after the projector enters the standby mode.
During normal operation, when putting the projector into standby mode always use the POWER button on the
projector or on the remote control. Ensure the cooling fan has stopped before disconnecting the power cord.
DURING NORMAL OPERATION, NEVER TURN THE PROJECTOR OFF BY DISCONNECTING THE POWER CORD.
FAILURE TO OBSERVE THIS WILL RESULT IN PREMATURE LAMP FAILURE.
PRODUCT DISPOSAL
This projector utilizes tin-lead solder, and a pressurized lamp containing a small amount of mercury. Disposal of
these materials may be regulated due to environmental considerations. For disposal or recycling information,
please contact your local authorities or, if you are located in the United States of America, the Electronic Industries
Alliance: www.eiae.org .
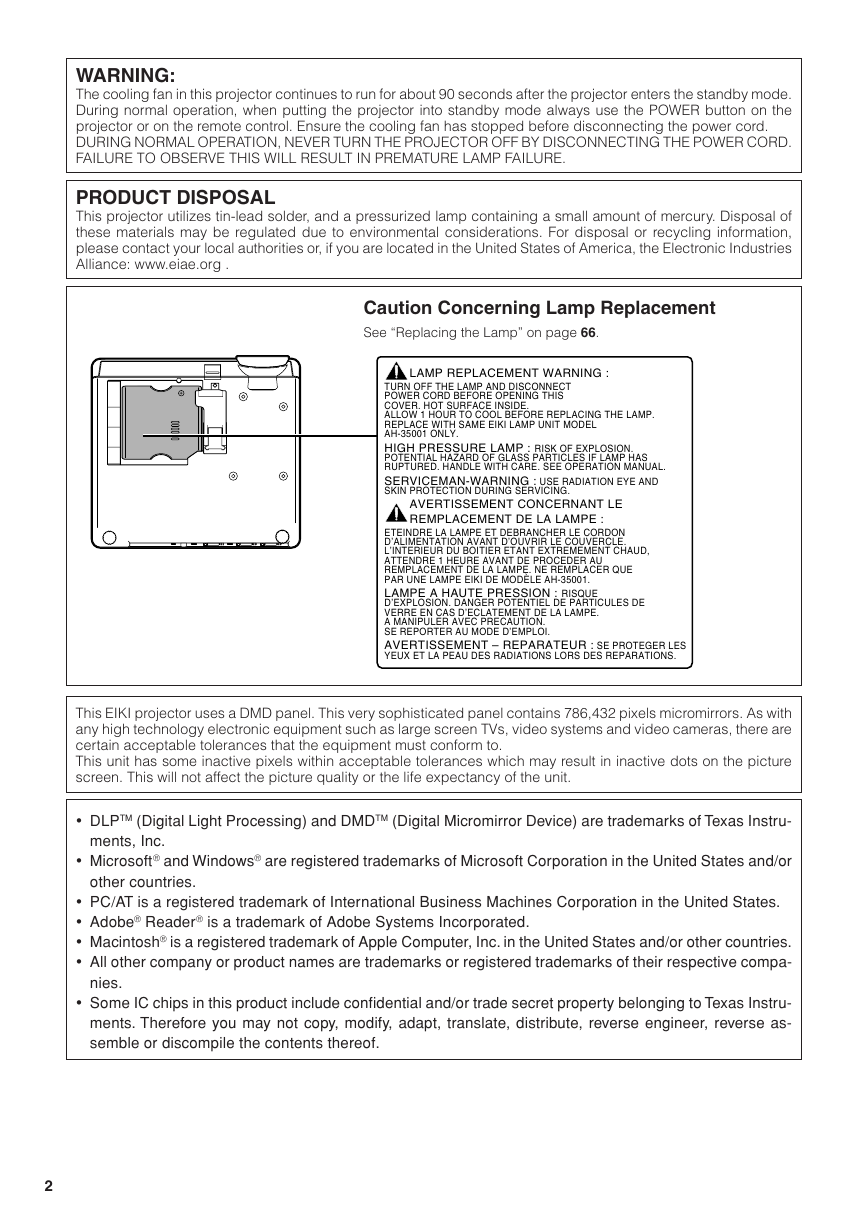
Caution Concerning Lamp Replacement
See “Replacing the Lamp” on page 66.
LAMP REPLACEMENT WARNING :
TURN OFF THE LAMP AND DISCONNECT
POWER CORD BEFORE OPENING THIS
COVER. HOT SURFACE INSIDE.
ALLOW 1 HOUR TO COOL BEFORE REPLACING THE LAMP.
REPLACE WITH SAME EIKI LAMP UNIT MODEL
AH-35001 ONLY.
HIGH PRESSURE LAMP : RISK OF EXPLOSION.
POTENTIAL HAZARD OF GLASS PARTICLES IF LAMP HAS
RUPTURED. HANDLE WITH CARE. SEE OPERATION MANUAL.
SERVICEMAN-WARNING : USE RADIATION EYE AND
SKIN PROTECTION DURING SERVICING.
AVERTISSEMENT CONCERNANT LE
REMPLACEMENT DE LA LAMPE :
ETEINDRE LA LAMPE ET DEBRANCHER LE CORDON
D’ALIMENTATION AVANT D’OUVRIR LE COUVERCLE.
L’INTERIEUR DU BOITIER ETANT EXTREMEMENT CHAUD,
ATTENDRE 1 HEURE AVANT DE PROCEDER AU
REMPLACEMENT DE LA LAMPE. NE REMPLACER QUE
PAR UNE LAMPE EIKI DE MODÈLE AH-35001.
LAMPE A HAUTE PRESSION : RISQUE
D’EXPLOSION. DANGER POTENTIEL DE PARTICULES DE
VERRE EN CAS D’ECLATEMENT DE LA LAMPE.
A MANIPULER AVEC PRECAUTION.
SE REPORTER AU MODE D’EMPLOI.
AVERTISSEMENT – REPARATEUR : SE PROTEGER LES
YEUX ET LA PEAU DES RADIATIONS LORS DES REPARATIONS.
This EIKI projector uses a DMD panel. This very sophisticated panel contains 786,432 pixels micromirrors. As with
any high technology electronic equipment such as large screen TVs, video systems and video cameras, there are
certain acceptable tolerances that the equipment must conform to.
This unit has some inactive pixels within acceptable tolerances which may result in inactive dots on the picture
screen. This will not affect the picture quality or the life expectancy of the unit.
• DLPTM (Digital Light Processing) and DMDTM (Digital Micromirror Device) are trademarks of Texas Instru-
ments, Inc.
• Microsoft® and Windows® are registered trademarks of Microsoft Corporation in the United States and/or
other countries.
• PC/AT is a registered trademark of International Business Machines Corporation in the United States.
• Adobe® Reader® is a trademark of Adobe Systems Incorporated.
• Macintosh® is a registered trademark of Apple Computer, Inc. in the United States and/or other countries.
• All other company or product names are trademarks or registered trademarks of their respective compa-
nies.
• Some IC chips in this product include confidential and/or trade secret property belonging to Texas Instru-
ments. Therefore you may not copy, modify, adapt, translate, distribute, reverse engineer, reverse as-
semble or discompile the contents thereof.
2
�
How to Read this Operation Manual
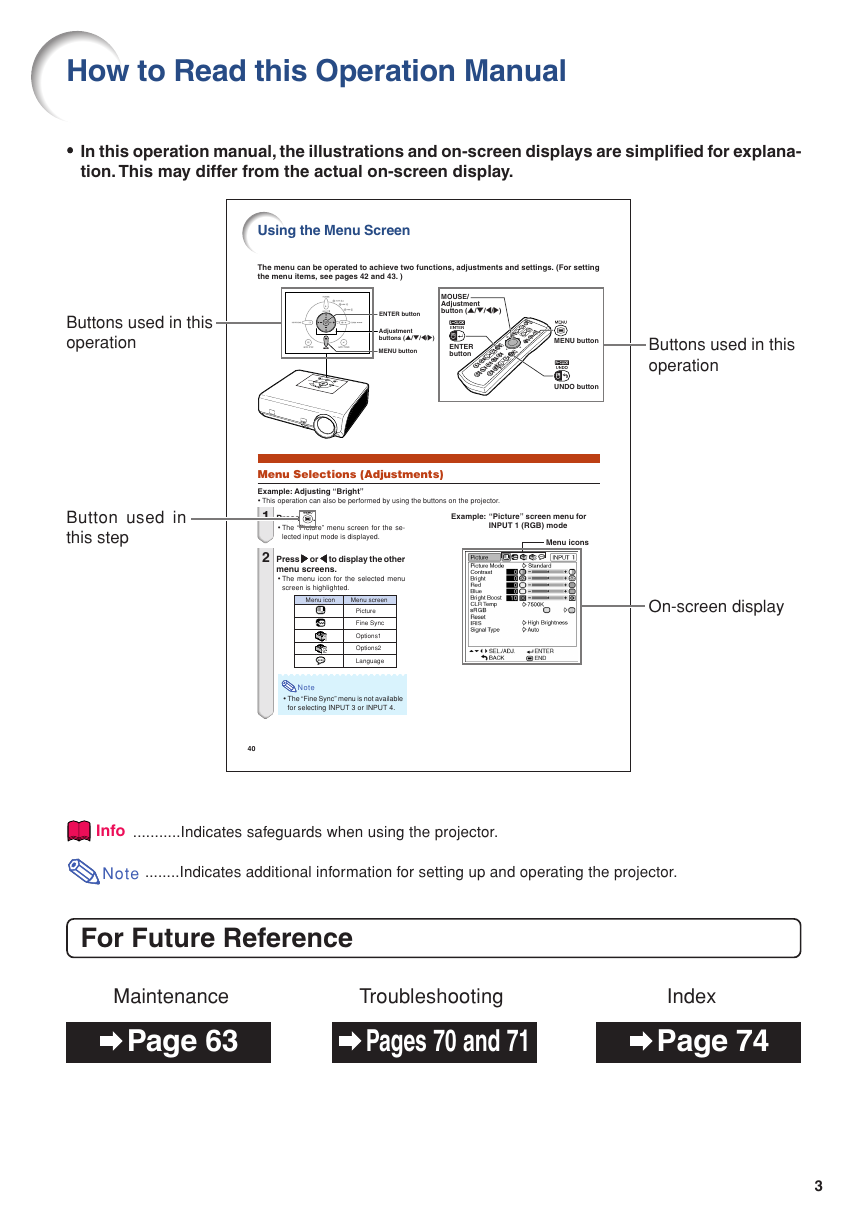
••••• In this operation manual, the illustrations and on-screen displays are simplified for explana-
tion. This may differ from the actual on-screen display.
Using the Menu Screen
The menu can be operated to achieve two functions, adjustments and settings. (For setting
the menu items, see pages 42 and 43. )
Buttons used in this
operation
ENTER button
Adjustment
buttons ('/"/\/|)
MENU button
MOUSE/
Adjustment
button ('/"/\/|)
ENTER
button
MENU button
UNDO button
Buttons used in this
operation
Menu Selections (Adjustments)
Example: Adjusting “Bright”
• This operation can also be performed by using the buttons on the projector.
1 Press
.
Example: “Picture” screen menu for
INPUT 1 (RGB) mode
Button used in
this step
• The “Picture” menu screen for the se-
lected input mode is displayed.
2 Press ||||| or \\\\\ to display the other
menu screens.
• The menu icon for the selected menu
screen is highlighted.
Menu icon
Menu screen
Picture
Fine Sync
Options1
Options2
Language
Note
• The “Fine Sync” menu is not available
for selecting INPUT 3 or INPUT 4.
40
Menu icons
On-screen display
Info ...........Indicates safeguards when using the projector.
Note ........Indicates additional information for setting up and operating the projector.
For Future Reference
Maintenance
Page 63
Troubleshooting
Pages 70 and 71
Index
Page 74
3
�
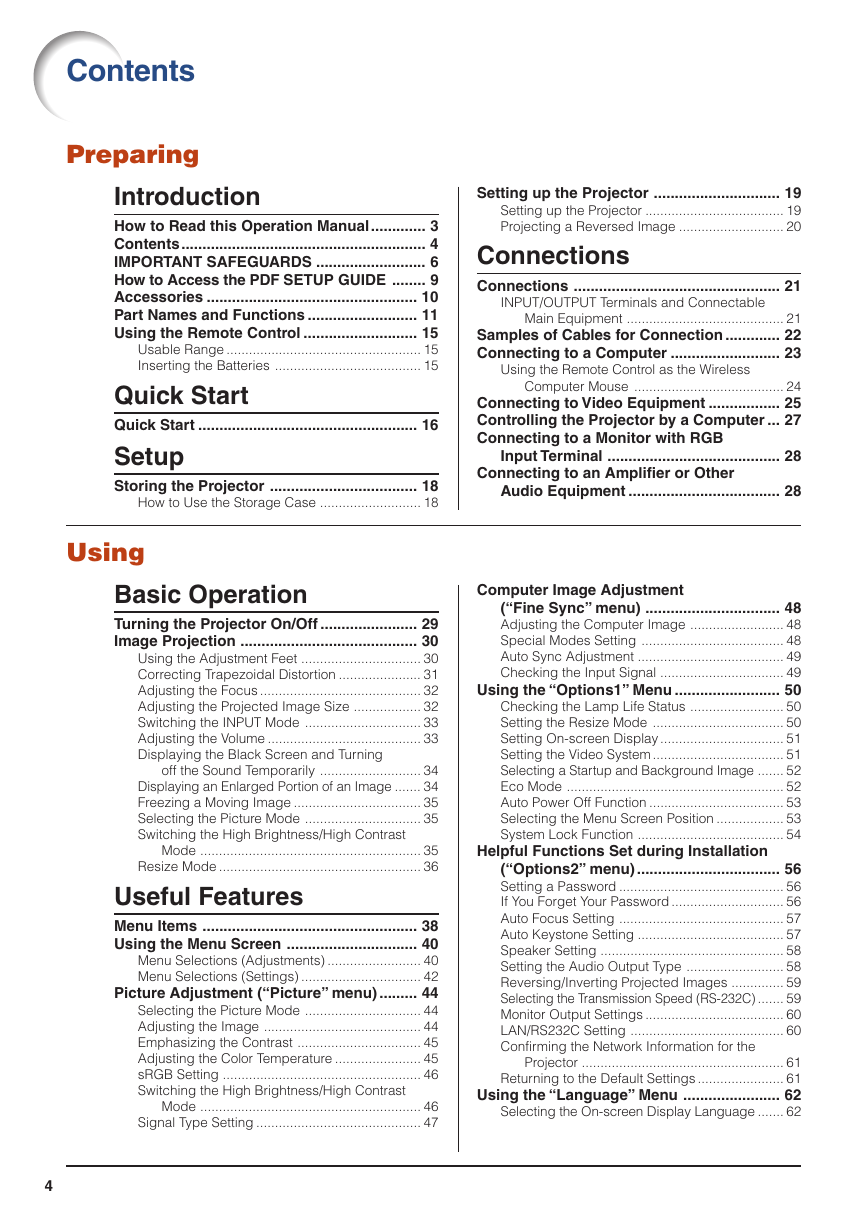
Contents
Preparing
Introduction
How to Read this Operation Manual............. 3
Contents.......................................................... 4
IMPORTANT SAFEGUARDS .......................... 6
How to Access the PDF SETUP GUIDE ........ 9
Accessories .................................................. 10
Part Names and Functions .......................... 11
Using the Remote Control ........................... 15
Usable Range .................................................... 15
Inserting the Batteries ....................................... 15
Quick Start
Quick Start .................................................... 16
Setup
Storing the Projector ................................... 18
How to Use the Storage Case ........................... 18
Using
Basic Operation
Turning the Projector On/Off ....................... 29
Image Projection .......................................... 30
Using the Adjustment Feet ................................ 30
Correcting Trapezoidal Distortion ...................... 31
Adjusting the Focus ........................................... 32
Adjusting the Projected Image Size .................. 32
Switching the INPUT Mode ............................... 33
Adjusting the Volume ......................................... 33
Displaying the Black Screen and Turning
off the Sound Temporarily ........................... 34
Displaying an Enlarged Portion of an Image ....... 34
Freezing a Moving Image .................................. 35
Selecting the Picture Mode ............................... 35
Switching the High Brightness/High Contrast
Mode ........................................................... 35
Resize Mode ...................................................... 36
Useful Features
Menu Items ................................................... 38
Using the Menu Screen ............................... 40
Menu Selections (Adjustments) ......................... 40
Menu Selections (Settings) ................................ 42
Picture Adjustment (“Picture” menu) ......... 44
Selecting the Picture Mode ............................... 44
Adjusting the Image .......................................... 44
Emphasizing the Contrast ................................. 45
Adjusting the Color Temperature ....................... 45
sRGB Setting ..................................................... 46
Switching the High Brightness/High Contrast
Mode ........................................................... 46
Signal Type Setting ............................................ 47
4
Setting up the Projector .............................. 19
Setting up the Projector ..................................... 19
Projecting a Reversed Image ............................ 20
Connections
Connections ................................................. 21
INPUT/OUTPUT Terminals and Connectable
Main Equipment .......................................... 21
Samples of Cables for Connection ............. 22
Connecting to a Computer .......................... 23
Using the Remote Control as the Wireless
Computer Mouse ........................................ 24
Connecting to Video Equipment ................. 25
Controlling the Projector by a Computer ... 27
Connecting to a Monitor with RGB
Input Terminal ......................................... 28
Connecting to an Amplifier or Other
Audio Equipment .................................... 28
Computer Image Adjustment
(“Fine Sync” menu) ................................ 48
Adjusting the Computer Image ......................... 48
Special Modes Setting ...................................... 48
Auto Sync Adjustment ....................................... 49
Checking the Input Signal ................................. 49
Using the “Options1” Menu ......................... 50
Checking the Lamp Life Status ......................... 50
Setting the Resize Mode ................................... 50
Setting On-screen Display ................................. 51
Setting the Video System ................................... 51
Selecting a Startup and Background Image ....... 52
Eco Mode .......................................................... 52
Auto Power Off Function .................................... 53
Selecting the Menu Screen Position .................. 53
System Lock Function ....................................... 54
Helpful Functions Set during Installation
(“Options2” menu) .................................. 56
Setting a Password ............................................ 56
If You Forget Your Password .............................. 56
Auto Focus Setting ............................................ 57
Auto Keystone Setting ....................................... 57
Speaker Setting ................................................. 58
Setting the Audio Output Type .......................... 58
Reversing/Inverting Projected Images .............. 59
Selecting the Transmission Speed (RS-232C) ....... 59
Monitor Output Settings ..................................... 60
LAN/RS232C Setting ......................................... 60
Confirming the Network Information for the
Projector ...................................................... 61
Returning to the Default Settings ....................... 61
Using the “Language” Menu ....................... 62
Selecting the On-screen Display Language ....... 62
�


 2023年江西萍乡中考道德与法治真题及答案.doc
 2012年重庆南川中考生物真题及答案.doc
 2013年江西师范大学地理学综合及文艺理论基础考研真题.doc
 2020年四川甘孜小升初语文真题及答案I卷.doc
 2020年注册岩土工程师专业基础考试真题及答案.doc
 2023-2024学年福建省厦门市九年级上学期数学月考试题及答案.doc
 2021-2022学年辽宁省沈阳市大东区九年级上学期语文期末试题及答案.doc
 2022-2023学年北京东城区初三第一学期物理期末试卷及答案.doc
 2018上半年江西教师资格初中地理学科知识与教学能力真题及答案.doc
 2012年河北国家公务员申论考试真题及答案-省级.doc
 2020-2021学年江苏省扬州市江都区邵樊片九年级上学期数学第一次质量检测试题及答案.doc
 2022下半年黑龙江教师资格证中学综合素质真题及答案.doc