< > !
R-30+A/R-30+A Mate/R-30iB CONTROLLER
CC-Link Interface (Slave)
OPERATOR'S MANUAL
B-82654EN/04
�
• Original Instructions
Before using the Robot, be sure to read the "FANUC Robot Safety Manual (B-80687EN)" and
understand the content.
• No part of this manual may be reproduced in any form.
• All specifications and designs are subject to change without notice.
The products in this manual are controlled based on Japan’s “Foreign Exchange and
Foreign Trade Law”. The export from Japan may be subject to an export license by the
government of Japan.
Further, re-export to another country may be subject to the license of the government of
the country from where the product is re-exported. Furthermore, the product may also be
controlled by re-export regulations of the United States government.
Should you wish to export or re-export these products, please contact FANUC for advice.
In this manual we have tried as much as possible to describe all the various matters.
However, we cannot describe all the matters which must not be done, or which cannot be
done, because there are so many possibilities.
Therefore, matters which are not especially described as possible in this manual should be
regarded as ”impossible”.
�
B-82654EN/04
SAFETY PRECAUTIONS
SAFETY PRECAUTIONS
Thank you for purchasing FANUC Robot.
This chapter describes the precautions which must be observed to ensure the safe use of the robot.
Before attempting to use the robot, be sure to read this chapter thoroughly.
Before using the functions related to robot operation, read the relevant operator's manual to become
familiar with those functions.
If any description in this chapter differs from that in the other part of this manual, the description given in
this chapter shall take precedence.
For the safety of the operator and the system, follow all safety precautions when operating a robot and its
peripheral devices installed in a work cell.
In addition, refer to the “FANUC Robot SAFETY HANDBOOK (B-80687EN)”.
WORKING PERSON
The personnel can be classified as follows.
Operator:
• Turns robot controller power ON/OFF
• Starts robot program from operator’s panel
Programmer or teaching operator:
• Operates the robot
• Teaches robot inside the safety fence
Maintenance engineer:
• Operates the robot
• Teaches robot inside the safety fence
• Maintenance (adjustment, replacement)
1
-
-
An operator cannot work inside the safety fence.
A programmer, teaching operator, and maintenance engineer can work inside the safety fence. The
working activities inside the safety fence include lifting, setting, teaching, adjusting, maintenance,
etc.
To work inside the fence, the person must be trained on proper robot operation.
-
During the operation, programming, and maintenance of your robotic system, the programmer, teaching
operator, and maintenance engineer should take additional care of their safety by using the following
safety precautions.
-
- Wear safety shoes
-
Use adequate clothing or uniforms during system operation
Use helmet
s-1
�
2
SAFETY PRECAUTIONS
B-82654EN/04
DEFINITION OF WARNING, CAUTION AND
NOTE
To ensure the safety of user and prevent damage to the machine, this manual indicates each precaution on
safety with "Warning" or "Caution" according to its severity. Supplementary information is indicated by
"Note". Read the contents of each "Warning", "Caution" and "Note" before attempting to use the
oscillator.
WARNING
Applied when there is a danger of the user being injured or when there is a
danger of both the user being injured and the equipment being damaged if the
approved procedure is not observed.
CAUTION
Applied when there is a danger of the equipment being damaged, if the
approved procedure is not observed.
NOTE
Notes are used to indicate supplementary information other than Warnings and
Cautions.
•
3
Read this manual carefully, and store it in a sales place.
WORKING PERSON SAFETY
Working person safety is the primary safety consideration. Because it is very dangerous to enter the
operating space of the robot during automatic operation, adequate safety precautions must be observed.
The following lists the general safety precautions. Careful consideration must be made to ensure
working person safety.
(1) Have the robot system working persons attend the training courses held by FANUC.
FANUC provides various training courses. Contact our sales office for details.
(2) Even when the robot is stationary, it is possible that the robot is still in a ready to move state, and is
waiting for a signal. In this state, the robot is regarded as still in motion. To ensure working
person safety, provide the system with an alarm to indicate visually or aurally that the robot is in
motion.
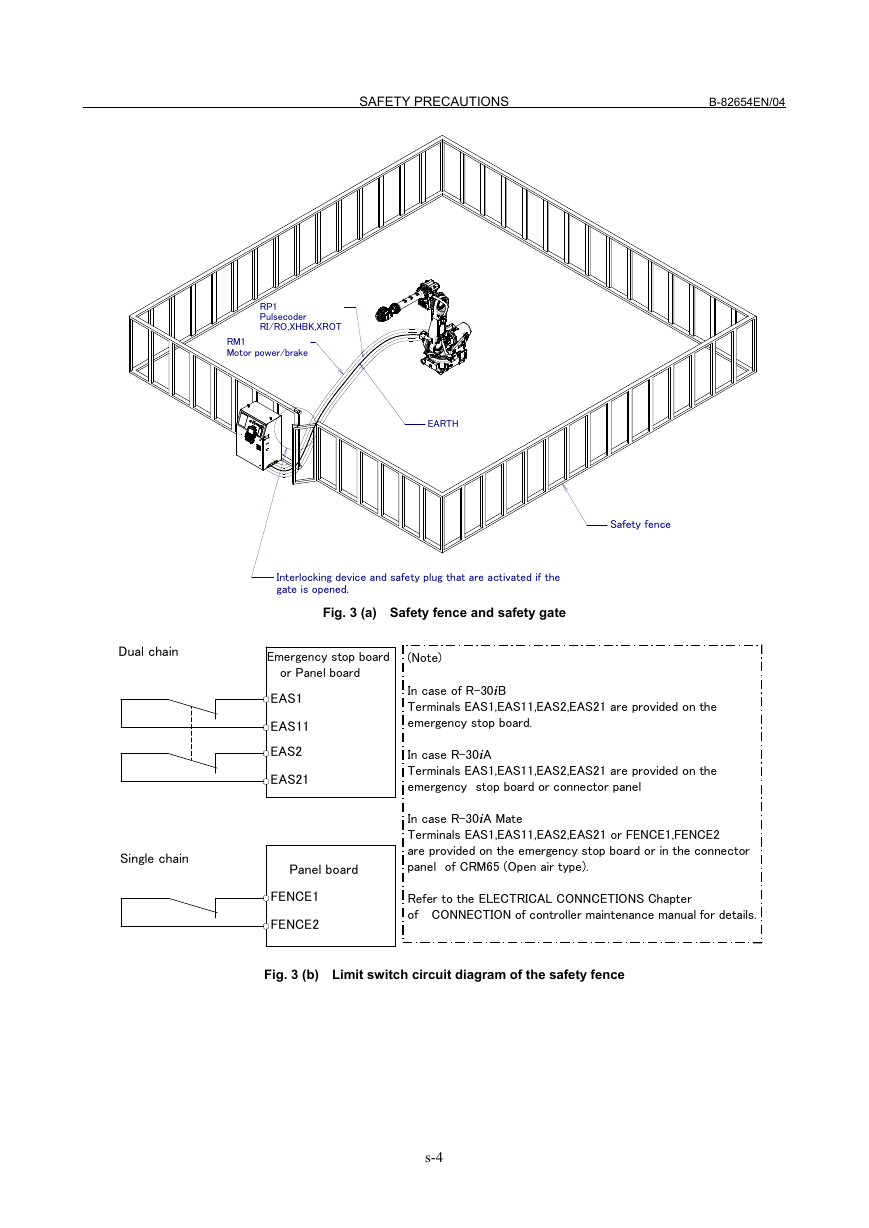
(3) Install a safety fence with a gate so that no working person can enter the work area without passing
through the gate. Install an interlocking device, a safety plug, and so forth in the safety gate so that
the robot is stopped as the safety gate is opened.
The controller is designed to receive this interlocking signal of the door switch. When the gate
is opened and this signal received, the controller stops the robot (Please refer to "STOP
TYPE OF ROBOT" in SAFETY PRECAUTIONS for detail of stop type). For connection, see
Fig.3 (a) and Fig.3 (b).
(4) Provide the peripheral devices with appropriate grounding (Class A, Class B, Class C, and Class D).
s-2
�
B-82654EN/04
SAFETY PRECAUTIONS
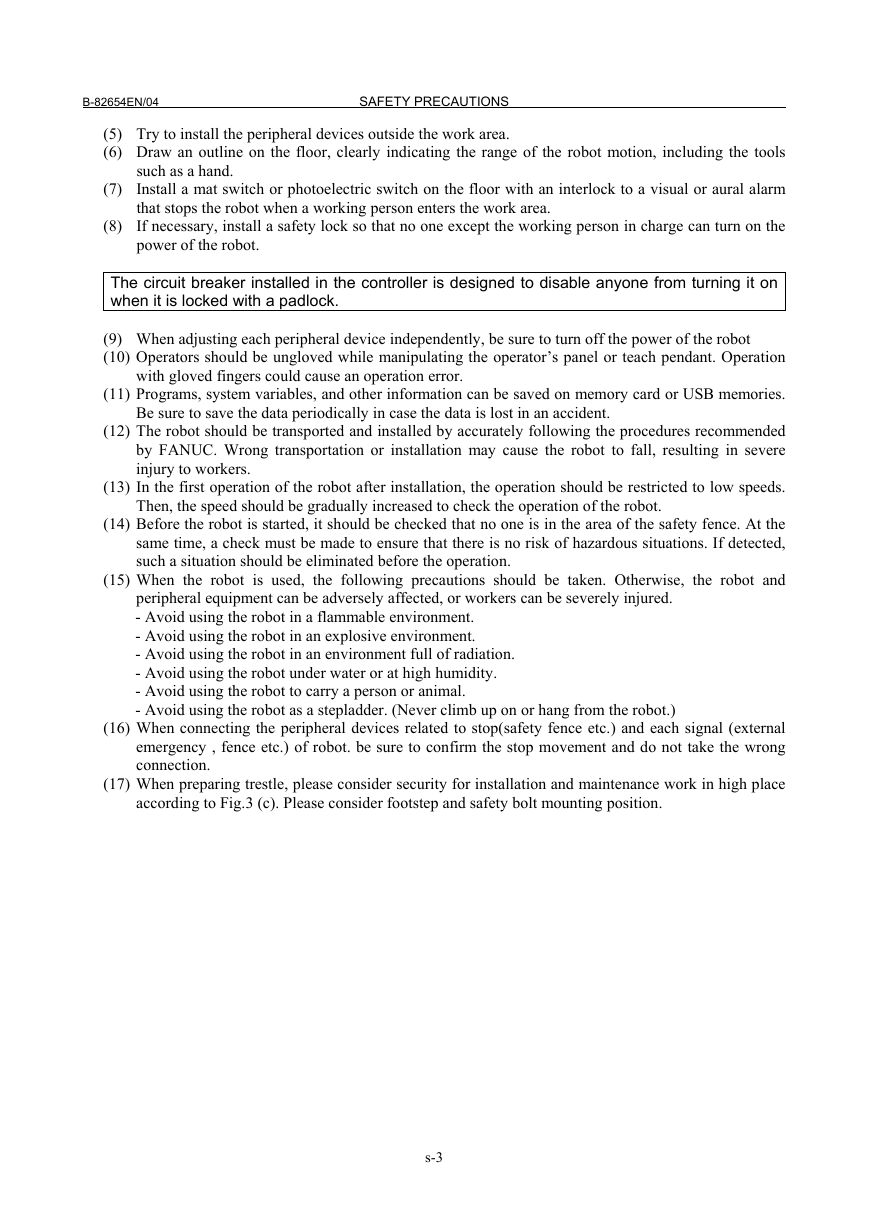
(5) Try to install the peripheral devices outside the work area.
(6) Draw an outline on the floor, clearly indicating the range of the robot motion, including the tools
(7) Install a mat switch or photoelectric switch on the floor with an interlock to a visual or aural alarm
that stops the robot when a working person enters the work area.
(8) If necessary, install a safety lock so that no one except the working person in charge can turn on the
such as a hand.
power of the robot.
The circuit breaker installed in the controller is designed to disable anyone from turning it on
when it is locked with a padlock.
(9) When adjusting each peripheral device independently, be sure to turn off the power of the robot
(10) Operators should be ungloved while manipulating the operator’s panel or teach pendant. Operation
with gloved fingers could cause an operation error.
(11) Programs, system variables, and other information can be saved on memory card or USB memories.
Be sure to save the data periodically in case the data is lost in an accident.
(12) The robot should be transported and installed by accurately following the procedures recommended
by FANUC. Wrong transportation or installation may cause the robot to fall, resulting in severe
injury to workers.
(13) In the first operation of the robot after installation, the operation should be restricted to low speeds.
Then, the speed should be gradually increased to check the operation of the robot.
(14) Before the robot is started, it should be checked that no one is in the area of the safety fence. At the
same time, a check must be made to ensure that there is no risk of hazardous situations. If detected,
such a situation should be eliminated before the operation.
(15) When the robot is used, the following precautions should be taken. Otherwise, the robot and
peripheral equipment can be adversely affected, or workers can be severely injured.
- Avoid using the robot in a flammable environment.
- Avoid using the robot in an explosive environment.
- Avoid using the robot in an environment full of radiation.
- Avoid using the robot under water or at high humidity.
- Avoid using the robot to carry a person or animal.
- Avoid using the robot as a stepladder. (Never climb up on or hang from the robot.)
(16) When connecting the peripheral devices related to stop(safety fence etc.) and each signal (external
emergency , fence etc.) of robot. be sure to confirm the stop movement and do not take the wrong
connection.
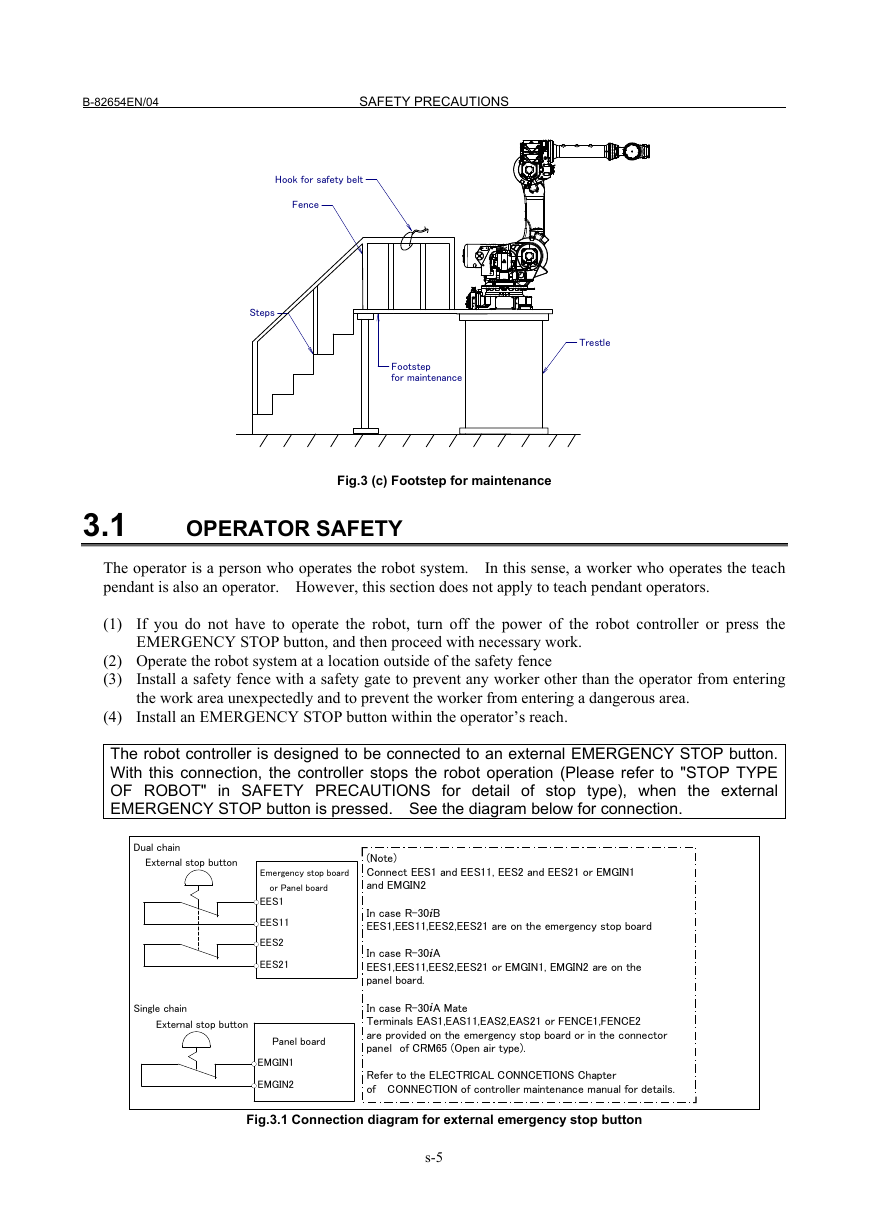
(17) When preparing trestle, please consider security for installation and maintenance work in high place
according to Fig.3 (c). Please consider footstep and safety bolt mounting position.
s-3
�
SAFETY PRECAUTIONS
B-82654EN/04
RP1
Pulsecoder
RI/RO,XHBK,XROT
RM1
Motor power/brake
EARTH
Safety fence
Interlocking device and safety plug that are activated if the
gate is opened.
Fig. 3 (a) Safety fence and safety gate
Dual chain
Emergency stop board
Panel board
or Panel board
EAS1
EAS11
EAS2
EAS21
Panel board
FENCE1
FENCE2
Single chain
(Note)
(Note)
In case of R-30iB
In case of R-30iA
Terminals EAS1,EAS11,EAS2,EAS21 are provided on the
Terminals EAS1,EAS11,EAS2,EAS21 or FENCE1,FENCE2
emergency stop board.
are provided on the operation box or on the terminal block
of the printed circuit board.
In case R-30iA
In case of R-30iA Mate
Terminals EAS1,EAS11,EAS2,EAS21 are provided on the
Terminals EAS1,EAS11,EAS2,EAS21 are provided
emergency stop board or connector panel
on the emergency stop board or connector panel.
(in case of Open air type)
In case R-30iA Mate
Terminals EAS1,EAS11,EAS2,EAS21 or FENCE1,FENCE2
Termianls FENCE1,FENCE2 are provided
on the emergency stop board.
are provided on the emergency stop board or in the connector
panel of CRM65 (Open air type).
Refer to the ELECTRICAL CONNCETIONS Chapter
of CONNECTION of controller maintenance manual for details.
Refer to controller maintenance manual for details.
Fig. 3 (b) Limit switch circuit diagram of the safety fence
s-4
�
B-82654EN/04
SAFETY PRECAUTIONS
Hook for safety belt
Fence
Steps
Footstep
for maintenance
Trestle
Fig.3 (c) Footstep for maintenance
OPERATOR SAFETY
3.1
The operator is a person who operates the robot system. In this sense, a worker who operates the teach
pendant is also an operator. However, this section does not apply to teach pendant operators.
(1) If you do not have to operate the robot, turn off the power of the robot controller or press the
EMERGENCY STOP button, and then proceed with necessary work.
(2) Operate the robot system at a location outside of the safety fence
(3) Install a safety fence with a safety gate to prevent any worker other than the operator from entering
the work area unexpectedly and to prevent the worker from entering a dangerous area.
(4) Install an EMERGENCY STOP button within the operator’s reach.
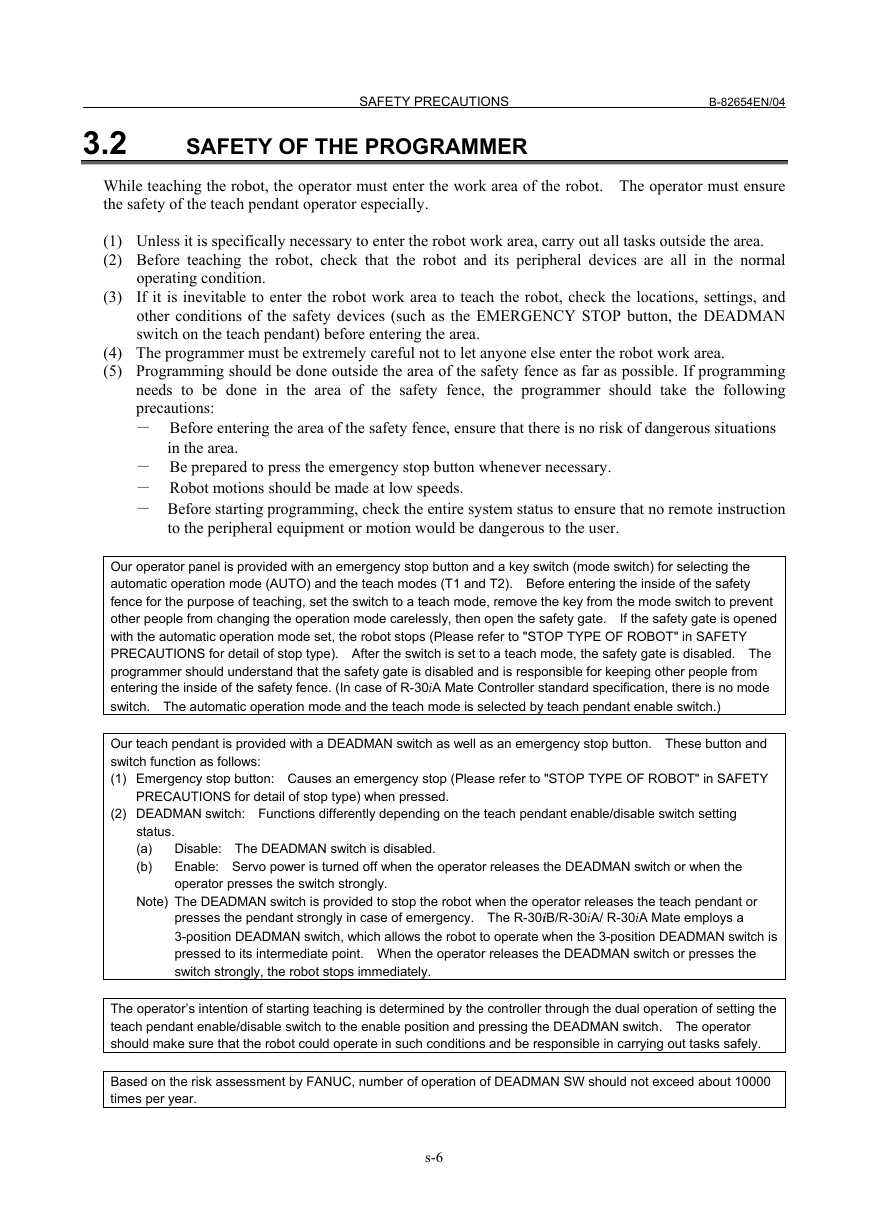
The robot controller is designed to be connected to an external EMERGENCY STOP button.
With this connection, the controller stops the robot operation (Please refer to "STOP TYPE
OF ROBOT" in SAFETY PRECAUTIONS for detail of stop type), when the external
EMERGENCY STOP button is pressed. See the diagram below for connection.
Dual chain
External stop button
Single chain
External stop button
Emergency stop board
Panel board
or Panel board
EES1
EES11
EES2
EES21
Panel board
EMGIN1
EMGIN2
(Note)
Connect EES1 and EES11, EES2 and EES21 or EMGIN1
and EMGIN2
(Note)
In case R-30iB
Connect EES1and EES11,EES2 and EES21or EMGIN1and EMGIN2.
EES1,EES11,EES2,EES21 are on the emergency stop board
In case of R-30iA
In case R-30iA
EES1,EES11,EES2,EES21 or EMGIN1,EMGIN2 are on the panel board.
EES1,EES11,EES2,EES21 or EMGIN1, EMGIN2 are on the
In case of R-30iA Mate
panel board.
EES1,EES11,EES2,EES21 are on the emergency stop board
or connector panel (in case of Open air type).
In case R-30iA Mate
EMGIN1,EMGIN2 are on the emergency stop board.
Terminals EAS1,EAS11,EAS2,EAS21 or FENCE1,FENCE2
Refer to the maintenance manual of the controller for details.
are provided on the emergency stop board or in the connector
panel of CRM65 (Open air type).
Refer to the ELECTRICAL CONNCETIONS Chapter
of CONNECTION of controller maintenance manual for details.
Fig.3.1 Connection diagram for external emergency stop button
s-5
�
3.2
SAFETY PRECAUTIONS
B-82654EN/04
SAFETY OF THE PROGRAMMER
While teaching the robot, the operator must enter the work area of the robot. The operator must ensure
the safety of the teach pendant operator especially.
(1) Unless it is specifically necessary to enter the robot work area, carry out all tasks outside the area.
(2) Before teaching the robot, check that the robot and its peripheral devices are all in the normal
operating condition.
(3) If it is inevitable to enter the robot work area to teach the robot, check the locations, settings, and
other conditions of the safety devices (such as the EMERGENCY STOP button, the DEADMAN
switch on the teach pendant) before entering the area.
(4) The programmer must be extremely careful not to let anyone else enter the robot work area.
(5) Programming should be done outside the area of the safety fence as far as possible. If programming
needs to be done in the area of the safety fence, the programmer should take the following
precautions:
- Before entering the area of the safety fence, ensure that there is no risk of dangerous situations
in the area.
- Be prepared to press the emergency stop button whenever necessary.
- Robot motions should be made at low speeds.
- Before starting programming, check the entire system status to ensure that no remote instruction
to the peripheral equipment or motion would be dangerous to the user.
Our operator panel is provided with an emergency stop button and a key switch (mode switch) for selecting the
automatic operation mode (AUTO) and the teach modes (T1 and T2). Before entering the inside of the safety
fence for the purpose of teaching, set the switch to a teach mode, remove the key from the mode switch to prevent
other people from changing the operation mode carelessly, then open the safety gate. If the safety gate is opened
with the automatic operation mode set, the robot stops (Please refer to "STOP TYPE OF ROBOT" in SAFETY
PRECAUTIONS for detail of stop type). After the switch is set to a teach mode, the safety gate is disabled. The
programmer should understand that the safety gate is disabled and is responsible for keeping other people from
entering the inside of the safety fence. (In case of R-30iA Mate Controller standard specification, there is no mode
switch. The automatic operation mode and the teach mode is selected by teach pendant enable switch.)
Our teach pendant is provided with a DEADMAN switch as well as an emergency stop button. These button and
switch function as follows:
(1) Emergency stop button: Causes an emergency stop (Please refer to "STOP TYPE OF ROBOT" in SAFETY
PRECAUTIONS for detail of stop type) when pressed.
(2) DEADMAN switch: Functions differently depending on the teach pendant enable/disable switch setting
status.
(a) Disable: The DEADMAN switch is disabled.
(b)
Enable: Servo power is turned off when the operator releases the DEADMAN switch or when the
operator presses the switch strongly.
Note) The DEADMAN switch is provided to stop the robot when the operator releases the teach pendant or
presses the pendant strongly in case of emergency. The R-30iB/R-30iA/ R-30iA Mate employs a
3-position DEADMAN switch, which allows the robot to operate when the 3-position DEADMAN switch is
pressed to its intermediate point. When the operator releases the DEADMAN switch or presses the
switch strongly, the robot stops immediately.
The operator’s intention of starting teaching is determined by the controller through the dual operation of setting the
teach pendant enable/disable switch to the enable position and pressing the DEADMAN switch. The operator
should make sure that the robot could operate in such conditions and be responsible in carrying out tasks safely.
Based on the risk assessment by FANUC, number of operation of DEADMAN SW should not exceed about 10000
times per year.
s-6
�


 2023年江西萍乡中考道德与法治真题及答案.doc
 2012年重庆南川中考生物真题及答案.doc
 2013年江西师范大学地理学综合及文艺理论基础考研真题.doc
 2020年四川甘孜小升初语文真题及答案I卷.doc
 2020年注册岩土工程师专业基础考试真题及答案.doc
 2023-2024学年福建省厦门市九年级上学期数学月考试题及答案.doc
 2021-2022学年辽宁省沈阳市大东区九年级上学期语文期末试题及答案.doc
 2022-2023学年北京东城区初三第一学期物理期末试卷及答案.doc
 2018上半年江西教师资格初中地理学科知识与教学能力真题及答案.doc
 2012年河北国家公务员申论考试真题及答案-省级.doc
 2020-2021学年江苏省扬州市江都区邵樊片九年级上学期数学第一次质量检测试题及答案.doc
 2022下半年黑龙江教师资格证中学综合素质真题及答案.doc