Getting to Know the D1
Parts of the D1
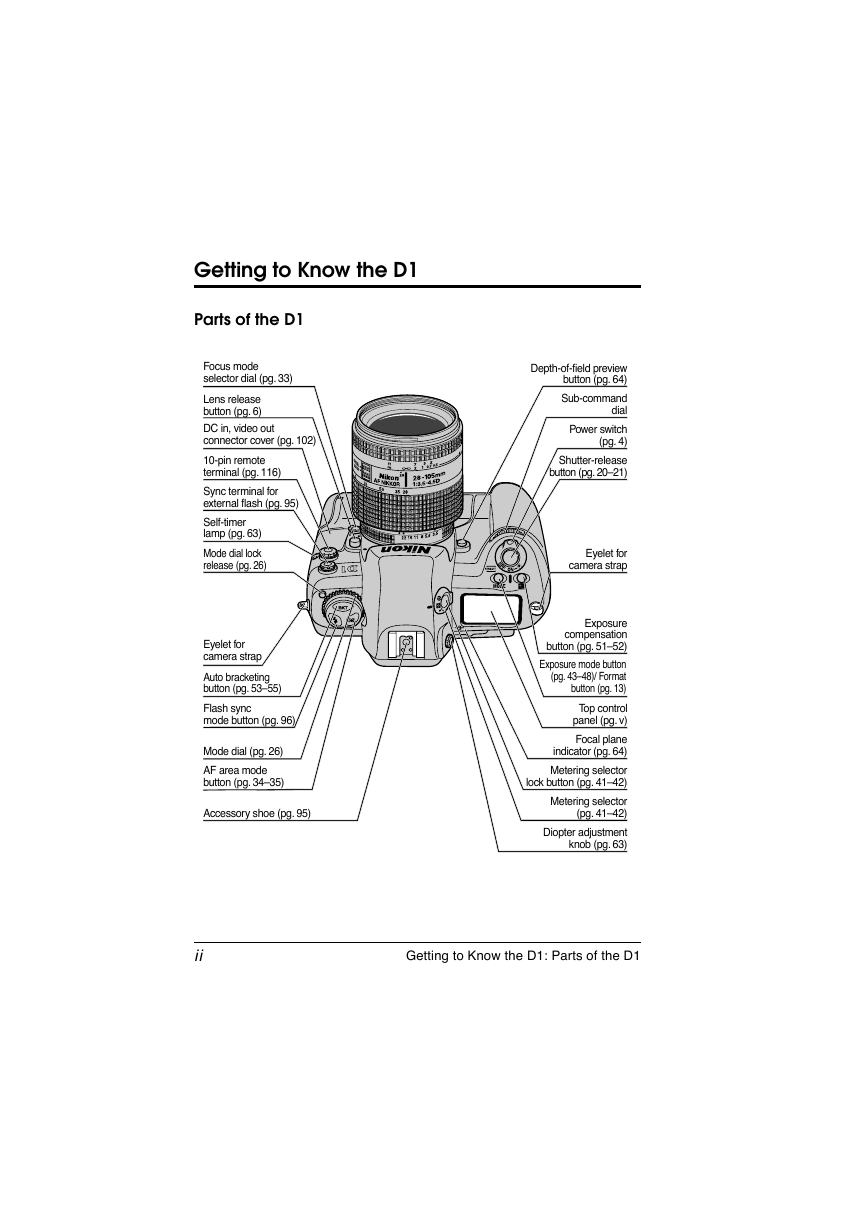
Focus mode
selector dial (pg. 33)
Lens release
button (pg. 6)
DC in, video out
connector cover (pg. 102)
10-pin remote
terminal (pg. 116)
Sync terminal for
external flash (pg. 95)
Self-timer
lamp (pg. 63)
Mode dial lock
release (pg. 26)
Eyelet for
camera strap
Auto bracketing
button (pg. 53–55)
Flash sync
mode button (pg. 96)
Mode dial (pg. 26)
AF area mode
button (pg. 34–35)
Accessory shoe (pg. 95)
Depth-of-field preview
button (pg. 64)
Sub-command
dial
Power switch
(pg. 4)
Shutter-release
button (pg. 20–21)
Eyelet for
camera strap
Exposure
compensation
button (pg. 51–52)
Exposure mode button
(pg. 43–48)/ Format
button (pg. 13)
Top control
panel (pg. v)
Focal plane
indicator (pg. 64)
Metering selector
lock button (pg. 41–42)
Metering selector
(pg. 41–42)
Diopter adjustment
knob (pg. 63)
ii
Getting to Know the D1: Parts of the D1
�
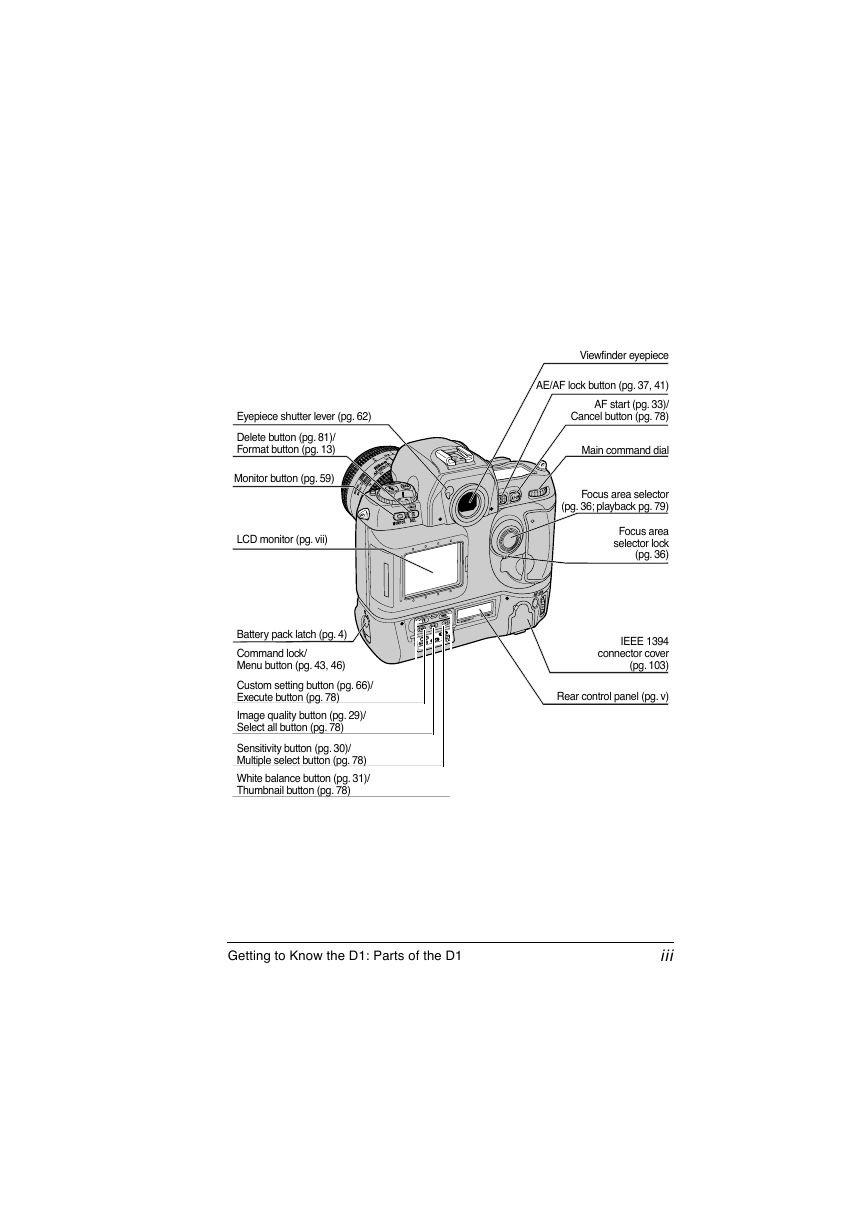
Viewfinder eyepiece
AE/AF lock button (pg. 37, 41)
AF start (pg. 33)/
Cancel button (pg. 78)
Main command dial
Focus area selector
(pg. 36; playback pg. 79)
Focus area
selector lock
(pg. 36)
IEEE 1394
connector cover
(pg. 103)
Rear control panel (pg. v)
Eyepiece shutter lever (pg. 62)
Delete button (pg. 81)/
Format button (pg. 13)
Monitor button (pg. 59)
LCD monitor (pg. vii)
Battery pack latch (pg. 4)
Command lock/
Menu button (pg. 43, 46)
Custom setting button (pg. 66)/
Execute button (pg. 78)
Image quality button (pg. 29)/
Select all button (pg. 78)
Sensitivity button (pg. 30)/
Multiple select button (pg. 78)
White balance button (pg. 31)/
Thumbnail button (pg. 78)
Getting to Know the D1: Parts of the D1
iii
�
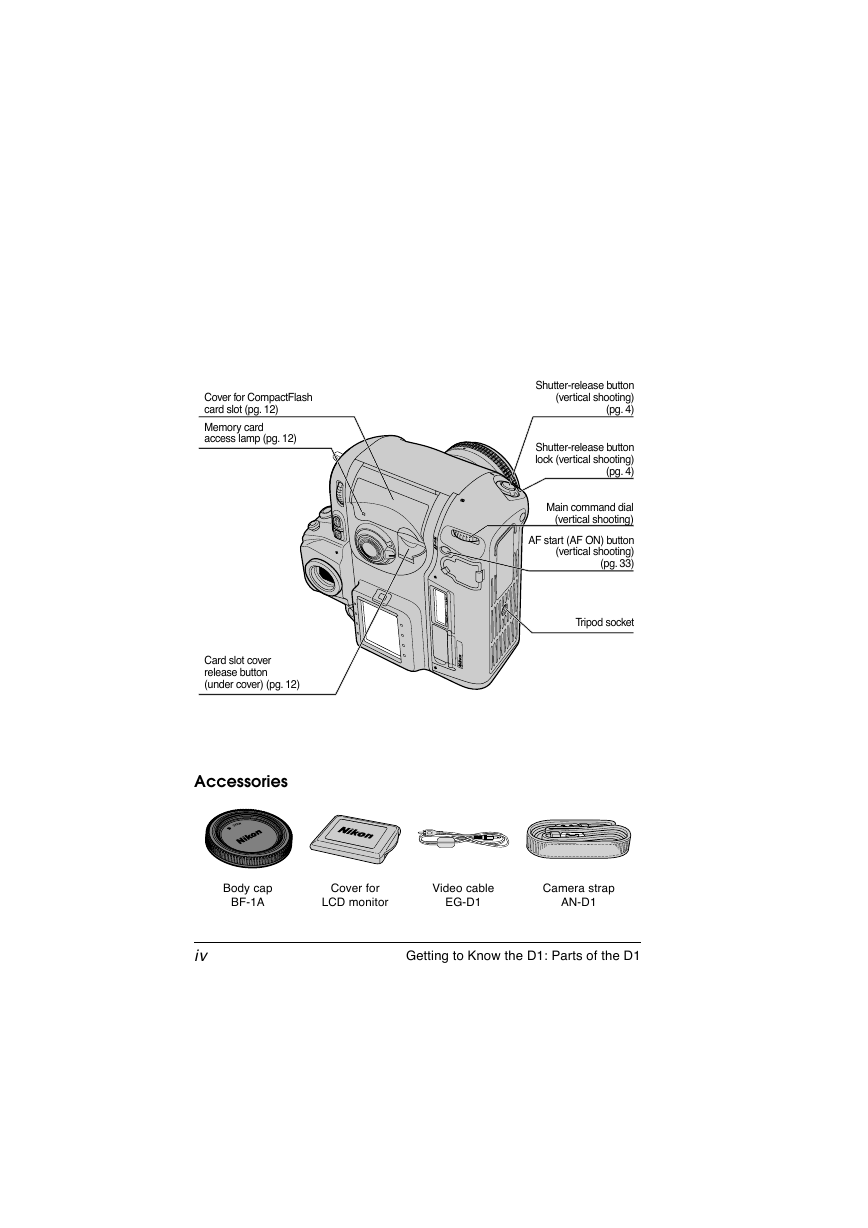
Shutter-release button
(vertical shooting)
(pg. 4)
Shutter-release button
lock (vertical shooting)
(pg. 4)
Main command dial
(vertical shooting)
AF start (AF ON) button
(vertical shooting)
(pg. 33)
Tripod socket
Cover for CompactFlash
card slot (pg. 12)
Memory card
access lamp (pg. 12)
Card slot cover
release button
(under cover) (pg. 12)
Accessories
Body cap
BF-1A
Cover for
LCD monitor
Video cable
EG-D1
Camera strap
AN-D1
iv
Getting to Know the D1: Parts of the D1
�
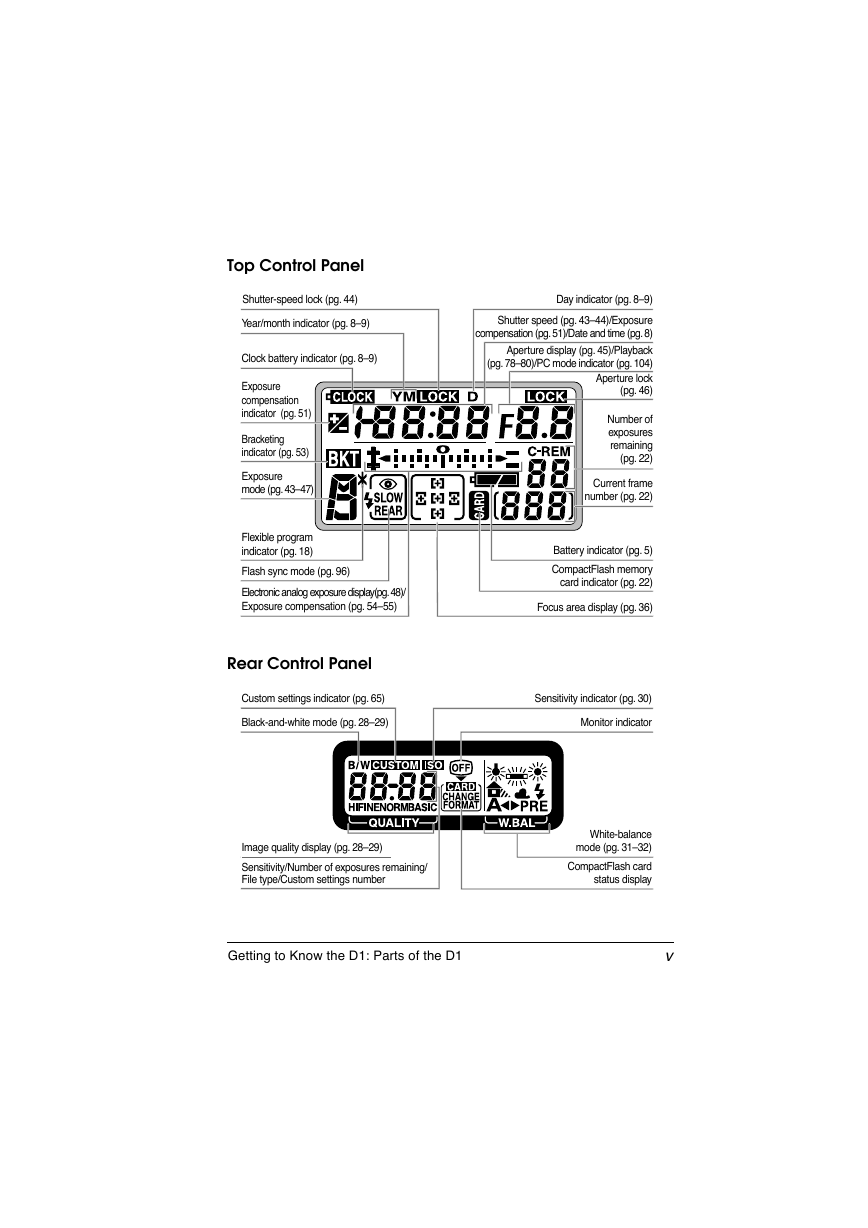
Top Control Panel
Shutter-speed lock (pg. 44)
Year/month indicator (pg. 8–9)
Clock battery indicator (pg. 8–9)
Exposure
compensation
indicator (pg. 51)
Bracketing
indicator (pg. 53)
Exposure
mode (pg. 43–47)
Flexible program
indicator (pg. 18)
Flash sync mode (pg. 96)
Electronic analog exposure display(pg. 48)/
Exposure compensation (pg. 54–55)
Rear Control Panel
Custom settings indicator (pg. 65)
Black-and-white mode (pg. 28–29)
Day indicator (pg. 8–9)
Shutter speed (pg. 43–44)/Exposure
compensation (pg. 51)/Date and time (pg. 8)
Aperture display (pg. 45)/Playback
(pg. 78–80)/PC mode indicator (pg. 104)
Aperture lock
(pg. 46)
Number of
exposures
remaining
(pg. 22)
Current frame
number (pg. 22)
Battery indicator (pg. 5)
CompactFlash memory
card indicator (pg. 22)
Focus area display (pg. 36)
Sensitivity indicator (pg. 30)
Monitor indicator
Image quality display (pg. 28–29)
Sensitivity/Number of exposures remaining/
File type/Custom settings number
White-balance
mode (pg. 31–32)
CompactFlash card
status display
Getting to Know the D1: Parts of the D1
v
�
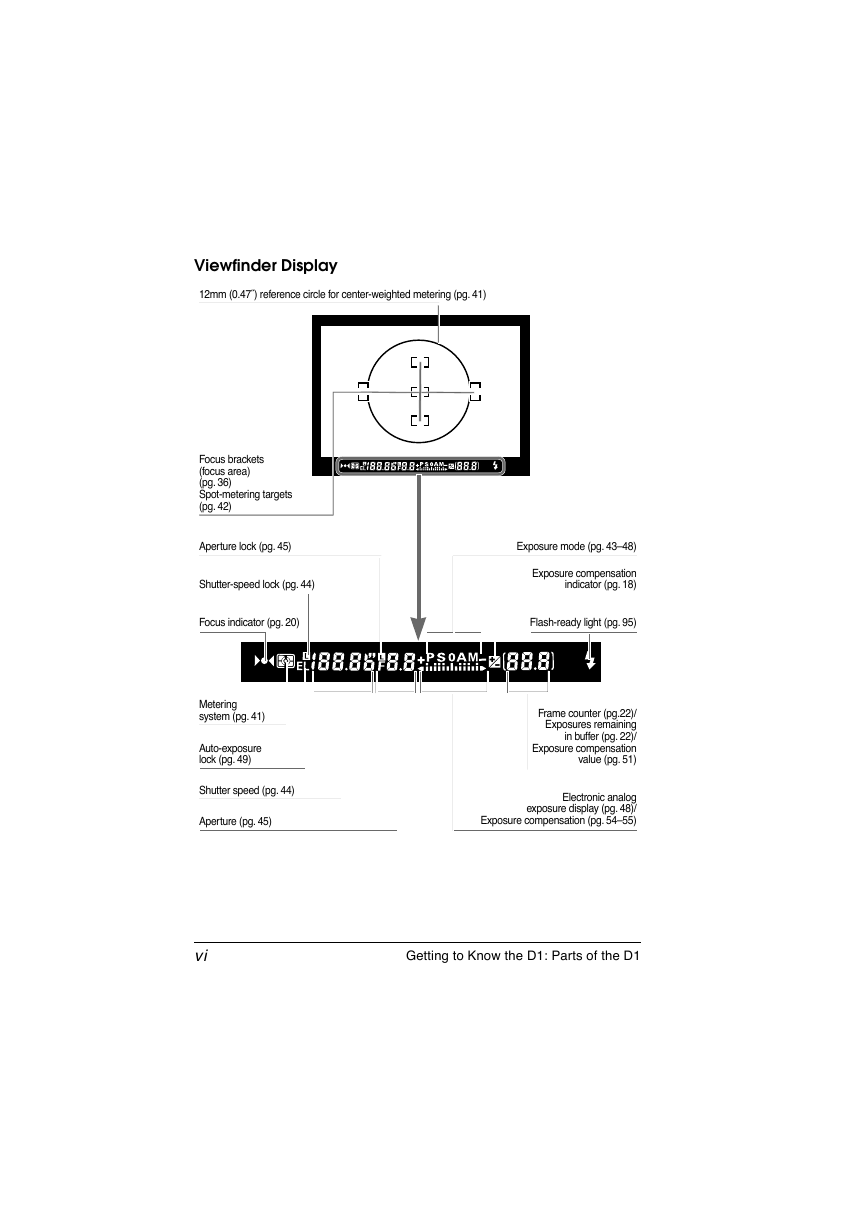
Viewfinder Display
12mm (0.47˝) reference circle for center-weighted metering (pg. 41)
Focus brackets
(focus area)
(pg. 36)
Spot-metering targets
(pg. 42)
Aperture lock (pg. 45)
Shutter-speed lock (pg. 44)
Exposure mode (pg. 43–48)
Exposure compensation
indicator (pg. 18)
Focus indicator (pg. 20)
Flash-ready light (pg. 95)
Metering
system (pg. 41)
Auto-exposure
lock (pg. 49)
Shutter speed (pg. 44)
Aperture (pg. 45)
Frame counter (pg.22)/
Exposures remaining
in buffer (pg. 22)/
Exposure compensation
value (pg. 51)
Electronic analog
exposure display (pg. 48)/
Exposure compensation (pg. 54–55)
vi
Getting to Know the D1: Parts of the D1
�
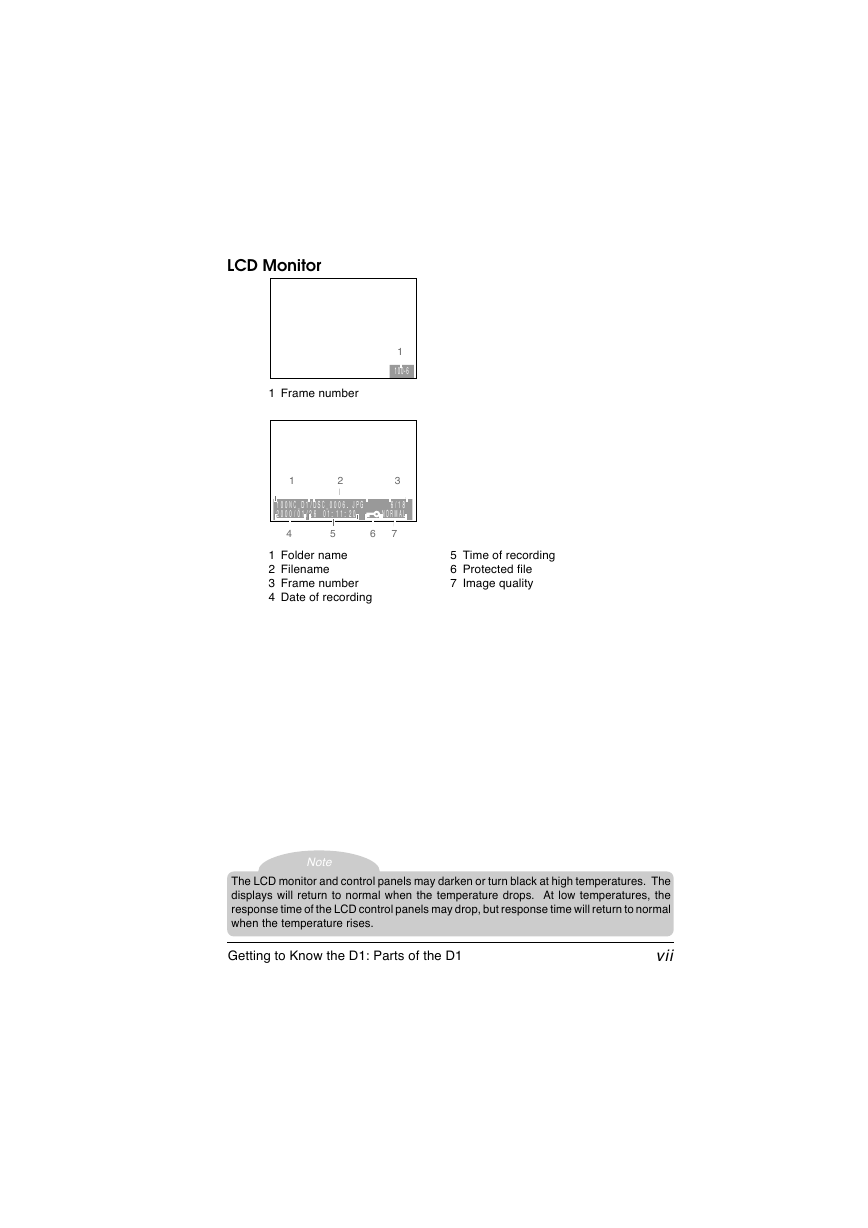
LCD Monitor
1
100-6
1 Frame number
1
2
3
1 0 0 N C _ D 1 / DS C _ 0 0 0 6 . J P G 6 / 1 8
2 0 0 0 / 0 1 / 2 6 0 1 : 1 1 : 2 0 N O R M A L
4
5
6
7
1 Folder name
2 Filename
3 Frame number
4 Date of recording
5 Time of recording
6 Protected file
7 Image quality
Note
The LCD monitor and control panels may darken or turn black at high temperatures. The
displays will return to normal when the temperature drops. At low temperatures, the
response time of the LCD control panels may drop, but response time will return to normal
when the temperature rises.
Getting to Know the D1: Parts of the D1
vii
�
Caring for the Camera and Battery
Do not drop
The camera and lens may malfunction if
subjected to strong shocks or vibration.
Keep dry
This product is not waterproof, and may
malfunction if immersed in water or exposed
to high levels of humidity. Rusting of the
internal mechanism can cause irreparable
damage.
Avoid sudden changes in temperature
Sudden changes in temperature, such as
occur when entering or leaving a heated
building on a cold day, can cause
condensation inside the device. To prevent
condensation, place the device in its carrying
case or a plastic bag before exposing it to
sudden changes in temperature.
Keep away from strong magnetic fields
Do not use or store this device in the vicinity
of equipment
that produces strong
electromagnetic radiation or magnetic
fields. Strong static charges or the magnetic
fields produced by equipment such as radio
transmitters could interfere with the color
LCD monitor, damage data stored on the
flash memory card, or affect the product’s
internal circuitry.
Do not touch shutter curtain
The shutter curtain is made of extremely thin
material and is easily damaged. Under no
circumstances should you exert pressure on
the curtain, poke it with cleaning tools or
other implements, or subject it to strong air
currents from a blower. Any of these actions
could scratch, deform, or tear the curtain.
Cleaning
• When cleaning the camera body, use a
blower to remove dust and lint, then wipe
gently with a soft, dry cloth. After using
your camera at the beach or seaside, wipe
off any sand or salt using a cloth lightly
dampened with pure water and then dry
your camera thoroughly. In rare instances,
static electricity produced by a brush or
cloth may cause the LCD displays to light
up or darken. This does not indicate a
malfunction, and the display will shortly
return to normal.
• When cleaning the lens and mirror,
remember that these elements are easily
damaged. Dust and lint should be gently
removed with a blower. When using an
aerosol blower, keep the can vertical (tilting
the can could result in liquid being sprayed
on the mirror). If you do get a fingerprint or
other stain on the lens, apply a small
amount of lens cleaner to a soft cloth and
wipe the lens carefully.
• See “Technical Notes: Cleaning the CCD”
for information on cleaning the CCD.
Storage
• To prevent mold or mildew, store the
equipment in a dry, well-ventilated area.
Do not store it with naptha or camphor
moth balls, close to equipment that
produces strong magnetic fields, or in areas
subject to high temperatures, for example
near a kerosene heater or in a car on a hot
day.
• When leaving the product unattended for a
long period of time, remove the battery to
prevent leakage and store the camera in a
plastic bag containing desiccant. Do not
however store the camera case in a plastic
bag, as this may cause the material to
deteriorate. Note also that desiccant loses
its ability to absorb moisture after a period
of time, and should be replaced at regular
intervals.
• To prevent mold or mildew, take the camera
out at least once a month to turn it on and
release the shutter a few times.
• Store the battery in a cool, dry place.
viii
Caring for the Camera and Battery
�
Color LCD monitor
• The monitor may contain a few pixels that
are always lit or that do not light. This is a
characteristic common to all TFT LCD
monitors and does not indicate a
malfunction. Images recorded with the
camera will not be affected.
Images in the monitor may be difficult to
see in a bright light.
•
• The monitor is lit by a fluorescent backlight.
Should the monitor begin to dim or flicker,
contact your Nikon service representative.
• Do not apply pressure to the LCD monitor,
as this could cause damage or malfunction.
Dust or lint adhering to the monitor can be
removed with a blower brush. Stains can
be removed by rubbing the surface lightly
with a soft cloth or chamois leather.
• Should the monitor break, care should be
taken to avoid injury due to broken glass
and to prevent the liquid crystal from the
monitor touching the skin or entering the
eyes or mouth.
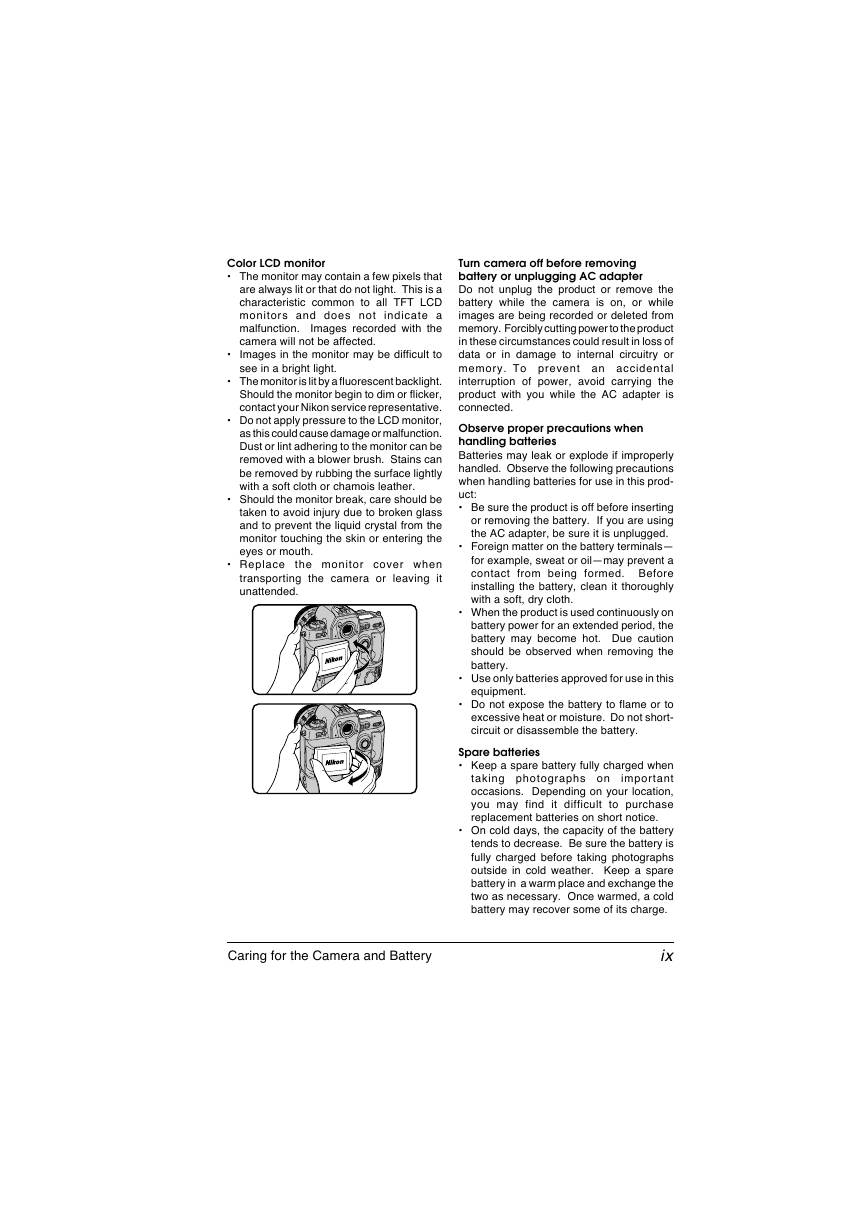
• Replace the monitor cover when
transporting the camera or leaving it
unattended.
Turn camera off before removing
battery or unplugging AC adapter
Do not unplug the product or remove the
battery while the camera is on, or while
images are being recorded or deleted from
memory. Forcibly cutting power to the product
in these circumstances could result in loss of
data or in damage to internal circuitry or
memory. To prevent an accidental
interruption of power, avoid carrying the
product with you while the AC adapter is
connected.
Observe proper precautions when
handling batteries
Batteries may leak or explode if improperly
handled. Observe the following precautions
when handling batteries for use in this prod-
uct:
• Be sure the product is off before inserting
or removing the battery. If you are using
the AC adapter, be sure it is unplugged.
• Foreign matter on the battery terminals—
for example, sweat or oil—may prevent a
contact from being formed. Before
installing the battery, clean it thoroughly
with a soft, dry cloth.
• When the product is used continuously on
battery power for an extended period, the
battery may become hot. Due caution
should be observed when removing the
battery.
• Use only batteries approved for use in this
equipment.
• Do not expose the battery to flame or to
excessive heat or moisture. Do not short-
circuit or disassemble the battery.
Spare batteries
• Keep a spare battery fully charged when
taking photographs on
important
occasions. Depending on your location,
you may find it difficult to purchase
replacement batteries on short notice.
• On cold days, the capacity of the battery
tends to decrease. Be sure the battery is
fully charged before taking photographs
outside in cold weather. Keep a spare
battery in a warm place and exchange the
two as necessary. Once warmed, a cold
battery may recover some of its charge.
Caring for the Camera and Battery
ix
�


 2023年江西萍乡中考道德与法治真题及答案.doc
 2012年重庆南川中考生物真题及答案.doc
 2013年江西师范大学地理学综合及文艺理论基础考研真题.doc
 2020年四川甘孜小升初语文真题及答案I卷.doc
 2020年注册岩土工程师专业基础考试真题及答案.doc
 2023-2024学年福建省厦门市九年级上学期数学月考试题及答案.doc
 2021-2022学年辽宁省沈阳市大东区九年级上学期语文期末试题及答案.doc
 2022-2023学年北京东城区初三第一学期物理期末试卷及答案.doc
 2018上半年江西教师资格初中地理学科知识与教学能力真题及答案.doc
 2012年河北国家公务员申论考试真题及答案-省级.doc
 2020-2021学年江苏省扬州市江都区邵樊片九年级上学期数学第一次质量检测试题及答案.doc
 2022下半年黑龙江教师资格证中学综合素质真题及答案.doc