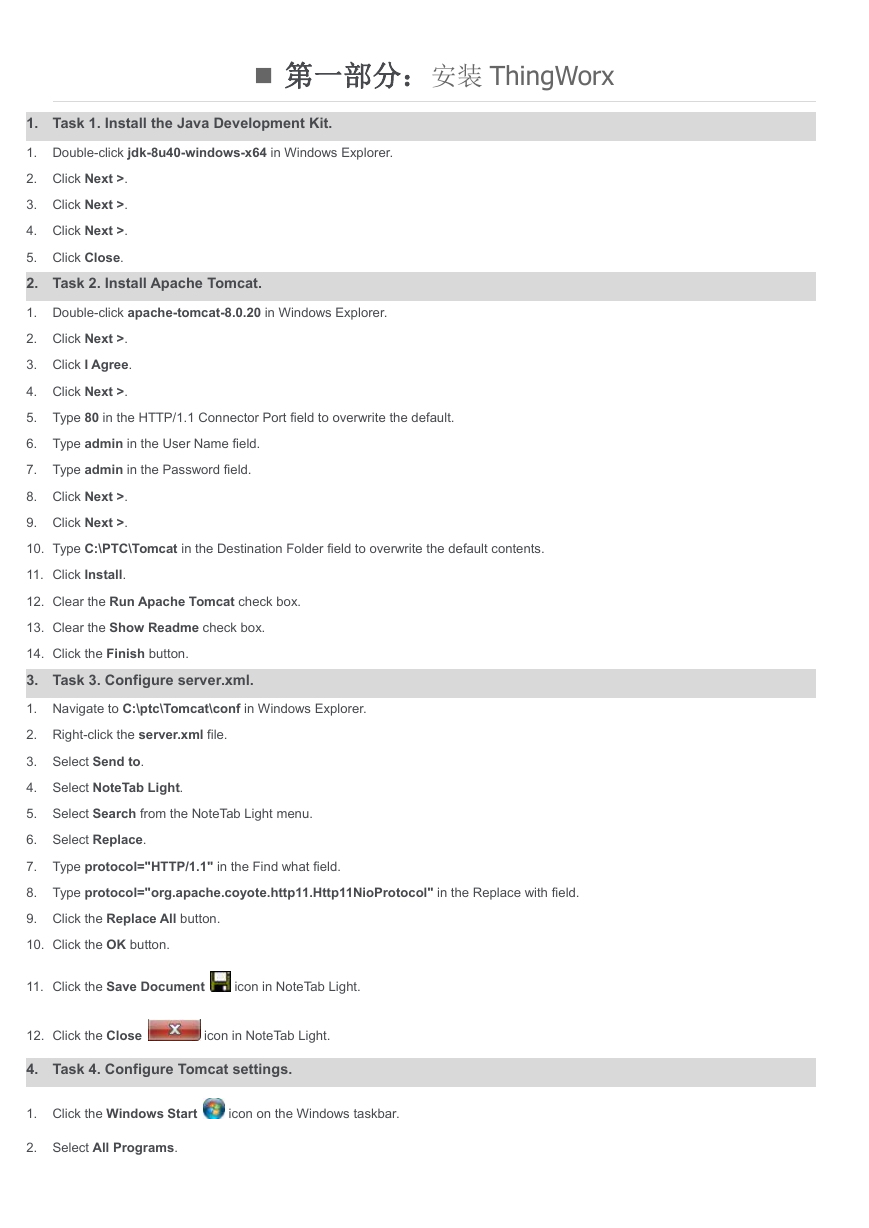
第一部分:安装ThingWorx
1.Task 1. Install the Java Development Kit.
2.Task 2. Install Apache Tomcat.
3.Task 3. Configure server.xml.
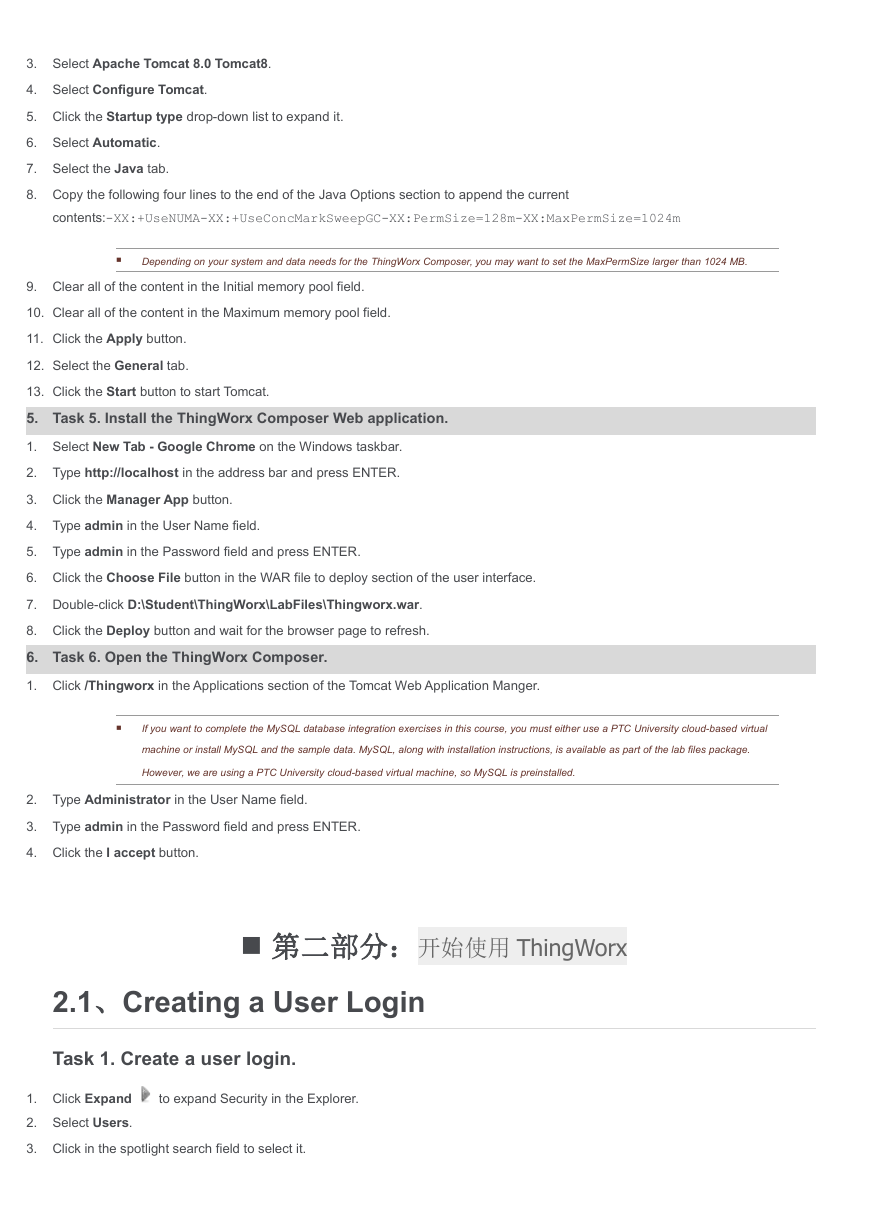
4.Task 4. Configure Tomcat settings.
5.Task 5. Install the ThingWorx Composer Web applica
6.Task 6. Open the ThingWorx Composer.
第二部分:开始使用ThingWorx
2.1、Creating a User Login
Task 1. Create a user login.
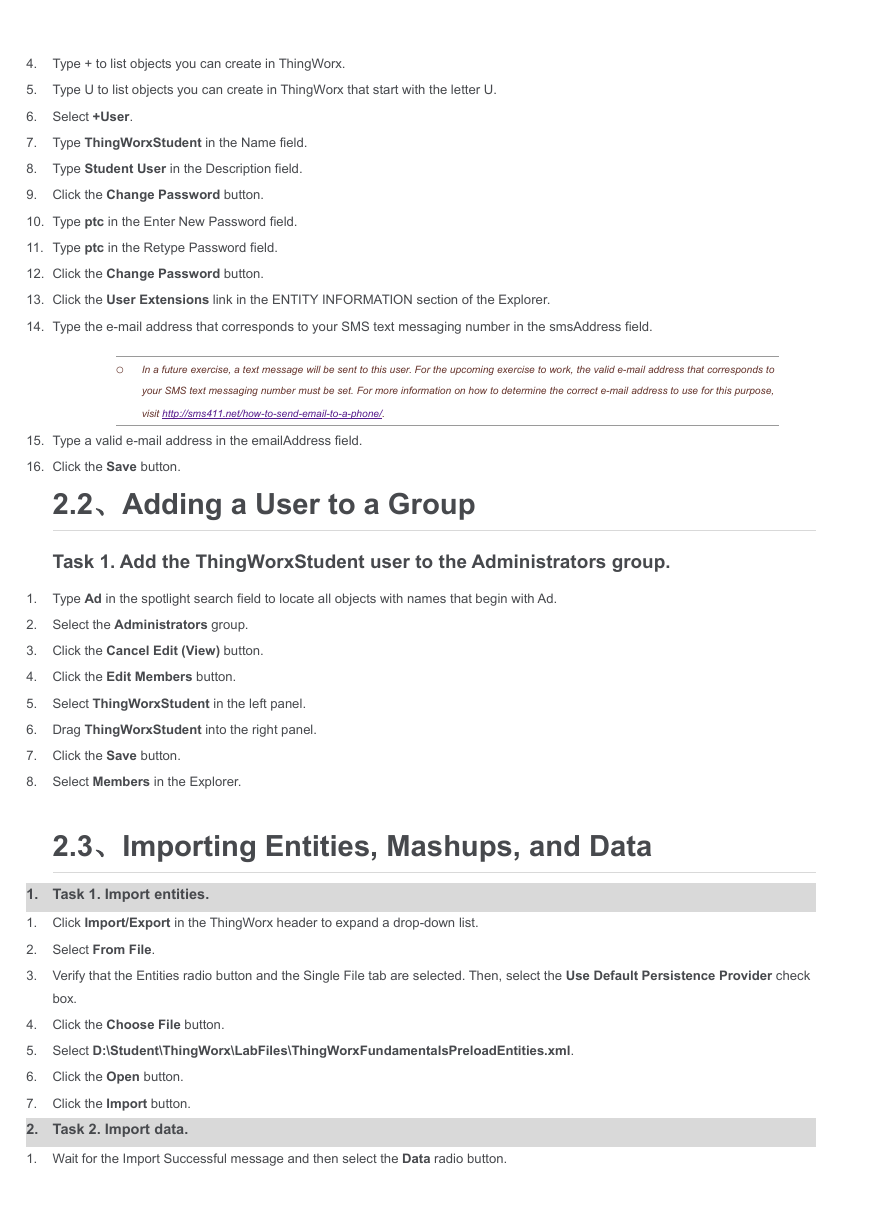
2.2、Adding a User to a Group
Task 1. Add the ThingWorxStudent user to the Admin
2.3、Importing Entities, Mashups, and Data
1.Task 1. Import entities.
2.Task 2. Import data.
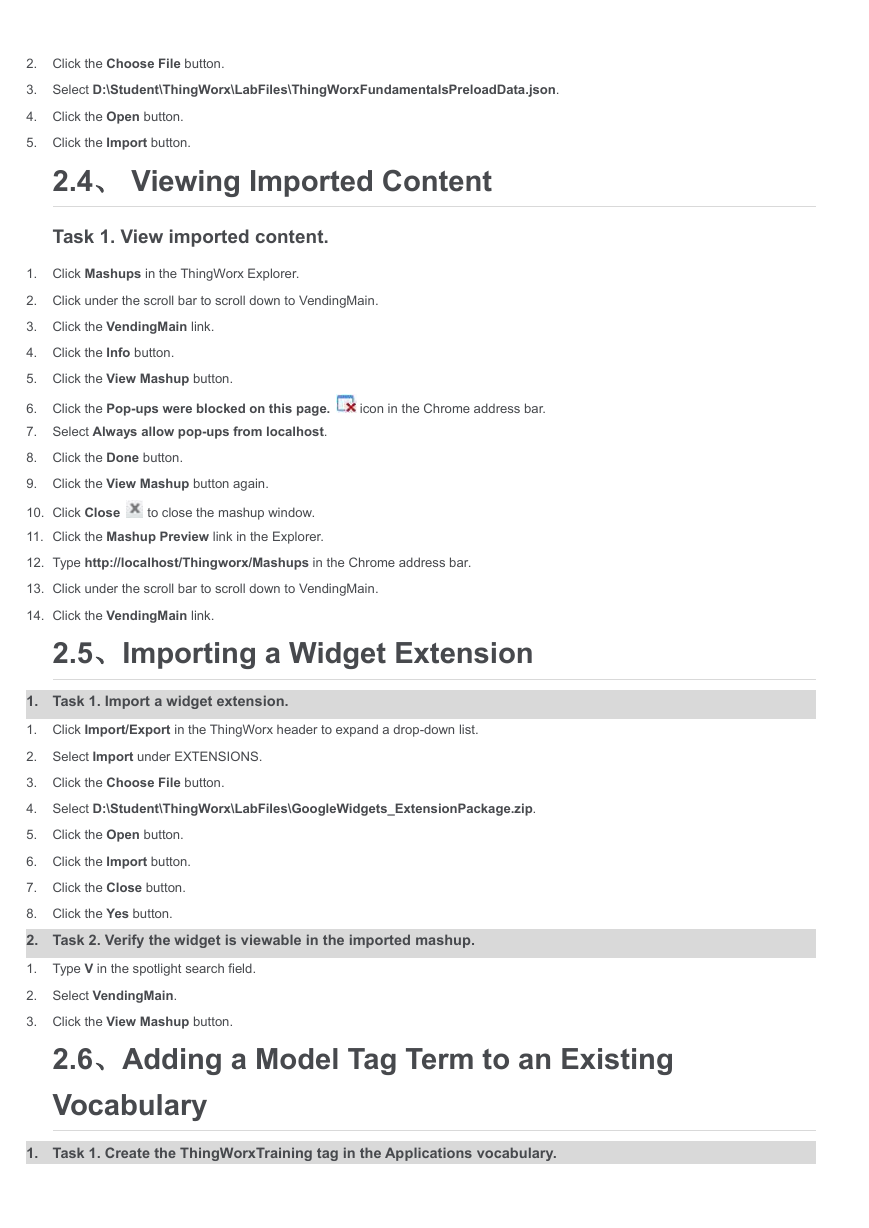
2.4、Viewing Imported Content
Task 1. View imported content.
2.5、Importing a Widget Extension
1.Task 1. Import a widget extension.
2.Task 2. Verify the widget is viewable in the impor
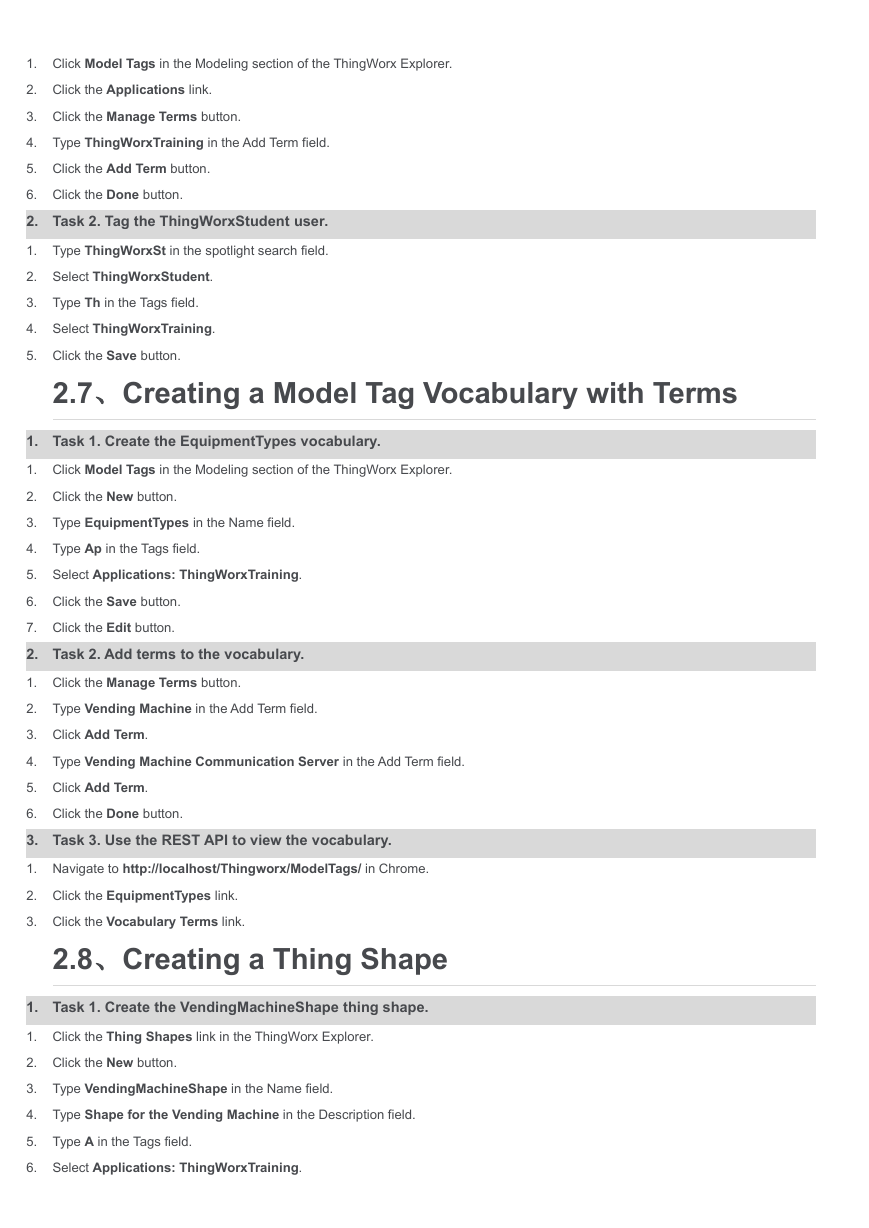
2.6、Adding a Model Tag Term to an Existing Vocabul
1.Task 1. Create the ThingWorxTraining tag in the Ap
2.Task 2. Tag the ThingWorxStudent user.
2.7、Creating a Model Tag Vocabulary with Terms
1.Task 1. Create the EquipmentTypes vocabulary.
2.Task 2. Add terms to the vocabulary.
3.Task 3. Use the REST API to view the vocabulary.
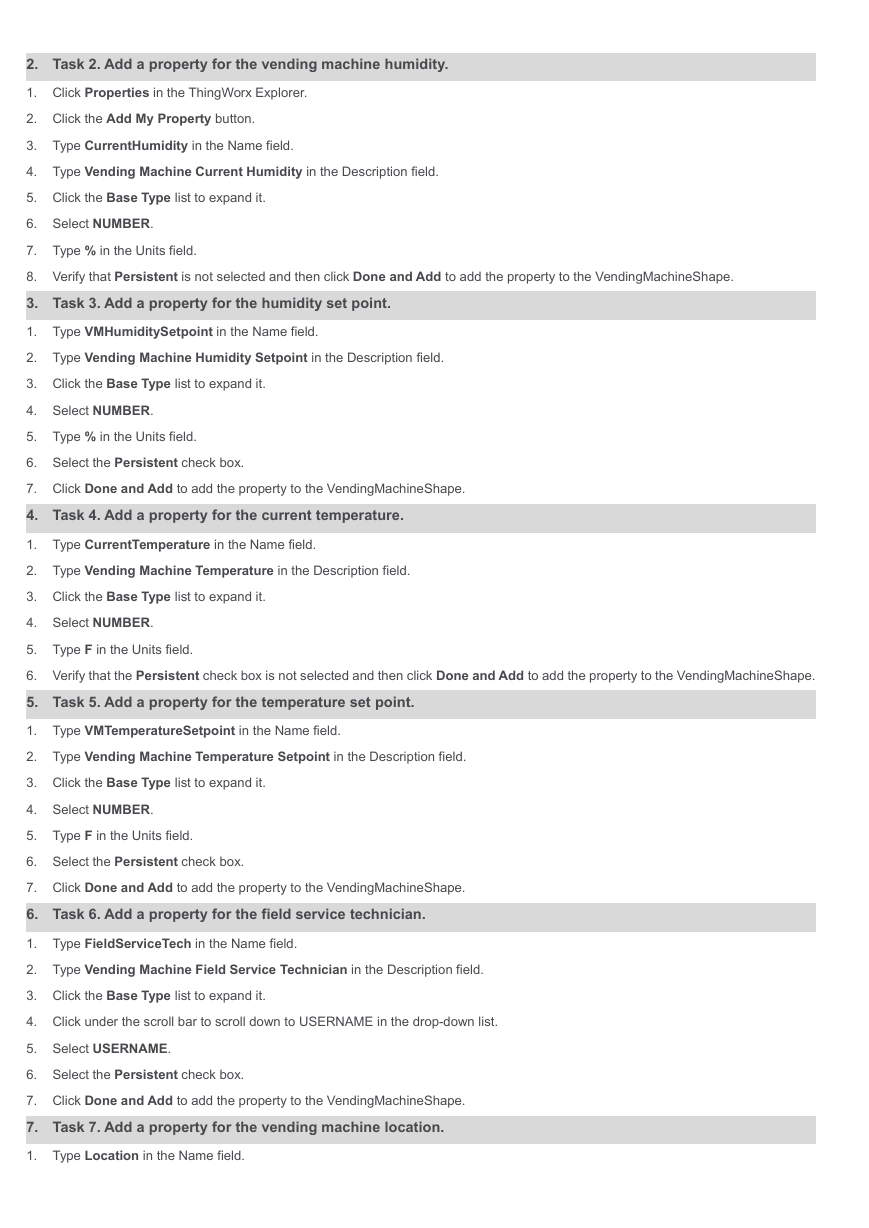
2.8、Creating a Thing Shape
1.Task 1. Create the VendingMachineShape thing shape
2.Task 2. Add a property for the vending machine hum
3.Task 3. Add a property for the humidity set point.
4.Task 4. Add a property for the current temperature
5.Task 5. Add a property for the temperature set poi
6.Task 6. Add a property for the field service techn
7.Task 7. Add a property for the vending machine loc
8.Task 8. View the thing shape using the REST API.
2.9、Creating a Thing Template
1.Task 1. Create the VendingMachineTemplate thing te
2.Task 2. Explore the properties, services, events,
3.Task 3. View the ThingShape using the REST API.
2.10、Creating a Thing
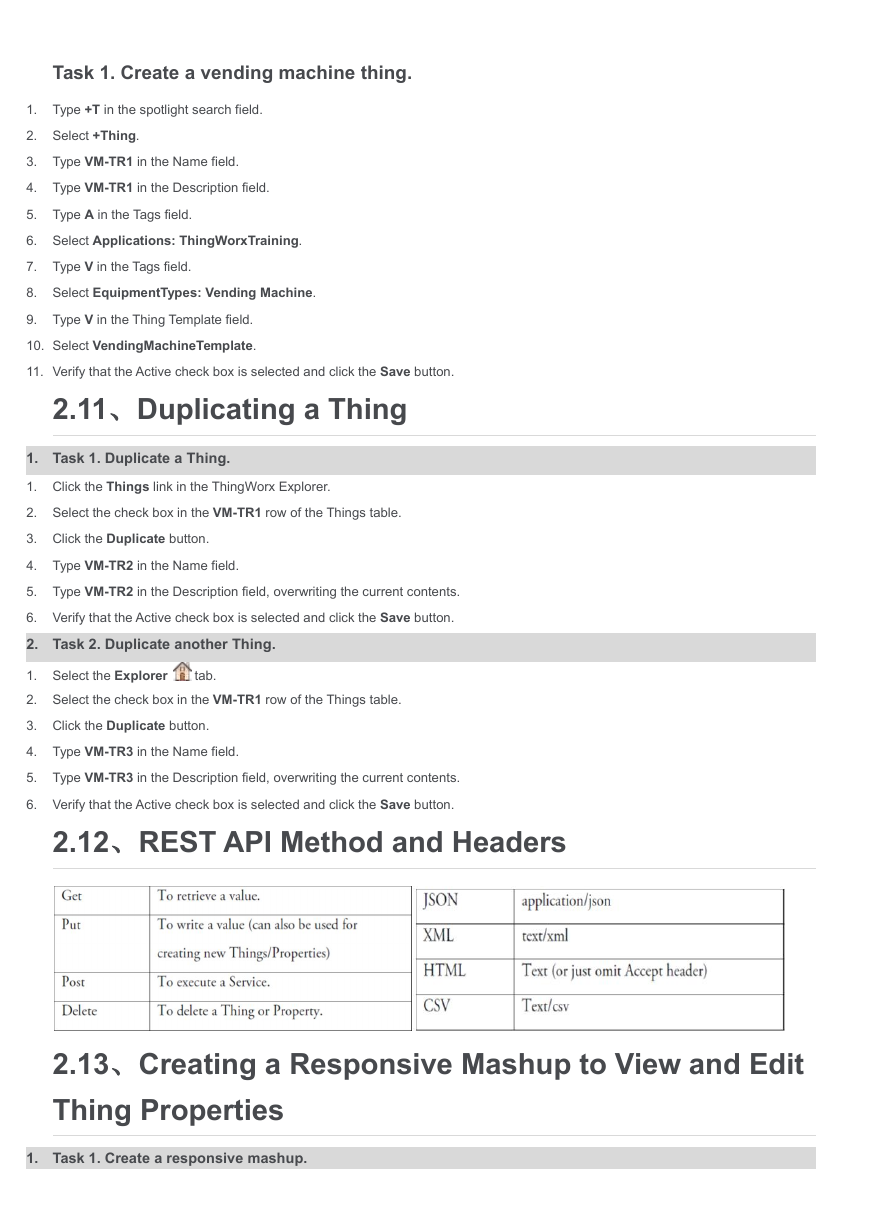
Task 1. Create a vending machine thing.
2.11、Duplicating a Thing
1.Task 1. Duplicate a Thing.
2.Task 2. Duplicate another Thing.
2.12、REST API Method and Headers
2.13、Creating a Responsive Mashup to View and Edit
1.Task 1. Create a responsive mashup.
2.Task 2. Divide the layout area.
3.Task 3. Add a list of the vending machines to the
4.Task 4. Save and test the mashup.
5.Task 5. Add a temperature gauge for the selected v
6.Task 6. Save and test the mashup.
7.Task 7. Add a panel with an LED display of the cur
8.Task 8. Save and test the mashup.
9.Task 9. Add a panel indicating the location of the
10.Task 10. Save and test the mashup.
11.Task 11. Add components to the mashup that modify
12.Task 12. Save and test the mashup.
2.14、Editing the VendingMachineShape ThingShape
Task 1. Edit the VendingMachineShape ThingShape.
2.15、Implementing the New Properties in the Mashup
1.Task 1. Open the Mashup Builder.
2.Task 2. Use the VMTempMax and VMTempMin properties
3.Task 3. Save and test the mashup.
4.Task 4. Reset the data entry fields after they are
5.Task 5. Save and test the mashup.
6.Task 6. Edit the VMTempMax and VMTempMin propertie
7.Task 7. Test the mashup.
2.16、Creating a Blog
Task 1. Create a blog.
2.17、Creating a Wiki
Task 1. Create a wiki.
2.18、Creating a Mashup with a Blog and a Wiki
1.Task 1. Verify that the blog and wiki exist in the
2.Task 2. Create a mashup.
3.Task 3. Add a blog to the mashup.
4.Task 4. View and test the blog and mashup.
5.Task 5. Add a wiki to the mashup.
6.Task 6. View and test the wiki and mashup.
2.19、Review Exercise: Modeling a Delivery Truck an
1.Task 1. Create a Trucking application tag.
2.Task 2. Create a thing shape.
3.Task 3. Create a truck template.
4.Task 4. Create three trucks.
5.Task 5. Create a mashup.
6.Task 6. Add a grid to the sidebar to display the l
7.Task 7. Add a three row layout to the center colum
8.Task 8. Add a gauge to the top row.
9.Task 9. Add displays for brakesOn and driver to th
10.Task 10. Add a two row layout to the right column.
11.Task 11. Add a Google Map widget.
12.Task 12. Save and test the mashup.
13.Task 13. Add services to set truck properties.
14.Task 14. Add widgets to set the properties.
15.Task 15. Bind the widgets to their services.
16.Task 16. Set the data in the entry widgets (option
17.Task 17. Save and test the mashup.
18.Task 18. Add functionality to select the driver (o
3.1、Creating a Service to Consume an XML Web Page
1.Task 1. Create the GetThingWorxFeed service.
2.Task 2. Write the service code.
3.Task 3. Examine the structure of the XML feed.
4.Task 4. Complete the logger code.
5.Task 5. Test the service code.
3.2、Creating a Data Shape for the ThingWorxFeed
Task 1. Create the ThingWorxFeedData data shape.
3.3、Completing the GetThingWorxFeed
1.Task 1. Configure the GetThingWorxFeed service to
2.Task 2. Edit the service code to output an InfoTab
3.Task 3. Edit the code to ensure only one result is
4.Task 4. Add rows from the XML stream to the InfoTa
3.4、Creating a Mashup to Display the ThingWorxFeed
1.Task 1. Create a responsive mashup.
2.Task 2. Add ThingWorxFeed data to the mashup.
3.Task 3. Load the service data into a Grid widget.
4.Task 4. Save and test the mashup.
3.5、Importing Mail and SQL Extensions
Task 1. Import the Mail Server and SQL Extensions.
3.6、Creating a Database Thing
Task 1. Create an ACMESQLDatabase thing.
3.7、Verifying the Database Connection
1.Task 1. Edit the ACMESQLDatabase thing.
2.Task 2. Test the service.
3.8、Creating SQL Queries
1.Task 1. Use the GetAllRecords service to create a
2.Task 2. Configure the GetAllRecords service to ret
3.Task 3. Test the service.
3.9、Creating a Mashup to View Data from the GetAll
1.Task 1. Create a responsive mashup.
2.Task 2. Add a layout with one row and a header.
3.Task 3. Retrieve data from the GetAllRecords servi
4.Task 4. Load the service data into a Grid widget.
5.Task 5. Rename the grid columns.
6.Task 6. Save and test the mashup.
3.10、Creating SQL Commands
1.Task 1. Edit the ACMESQLDatabase thing.
2.Task 2. Add a service to insert a record into the
3.Task 3. Test the InsertRecord service.
4.Task 4. Add a service to delete a record from the
5.Task 5. Test the DeleteARecord service.
6.Task 6. Add a service to update a record in the da
7.Task 7. Test the UpdateARecord service.
3.11、Adding Commands to the SQL Mashup
1.Task 1. Open the Mashup Builder.
2.Task 2. Add the InsertRecord service.
3.Task 3. Add widgets to enable the user to populate
4.Task 4. Link widgets to parameters.
5.Task 5. Add a button to start the service.
6.Task 6. Save and test the mashup.
7.Task 7. Add the DeleteARecord service.
8.Task 8. Link widgets to parameters.
9.Task 9. Add a button to start the service.
10.Task 10. Save and test the mashup.
11.Task 11. Add the UpdateARecord service.
12.Task 12. Link widgets to parameters.
13.Task 13. Add a button to start the service.
14.Task 14. Save and test the mashup.
3.12、Setting the Remote Vending Machine Simulator
1.Task 1. Copy the vending machine simulator to the
2.Task 2. Configure the TrainingConfig.json file.
3.Task 3. Start the vending machine simulator.
4.Task 4. Verify the WebSocket and communications su
3.13、Setting Up a Modeled Remote Thing
Task 1. Create the RemoteVendingMachines thing.
3.14、Adding Remote Thing Properties
Task 1. Add remote thing properties.
3.15、Creating Local Bindings
1.Task 1. Create local bindings for the VM-TR1 vendi
2.Task 2. Test the bindings for the VM-TR1 vending m
3.Task 3. Create local bindings for the VM-TR2 vendi
4.Task 4. Test the bindings for the VM-TR2 vending m
3.16、Adding Auto Refresh to the Mashup
1.Task 1. Open the Mashup Builder.
2.Task 2. Add an Auto Refresh widget.
3.Task 3. Configure the Auto Refresh widget.
4.Task 4. Test the mashup.
4.1、Creating a Property Alert
Task 1. Create a property alert.
4.2Creating a Notification Thing
1.Task 1. Create an ACMEVendingNotifier thing.
2.Task 2. Test the Notifier thing.
4.3、Creating a Thing Subscription Service
1.Task 1. Create a subscription.
2.Task 2. Write the service code.
3.Task 3. Test the subscription.
4.4、Creating Streams
Task 1. Create the VendingMachineProcessValuesStre
4.5、Creating a Timer Thing
Task 1. Create a Timer Thing.
4.6、Creating Data Tags
1.Task 1. Create the VendingMachineEventTags vocabul
2.Task 2. Add terms to the vocabulary.
3.Task 3. Use the REST API to view the vocabulary.
4.7、Modifying the VendingMachineShape Thing Shape
1.Task 1. Open the VendingMachineShape thing shape.
2.Task 2. Add properties for high and low humidity l
3.Task 3. Add properties for high and low temperatur
4.Task 4. Add boolean properties that are true if th
4.8、Logging Process Data to a Stream
1.Task 1. Open the VendingMachineTemplate template.
2.Task 2. Subscribe to the ACMETimer30S timer event.
3.Task 3. Author the script code.
4.Task 4. Save and test the subscription.
4.9、Modifying the Mashup to View, Query, and Filte
1.Task 1. Open the Mashup Builder.
2.Task 2. Add a layout to the mashup.
3.Task 3. Retrieve the data from the stream and add
4.Task 4. Add a Time Series Chart widget to the mash
5.Task 5. Configure the Time Series Chart.
6.Task 6. Save and test the mashup.
7.Task 7. Edit the query to retrieve only the last f
8.Task 8. Save and test the mashup.
9.Task 9. Use a widget to generate the query.
10.Task 10. Save and test the mashup.
11.Task 11. Rename filter options.
12.Task 12. Save and test the mashup.
13.Task 13. Add a Data Export widget.
14.Task 14. Save and test the mashup.
15.Task 15. Add a Time Selector widget.
16.Task 16. Save and test the mashup.
4.10、Modeling Value Streams
1.Task 1. Create a Value Stream.
2.Task 2. Configure the Vending Machine template to
3.Task 3. Specify which properties are logged to the
4.Task 4. Validate that the vending machine simulato
5.Task 5. View the stream values.
4.11、Modifying the Mashup to View Value Streams
1.Task 1. Open the Mashup Builder.
2.Task 2. Add tabs to the mashup.
3.Task 3. Add a layout to the tab.
4.Task 4. Add a time series chart to the layout.
5.Task 5. Bind the value stream data to the time ser
6.Task 6. Save and test the mashup.
7.Task 7. Delete the QueryPropertyHistory service.
8.Task 8. Bind the value stream data to the time ser
9.Task 9. Bind the GetLoggedProperties to a selectab
10.Task 10. Save and test the mashup.
11.Task 11. Bind the QueryNamedPropertyHistory servic
12.Task 12. Save and test the mashup.
4.12、Creating a Data Shape and Table for the Inven
1.Task 1. Create a data table.
2.Task 2. Create a data shape for the data table.
4.13、Creating a Data Table Administration Mashup
1.Task 1. Examine the services available in the Vend
2.Task 2. Create a wrapped service.
3.Task 3. Save and test the service.
4.Task 4. Create a mashup.
5.Task 5. Divide the layout area.
6.Task 6. Add the data table services to the mashup.
7.Task 7. Load the service data into a Grid widget.
8.Task 8. Add widgets to enable the user to populate
9.Task 9. Add a button for the EnterMyInfo service.
10.Task 10. Add a button for the DeleteDataTableEntry
11.Task 11. Save and test the mashup.
4.14、Creating an Additional Thing Shape to Extend
Task 1. Create a thing shape.
4.15、Modifying the Vending Machine Thing Template
Task 1. Modify the VendingMachineTemplate thing te
4.16、Creating the Add Inventory Service
1.Task 1. Modify the VendingMachineInventoryShape.
2.Task 2. Create the AddInventory service.
3.Task 3. Configure the input parameters.
4.Task 4. Author the service code.
5.Task 5. Save and test the service.
4.17、Creating the Delete Inventory Service
1.Task 1. Modify VendingMachineInventoryShape.
2.Task 2. Create the AddInventory service.
3.Task 3. Configure the input parameters.
4.Task 4. Author the service code.
5.Task 5. Save and test the service.
4.18、Creating the Sales Per Product Calculation Se
1.Task 1. Modify the VendingMachineInventoryShape.
2.Task 2. Create the AddInventory service.
3.Task 3. Configure the output parameter.
4.Task 4. Author the service code.
5.Task 5. Save and test the service.
4.19、Creating the Total Sales Calculation Service
1.Task 1. Modify the VendingMachineInventoryShape.
2.Task 2. Create the TotalSales service.
3.Task 3. Configure the output parameter.
4.Task 4. Author the service code.
5.Task 5. Save and test the service.
4.20、Creating the Product Priced Over Service
1.Task 1. Modify the VendingMachineInventoryShape.
2.Task 2. Create the ProductPricedOver service.
3.Task 3. Configure the input and output parameters.
4.Task 4. Author the service code.
5.Task 5. Save and test the service.
4.21、Creating the Update Inventory Service
1.Task 1. Modify the VendingMachineInventoryShape.
2.Task 2. Create the UpdateInventory service.
3.Task 3. Configure the input parameter.
4.Task 4. Author the service code.
5.Task 5. Save and test the service.
4.22、Modifying the Mashup to View and Modify Vendi
1.Task 1. Open the Mashup Builder.
2.Task 2. Add a tab to the mashup.
3.Task 3. Add a layout to the tab.
4.Task 4. Add a grid with current inventory to the l
5.Task 5. Save and test the mashup.
6.Task 6. Add inventory services to the mashup.
7.Task 7. Implement the AddInventory service.
8.Task 8. Save and test the mashup.
9.Task 9. Implement the DeleteInventory service.
10.Task 10. Save and test the mashup.
11.Task 11. Display total sales for the vending machi
12.Task 12. Save and test the mashup.
13.Task 13. Implement the UpdateInventory service.
14.Task 14. Save and test the mashup.
4.23、Creating the VendingMachineIssueStream
Task 1. Create the VendingMachineIssueStream strea
4.24、Creating a Data Shape for a Custom Vending Ma
1.Task 1. Create the TemeratureHumidityHighData data
2.Task 2. Configure the field definitions.
4.25、Configuring a Custom Event and Subscription
1.Task 1. Open the VendingMachineShape thing shape.
2.Task 2. Add an event.
3.Task 3. Add a subscription.
4.26、Configuring a Subscription to Built-In Events
1.Task 1. Open the VendingMachineShape thing shape.
2.Task 2. Add a temperature high subscription.
3.Task 3. Add a humidity high subscription.
4.Task 4. Test the subscriptions and logs.
4.27、Review Exercise: Binding to a Remote Thing an
1.Task 1. Start the truck simulator.
2.Task 2. Create the TruckStreamDS data shape.
3.Task 3. Create the TruckStream stream.
4.Task 4. Create a 60 second timer.
5.Task 5. Create a remote truck thing.
6.Task 6. Manage remote bindings.
7.Task 7. Manage local bindings.
8.Task 8. Subscribe all trucks to the Truck60sTimer.
9.Task 9. Author the script for the subscription.
10.Task 10. Test the stream.
11.Task 11. Add services to the TruckMash mashup.
12.Task 12. Set service bindings.
13.Task 13. Add a label chart to the mashup.
14.Task 14. Add an Auto-Refresh widget (optional).
15.Task 15. Save and test the mashup.
5.1 Editing a Network
1.Task 1. Open the AcmeVending network.
2.Task 2. Add vending machines to the network.
5.2 Viewing the Vending Machines in a Mashup
Task 1. View the VendingMain mashup.
5.3 Creating a File Repository Thing
Task 1. Create a file repository thing.
5.4 Creating a Mashup to Upload and Download File
1.Task 1. Create a responsive mashup.
2.Task 2. Add a layout with one row and a header.
3.Task 3. Add a File Upload widget to the header.
4.Task 4. Save and test the mashup.
5.Task 5. Add a two-column layout to the bottom row.
6.Task 6. Add a tree widget to the left column.
7.Task 7. Add a grid to the right column.
8.Task 8. Add services to retrieve directories and f
9.Task 9. Bind services to widgets.
10.Task 10. Save and test the mashup.
5.5 Creating a Remote Thing with File Transfer
1.Task 1. Create a thing.
2.Task 2. Verify the remote folder.
5.6 Modifying the File Upload Mashup to Enable Fi
1.Task 1. Open the FileUploadMash mashup.
2.Task 2. Add services to browse files and directori
3.Task 3. Duplicate the tree and grid.
4.Task 4. Start the File Transfer Thing Simulator.
5.Task 5. Save and test the mashup.
6.Task 6. Add services to transfer files between the
7.Task 7. Configure the first Copy service.
8.Task 8. Add a button to start the service.
9.Task 9. Save and test the mashup.
10.Task 10. Configure the second Copy service.
11.Task 11. Add a button to start the service.
12.Task 12. Save and test the mashup.
6.1 Creating a Master and Menu
1.Task 1. Create a master.
2.Task 2. Create a media entitiy.
3.Task 3. Add a two-column layout to the master.
4.Task 4. Add an Image widget to the left column.
5.Task 5. Save the master.
6.Task 6. Bind the master to the VendingMachineMash
7.Task 7. Save and test the mashup.
8.Task 8. Create a menu.
9.Task 9. Add the menu to the master.
10.Task 10. Save and test the mashup.
6.2 Creating Style Definitions
1.Task 1. Create a style definition.
2.Task 2. Create the second style.
3.Task 3. Create the third style.
4.Task 4. Use the newly created styles in the Vendin
5.Task 5. Save and test the mashup.
6.3 Creating State Definitions
1.Task 1. Create a state definition.
2.Task 2. Use the state definition in a Gauge widget
3.Task 3. Use the state definition in an LED widget.
4.Task 4. Save and test the mashup.
6.4 Creating a Thing Shape for a Subsystem
1.Task 1. Create the MySessionParameters thing shape
2.Task 2. Add a number property.
3.Task 3. Add a string property.
4.Task 4. Implement the thing shape in the User Mana
6.5 Review Exercise: Creating a Tooltip Mashup
1.Task 1. Create a tooltip mashup.
2.Task 2. Use the tooltip mashup in the TruckMash.
3.Task 3. Test the mashup.
7.1 Adding User Extensions
1.Task 1. Add a property to the UserExtensions thing
2.Task 2. Create two users.
3.Task 3. Use the REST API to view the users and pro
7.2 Creating a Group
1.Task 1. Create a group.
2.Task 2. Add group members.
3.Task 3. Use the REST API to view the users.
7.3 Creating an Organization
1.Task 1. Create an organization.
2.Task 2. Create two sub-organizational units.
3.Task 3. Add organization members.
7.4 Creating a Permission and an Override
1.Task 1. Examine the VendingMachineMash as the Driv
2.Task 2. Create a permission for the ThingWorxTrain
3.Task 3. View the mashup as the Driver user.
4.Task 4. Create permission to view vending machine
5.Task 5. View the mashup as the Driver user.
6.Task 6. Deny the ThingWorxTraining group permissio
7.Task 7. View the mashup as the Driver user.
7.5 Using the System User to Gain Access to a Ser
1.Task 1. Examine the VendingMachineMash as the Driv
2.Task 2. Grant the ThingWorxTraining group permissi
3.Task 3. View the mashup as the Driver user.
4.Task 4. Create permission for the System user to e
5.Task 5. View the mashup as the Driver user.
7.6 Setting Visibility
1.Task 1. Remove all users from the Everyone group.
2.Task 2. Verify that the technician has no visibili
3.Task 3. Create permission for the System user to e
4.Task 4. Verify that the technician has visibility
7.7 Review Exercise: Creating a Master, Menu, and
1.Task 1. Create a media entity.
2.Task 2. Create a master.
3.Task 3. Add a layout.
4.Task 4. Add an image.
5.Task 5. Associate the master to the TruckMash mash
6.Task 6. Save and test the mashup.
7.Task 7. Create a menu.
8.Task 8. Add the menu to the master.
8.1 Creating a Dashboard
1.Task 1. Create a gadget for the vending machine te
2.Task 2. Create a gadget for the vending machine hu
3.Task 3. Create a gadget to view the historical tem
4.Task 4. Create a Gadget Library mashup.
5.Task 5. Create a Dashboard Viewer mashup.
6.Task 6. Create a dashboard using the viewer.
7.Task 7. Set the initial dashboard.



 2023年江西萍乡中考道德与法治真题及答案.doc
 2012年重庆南川中考生物真题及答案.doc
 2013年江西师范大学地理学综合及文艺理论基础考研真题.doc
 2020年四川甘孜小升初语文真题及答案I卷.doc
 2020年注册岩土工程师专业基础考试真题及答案.doc
 2023-2024学年福建省厦门市九年级上学期数学月考试题及答案.doc
 2021-2022学年辽宁省沈阳市大东区九年级上学期语文期末试题及答案.doc
 2022-2023学年北京东城区初三第一学期物理期末试卷及答案.doc
 2018上半年江西教师资格初中地理学科知识与教学能力真题及答案.doc
 2012年河北国家公务员申论考试真题及答案-省级.doc
 2020-2021学年江苏省扬州市江都区邵樊片九年级上学期数学第一次质量检测试题及答案.doc
 2022下半年黑龙江教师资格证中学综合素质真题及答案.doc