REgistER youR PRo Duct!
www
ÄOn the web at http://arnovatech.com/register
Thank you for choosing this ARNOVA product. We hope that you will enjoy using it and that it will give you satisfaction for many
years to come. Once you unpack your ARNOVA product, we recommend that you take a few minutes to register it
(http://arnovatech.com/register). This will allow you to get access to ARNOVA technical support (http://arnovatech.com/support).
?
NEED HELP?
On our Website: See the Frequently Asked Questions section on http://arnovatech.com/faq
Contact our Technical Support Team: Visit http://arnovatech.com/support for e-mail support.
Please register your product before contacting Technical Support (see Register your Product).
As we are often updating and improving our products, your device’s software may have
a slightly different appearance or modified functionality than presented in this Quick Start Guide.
E
n
g
l
i
s
h
4
9
1
0
1
1
:
N
/
P
1
UserGuide_Arnova_10G2_PN110194_book.indd 1
12/10/2011 16:03:47
�
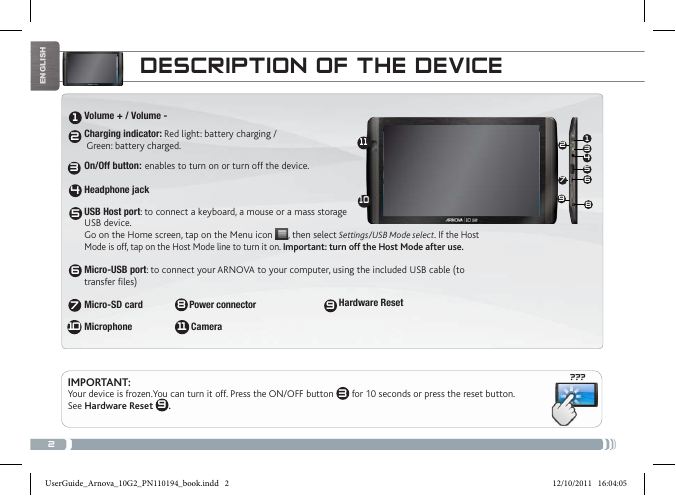
DEscRiPtioN of tHE DEvicE
1
2
3
4
5
6
7
Volume + / Volume -
Charging indicator: Red light: battery charging /
Green: battery charged.
On/Off button: enables to turn on or turn off the device.
Headphone jack
11
10
USB Host port: to connect a keyboard, a mouse or a mass storage
USB device.
Go on the Home screen, tap on the Menu icon
Mode is off, tap on the Host Mode line to turn it on. Important: turn off the Host Mode after use.
Micro-USB port: to connect your ARNOVA to your computer, using the included USB cable (to
transfer files)
Micro-SD card
Power connector
, then select Settings/USB Mode select. If the Host
9
Hardware Reset
8
Microphone Camera
IMportant:
Your device is frozen.You can turn it off. Press the ON/OFF button 3 for 10 seconds or press the reset button.
See Hardware reset 9 .
2
7
9
1
3
4
5
6
8
h
s
i
l
g
n
E
2
UserGuide_Arnova_10G2_PN110194_book.indd 2
12/10/2011 16:04:05
???1011�
staRtiNg uP
▲!
Before using your ARNOVA for the first time, completely charge the battery!
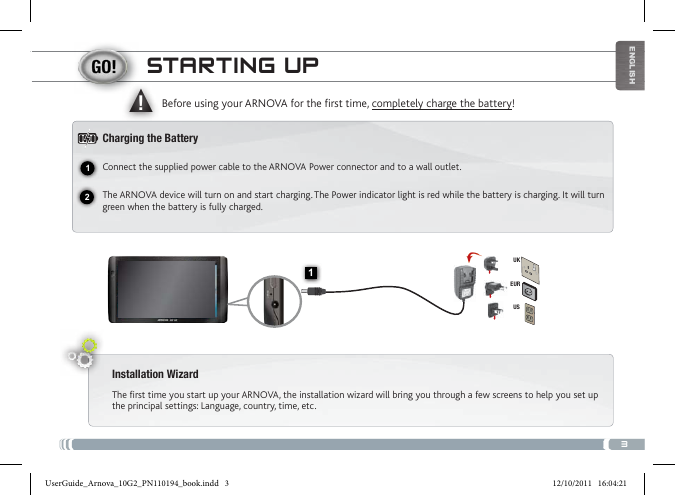
Charging the Battery
Connect the supplied power cable to the ARNOVA Power connector and to a wall outlet.
E
n
g
l
i
s
h
The ARNOVA device will turn on and start charging. The Power indicator light is red while the battery is charging. It will turn
green when the battery is fully charged.
UK
EUR
US
Installation Wizard
The first time you start up your ARNOVA, the installation wizard will bring you through a few screens to help you set up
the principal settings: Language, country, time, etc.
UserGuide_Arnova_10G2_PN110194_book.indd 3
3
12/10/2011 16:04:21
121�
h
s
i
l
g
n
E
www
coNNEctiNg to tHE Wifi NEtWo Rk
For this procedure to work, you need to be in a WiFi zone that will allow you to connect to it. Every time the ARNOVA is
in range of a network that you have already configured once, it will attempt to make a connection.
To configure a new WiFi network, go on the Home screen, tap Settings
.
In the Settings screen, select Wireless & networks.
If the WiFi is off, tap on the Wi-Fi line to turn it on. Then select Wi-Fi settings. The ARNOVA
will scan for available WiFi networks and display them at the bottom of the screen.
Tap on the network you want to connect to, enter the required network information* and then tap on Connect.
Your ARNOVA will establish a connection to that WiFi hot spot.
* For free access WiFi points, there is no need to enter any special information. For secured networks, you will need either a key (a series of numbers and/or letters)
of the type WEP, WPA, or WPA2. To obtain the exact connection parameters required, contact the Internet service provider.
4
UserGuide_Arnova_10G2_PN110194_book.indd 4
12/10/2011 16:04:22
1234�
tHE aRNova iNtERfacE
E
n
g
l
i
s
h
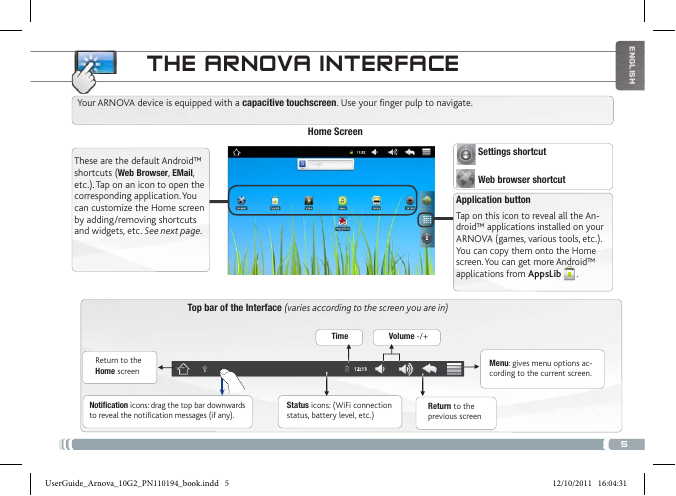
Your ARNOVA device is equipped with a capacitive touchscreen. Use your finger pulp to navigate.
Home Screen
These are the default Android™
shortcuts (Web Browser, EMail,
etc.). Tap on an icon to open the
corresponding application. You
can customize the Home screen
by adding/removing shortcuts
and widgets, etc. See next page.
Settings shortcut
Web browser shortcut
Application button
Tap on this icon to reveal all the An-
droid™ applications installed on your
ARNOVA (games, various tools, etc.).
You can copy them onto the Home
screen. You can get more Android™
applications from appsLib
.
Top bar of the Interface (varies according to the screen you are in)
Time
Volume -/+
Return to the
Home screen
▼
▼
Menu: gives menu options ac-
cording to the current screen.
Notification icons: drag the top bar downwards
to reveal the notification messages (if any).
Status icons: (WiFi connection
status, battery level, etc.)
▼
Return to the
previous screen
UserGuide_Arnova_10G2_PN110194_book.indd 5
5
12/10/2011 16:04:31
▼▼▼�
customiziNg youR PRo Duct
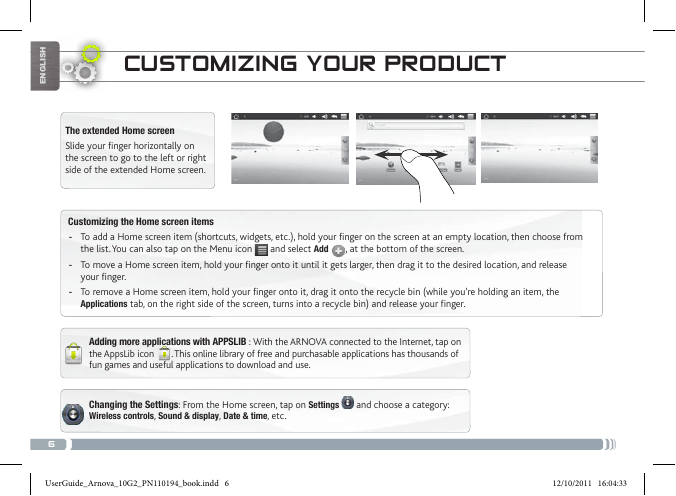
The extended Home screen
Slide your finger horizontally on
the screen to go to the left or right
side of the extended Home screen.
Customizing the Home screen items
- To add a Home screen item (shortcuts, widgets, etc.), hold your finger on the screen at an empty location, then choose from
, at the bottom of the screen.
the list. You can also tap on the Menu icon
and select Add
- To move a Home screen item, hold your finger onto it until it gets larger, then drag it to the desired location, and release
your finger.
- To remove a Home screen item, hold your finger onto it, drag it onto the recycle bin (while you’re holding an item, the
Applications tab, on the right side of the screen, turns into a recycle bin) and release your finger.
Adding more applications with APPSLIB : With the ARNOVA connected to the Internet, tap on
. This online library of free and purchasable applications has thousands of
the AppsLib icon
fun games and useful applications to download and use.
Changing the Settings: From the Home screen, tap on Settings
Wireless controls, Sound & display, Date & time, etc.
and choose a category:
h
s
i
l
g
n
E
6
UserGuide_Arnova_10G2_PN110194_book.indd 6
12/10/2011 16:04:33
�
PLayiNg muLtimEDia fiLEs
E
n
g
l
i
s
h
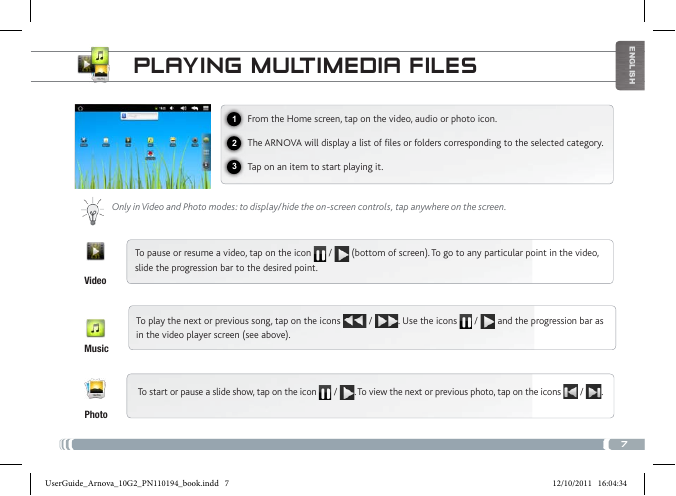
From the Home screen, tap on the video, audio or photo icon.
The ARNOVA will display a list of files or folders corresponding to the selected category.
Tap on an item to start playing it.
Only in Video and Photo modes: to display/hide the on-screen controls, tap anywhere on the screen.
To pause or resume a video, tap on the icon
slide the progression bar to the desired point.
/
(bottom of screen). To go to any particular point in the video,
To play the next or previous song, tap on the icons
in the video player screen (see above).
/
. Use the icons
/
and the progression bar as
To start or pause a slide show, tap on the icon
/
. To view the next or previous photo, tap on the icons
/
.
Video
Music
Photo
UserGuide_Arnova_10G2_PN110194_book.indd 7
7
12/10/2011 16:04:34
123�
h
s
i
l
g
n
E
1
2
3
tRaNsfERRiNg mEDia to youR aRNova
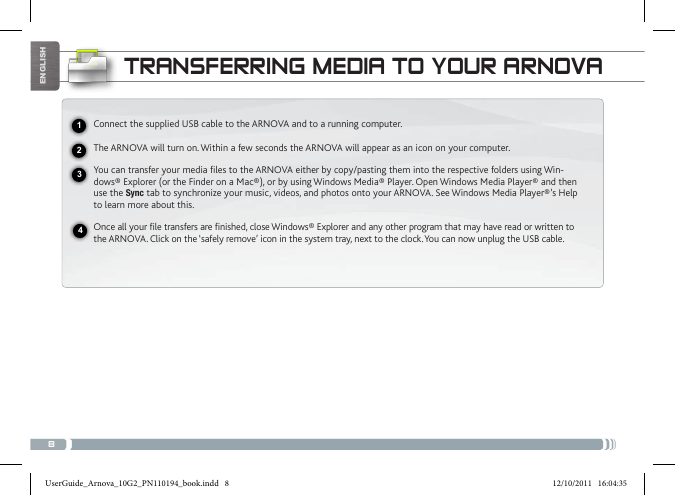
Connect the supplied USB cable to the ARNOVA and to a running computer.
The ARNOVA will turn on. Within a few seconds the ARNOVA will appear as an icon on your computer.
You can transfer your media files to the ARNOVA either by copy/pasting them into the respective folders using Win-
dows® Explorer (or the Finder on a Mac®), or by using Windows Media® Player. Open Windows Media Player® and then
use the Sync tab to synchronize your music, videos, and photos onto your ARNOVA. See Windows Media Player®’s Help
to learn more about this.
4
Once all your file transfers are finished, close Windows® Explorer and any other program that may have read or written to
the ARNOVA. Click on the ‘safely remove’ icon in the system tray, next to the clock. You can now unplug the USB cable.
8
UserGuide_Arnova_10G2_PN110194_book.indd 8
12/10/2011 16:04:35
�




 2023年江西萍乡中考道德与法治真题及答案.doc
 2012年重庆南川中考生物真题及答案.doc
 2013年江西师范大学地理学综合及文艺理论基础考研真题.doc
 2020年四川甘孜小升初语文真题及答案I卷.doc
 2020年注册岩土工程师专业基础考试真题及答案.doc
 2023-2024学年福建省厦门市九年级上学期数学月考试题及答案.doc
 2021-2022学年辽宁省沈阳市大东区九年级上学期语文期末试题及答案.doc
 2022-2023学年北京东城区初三第一学期物理期末试卷及答案.doc
 2018上半年江西教师资格初中地理学科知识与教学能力真题及答案.doc
 2012年河北国家公务员申论考试真题及答案-省级.doc
 2020-2021学年江苏省扬州市江都区邵樊片九年级上学期数学第一次质量检测试题及答案.doc
 2022下半年黑龙江教师资格证中学综合素质真题及答案.doc