VXWORKS® 7
GETTING STARTED WITH VXWORKS® 7 AND
THE BEAGLEBONE BLACK BOARD
EDITION 3
�
Copyright Notice
Copyright © 2016 Wind River Systems, Inc.
All rights reserved. No part of this publication may be reproduced or transmitted in any form or
by any means without the prior written permission of Wind River Systems, Inc.
Wind River, Simics, Tornado, and VxWorks are registered trademarks of Wind River Systems,
Inc. Helix, Pulsar, Rocket, Titanium Cloud, Titanium Server, and the Wind River logo are
trademarks of Wind River Systems, Inc. Any third-party trademarks referenced are the property
of their respective owners. For further information regarding Wind River trademarks, please see:
www.windriver.com/company/terms/trademark.html
This product may include software licensed to Wind River by third parties. Relevant notices (if
any) are provided in your product installation at the following location:
installDir/legal-notices/
Wind River may refer to third-party documentation by listing publications or providing links to
third-party websites for informational purposes. Wind River accepts no responsibility for the
information provided in such third-party documentation.
Corporate Headquarters
Wind River
500 Wind River Way
Alameda, CA 94501-1153
U.S.A.
Toll free (U.S.A.): +1-800-545-WIND
Telephone: +1-510-748-4100
Facsimile: +1-510-749-2010
For additional contact information, see the Wind River website:
www.windriver.com
For information on how to contact Customer Support, see:
www.windriver.com/support
VxWorks® 7
Getting Started with VxWorks® 7 and the BeagleBone Black Board EDITION 3
7 September 2016
�
Contents
1 Introduction to VxWorks 7 and the BeagleBone Black Board ............................
Overview of VxWorks 7 Quick Start for the BeagleBone Black Board ...............................
Host Requirements .............................................................................................................
VxWorks 7 Requirements ...................................................................................................
License Requirements ........................................................................................................
USB to Serial Console Driver Requirements ......................................................................
Hardware Requirements ....................................................................................................
2 Software Installation ...............................................................................................
Downloading the VxWorks Quick Start Software ...............................................................
Installing a Bootable VxWorks 7 on Your Media ................................................................
Installing and Launching Workbench .................................................................................
Installing the Virtual COM Port Driver on Your Host ..........................................................
3 Hardware Installation ..............................................................................................
Connecting and Booting the Board ....................................................................................
Establishing an Ethernet Connection to the Board .............................................................
Establishing a Serial Connection to the Board ...................................................................
4 Creating and Running Your First Real-Time Process Application .....................
Creating a Real-Time Process Project ...............................................................................
Adding Code to the Real-Time Process Project and Building the Project ..........................
Connecting to the Board .....................................................................................................
Loading and Running the Real-Time Process Application .................................................
5 Creating and Running your First Downloadable Kernel Module Application ...
Creating a Downloadable Kernel Module Project ...............................................................
Adding Code to the Downloadable Kernel Module Project ................................................
Loading and Running Tasks from a Downloadable Kernel Module Application .................
6 Example Code for Working with Inputs and Outputs ..........................................
Input and Output Functions ................................................................................................
Example Code for the Input and Output Functions ............................................................
7 File-Based Configuration of Network Services ....................................................
Run Time Kernel Parameter Configuration ........................................................................
1
1
2
2
3
3
3
5
5
6
6
7
9
9
10
13
15
15
16
17
19
21
21
22
23
25
25
26
29
29
iii
�
VxWorks® 7
Getting Started with VxWorks® 7 and the BeagleBone Black Board
8 Configuring a Static IP Address for the Board .....................................................
Specifying the Boot Parameters for a Static IP Address ....................................................
31
31
iv
�
1
Introduction to VxWorks 7 and the
BeagleBone Black Board
Overview of VxWorks 7 Quick Start for the BeagleBone Black Board
1
Host Requirements
2
VxWorks 7 Requirements
2
License Requirements
3
USB to Serial Console Driver Requirements
3
Hardware Requirements
3
Overview of VxWorks 7 Quick Start for the BeagleBone Black Board
VxWorks 7 Quick Start is a fully configured bootable VxWorks 7 software package that allows
you to start your development effort by simply downloading and installing VxWorks 7, booting
the board, and coding your application.
VxWorks 7
VxWorks 7 includes a set of development tools and software run-time products, at the core of
which is the VxWorks real-time operating system (RTOS) with a modular architecture for IoT-
ready hardware.
This document guides you through software installation, hardware installation, and the creation
of your first real-time process (RTP) and your first kernel application that will run on the board.
The main page of the VxWorks 7 documentation is available from the Wind River Knowledge
Library at VxWorks 7 documentation.
To get started with VxWorks 7 in a full development environment, see the VxWorks 7 Getting
Started documentation at Getting Started.
1
�
VxWorks® 7
Getting Started with VxWorks® 7 and the BeagleBone Black Board
For information on the VxWorks 7 integrated development environment tool, see the Workbench 4
documentation.
BeagleBone Black Board
The BeagleBone Black board is an open source hardware design based on the AM335x 1GHz
ARM® Cortex-A8. The board includes the following functionality:
• 3D graphics accelerator
• NEON floating-point accelerator
• MicroSD slot
• Universal asynchronous receiver transmitter (UART) 6-pin header for serial console access
• USB host port
• USB client port
• Ethernet
• HDMI
• 2x 46 pin headers
• 4GB 8-bit eMMC on-board flash storage
• 512MB DDR3 RAM
• An input voltage of 5 VDC
For more information on the BeagleBone board, see the BeagleBone Board Website.
Host Requirements
The VxWorks 7 development environment supports Windows and Linux operating systems.
For specific information on supported operating systems and hardware architectures for
VxWorks 7, go to VxWorks 7 documentation and select Getting Started, then VxWorks 7 Release
Notes, Core.
Your host must also provide a USB port to communicate with the target over a universal
asynchronous receiver transmitter (UART) interface.
VxWorks 7 Requirements
You must acquire the VxWorks 7 Quick Start prebuilt boot image, VxWorks 7 software, the
VxWorks 7 development environment software, and a license file from Wind River.
The VxWorks 7 Quick Start development environment includes a prebuilt VxWorks source build
(VSB) project and a prebuilt kernel image to save you time. If you must change the VSB project
2
�
1 Introduction to VxWorks 7 and the BeagleBone Black Board
License Requirements
option configuration or the VIP component configuration, or you require functionality that is
only available in a VxWorks profile, you must download and install a full version of VxWorks 7.
For certain network services such as DHCPv4 and telnet, you can change the preconfigured
component parameters at run time by editing a configuration file and rebooting the board. For
more information, refer to Run Time Kernel Parameter Configuration on page 29.
License Requirements
The VxWorks 7 and Workbench 4 software require either a node-locked license or a floating
license from Wind River.
You can use your existing VxWorks 7 and Workbench 4 license to enable VxWorks 7 Quick Start
or request a new license from Wind River.
NOTE: If you have a floating license, you can configure Workbench to obtain a key from a
known server.
For more information on licensing Wind River products, go to the Wind River Knowledge Library,
select Installation and view the Wind River Product Installation and Licensing video.
USB to Serial Console Driver Requirements
To access the serial console directly from a USB interface on your host, you need an interface
cable and the associated driver to communicate with the serial console.
In a small networking environment with a single subnet, Workbench can generally determine the
IP address of your target upon a target connection request. However, in a large networking
environment where multiple networks are present and the host and target are on different
subnets, you must access the serial console on the board to obtain the DHCP-assigned IP address
of your target.
NOTE: The USB to serial console driver causes the USB port on your host to appear as a
serial universal asynchronous receiver transmitter (UART) port.
Hardware Requirements
To proceed with development on the BeagleBone Black board, you need a power adapter, a micro
secure digital (microSD) card, and interconnecting cables.
The specific components as follows:
3
�
VxWorks® 7
Getting Started with VxWorks® 7 and the BeagleBone Black Board
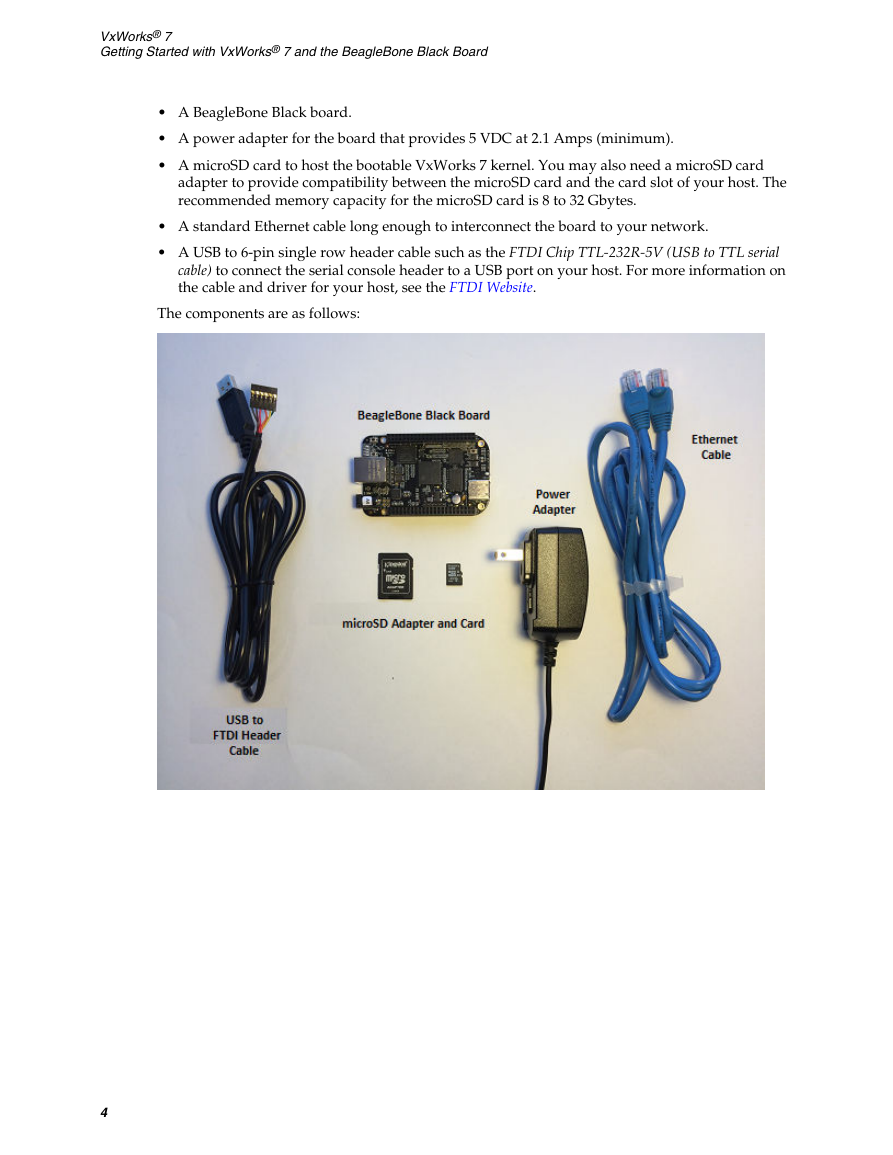
• A BeagleBone Black board.
• A power adapter for the board that provides 5 VDC at 2.1 Amps (minimum).
• A microSD card to host the bootable VxWorks 7 kernel. You may also need a microSD card
adapter to provide compatibility between the microSD card and the card slot of your host. The
recommended memory capacity for the microSD card is 8 to 32 Gbytes.
• A standard Ethernet cable long enough to interconnect the board to your network.
• A USB to 6-pin single row header cable such as the FTDI Chip TTL-232R-5V (USB to TTL serial
cable) to connect the serial console header to a USB port on your host. For more information on
the cable and driver for your host, see the FTDI Website.
The components are as follows:
4
�



 2023年江西萍乡中考道德与法治真题及答案.doc
 2012年重庆南川中考生物真题及答案.doc
 2013年江西师范大学地理学综合及文艺理论基础考研真题.doc
 2020年四川甘孜小升初语文真题及答案I卷.doc
 2020年注册岩土工程师专业基础考试真题及答案.doc
 2023-2024学年福建省厦门市九年级上学期数学月考试题及答案.doc
 2021-2022学年辽宁省沈阳市大东区九年级上学期语文期末试题及答案.doc
 2022-2023学年北京东城区初三第一学期物理期末试卷及答案.doc
 2018上半年江西教师资格初中地理学科知识与教学能力真题及答案.doc
 2012年河北国家公务员申论考试真题及答案-省级.doc
 2020-2021学年江苏省扬州市江都区邵樊片九年级上学期数学第一次质量检测试题及答案.doc
 2022下半年黑龙江教师资格证中学综合素质真题及答案.doc