DC-Cam Eng.fm Page 1 Tuesday, July 22, 2003 3:34 PM
1 About Your Camera
Front View
Back View
1
2
3
4
7
8
9
10
6
5
14
Flash/Up button
Self-timer/Left button
Macro/Right button
Replay/Down button
English
11
12
13
13
1. Self-timer lamp
2. Flash
3. Viewfinder
4. Lens
5. Microphone
6. Exposure sensor
7. Viewfinder
8. Operation lamp
9. Zoom Out button
10. Zoom In button
11. Display button
12. Menu button
13. Set button
14. LCD screen
1
�
DC-Cam Eng.fm Page 2 Tuesday, July 22, 2003 3:34 PM
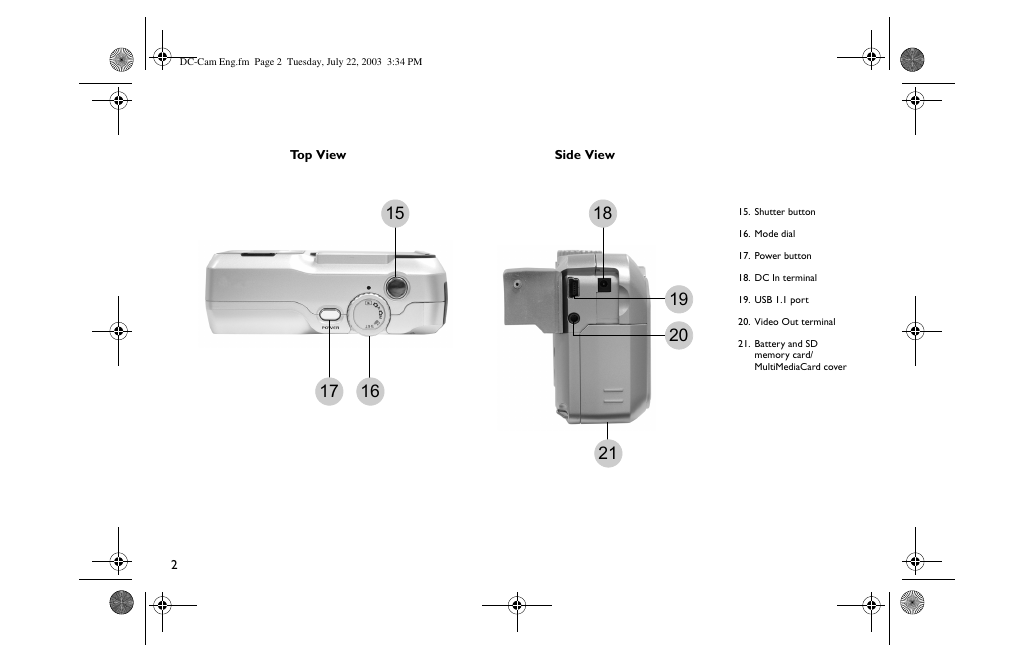
Top View
Side View
15
18
17
16
21
2
15. Shutter button
16. Mode dial
17. Power button
18. DC In terminal
19. USB 1.1 port
20. Video Out terminal
21. Battery and SD
memory card/
MultiMediaCard cover
19
20
�
DC-Cam Eng.fm Page 3 Tuesday, July 22, 2003 3:34 PM
2 Set Up the Camera
1
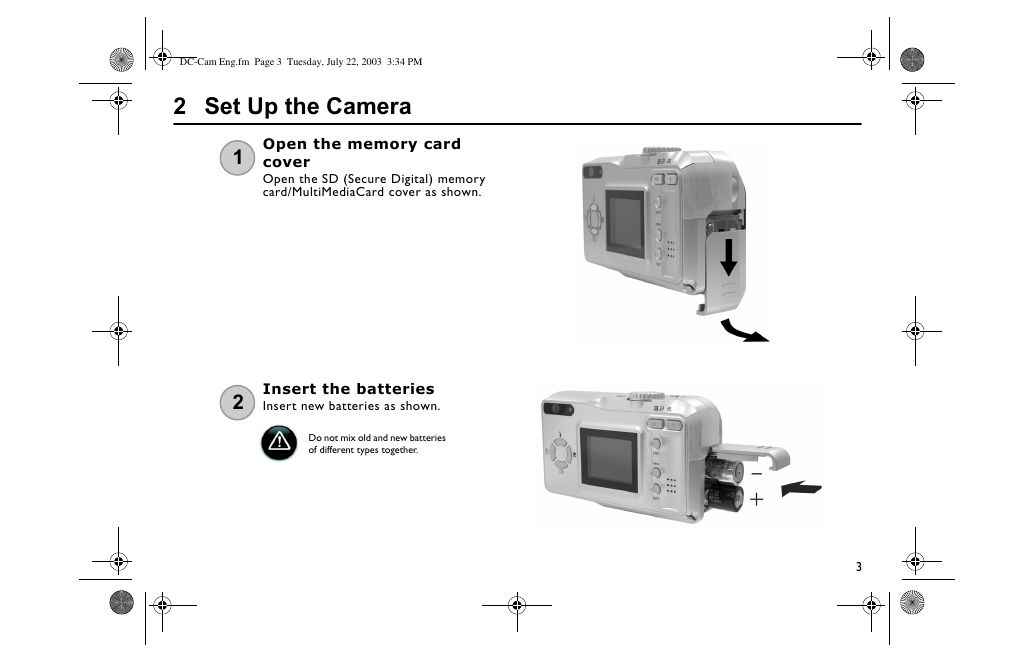
Open the memory card
cover
Open the SD (Secure Digital) memory
card/MultiMediaCard cover as shown.
2
Insert the batteries
Insert new batteries as shown.
Do not mix old and new batteries
of different types together.
3
�
DC-Cam Eng.fm Page 4 Tuesday, July 22, 2003 3:34 PM
3 Insert the memory card
(optional)
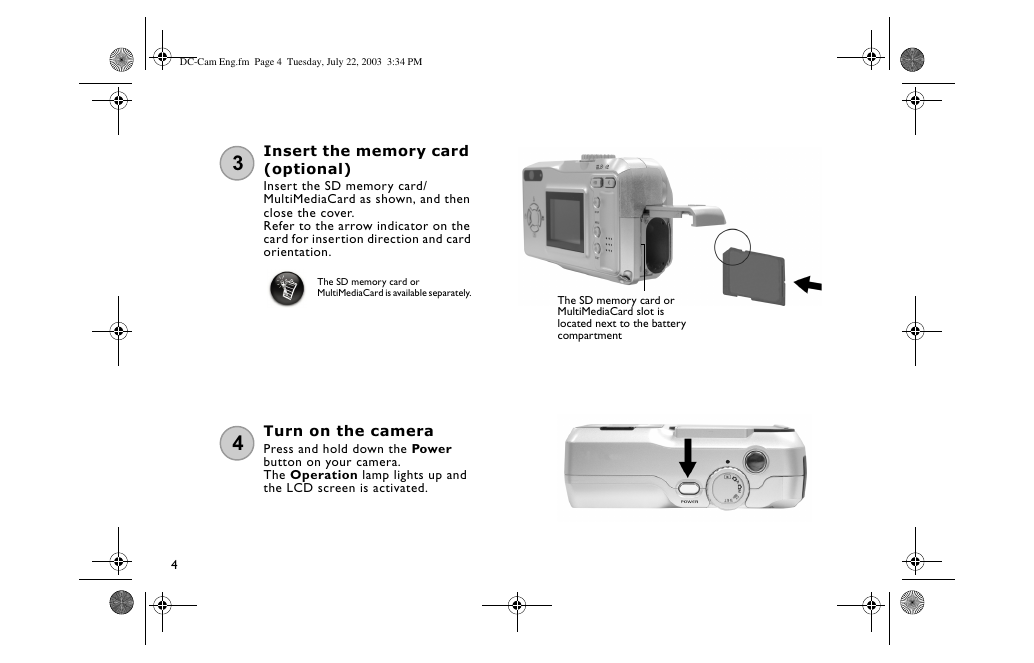
Insert the SD memory card/
MultiMediaCard as shown, and then
close the cover.
Refer to the arrow indicator on the
card for insertion direction and card
orientation.
The SD memory card or
MultiMediaCard is available separately.
4 Turn on the camera
Press and hold down the Power
button on your camera.
The Operation lamp lights up and
the LCD screen is activated.
4
The SD memory card or
MultiMediaCard slot is
located next to the battery
compartment
�
DC-Cam Eng.fm Page 5 Tuesday, July 22, 2003 3:34 PM
3 Install the Drivers and Camera
Installing the Drivers and Software
DO NOT connect the camera to your computer yet!
1.
Insert the Installation CD into your CD-ROM drive. Do not connect your camera to your computer yet.
The disc supports Windows Autoplay mode and starts running automatically. If not, click Start-> Run. In the Open dialog
box, type d:\install.exe (replace d:\ with the drive letter of your CD-ROM drive), and then click the OK button.
2. Click the names of the drivers and applications you want to install in your computer.
3. Follow the onscreen instructions. When prompted, restart your computer.
Installing Hardware
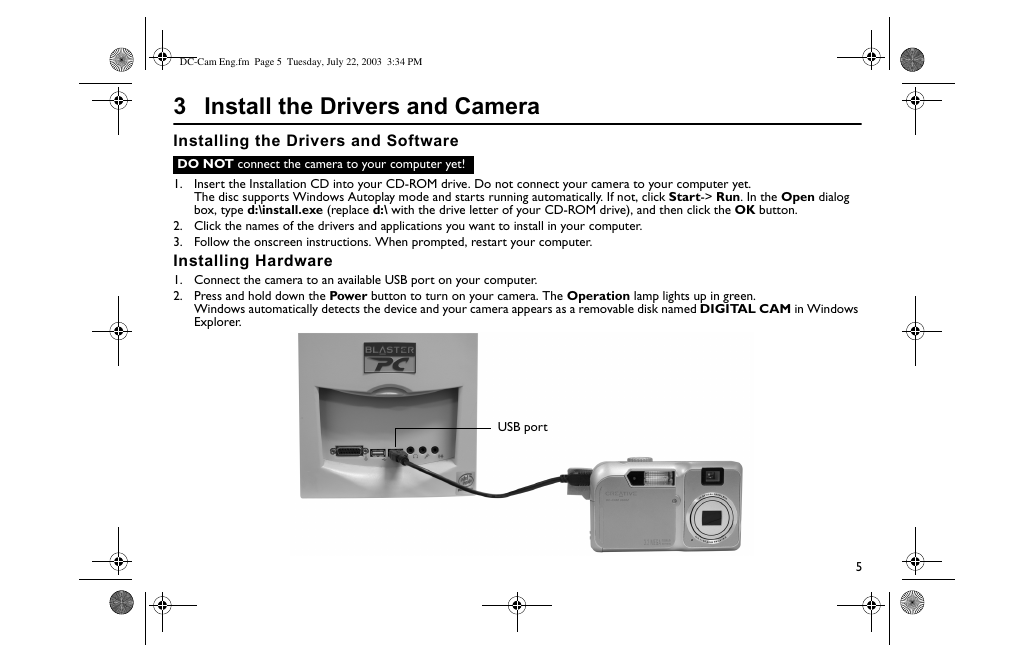
1. Connect the camera to an available USB port on your computer.
2. Press and hold down the Power button to turn on your camera. The Operation lamp lights up in green.
Windows automatically detects the device and your camera appears as a removable disk named DIGITAL CAM in Windows
Explorer.
USB port
5
�
DC-Cam Eng.fm Page 6 Tuesday, July 22, 2003 3:34 PM
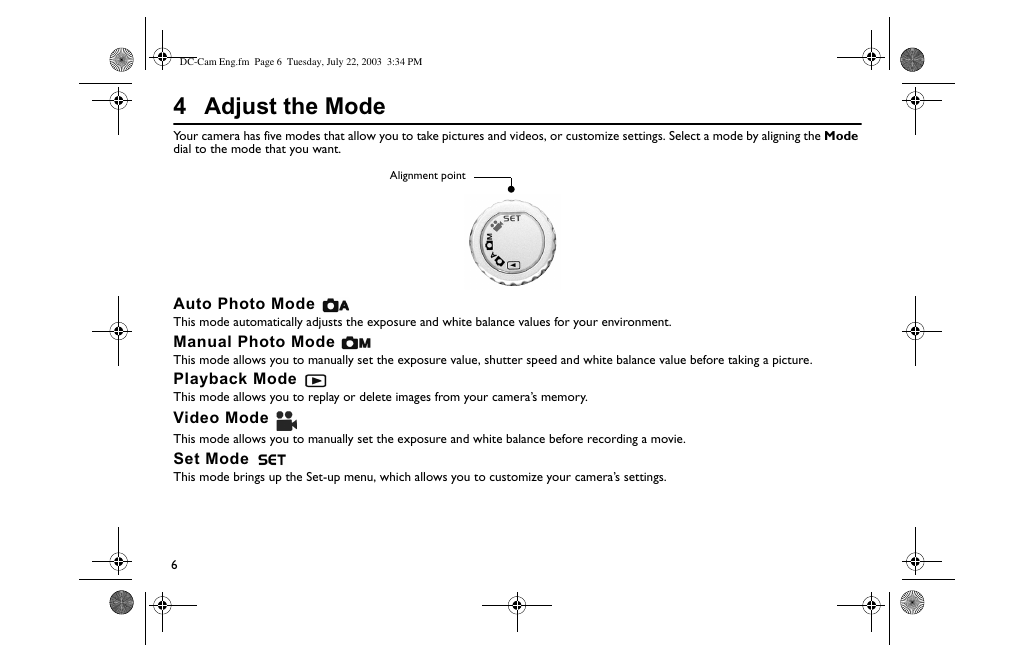
4 Adjust the Mode
Your camera has five modes that allow you to take pictures and videos, or customize settings. Select a mode by aligning the Mode
dial to the mode that you want.
Alignment point
Auto Photo Mode
This mode automatically adjusts the exposure and white balance values for your environment.
Manual Photo Mode
This mode allows you to manually set the exposure value, shutter speed and white balance value before taking a picture.
Playback Mode
This mode allows you to replay or delete images from your camera’s memory.
Video Mode
This mode allows you to manually set the exposure and white balance before recording a movie.
Set Mode
This mode brings up the Set-up menu, which allows you to customize your camera’s settings.
6
�
DC-Cam Eng.fm Page 7 Tuesday, July 22, 2003 3:34 PM
5 Take a Digital Camera Picture or Video
Taking and viewing a photo
1. Disconnect your camera from your computer.
2. Set the Mode dial to Auto
or Manual
3. Lightly press the Shutter button halfway down and look through the Viewfinder to focus on your subject.
, and then turn the camera on.
When the focus is locked, the auto focus mark turns green and the Operation lamp lights up in green.
4. Fully press down the Shutter button to take a picture. A beep sound is heard.
5. Set the Mode dial to Playback
6. Use the Macro/Right
. The last photo taken is displayed.
and Self-Timer/Left
buttons to view other photos.
If the Focus Indicator setting is disabled, the Auto Focus Indicator will not appear.
If the beeper setting is disabled, the camera will not beep.
For more information on adjusting your camera’s settings, refer to the User’s Guide (on CD). Go to d:\manual\English\manual.pdf (replace d:/ with
the drive letter of your CD-ROM drive).
Taking and viewing a video
1. Disconnect your camera from your computer.
2. Turn the camera on and set the Mode dial to Video
3. Press the Shutter button to start recording.
4. Press Shutter button again to stop recording.
5. Press the Replay/Down button
to play your video.
.
In Video mode, the camera’s resolution is set at 320 x 240 pixels.
The maximum video length depends on the available memory space. The video recording automatically ends if the camera’s memory is full.
Do not block the microphone when recording a video.
7
�
DC-Cam Eng.fm Page 8 Tuesday, July 22, 2003 3:34 PM
6 Other Information
User’s Guide
For more details on using your camera, read the User’s Guide (on CD): d:\manual\English\manual.pdf
Product Registration
Enjoy a host of benefits by registering your product during installation, or at http://www.creative.com/register.
Benefits include:
Service and product support from Creative
Exclusive updates on promotions and events
Technical Support and Warranty
For Technical Support information, go to d:\support\\support.pdf
For Warranty information, go to d:\warranty\\\warranty.pdf
Please keep your Proof of Purchase for the duration of the warranty period.
(replace d:\ with the drive letter of your CD-ROM drive, with the region that you are in, and with the
language that your document is in)
Creative Knowledgebase
Resolve and troubleshoot technical queries at Creative’s
24-hour self-help Knowledgebase. Go to
http://www.creative.com and select your region.
Copyright © 2003 Creative Technology Ltd. All rights reserved. Microsoft and Windows are registered trademarks of Microsoft Corporation. All other brand and
product names are trademarks or registered trademarks of their respective holders and are hereby recognized as such.
8
�



 2023年江西萍乡中考道德与法治真题及答案.doc
 2012年重庆南川中考生物真题及答案.doc
 2013年江西师范大学地理学综合及文艺理论基础考研真题.doc
 2020年四川甘孜小升初语文真题及答案I卷.doc
 2020年注册岩土工程师专业基础考试真题及答案.doc
 2023-2024学年福建省厦门市九年级上学期数学月考试题及答案.doc
 2021-2022学年辽宁省沈阳市大东区九年级上学期语文期末试题及答案.doc
 2022-2023学年北京东城区初三第一学期物理期末试卷及答案.doc
 2018上半年江西教师资格初中地理学科知识与教学能力真题及答案.doc
 2012年河北国家公务员申论考试真题及答案-省级.doc
 2020-2021学年江苏省扬州市江都区邵樊片九年级上学期数学第一次质量检测试题及答案.doc
 2022下半年黑龙江教师资格证中学综合素质真题及答案.doc