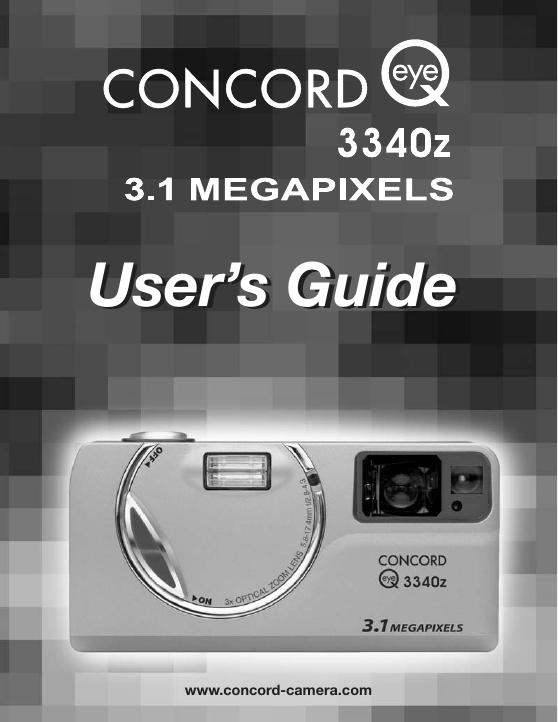
User’s Guide
User’s Guide
www.concord-camera.com
�
ENGLISH
CONGRATULATIONS
Congratulations on the purchase of your new camera. Your
camera has been carefully engineered and manufactured to give
you dependable operation. Read this manual before operating the
camera to become more familiar with it.
This manual has been written and formatted with depth and detail
so that you can easily follow the instructions to maximize the
features of your camera.
1
�
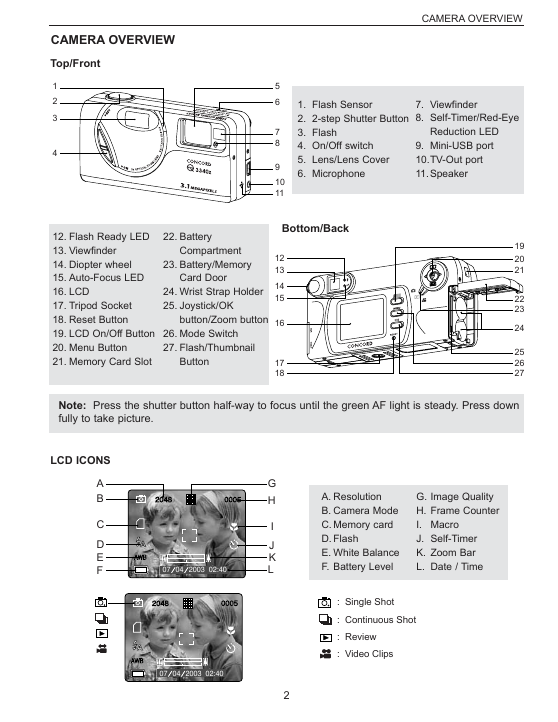
CAMERA OVERVIEW
Top/Front
1
2
3
4
12. Flash Ready LED
13. Viewfinder
14. Diopter wheel
15. Auto-Focus LED
16. LCD
17. Tripod Socket
18. Reset Button
19. LCD On/Off Button
20. Menu Button
21. Memory Card Slot
22. Battery
Compartment
23. Battery/Memory
Card Door
24. Wrist Strap Holder
25. Joystick/OK
button/Zoom button
26. Mode Switch
27. Flash/Thumbnail
Button
CAMERA OVERVIEW
5
6
7
8
9
10
11
1. Flash Sensor
2. 2-step Shutter Button
3. Flash
4. On/Off switch
5. Lens/Lens Cover
6. Microphone
7. Viewfinder
8. Self-Timer/Red-Eye
Reduction LED
9. Mini-USB port
10.TV-Out port
11.Speaker
Bottom/Back
12
13
14
15
16
17
18
19
20
21
22
23
24
25
26
27
Note: Press the shutter button half-way to focus until the green AF light is steady. Press down
fully to take picture.
LCD ICONS
A
B
C
D
E
F
G
H
I
J
K
L
2048
0005
07 ⁄ 04 ⁄ 2003 02:40
2048
0005
A
AWB
A
AWB
07 ⁄ 04 ⁄ 2003 02:40
2
A. Resolution
B. Camera Mode
C. Memory card
D. Flash
E. White Balance
F. Battery Level
G. Image Quality
H. Frame Counter
I. Macro
J. Self-Timer
K. Zoom Bar
L. Date / Time
: Single Shot
: Continuous Shot
: Review
: Video Clips
�
Table of Contents
CAMERA OVERVIEW ..............................................................................................................................2
Top/Front ..........................................................................................................................................2
Bottom/Back ......................................................................................................................................2
LCD ICONS.......................................................................................................................................2
GETTING STARTED ................................................................................................................................5
Package Contents ............................................................................................................................5
Camera Features ..............................................................................................................................5
Attaching the Wrist Strap ..................................................................................................................6
Charging the Rechargeable Batteries ..............................................................................................6
Loading the Batteries ........................................................................................................................8
Checking the Battery Level ..............................................................................................................8
Internal Memory/Inserting the Memory Card ....................................................................................9
Turning the Camera On and Off ....................................................................................................10
Removing the Protective Plastic Film ............................................................................................10
Setting the Language, Date and Time ............................................................................................10
Turning the LCD On and Off ..........................................................................................................12
Setting the cameras operational mode ..........................................................................................12
TAKING PICTURES ................................................................................................................................13
Taking a Picture with the Viewfinder ..............................................................................................13
Flash Ready LED ............................................................................................................................13
Taking a Picture with the LCD ........................................................................................................14
Auto-Focus Lock ............................................................................................................................14
Setting the Flash ............................................................................................................................15
Optical Zoom ..................................................................................................................................15
Digital Zoom ....................................................................................................................................16
Using the main menu in camera mode ..........................................................................................17
Capture mode options ....................................................................................................................18
Self Timer ........................................................................................................................................19
Macro Mode ....................................................................................................................................20
Continuous shooting ......................................................................................................................21
Image Resolution ............................................................................................................................22
Image Quality ..................................................................................................................................23
White Balance ................................................................................................................................24
EV Compensation ..........................................................................................................................25
Scene Selection ............................................................................................................................26
TAKING VIDEO CLIPS............................................................................................................................27
REVIEWING YOUR FILES......................................................................................................................28
Using Review Mode ........................................................................................................................28
Reviewing Video Clips ....................................................................................................................28
Enlarging Stored Pictures ..............................................................................................................29
Using the Delete Menu ..................................................................................................................30
Deleting Your Files ..........................................................................................................................31
Using Thumbnail Mode ..................................................................................................................32
3
�
CUSTOMIZING THE CAMERA SETTINGS............................................................................................33
Setup Menu and Features ..............................................................................................................35
Setting the Auto Off Time ................................................................................................................36
Setting the Language......................................................................................................................36
Setting the Date ..............................................................................................................................37
Setting the Time ..............................................................................................................................37
Setting the LCD Brightness ............................................................................................................38
Formatting the internal memory or memory card............................................................................38
RESTORE THE CAMERA TO FACTORY DEFAULT SETTINGS ..........................................................39
INSTALLATION GUIDE ..........................................................................................................................40
Computer System Requirements ....................................................................................................40
Installation Requirements................................................................................................................40
Using the installer splash screen ....................................................................................................41
Flow diagram for software installation ............................................................................................42
Identifying your operating system ..................................................................................................43
Installing the driver and DirectX 9 - Windows 98/98SE..................................................................44
Installing DirectX 9 - Windows 2000 ..............................................................................................46
Installing ArcSoft PhotoImpression - all Windows users ................................................................47
Installing Adobe Acrobat Reader 5.1 - all Windows users (optional)..............................................48
CONNECTING THE CAMERA TO THE COMPUTER............................................................................51
Downloading pictures and video clips onto your computer ............................................................51
Using ArcSoft PhotoImpression ......................................................................................................52
Unplugging your camera from the computer ..................................................................................53
TV MODE ................................................................................................................................................54
Connecting the camera to the television ........................................................................................55
Using the TV as a Live Viewfinder..................................................................................................55
Reviewing pictures and video clips on your TV ..............................................................................55
ERROR MESSAGES ..............................................................................................................................55
TROUBLESHOOTING ............................................................................................................................56
GETTING HELP ......................................................................................................................................60
CAMERA SPECIFICATIONS ..................................................................................................................61
SAFETY TIPS AND MAINTENANCE ....................................................................................................62
Safety Tips ......................................................................................................................................62
Precautions for the camera ............................................................................................................62
Precautions for batteries ................................................................................................................63
Precautions for SD Memory Cards ................................................................................................63
REGULATORY INFORMATION ..............................................................................................................64
4
�
GETTING STARTED
GETTING STARTED
Package Contents
Concord Eye-Q 3340z
Mini-USB Cable
TV Out Cable
Users Guide/Quick Start Guide/Warranty Card
Camera Case
Wrist Strap
Overnight Battery Charger and 4x AA Rechargeable Batteries
CD-ROM (for Windows users only)
USB Mass Storage Driver
ArcSoft PhotoImpression 2000
Adobe Acrobat Reader 5.1
Microsoft DirectX 9
View User’s Guide (Multilingual)
Visit Concord Support Web Site
Camera Features
3.1 Megapixels, 2048 x 1536 Resolution
1.5 Color LCD
3x Optical Zoom
4x Digital Zoom
Video Clips
Compatible with Secure Digital (SD) memory cards (not included)
5
�
Attaching the Wrist Strap
Please attach the wrist strap to prevent dropping the camera.
1
2
3
GETTING STARTED
Charging Rechargeable Batteries
NOTE! : The supplied rechargeable Ni-MH batteries are not charged when you receive them.
Charge them before loading into the camera.
fig.1.1
fig.1.2 (correct loading way 1)
fig.1.3 (correct loading way 2)
How to Charge the Rechargeable Batteries:
1. Open the chargers battery door by pressing on the OPEN
area and sliding to the direction of arrow. (fig. 1.1)
2. Insert the rechargeable Ni-MH batteries into the charger with
its (+) and (-) ends matching with the polarity indication
engraved inside the charger. (fig. 1.2 - 1.4)
The bottom row of battery contacts is designed for AAA
batteries. Do not force the AA batteries into the bottom row.
3. Replace the battery door. (fig. 1.5)
4. Plug the charger into a standard AC power outlet.(fig. 1.6) Check if the green LED indicator
lights up. If not, unplug the charger and ensure the batteries are properly inserted. (fig. 1.7)
If there are two pairs of batteries charging, both green LED indicators will light up.
fig.1.4 (correct loading way 3)
5. The first time you charge the batteries, charge them for 24 hours. For repeated use, it is
recommended to charge the batteries for 24 hours for best performance.
When the green LED indicator light up, it indicates the charger is under operation. As long
as the batteries are kept in contact with the charger, the LED will not turn off.
fig.1.5
fig.1.6
fig.1.7
6
�
GETTING STARTED
6. After the batteries are fully charged, unplug the charger from AC outlet first, and then remove
the batteries. (fig. 1.8 -1.10)
fig.1.8
fig.1.9
fig.1.10
Important Tips
1. This charger is designed for indoor use only. Do not expose it to rain or snow.
2. Do not touch the charger with wet hands, especially while plugging or unplugging the charger
to or from AC outlet.
3. Charge only the suggested type of rechargeable batteries. Other types of batteries may burst
causing personal injury and damage. And do not charge different brand batteries or batteries
of different capacities at the same time.
4. Remove batteries from the charger if it is not going to be used for a long time.
5. If the performance of the batteries decreases substantially, it is time to replace the batteries.
7
�



 2023年江西萍乡中考道德与法治真题及答案.doc
 2012年重庆南川中考生物真题及答案.doc
 2013年江西师范大学地理学综合及文艺理论基础考研真题.doc
 2020年四川甘孜小升初语文真题及答案I卷.doc
 2020年注册岩土工程师专业基础考试真题及答案.doc
 2023-2024学年福建省厦门市九年级上学期数学月考试题及答案.doc
 2021-2022学年辽宁省沈阳市大东区九年级上学期语文期末试题及答案.doc
 2022-2023学年北京东城区初三第一学期物理期末试卷及答案.doc
 2018上半年江西教师资格初中地理学科知识与教学能力真题及答案.doc
 2012年河北国家公务员申论考试真题及答案-省级.doc
 2020-2021学年江苏省扬州市江都区邵樊片九年级上学期数学第一次质量检测试题及答案.doc
 2022下半年黑龙江教师资格证中学综合素质真题及答案.doc